
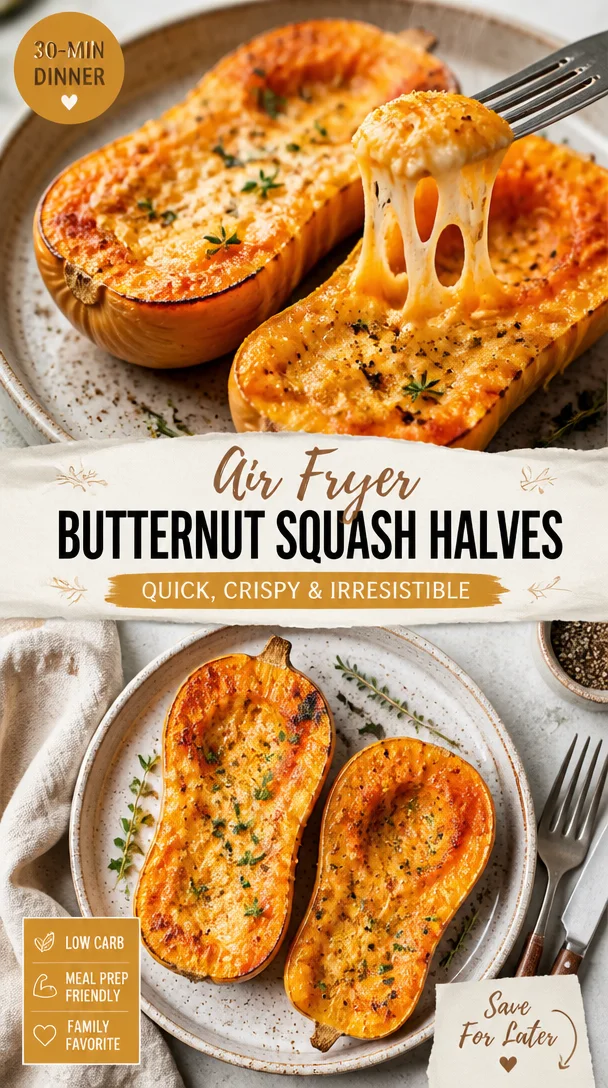
Air Fryer Butternut Squash Halves: Quick, Crispy Side
Air Fryer Butternut Squash Halves: A Cozy, Flavorful Delight
Welcome to my kitchen, dear friends! Today, we’re diving into the delightful world of butternut squash, specifically in the form of Air Fryer Butternut Squash Halves. If you haven’t experienced the wonder of cooking squash in an air fryer, you’re in for a treat! I can hardly contain my excitement as I think about the sweet, nutty flavor of roasted butternut squash, combined with the ease and convenience of using an air fryer. Whether you’re looking for a simple side dish, a comforting meal, or a nourishing treat, this recipe ticks all the boxes!
But let’s be honest for a moment; cooking doesn’t have to be a wild culinary adventure every time. This recipe is about savoring the simple pleasures of food. The air fryer takes the humble butternut squash to new heights, providing tender, caramelized, and deliciously savory halves in no time at all. Plus, the best part? You can enjoy them on a weeknight or wow your friends at a holiday gathering.
Let’s jump into some kitchen magic! Ready to impress your taste buds and your loved ones with this delicious dish? Buckle up, and let’s get cooking! I promise you, this is not just a recipe; it’s a heartfelt experience.
A Cozy Memory
My love affair with butternut squash started on cool autumn afternoons when my grandma would make her famous roasted squash for Sunday dinners. I can still picture the kitchen filled with the warm aroma of herbs and spices, mingling with laughter and stories shared around the family table. She would slice that squash with such precision, her hands moving like seasoned art. Grandma would always say, “It’s not just about the food; it’s about the love you put into it.”
One day, in her cozy kitchen, while watching her work, I asked her to teach me her secrets. She chuckled and said jokingly, “Oh, dear! There are no secrets in cooking, just a little heart and some kitchen know-how!” That’s exactly what this recipe embodies! It’s about celebrating those nostalgic times, transforming simple ingredients into something heartwarming, and adding your own twist—just like grandma would have wanted.
Ingredients
Here’s what you’ll need to bring this cozy dish to life, along with some helpful tips:
-
1 Medium Butternut Squash
The star of the show! Choose a squash that feels heavy for its size with smooth, unblemished skin. If you can’t find butternut squash, pumpkin or acorn squash is a great substitute. -
2 tablespoons Olive Oil
This adds just the right richness to our squash. If you’re watching your calories, feel free to reduce the amount. You could also use melted coconut oil for a delightful flavor. -
1 teaspoon Salt
Salt enhances the natural sweetness of the squash. If you’re looking for low-sodium options, consider using a pinch of garlic powder or herb seasoning for flavor. -
1/2 teaspoon Black Pepper
Black pepper provides a kick, but if you prefer a milder flavor, you can use white pepper instead. -
1 teaspoon Ground Cinnamon
This is optional, but it adds a warm, sweet note that complements the squash beautifully. For a twist, try nutmeg or allspice instead! -
Fresh Herbs (optional)
Fresh sage or thyme makes for a flavorful herbaceous topping. If you don’t have fresh herbs, dried ones will do!
Step-by-Step Instructions
Let’s get that air fryer humming! Here’s how to make your Air Fryer Butternut Squash Halves step by step:
-
Prepare the Squash
Start by washing and drying your butternut squash. Using a sharp knife, carefully cut it in half lengthwise. If you’re not used to knife work, take it slow and steady; safety first! The flesh is pretty tough, so ensure your knife is sharp. -
Scoop Out the Seeds
Using a spoon, scoop out the seeds and the fibrous strings in the center. This part can be messy, but that’s part of the fun! Save those seeds if you want to roast them later as a crunchy snack. -
Season the Squash
Place the squash halves cut-side up on a large cutting board. Drizzle the olive oil over each half and sprinkle the salt, pepper, and cinnamon. Use your hands to rub the seasoning all over the flesh, ensuring an even coating. This is where the magic begins! Your hands will get a little oily, but that’s just a reminder of the love you’re putting into your dish. -
Air Frying Time
Preheat your air fryer to 370°F (190°C). Once hot, carefully place the butternut squash halves in the air fryer basket, cut-side up. Don’t overcrowd! You want to let the air circulate for that perfect roast. Depending on your air fryer’s capacity, you might need to do this in batches. -
Cook and Check
Air fry the squash for about 25-30 minutes. Halfway through, take a peek and check for tenderness by poking it with a fork. If it glides through easily, you’re all set—if not, let it cook a bit longer. The goal is perfectly tender flesh that’s also caramelized on top. Yum! -
Serving the Squash
Once cooked, carefully remove the squash from the air fryer. Be sure to let it cool for a few minutes before serving. As a finishing touch, sprinkle some fresh herbs on top for a pop of color and extra flavor.
Serving Suggestions
These Air Fryer Butternut Squash Halves are incredibly versatile! You can serve them as a side dish at dinner, stuffed with grains or quinoa for a heartier meal, or simply drizzled with a little balsamic glaze for a touch of sweetness. They pair beautifully with chicken, pork, or even a lovely fall salad.
For a fun presentation, you can place them on a large serving platter alongside some additional sautéed greens or roasted veggies to brighten up the dish.
Recipe Variations
-
Stuffed Squash: After air frying, scoop out some of the flesh and mix it with cooked grains, nuts, cranberries, and spices for a delicious stuffing.
-
Sweet Maple Glaze: Drizzle some maple syrup over the halves in the last few minutes of cooking for a sweet twist.
-
Spicy Kick: Add a sprinkle of cayenne pepper or chili powder for some heat alongside the cinnamon.
-
Cheesy Goodness: Top with crumbled feta or goat cheese before serving for a savory finish.
-
Mediterranean Touch: Blend in sun-dried tomatoes and olives for a unique flavor profile that transports your taste buds straight to the Mediterranean.
Chef’s Notes
Cooking is not just about following a recipe; it’s about experimenting, creating, and making it your own. This Air Fryer Butternut Squash Halves recipe has evolved since I first started making it. Initially, I kept it super simple, but I’ve found that experimenting with spices and toppings allows me to honor the essence of what butternut squash is while adding my own personal flair.
And sometimes, kitchen mishaps become the best stories! One time, I miscalculated the air fryer settings and ended up with a truly caramelized batch of squash—I thought I ruined dinner, but everyone loved the intensified flavor. So don’t sweat it if something doesn’t go precisely as planned; celebrate those "happy accidents!"
FAQs and Troubleshooting
Q1: How do I know when the butternut squash is done cooking?
You’ll want to test the tenderness with a fork. It should slide in easily without resistance. If it feels firm, give it a few more minutes!
Q2: Can I use frozen butternut squash?
Absolutely! Just adjust the cooking time. Frozen squash may need slightly less time, so start checking for doneness at around 20 minutes.
Q3: My squash turned out mushy; what went wrong?
This can happen if the squash was overcooked or if there was too much moisture. Make sure to check it a little earlier next time!
Q4: Can I make this in the oven?
For sure! Preheat your oven to 400°F (200°C) and roast the squash halves for about 40-50 minutes, cut-side up, until tender and caramelized.
Nutritional Info
While I encourage you to enjoy your cooking journey, I know nutrition is important! Butternut squash is loaded with vitamins A and C, high in fiber, and low in calories. It’s the ultimate comforting dish that also provides a nutrient boost—definitely a win-win!
And there you have it! Air Fryer Butternut Squash Halves, bursting with flavor and the warmth of home cooking. I hope this recipe brings as much joy to your kitchen as it does to mine! Whether you whip it up on your own or gather friends and family around, remember to savor each bite and make it your own. Happy cooking, friends!
Print
Air Fryer Butternut Squash Halves
- Total Time: 45 minutes
- Yield: 4 servings 1x
- Diet: Vegetarian
Description
Delight in the sweet, nutty flavors of roasted butternut squash halves, perfectly cooked in an air fryer for a quick and healthy dish.
Ingredients
- 1 Medium Butternut Squash
- 2 tablespoons Olive Oil
- 1 teaspoon Salt
- 1/2 teaspoon Black Pepper
- 1 teaspoon Ground Cinnamon (optional)
- Fresh Herbs (optional, for topping)
Instructions
- Prepare the Squash: Wash and dry your butternut squash. Cut it in half lengthwise with a sharp knife.
- Scoop Out the Seeds: Use a spoon to remove the seeds and fibrous strings in the center.
- Season the Squash: Drizzle olive oil on each half and sprinkle with salt, pepper, and cinnamon. Rub the seasoning over the flesh.
- Air Frying Time: Preheat your air fryer to 370°F (190°C). Place the squash halves cut-side up in the basket.
- Cook and Check: Air fry for about 25-30 minutes, checking for tenderness halfway through.
- Serve the Squash: Remove from the air fryer, let cool, and sprinkle fresh herbs on top before serving.
Notes
Experiment with different spices and toppings like maple syrup, cayenne pepper, or cheese for diverse flavors.
- Prep Time: 15 minutes
- Cook Time: 30 minutes
- Category: Side Dish
- Method: Air Frying
- Cuisine: American
Nutrition
- Serving Size: 1 half
- Calories: 150
- Sugar: 2g
- Sodium: 300mg
- Fat: 10g
- Saturated Fat: 1g
- Unsaturated Fat: 8g
- Trans Fat: 0g
- Carbohydrates: 23g
- Fiber: 4g
- Protein: 3g
- Cholesterol: 0mg
Keywords: butternut squash, air fryer, vegetarian, side dish, healthy cooking

Refreshing Recipes
Refreshing Recipes: The Art of Bringing Flavor to Your Table
Welcome to my cozy corner of the culinary world! I’m Olivia Bennett, and today, we’re diving into the vibrantly fresh recipes that not only tingle your taste buds but also provide a much-needed break from the heavy winter meals we often indulge in. As the seasons begin to change, our plates deserve a refresh just as much as our wardrobes. There’s something truly magical about ingredients that burst with color and flavor, transforming your kitchen into a bright, welcoming haven.
When I think about refreshing recipes, I imagine sunshine-filled afternoons, laughter shared with friends, and those simple yet fantastic delights that bring everyone together. Whether it’s a light citrus salad that sings with brightness or a rejuvenating smoothie that can power you through your day, these recipes are a celebration of the bounty that nature offers. So, let’s roll up our sleeves, put on our favorite apron (yes, the one with some flour on it—shows you actually cook!), and create something beautiful!
Each recipe I’m sharing today not only evokes my memories of summer picnics and late-night cooking adventures but also hopes to inspire you to create your own kitchen stories. The best part? You don’t need to be a master chef or have hours to spare in the kitchen; you just need a little love for cooking and adventure! Ready to eat your way to refreshment? Let’s get cooking!
Personal Story
I can still remember the summer I spent with my grandmother at her little lake cabin. We would wake up early and head out to her garden to pick the ripest tomatoes, cucumbers, and herbs, our hands stained with dirt and our hearts full of joy. Cooking with her was magic—her laughter would fill the air as she tried to teach me how to make the most refreshing tomato and cucumber salad. The taste was incredible, but the memories of us chopping, mixing, and, of course, sneaking tastes along the way, are what I cherish most.
To this day, every time I make that salad or a variation of it, I’m transported back to those carefree summer days. It reminds me that cooking is not just about feeding yourself or others; it’s about creating precious moments, bridging generations, and enjoying the simple pleasures in life. From that summer, I’ve learned how to play with flavors and textures, turning the ordinary into something unforgettable—and I can’t wait to share those secrets with you!
Ingredients
Here’s what you’ll need for one of my favorite refreshing dishes—a Summer Tomato and Cucumber Salad—and some insights to help you along the way!
Ingredients List:
-
Ripe Tomatoes
(Use heirloom, cherry, or beefsteak—whichever you find at your local market! Substitute with bell peppers for a sweeter flavor.) -
Cucumbers
(English cucumbers are long and less bitter, but feel free to use any variety! For a twist, use zucchini.) -
Red Onion
(Adds a nice bite! If raw onion is too much for you, soak it in cold water for 10 minutes to mellow the flavor.) -
Fresh Herbs (Basil, Mint, or Dill)
(Herbs elevate this salad! If fresh isn’t available, dried can work but be sure to use much less.) -
Olive Oil
(A high-quality extra virgin olive oil brings richness—consider substituting with avocado oil for a different flavor profile.) -
Red Wine Vinegar
(This brightens the dish; white vinegar works too but opt for lemon juice for a zestier twist!) -
Salt and Pepper
(Your basic seasoning can make a huge difference! Try sea salt for a more intense flavor or freshly cracked pepper for heat.)
Step-by-Step Instructions
Now, let’s jump into the heart of the matter—making that delicious salad! Here are the detailed steps to guide you through it:
-
Gather Your Ingredients
Gather everything in a spacious, clean area on your kitchen counter. It keeps things organized and helps prevent any surprise ingredients from shocking you midway through. (No one wants to discover they’re out of cucumbers halfway through!) -
Chop the Vegetables
Start by dicing the tomatoes into bite-sized pieces; they should still hold some structure. Next, slice the cucumbers. If using a standard cucumber, peel alternating strips for a cute striped look. You can remove some seeds if you prefer not to have excess moisture in your salad.Chef Tip: A serrated knife works wonders on tomatoes—no more squished fruit!
-
Slice the Onions
Thinly slice the red onion. For an even more refreshing vibe, try soaking the slices in cold water for a few minutes; it mellows the sharpness and keeps the salad light. -
Chop the Fresh Herbs
Roughly chop your chosen fresh herbs. Don’t be shy; a generous handful of basil or mint can take this salad over the top! -
Combine the Ingredients
In a large mixing bowl, toss together the chopped tomatoes, cucumbers, onions, and herbs until combined. Feel free to get your hands in there—it’s the best way to ensure everything evenly mingles! -
Make the Dressing
In a small bowl, whisk together your olive oil, red wine vinegar, a pinch of salt, and freshly cracked pepper. If you’re feeling adventurous, add a drizzle of honey or a dash of Dijon mustard for extra depth! -
Dress the Salad
Pour the dressing over your salad, and toss everything once again to ensure every piece is coated. It’s like giving your salad a little shower of flavor! -
Let It Rest
For the best flavor, let your salad sit for about 10-15 minutes at room temperature. This allows all the ingredients to get chummy and enhances the overall taste. -
Taste and Adjust
Before serving, scoop a little out and taste! This is your chance to adjust seasoning as needed—don’t be afraid to add a little more salt or vinegar! -
Serve
Serve in your favorite bowl, perhaps with a side of crusty bread to soak up that delicious dressing. This salad is best enjoyed fresh but works great as leftovers for a day!
Serving Suggestions
Presentation is key when it comes to refreshing recipes! Serve this vibrant salad in a large bowl, allowing the colors to shine. You might consider garnishing with extra herb sprigs or a sprinkle of flaky sea salt for that gourmet touch. Pair it with grilled fish or chicken for a complete meal, or enjoy it on its own as a light lunch in the summer sun!
Recipe Variations
Looking to shake things up? Here are a few variations to keep your salads exciting:
- Add Avocado: Creamy avocado cubes add richness and balance the acidity of the dressing.
- Quinoa Boost: Toss in some cooked quinoa for added protein—it’s deliciously filling!
- Feta Cheese: Crumbled feta or goat cheese gives a salty tang that works beautifully with the fresh ingredients.
- Spicy Kick: Sprinkle in some red pepper flakes or diced jalapeños for a bit of heat!
- Fruit Twist: Add berries or diced peaches for a sweet contrast—think summer in a bowl!
Chef’s Notes
Creating this salad has become a rite of summertime for me! I often find myself experimenting with whatever herbs or produce I have on hand—everything from cilantro to seasonal stone fruits. It’s a testament to the art of cooking; a recipe can evolve based on inspiration and experimentation. Plus, my friends and family love it, which makes me smile every time I bring it to a gathering. Every salad is a new opportunity to create lovely memories and share joy through food!
FAQs and Troubleshooting
-
Why did my dressing separate?
Don’t worry! It’s normal for oil and vinegar to separate. Just give it a good shake or stir right before using. -
What if my salad is too salty?
Rinse your salad lightly under cold water to remove some saltiness, or balance it out with a little more cucumber or fresh herbs. -
Can I make this salad in advance?
It’s best enjoyed fresh, but you can prep the veggies and store them in the fridge. Just add dressing right before serving! -
How do I keep my salad crisp?
Make sure to keep wet ingredients (like tomatoes and cucumbers) separate from the dressing until just before serving. This keeps everything crunchy!
Nutritional Info
As you indulge in this refreshing tomato and cucumber salad, you’re also treating yourself to a bounty of vitamins and minerals. A typical serving is low in calories and high in antioxidants from the fresh veggies, while healthy fats from the olive oil help nourish your body.
This salad is perfect for anyone seeking a lighter meal option, whether you’re watching your intake or just looking for something to brighten up your culinary repertoire.
So there you have it! A fresh, easy-to-make recipe that’s packed with flavor and brings a bright spot to your table. Cooking should be about joy, laughter, and creating memories—and I hope that this refreshing salad brings all that and more into your life. So roll up your sleeves and get cooking; your kitchen awaits!
Print
Summer Tomato and Cucumber Salad
- Total Time: 15 minutes
- Yield: 4 servings
- Diet: Vegetarian
Description
A refreshing salad bursting with the flavors of summer, combining ripe tomatoes, crunchy cucumbers, and fresh herbs.
Ingredients
- Ripe Tomatoes (heirloom, cherry, or beefsteak)
- Cucumbers (English or standard)
- Red Onion
- Fresh Herbs (Basil, Mint, or Dill)
- Olive Oil
- Red Wine Vinegar
- Salt and Pepper
Instructions
- Gather your ingredients in a spacious, clean area on your kitchen counter.
- Chop the tomatoes into bite-sized pieces and slice the cucumbers.
- Slice the red onion thinly; consider soaking it in cold water for a milder flavor.
- Chop your fresh herbs generously.
- Combine the chopped tomatoes, cucumbers, onions, and herbs in a large bowl.
- Make the dressing by whisking together olive oil, red wine vinegar, salt, and pepper.
- Dress the salad by pouring the dressing over the mix and tossing to coat.
- Let the salad rest for 10-15 minutes to enhance flavors.
- Taste and adjust seasoning before serving.
- Serve in a beautiful bowl, optionally with crusty bread.
Notes
Experiment with different herbs or add ingredients like avocado, quinoa, or feta cheese for variations.
- Prep Time: 15 minutes
- Cook Time: 0 minutes
- Category: Salad
- Method: Mixing
- Cuisine: Mediterranean
Nutrition
- Serving Size: 1 serving
- Calories: 150
- Sugar: 4g
- Sodium: 300mg
- Fat: 10g
- Saturated Fat: 1.5g
- Unsaturated Fat: 8.5g
- Trans Fat: 0g
- Carbohydrates: 12g
- Fiber: 2g
- Protein: 3g
- Cholesterol: 0mg
Keywords: salad, fresh, summer, tomatoes, cucumbers
Protein Meal Prep
Ultimate Guide to Protein Meal Prep: Delicious Recipes and Tips to Fuel Your Week
Welcome to my kitchen! I’m so thrilled you’ve decided to join me on this culinary adventure. Today, we’re diving into the world of protein meal prep—a wonderful way to set yourself up for a week of tasty, nourishing meals. Let’s be real, life gets busy, and it’s all too easy to lose sight of healthy eating when you’re juggling work, family, and everything in between. But fear not. With a little planning and some fun recipes, we can keep those cravings at bay and ensure your meals are packed with flavor.
Imagine this: it’s Monday morning, and instead of rushing out the door with only a granola bar in hand, you open your fridge to find beautiful containers filled with mouthwatering, protein-rich meals. Each bite is an explosion of flavor and the simple knowledge that you’ve nourished yourself well. Meal prep is a total game-changer!
In this guide, we’ll explore delicious recipes that are perfect for meal prepping, along with tips, tricks, and personal stories to make this experience enjoyable and stress-free. So grab your apron, and let’s create some magic in the kitchen!
A Personal Story of Meal Prep
I vividly remember my college days when I was juggling classes, part-time jobs, and the relentless quest for a balanced diet. My diet consisted mostly of instant noodles and late-night snacks. One day, out of sheer desperation for something wholesome, I stumbled upon meal prepping. I spent an entire Sunday afternoon in my tiny kitchen, chopping veggies, marinating chicken, and cooking grains. The first week I followed this meal prep plan, I felt like a superhero! No more 3 PM slumps or overpriced takeout!
One recipe in particular stood out: my zesty lemon garlic chicken with quinoa. It was so simple yet packed with flavor, and it felt like a real win. I started sharing my meal prep secrets with friends, and we would often swap containers for lunch. That little ritual created a bond over good food and turned into a cherished part of my weekly routine. Fast forward to today, and I’m here, excited to share these tips and recipes with you!
Ingredients You’ll Need for Protein Meal Prep
For Zesty Lemon Garlic Chicken with Quinoa
-
Chicken Breasts: A lean source of protein that’s incredibly versatile. You can also substitute with turkey, tofu, or chickpeas for a vegetarian option.
-
Quinoa: A gluten-free grain packed with protein and fiber. Feel free to swap it with brown rice, farro, or even cauliflower rice if you’re looking to cut carbs.
-
Olive Oil: Adds richness and aids in cooking. Avocado oil or coconut oil work great here too.
-
Garlic: Fresh garlic provides an aromatic punch. If you’re in a pinch, garlic powder is an acceptable substitute (1/8 tsp = 1 clove).
-
Lemon Juice: Freshly squeezed lemon juice brightens the dish. Lime juice or vinegar can provide the necessary acidity, but nothing beats the freshness of lemon.
-
Spices (Paprika, Oregano, Salt, Pepper): These enhance the flavor profile. Don’t be afraid to get creative—try adding cumin or chili powder for a kick!
For the Veggie Medley
-
Bell Peppers: They come in various colors and add a sweet, crunchy texture. Feel free to swap these for zucchini, asparagus, or broccoli.
-
Red Onion: Adds sweetness and depth. Yellow or white onions can also work well.
-
Spinach: Nutrient-dense and cooks down quickly. If spinach isn’t your thing, try kale or Swiss chard!
Optional Toppings
-
Feta Cheese: For added creaminess and flavor—omit for a dairy-free dish or use nutritional yeast for a cheesy flavor.
-
Chopped Fresh Herbs (Parsley, Cilantro): Brightens up the dish beautifully. Basil or thyme would also be delightful.
Step-by-Step Instructions
Step 1: Marinate the Chicken
-
In a bowl, combine olive oil, minced garlic, lemon juice, paprika, oregano, salt, and pepper. Mix well until combined.
-
Place your chicken breasts in a zip-top bag and add the marinade. Seal it tightly and massage the chicken to fully coat. Allow to marinate for at least 30 minutes (or up to overnight in the fridge for maximum flavor).
Chef’s Tip: The longer the chicken marinates, the juicier and more flavorful it will be. If you’re tight on time, a quick 30 minutes works too!
Step 2: Prepare the Quinoa
-
Rinse 1 cup of quinoa under cold water, then combine with 2 cups of water in a pot.
-
Bring it to a boil, then reduce the heat to low, cover, and simmer for about 15 minutes, or until the water is absorbed and quinoa is fluffy.
Chef’s Insight: To amp up the flavor, cook quinoa in vegetable or chicken broth instead of water!
Step 3: Cook the Chicken
-
Preheat your grill or skillet to medium-high heat. Remove chicken from marinate (discard excess).
-
Grill or cook on each side for about 6-7 minutes until cooked through and juices run clear. The internal temperature should reach 165°F (75°C).
Chef’s Hack: If you’re grilling, don’t flip your chicken too soon! Aim for golden grill marks before turning for that perfect sear.
Step 4: Sauté the Veggie Medley
-
In another pan, heat a little olive oil over medium heat.
-
Add diced bell peppers and red onion, sauté for about 5-7 minutes until they’re tender.
-
Toss in fresh spinach at the end and cook until wilted.
Chef’s Tip: Don’t overcrowd the pan—it can cause your veggies to steam rather than sauté properly. Work in batches if necessary!
Step 5: Assemble Your Meal Prep Containers
-
Start with a scoop of quinoa on the bottom of each container.
-
Next, add sliced chicken on top followed by the sautéed veggies.
-
If you’re adding feta or herbs, sprinkle them on top before sealing containers.
Serving Suggestion: Pack your meal prep within clear containers, so you can see those vibrant colors—it makes everything feel more enticing!
Recipe Variations
-
Mediterranean Twist: Add olives and cherry tomatoes to the veggie medley; swap feta for goat cheese.
-
Asian-Inspired: Use sesame oil instead of olive oil, replace quinoa with brown rice, and add soy sauce, ginger, and sesame seeds for an umami-packed dish.
-
Spicy Mexican Vibe: Season the chicken with chili powder and cumin, and top with avocado and pico de gallo once plated.
-
Vegetarian Option: Replace chicken with marinated tofu or tempeh, follow the same seasoning process, and add kidney beans or black beans for protein.
Chef’s Notes
When I first started meal prepping, I quickly realized that it’s not just about saving time; it’s also a creative outlet! Playing around with flavors, colors, and textures has led to some of my fondest kitchen memories, like hosting friends for a weekly meal prep session. We’d mix and match our container contents and have a blast doing it. Meal prep has grown from just a means to eat well into a social experience that I treasure.
As I’ve expanded my recipe repertoire over the years, I’ve noticed that some of my go-to meals evolve. Ingredients vary with the seasons, and that’s part of the beauty of cooking—it keeps things fresh and exciting!
FAQs and Troubleshooting
1. How long can I store my meal prep in the fridge?
You can store your meal prep in airtight containers for up to 4-5 days in the fridge. After that, it’s time for a freezer detour!
2. Can I freeze these meals?
Absolutely! You can freeze these meals for up to 2-3 months. Just make sure to use freezer-safe containers or bags to prevent freezer burn.
3. Why is my chicken dry?
Overcooking is usually the culprit! Always recommend using a meat thermometer to ensure it’s just cooked through. Also, marinating cuts down on the dryness by keeping the chicken juicy.
4. Can I switch out the proteins?
Totally! Feel free to swap chicken for any protein you prefer—most cook similarly as long as you adjust cooking times. For vegetarian options, keep an eye on your cooking times!
Nutritional Info
While I generally encourage you to focus on enjoying your food, here’s a rough breakdown of what you’re getting with each serving of this meal prep:
- Calories: 400-450 (varies based on portions)
- Protein: 30-35g
- Carbohydrates: 40g
- Fat: 15g
- Fiber: 7-8g
If you follow these steps, not only will you set yourself up for success this week, but you’ll also enjoy every delicious bite along the way. Remember, cooking should be fun, fulfilling, and a bit messy (apron stains are a badge of honor!). So roll up your sleeves, unleash your inner chef, and make this meal prep your best decision yet, right here in your cozy kitchen. Happy cooking, my friends!
Print
Zesty Lemon Garlic Chicken with Quinoa
- Total Time: 55 minutes
- Yield: 4 servings 1x
- Diet: High Protein
Description
A flavorful and protein-packed meal prep recipe featuring marinated chicken breasts served with quinoa and sautéed vegetables.
Ingredients
- 2 Chicken Breasts
- 1 cup Quinoa
- 2 tbsp Olive Oil
- 3 cloves Garlic, minced
- 3 tbsp Lemon Juice
- 1 tsp Paprika
- 1 tsp Oregano
- Salt and Pepper to taste
- 1 Bell Pepper, diced
- 1 Red Onion, diced
- 2 cups Spinach
- Feta Cheese, optional
- Chopped Fresh Herbs, optional
Instructions
- Marinate the Chicken: In a bowl, combine olive oil, minced garlic, lemon juice, paprika, oregano, salt, and pepper. Mix well until combined. Place your chicken breasts in a zip-top bag and add the marinade. Seal it tightly and massage the chicken to fully coat. Allow to marinate for at least 30 minutes (or up to overnight in the fridge for maximum flavor).
- Prepare the Quinoa: Rinse 1 cup of quinoa under cold water, then combine with 2 cups of water in a pot. Bring it to a boil, then reduce the heat to low, cover, and simmer for about 15 minutes, or until the water is absorbed and quinoa is fluffy.
- Cook the Chicken: Preheat your grill or skillet to medium-high heat. Remove chicken from marinade (discard excess). Grill or cook on each side for about 6-7 minutes until cooked through and juices run clear. The internal temperature should reach 165°F (75°C).
- Sauté the Veggie Medley: In another pan, heat a little olive oil over medium heat. Add diced bell peppers and red onion, sauté for about 5-7 minutes until they’re tender. Toss in fresh spinach at the end and cook until wilted.
- Assemble Your Meal Prep Containers: Start with a scoop of quinoa on the bottom of each container. Next, add sliced chicken on top followed by the sautéed veggies. If you’re adding feta or herbs, sprinkle them on top before sealing containers.
Notes
You can store your meal prep in airtight containers for up to 4-5 days in the fridge. Feel free to freeze these meals for up to 2-3 months.
- Prep Time: 30 minutes
- Cook Time: 25 minutes
- Category: Main Course
- Method: Grilling
- Cuisine: Mediterranean
Nutrition
- Serving Size: 1 serving
- Calories: 425
- Sugar: 3g
- Sodium: 300mg
- Fat: 15g
- Saturated Fat: 3g
- Unsaturated Fat: 9g
- Trans Fat: 0g
- Carbohydrates: 45g
- Fiber: 7g
- Protein: 35g
- Cholesterol: 80mg
Keywords: meal prep, chicken, quinoa, healthy, Mediterranean


