
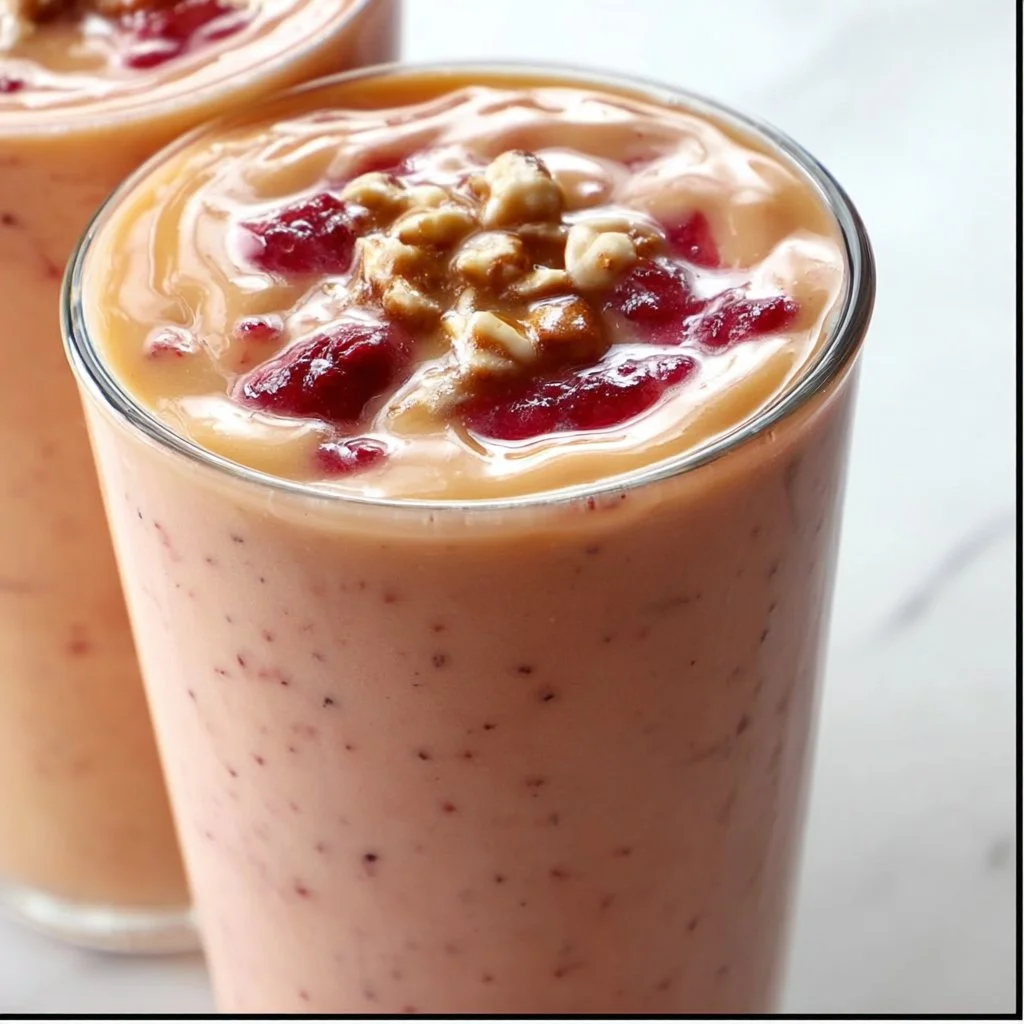
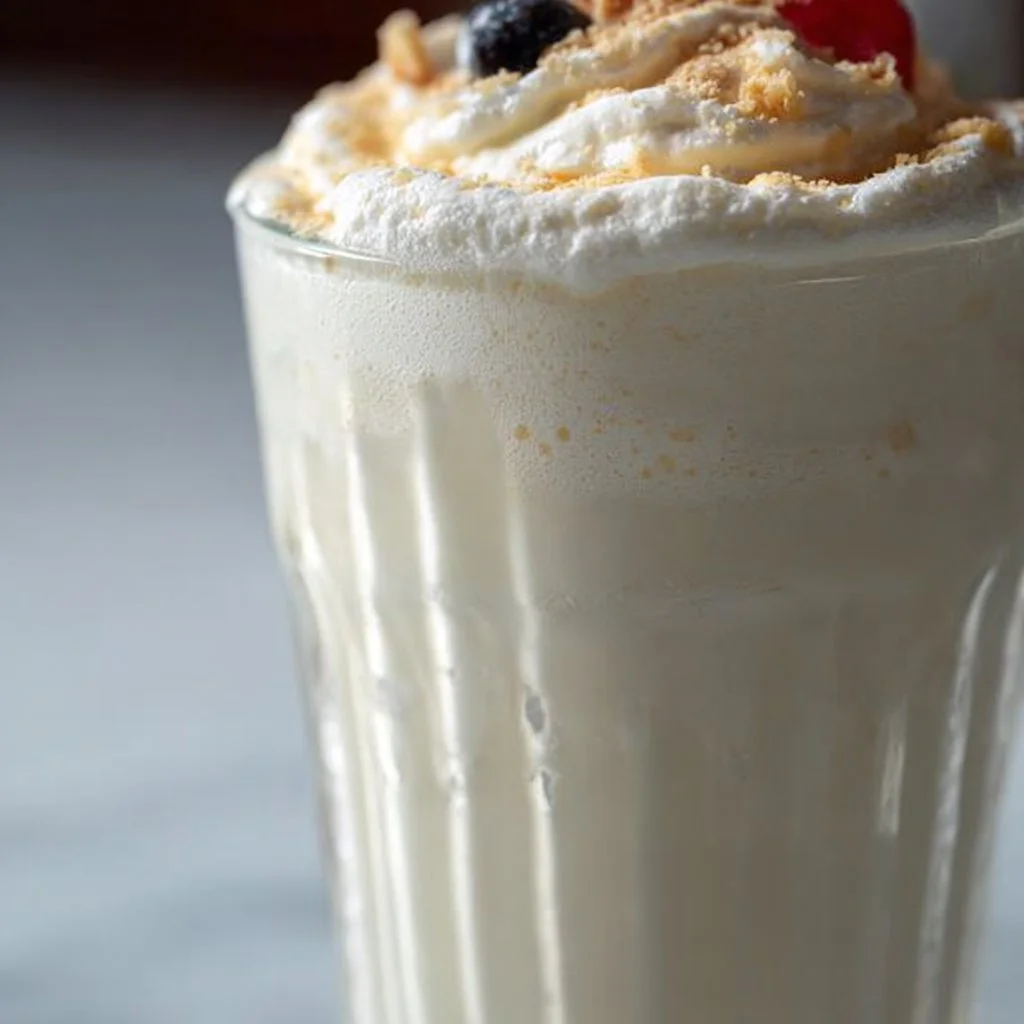
Easy Tropical Smoothie
The Ultimate Easy Tropical Smoothie Recipe
Welcome to my kitchen! Today, we’re diving into a refreshing and feel-good recipe that’s perfect for brightening up your day: the Easy Tropical Smoothie! If you’ve ever dreamt of feeling like you’re lounging on a sun-soaked beach, sipping from a fruity drink, this smoothie is the way to go. It’s not just a drink; it’s a little cup of paradise that you can whip up in minutes.
Imagine a medley of bananas, juicy pineapples, creamy coconut, and a splash of orange juice all blended together to create a silky-smooth delight. The best part? This recipe requires minimal ingredients, is super customizable, and offers countless health benefits, making it the perfect pick-me-up for breakfast or an afternoon snack.
Smoothies are incredible because they allow you to sneak in fruits and veggies while staying deliciously fresh. Whether you’re in a rush or have time to sit and savor, this smoothie can be adjusted to your needs. Plus, it’s the ultimate way to cool down on a hot day! So roll up your sleeves, grab your blender, and let’s blend away!
Personal Story: A Sip of Sunshine
I’ll never forget the summer I spent visiting my grandparents in Florida. Every morning would start with the sun streaming in through the kitchen window, and grandma would be busy blending her famous tropical smoothies. The sight of her vibrant blender whirring away was enough to send my taste buds into a frenzy!
We’d all sit around the kitchen island with our colorful cups, laughing over stories of her youth and debating which fruit packed the best punch of flavor. Each sip transported me to that beach where the sky seemed a little bluer, and the air was filled with the scent of coconut sunscreen.
That joyful experience sparked my passion for blending up tropical flavors. I’ve carried this recipe with me ever since and have tailored it over the years to create the perfect drink that transports me back to those wholesome family mornings. And now, I’d love to share this small slice of my childhood with you!
Ingredients
Here’s what you’ll need to create your Easy Tropical Smoothie:
-
1 ripe banana
- Provides natural sweetness and creaminess. If you’re out of bananas, try using half an avocado for a different taste and a good dose of healthy fats.
-
1 cup frozen pineapple chunks
- This is the star of our smoothie! You can substitute with fresh pineapple, but you’ll need to add ice to achieve that cool texture.
-
½ cup coconut milk
- Adds a creamy richness and tropical flavor. If you want a lighter option, you can use almond milk or oat milk.
-
½ cup orange juice
- Brings a zesty brightness. Feel free to swap this for coconut water to enhance the tropical vibe!
-
1 tablespoon honey (or maple syrup)
- For an extra sweetness kick. If you’re looking for a sugar-free option, mashed dates or a splash of vanilla can work wonders!
-
1 tablespoon chia seeds (optional)
- Great for an added boost of fiber and omega-3s. You can also experiment with flaxseeds if you have those on hand!
Step-by-Step Instructions
Now let’s get blending! Follow these simple steps, and you’ll have your tropical smoothie ready in no time:
-
Prepare Your Ingredients
Before you start blending, make sure everything is prepped and ready to go. Peel the banana, chop it into chunks for easier blending, and measure out your other ingredients. -
Combine in a Blender
Add the banana, frozen pineapple, coconut milk, and orange juice into your blender. If you want extra sweetness, this is also the perfect time to drizzle in your honey (or maple syrup). -
Blend Until Smooth
Secure the lid tightly and blend everything on high speed for about 30 seconds. Mix until the ingredients are fully combined, and the smoothie achieves a creamy, velvety texture. You can scrape down the sides with a spatula if needed to ensure everything gets evenly blended. -
Check Consistency
After blending, check the consistency of your smoothie. If it seems too thick for your liking, add a splash of orange juice or coconut milk and blend again until you reach your desired consistency. -
Taste and Adjust
Give your smoothie a taste! If you need extra sweetness, add more honey or syrup and blend again. Remember, the balance of flavors is key to that tropical paradise feeling! -
Serve Immediately
Pour the smoothie into your favorite glass. For a fun twist, use a mason jar or a funky beach-inspired glass.
Serving Suggestions
Nothing says tropical like colorful garnishes! Top your smoothie with a sprinkle of chia seeds, a slice of fresh pineapple, or a twist of orange peel. A little paper straw adds a playful touch, making it feel extra special. If you want to fancy it up even more, add a dollop of whipped coconut cream on top!
Recipe Variations
Want to switch things up? Here are some creative twists you can try:
-
Berry Blast: Add a handful of frozen berries like strawberries or blueberries for a berry-flavored tropical smoothie.
-
Green Power: Toss in a handful of fresh spinach or kale to amp up the nutritional value without affecting the taste too much.
-
Protein Boost: Add a scoop of your favorite protein powder to turn your smoothie into a post-workout recovery drink.
-
Nutty Twist: Blend in a tablespoon of almond butter or peanut butter for added creaminess and healthy fats.
-
Mango Madness: Swap out the pineapple for frozen mango for a sweet and distinct flavor profile.
Chef’s Notes
This recipe has a special place in my heart! It started with those sunny mornings in Florida, but it has evolved as I’ve experimented with various ingredients over the years. I’ve learned that the beauty of a smoothie lies in its flexibility—there’s no right or wrong way to do it.
There were a few kitchen mishaps along the way, like the time I accidentally grabbed a bottle of fish sauce instead of vanilla extract (yikes!). Who knew that would turn my smoothie from sweet bliss to a savory surprise? But every mistake has only made my recipes even better as I navigate through flavors!
FAQs and Troubleshooting
1. My smoothie is too thick; what can I do?
Simply add a little more liquid, either coconut milk or orange juice, and blend again until you reach your desired consistency.
2. Can I use fresh fruit instead of frozen?
Absolutely! Just add a handful of ice cubes after blending to keep it chilly and refreshing.
3. Is it okay to prep this smoothie the night before?
Sure! You can prepare all your ingredients, place them in a sealed container in the fridge overnight, and blend them in the morning for a quick breakfast option.
4. How do I make this smoothie vegan?
All you need is to use maple syrup instead of honey and ensure that your protein powder (if using) is dairy-free.
Nutritional Info
While you’re enjoying this delicious tropical treat, here’s a quick glance at what you’re putting into your body. This smoothie approximately provides:
- Calories: 250
- Protein: 4g
- Carbohydrates: 40g
- Fats: 10g
- Fiber: 5g
- Sugar: 20g
So there you have it! A fabulous Easy Tropical Smoothie that’s not only refreshing but also packed with nutrients. I hope this recipe brings a ray of sunshine to your day just as it has done for me. Cheers to your delicious, healthy adventures in the kitchen!
Print
Easy Tropical Smoothie
- Total Time: 5 minutes
- Yield: 2 servings 1x
- Diet: Vegan
Description
A refreshing and customizable tropical smoothie made with bananas, pineapples, coconut milk, and orange juice.
Ingredients
- 1 ripe banana
- 1 cup frozen pineapple chunks
- ½ cup coconut milk
- ½ cup orange juice
- 1 tablespoon honey (or maple syrup)
- 1 tablespoon chia seeds (optional)
Instructions
- Prepare your ingredients by peeling the banana and measuring the other ingredients.
- Combine the banana, frozen pineapple, coconut milk, and orange juice in a blender. Add honey for extra sweetness if desired.
- Blend on high speed for about 30 seconds until smooth.
- Check the consistency; if too thick, add more juice or coconut milk and blend again.
- Taste the smoothie and adjust sweetness if needed.
- Serve immediately in your favorite glass with optional garnishes.
Notes
Feel free to experiment with different fruits or add protein powder for a post-workout boost.
- Prep Time: 5 minutes
- Cook Time: 0 minutes
- Category: Beverage
- Method: Blending
- Cuisine: Tropical
Nutrition
- Serving Size: 1 serving
- Calories: 250
- Sugar: 20g
- Sodium: 50mg
- Fat: 10g
- Saturated Fat: 9g
- Unsaturated Fat: 1g
- Trans Fat: 0g
- Carbohydrates: 40g
- Fiber: 5g
- Protein: 4g
- Cholesterol: 0mg
Keywords: smoothie, tropical smoothie, healthy drink, breakfast, vegan smoothie
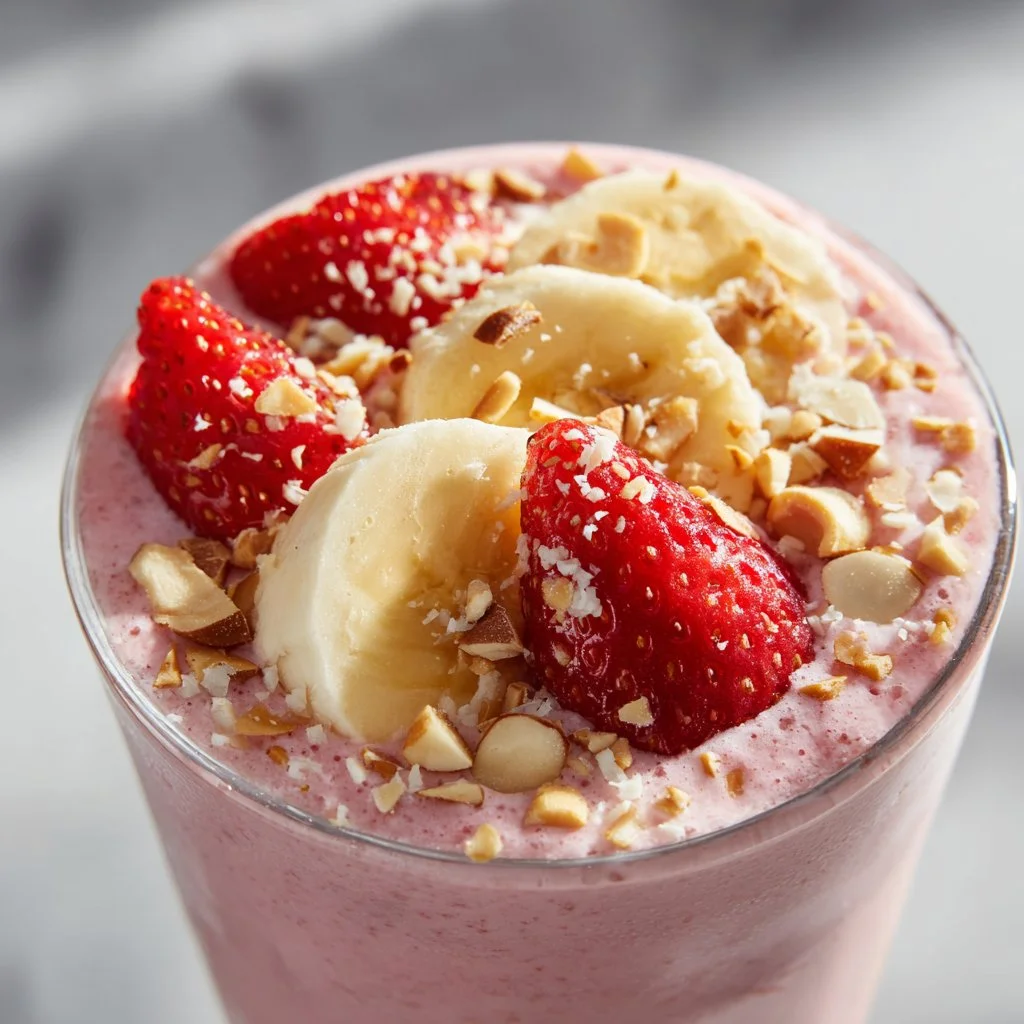
Ultimate Easy Strawberry Banana Smoothie Recipes 3 Ingredients
Ultimate Easy Strawberry Banana Smoothie Recipe: Just 3 Ingredients!
Welcome to my kitchen! If you’ve ever had a bananas-and-strawberries moment, where you just had to combine these sweet, fruity flavors, you’re going to absolutely love what I’m sharing today. I’m Olivia Bennett, and I can’t wait to show you how to make the ultimate easy strawberry banana smoothie using just three simple ingredients. This delectable, refreshing drink is perfect for a quick breakfast, a midday pick-me-up, or a nutritious snack. Plus, the vibrant colors and amazing flavor will have you feeling great too!
Let’s talk about the magic of smoothies. They’re like a canvas for creativity while being incredibly simple. My go-to ingredients for this smoothie are ripe bananas, fresh strawberries, and creamy yogurt (or any dairy alternative). That’s it! Whether you’re running late for work, prepping for a quick workout, or just craving something delicious, this smoothie is a delightful way to sprinkle some goodness into your day.
One of the best parts about this recipe is how easy it is to customize! You can swap ingredients, add extras, or even change up the dairy to suit your dietary preferences. And don’t worry—this smoothie blends up in minutes, so there’s no excuse not to whip one up. So grab your blender and let’s dive into this fabulous fruity adventure!
A Sweet Memory
Smoothies have always held a special place in my heart. I remember making my first smoothie as a teenager in the kitchen of my childhood home. It was a Saturday morning, and my mom had brought home a basket of the juiciest strawberries. With a few bananas sitting on the counter, I decided to throw them together. I’ll never forget the joy of blending those simple ingredients and watching the vibrant red-pink mixture whirl around in the blender. I poured it into a glass, and the taste was pure bliss—sweet, refreshing, and oh-so-decadent. Sharing that smoothie with my family at breakfast sparked conversations, laughter, and the kind of togetherness that comes from sharing good food.
Years later, that same rush of joy fills me every time I make a smoothie. It’s more than just a drink; it’s a reminder of those carefree mornings filled with laughter and love. Now it’s your turn to create your version of what could potentially be another joyful memory with those you love.
Ingredients
Here’s what you’ll need to make this delicious strawberry banana smoothie:
-
Bananas:
- Ripe bananas are key! They should be spotty and slightly soft to yield maximum sweetness and creaminess. If your bananas are too green, they won’t pack that delightful flavor. You can freeze overripe bananas for a thicker smoothie!
-
Fresh Strawberries:
- Pick ripe strawberries that are sweet and fragrant. Frozen strawberries work too if you don’t have fresh on hand. Just toss them in straight from the freezer without thawing for a chilled smoothie.
-
Yogurt (Greek, plain, or dairy-free alternative):
- This adds a wonderful creaminess to your smoothie. If you’re looking to keep it vegan, opt for coconut or almond yogurt. For a protein boost, Greek yogurt is an excellent choice. You can easily substitute with almond milk or oat milk, but just know it will be thinner!
Step-by-Step Instructions
Now that we have our ingredients, let’s create something wonderful!
-
Prep Your Ingredients
Begin by slicing the bananas into smaller pieces. Not only does this make blending easier, but it also helps to ensure a smoother texture. If using fresh strawberries, remove the green tops and slice them in half—they blend better this way! -
Load Up the Blender
Add the sliced bananas and strawberries to your blender. Just layer them nicely! You want to ensure that they get blended evenly. If you’re using frozen strawberries, throw those in now, too. -
Add the Yogurt
Spoon in your yogurt. This is where the creaminess comes from! If you prefer your smoothie a little less thick, you can use less yogurt or add a splash of milk (dairy or non-dairy) at this stage. -
Blend Away
Secure the lid of your blender and start blending on low speed. After about 10 seconds, increase to high speed. Blend until all the ingredients are well combined and the smoothie reaches your desired consistency. If it’s too thick, add a bit more yogurt or milk and blend again. -
Taste and Adjust
Before pouring, give your smoothie a quick taste. If you find it’s not sweet enough for your liking, consider adding a drizzle of honey or maple syrup for extra sweetness. Blend for a few more seconds to mix! -
Serve It Up
Pour your stunning strawberry banana smoothie into your favorite glasses. Feel free to garnish with a slice of banana or a few whole strawberries on top for that splash of color. Get ready to enjoy every sip!
Serving Suggestions
This smoothie is perfect on its own, but why not elevate it just a little more? Try serving it alongside some whole-grain toast with avocado or a sprinkle of cinnamon. If you’re feeling fancy, pair it with a few homemade granola bars or protein balls. You can also top it with some chia seeds for an extra nutritional boost.
Recipe Variations
Here are a few creative twists on the classic strawberry banana smoothie:
- Peanut Butter Delight: Add a tablespoon of peanut butter for a delicious nutty flavor and a protein boost.
- Green Smoothie: Toss in a handful of spinach or kale for a nutrient-packed version without losing the yummy strawberry-banana flavor!
- Chocolate Strawberry Banana: Mix in a tablespoon of cocoa powder for a chocolatey treat. You can even add chocolate chips to the mix.
- Tropical Twist: Swap some banana for mango or add a splash of coconut water for an island vibe.
- Spiced Smoothie: Sprinkle in a touch of cinnamon or nutmeg before blending for a warm, autumn-infused flavor.
Chef’s Notes
This recipe has truly evolved over the years! I remember the first time I tried adding spinach to my smoothie; I was skeptical. To my delight, it didn’t change the flavor—only the color! Now, it’s a go-to for extra greens without sacrificing taste. And honestly, just playing around with ingredients and trying different variations keeps the experience fresh! I once had a fun smoothie mishap when I accidentally grabbed my dad’s chili powder instead of cinnamon—let’s just say that smoothie didn’t make it to the party!
FAQs and Troubleshooting
1. Why is my smoothie too thick?
If your smoothie is thicker than preferred, simply add a little more liquid—a splash of milk or yogurt will do the trick! Blend again until smooth.
2. How can I make my smoothie sweeter?
Depending on your preferences, you can add a bit of honey, maple syrup, or even a few dates for natural sweetness. Just blend well after adding!
3. Can I make the smoothie ahead of time?
Yes! Just blend the ingredients and store in an airtight container in the fridge for up to 24 hours. You may need to stir or blend again before drinking, as it may separate a bit.
4. What can I do with leftover bananas or strawberries?
Freeze any overripe bananas for later smoothies, or make a simple strawberry compote to use as a topping for yogurt or pancakes. They can also be great in baking!
Nutritional Info
For each serving of this strawberry banana smoothie, you can expect approximately:
- Calories: 200
- Protein: 8g
- Carbohydrates: 35g
- Fat: 3g
- Fiber: 3g
Now that you have all the insights to create this delightful smoothie, I challenge you to whip one up soon! Enjoy the process, experiment a little, and most importantly, share it with the loved ones in your life. Happy blending!
Print
Ultimate Easy Strawberry Banana Smoothie
- Total Time: 5 minutes
- Yield: 2 servings 1x
- Diet: Vegetarian
Description
A refreshing and nutritious strawberry banana smoothie made with just three simple ingredients: ripe bananas, fresh strawberries, and creamy yogurt.
Ingredients
- 2 ripe bananas
- 1 cup fresh strawberries
- 1 cup yogurt (Greek, plain, or dairy-free alternative)
Instructions
- Prep your ingredients by slicing the bananas and halving the strawberries.
- Load up the blender with the sliced bananas and strawberries.
- Add the yogurt to the blender.
- Blend on low speed, then increase to high until smooth.
- Taste and adjust sweetness if necessary.
- Serve the smoothie in glasses, garnishing if desired.
Notes
This smoothie is customizable: add peanut butter, greens, or cocoa powder for different flavors.
- Prep Time: 5 minutes
- Cook Time: 0 minutes
- Category: Beverage
- Method: Blending
- Cuisine: American
Nutrition
- Serving Size: 1 serving
- Calories: 200
- Sugar: 15g
- Sodium: 50mg
- Fat: 3g
- Saturated Fat: 1g
- Unsaturated Fat: 2g
- Trans Fat: 0g
- Carbohydrates: 35g
- Fiber: 3g
- Protein: 8g
- Cholesterol: 5mg
Keywords: smoothie, strawberry, banana, healthy drink, breakfast

Banana Milkshake Recipe
Creamy Banana Milkshake Recipe That Will Make Your Day
Hey there, fellow food lovers! Welcome back to my cozy kitchen, where I’m always brewing up something delicious. Today, I’m excited to share one of my all-time favorite treats: the classic banana milkshake. There’s just something about that creamy, dreamy blend of fresh bananas and cold milk that takes me straight back to my childhood.
Picture this: it’s a hot summer day, the sun is shining, and you just finished playing outside with friends. Your mom whips up a batch of banana milkshakes to cool you down and put a big smile on your face. There’s a reason this drink has hung on for generations! Banana milkshakes are not only nostalgic but also unbelievably simple to make, and perfect for any occasion—from a comforting afternoon snack to a sweet pick-me-up after a long day.
In this post, I’m going to guide you through crafting your very own banana milkshake that’s creamy, luscious, and bursting with flavor. So grab your favorite blender and let’s get shaking!
Personal Story
I remember the first time my grandma introduced me to banana milkshakes. I was maybe seven years old, peering over the kitchen counter as she pulled a handful of perfectly ripe bananas from her grocery bag. She had this magical touch; everything she made was infused with love. Seeing her blend those bananas with ice cream and milk while the sweet smell danced in the air felt like a real enchantment. I was fascinated!
I watched her pour the milkshake into tall, frosty glasses, and let me tell you, that first sip was pure bliss. The sweetness of the bananas mingled with the rich, creamy texture, and suddenly, it became my favorite drink. Fast forward to today, and I love to make banana milkshakes for my friends and family, sharing that same joy and excitement that my grandma passed down to me. Every time I blend it up, I’m taken back to her kitchen, and I can’t help but feel grateful for those warm memories.
Ingredients
Now let’s dive into what you’ll need to whip up your own banana milkshake! Here’s a list of those essential ingredients:
-
Bananas: The star of the show! Use ripe, spotty bananas for the sweetest flavor. If you’re in a pinch, frozen bananas work great, too, adding a nice chill and thickness.
-
Milk: Whole milk gives the creamiest texture, but feel free to go for 2% or even almond milk if you’d like a dairy-free option. Just keep in mind that the flavor will change slightly.
-
Ice Cream: Vanilla ice cream is traditional and adds a delightful sweetness, but you can use any flavor you love. Neapolitan or even chocolate ice cream creates a fun twist. For a lighter version, consider using frozen yogurt.
-
Honey or Sugar: Depending on your personal taste preferences, a touch of sweetener can elevate the flavors. Use honey for a more natural option or plain sugar.
-
Vanilla Extract (optional): A splash of vanilla extract adds warmth and depth to the shake. Trust me—you won’t regret it!
Quick Chef Insights
- Ripe bananas are key! They’re sweeter and easier to blend for that creamy consistency.
- Don’t skip the ice cream—it’s what makes your milkshake indulgent.
- Taste as you go! If you prefer a sweeter shake, add more honey or sugar, and if it’s too thick, just splash in a little more milk.
Step-by-Step Instructions
Let’s get down to business and blend up this creamy goodness with step-by-step instructions that highlight my little chef secrets along the way:
-
Gather Your Ingredients: Start with a clean kitchen workspace. Measure out your ingredients: about 2 medium ripe bananas, 2 cups milk, 2 cups vanilla ice cream, and 1-2 tablespoons honey or sugar, depending on your taste.
-
Peel the Bananas: Grab those beautiful ripe bananas and peel them. Toss them into your blender. If you’re using frozen bananas, you can throw them in directly without thawing—more texture that way!
-
Add the Ice Cream: Scoop out about 2 cups of vanilla ice cream and add it to the blender. This is where the magic happens, so don’t skip this step!
-
Pour in the Milk: Gently pour in 2 cups of milk. You can add more or less depending on how thick you want your shake to be. A thicker shake is always more fun!
-
Sweeten It Up: Drizzle in 1-2 tablespoons of honey or sugar. Remember, you can always add more later after tasting it!
-
Vanilla Extract (Optional): If you’re feeling adventurous, add a teaspoon of vanilla extract for that extra flavor kick!
-
Blend Away: Secure the lid on the blender and blend everything on high speed until it’s perfectly smooth and creamy. This usually takes about 30 seconds. If it looks too thick, add a splash of milk and blend again.
-
Taste Test: This is my favorite part! Take a quick taste to see if it needs anything. A little more sweetness? Go for it! Need more milk for consistency? Blend it in!
-
Serve It Up: Once you’re happy with your shake, pour it into tall glasses. You can decorate the rim with some whipped cream or a sprinkle of cinnamon if you’re feeling fancy!
-
Enjoy with a Smile: Grab some straws, invite your friends over, and enjoy your creamy banana milkshake together while reminiscing about your own childhood memories!
Serving Suggestions
For an extra touch, you can serve your milkshake with dollops of whipped cream on top, sprinkled with a bit of cinnamon or chocolate shavings for a delightful crunch. Pair it with a couple of freshly baked cookies or a slice of pie, and you’ll have a dessert that truly impresses!
Recipe Variations
Get a little creative with these fun ideas to remix your banana milkshake:
-
Nutty Banana Shake: Stir in a tablespoon of almond butter or peanut butter for a protein-packed twist. It adds a nice nutty flavor!
-
Chocolate Lovers Delight: Add a tablespoon of cocoa powder or some chocolate syrup for a rich chocolate banana milkshake.
-
Fruit Frenzy: Mix in some strawberries or blueberries to the base for a fruity explosion. You’ll have a strawberry-banana milkshake that’s fabulous!
-
Dairy-Free Version: Use almond or coconut milk along with dairy-free ice cream for a delicious treat friendly for lactose intolerant folks.
-
Protein-Packed Shake: Toss in a scoop of your favorite protein powder and blend away—it’s a perfect post-workout treat!
Chef’s Notes
This recipe has evolved a lot over time, and I’ve experimented with countless variations. I’ll never forget the time I decided to throw in a handful of spinach. Surprisingly, it added a lovely green hue and a hint of earthiness. It was like a health boost disguised in a dessert.
I love how versatile a banana milkshake can be—you can change it to fit your cravings or dietary needs. Plus, it’s such a great way to use up those spotty bananas that are too ripe for snacking!
FAQs and Troubleshooting
Here’s a list of common questions I get about making banana milkshakes and their fixes:
-
Why is my milkshake too thin?
- If your milkshake is too thin, you can simply blend in more ice cream, or pop in a few ice cubes to thicken it up.
-
How do I prevent my bananas from browning?
- Make sure to use ripe bananas for the best flavor, but if you’re concerned about browning, you can freeze them right away or toss them in a little lemon juice before using.
-
Can I use non-dairy milk?
- Absolutely! Almond milk, oat milk, and coconut milk all work well—just remember they will change the flavor slightly.
-
What if I don’t have a blender?
- You can mash the bananas really well and stir everything together by hand. It won’t be as smooth, but you’ll still get that banana flavor!
Nutritional Info (Optional)
While banana milkshakes are a treat, they can fit into a balanced diet! Here’s an approximate nutritional breakdown per serving based on traditional ingredients:
- Calories: 380
- Protein: 9g
- Fat: 12g
- Carbohydrates: 65g
- Sugars: 50g
Remember, these numbers will change based on your specific ingredients and portion sizes, especially if you add any extra toppings or variations.
There you have it, friends! A delicious, easy banana milkshake recipe that’s perfect for bringing a smile to your face and nostalgia to your heart. I hope you enjoy every sip as much as I do! Remember, cooking is all about joy and love, so invite your family or friends to join you in the kitchen, make some memories, and indulge. Cheers to sweet adventures ahead!
Print
Creamy Banana Milkshake
- Total Time: 5 minutes
- Yield: 4 servings 1x
- Diet: Vegetarian
Description
A creamy, dreamy banana milkshake that’s easy to make and perfect for any occasion.
Ingredients
- 2 medium ripe bananas
- 2 cups whole milk
- 2 cups vanilla ice cream
- 1–2 tablespoons honey or sugar
- 1 teaspoon vanilla extract (optional)
Instructions
- Gather your ingredients: Start with a clean kitchen workspace. Measure out your ingredients: about 2 medium ripe bananas, 2 cups milk, 2 cups vanilla ice cream, and 1-2 tablespoons honey or sugar, depending on your taste.
- Peel the bananas: Grab those beautiful ripe bananas and peel them. Toss them into your blender. If using frozen bananas, you can throw them in directly without thawing.
- Add the ice cream: Scoop out about 2 cups of vanilla ice cream and add it to the blender.
- Pour in the milk: Gently pour in 2 cups of milk.
- Sweeten it up: Drizzle in 1-2 tablespoons of honey or sugar.
- Vanilla extract (optional): If you’re feeling adventurous, add a teaspoon of vanilla extract.
- Blend away: Secure the lid on the blender and blend everything on high speed until it’s perfectly smooth and creamy.
- Taste test: Take a quick taste to see if it needs anything.
- Serve it up: Once you’re happy with your shake, pour it into tall glasses.
- Enjoy with a smile: Grab some straws, invite your friends over, and enjoy!
Notes
For extra richness, serve with whipped cream and a sprinkle of cinnamon or chocolate shavings.
- Prep Time: 5 minutes
- Cook Time: 0 minutes
- Category: Dessert
- Method: Blending
- Cuisine: American
Nutrition
- Serving Size: 1 serving
- Calories: 380
- Sugar: 50g
- Sodium: 100mg
- Fat: 12g
- Saturated Fat: 8g
- Unsaturated Fat: 4g
- Trans Fat: 0g
- Carbohydrates: 65g
- Fiber: 2g
- Protein: 9g
- Cholesterol: 40mg
Keywords: banana milkshake, dessert, easy recipe, summer treat
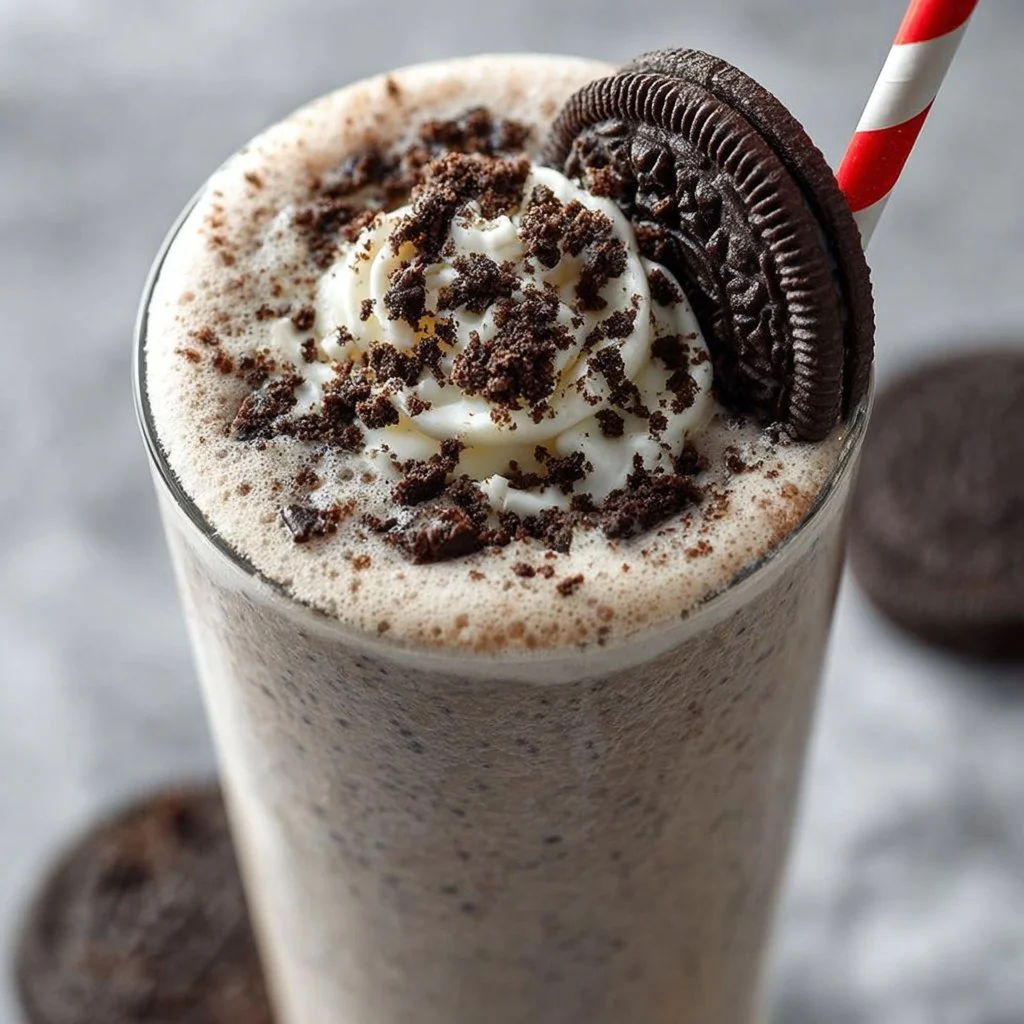
Oreo Milkshake
Creamy Dreamy Oreo Milkshake Recipe
Welcome to my cozy corner of the kitchen! Today, I’m excited to share a recipe that’s not just a treat, but a nostalgic trip down memory lane: the delicious Oreo milkshake. There’s something undeniably magical about this simple combination of ice cream, milk, and those iconic black-and-white cookies. With every sip, we’re transported back to carefree summer days and the joyful hugs of family gatherings.
As a passionate home cook, I truly believe that food is more than just fuel; it’s an experience meant to be shared. Whether you’re enjoying it alone on a quiet evening or whipping up a batch for a gathering of friends, an Oreo milkshake never fails to put a smile on my face (and I’m sure it’ll do the same for you!).
Today’s recipe is about more than just a tasty indulgence — it’s about creating memories with the people you cherish most. Let’s dive into the delightful world of Oreo milkshakes, where the only requirement is a love for delicious flavors and a willingness to sprinkle a little happiness into your day.
Personal Story
I remember the first time I made an Oreo milkshake. I was about ten years old, standing on a stool in my mom’s kitchen while trying to reach the blender on the countertop. The kitchen was filled with warm scents of baking cookies, and in the background, my siblings were busy with their own fun kitchen experiments. We had just come back from our favorite ice cream parlor, where we were dessert-testing for the family.
Eager to recreate that magical shake, I took a little trip to the pantry and grabbed a bag of Oreos. I carefully opened them, but the cookies crumbled under the weight of my excitement, and chocolate crumbs flew everywhere! Instead of worrying about the mess, my mom joined in the fun, helping me toss the cookies into the blender along with scoops of cool vanilla ice cream.
The milkshake was a little lumpy, twinkling with bits of Oreos floating around like stars in a chocolate galaxy. Once it was done, we each grabbed a straw and took that first sip together. It was a moment that sparked laughter, joy, and the pure bliss of homemade treats. That creamy, sweet concoction taught me that cooking is more than technique; it’s about having fun and making memories.
Ingredients
Now, let’s gather our ingredients! Here’s what you’ll need for this fantastic Oreo milkshake:
-
Oreo Cookies: The stars of the show! Famous for their creamy filling and cookie crunch, these iconic treats provide the base flavor. You can experiment with different Oreo varieties, like double-stuffed or mint, for a unique twist.
-
Vanilla Ice Cream: This creamy delight gives the milkshake its luscious texture. Feel free to swap with any ice cream you love — chocolate or cookies and cream work beautifully too.
-
Whole Milk: This adds the right amount of creaminess and helps blend everything smoothly together. If you want to cut down on calories, opt for 2% milk or your favorite milk alternative like almond or oat milk.
-
Whipped Cream: While optional, it’s a glorious topping that adds extra fluff and sweetness. You can either whip your own or grab a can from the store.
-
Chocolate Syrup: Drizzled on top or blended in, it amps up the chocolatey goodness! Use store-bought or homemade syrup for a personal touch.
-
Chocolate Shavings or Crushed Oreos for Garnish: These are perfect for that finishing touch. Don’t skip out on garnishing; it makes the treat feel extra special!
Chef Insight:
For a richer flavor, consider adding a splash of vanilla extract to the milkshake mixture. It enhances the taste just like a scoop of love!
Step-by-Step Instructions
Now that we’ve got our ingredients lined up, let’s get to the fun part – making your Oreo milkshake!
-
Crush the Oreos: Start by crushing about 4-5 Oreo cookies. You can use a food processor or pop them into a zip-lock bag and give them a hearty whack with a rolling pin. This will create a delightful crumb texture in your shake! Reserve some crumbs for garnish later.
-
Blend the Ingredients: In a blender, combine 3-4 scoops of vanilla ice cream, about 1 cup of whole milk, and the crushed cookies. The amount of milk can be adjusted based on how thick you want your shake. For a thicker shake, start with less milk and add gradually.
- Tip: Always add ice cream before the milk to prevent a messy blender situation. Trust me, I’ve been there!
-
Add Chocolate Syrup: For an extra indulgent flavor, next drizzle in 2 tablespoons of chocolate syrup. If you’re like me and love a good chocolate taste, don’t hold back!
-
Blend Again: Put the lid on and blend until combined and smooth — about 30 seconds to a minute. You want to see a beautiful, thick milkshake with cookie bits peppered throughout.
-
Taste Test: Here comes the most fun part! Pour a little bit into a glass to taste. If it’s perfect, wonderful! If not, tweak it — maybe a little more syrup or ice cream, depending on your taste.
-
Serve it Up: Pour the milkshake into tall glasses. You can go fancy if you want by drizzling chocolate syrup on the insides of the glass before pouring in the shake.
-
Top with Whipped Cream & Oreos: Now, the pièce de résistance! Add whipped cream to the top, and sprinkle those reserved Oreo crumbs and/or chocolate shavings to make it visually appealing and extra delicious!
Chef Hack:
If you want to get fancy, you can add a dollop of whipped cream followed by a whole Oreo cookie standing proud on top! It makes for a show-stopper treat.
Serving Suggestions
Presentation is key! Serve your Oreo milkshake in tall, clear glasses so that those layers of rich chocolate and creamy white ice cream are showing off. You can even accompany your milkshake with a few extra Oreos on the side for some dipping fun (and another way to experience that creamy goodness)!
Recipe Variations
Feeling adventurous? Let’s shake things up! Here are a few tasty twists to try with your Oreo milkshake:
-
Mint Oreo Shake: Swap regular Oreos for Mint Oreos and add a drop of peppermint extract for a refreshingly cool flavor.
-
Peanut Butter Oreo Shake: Toss in a tablespoon of creamy peanut butter before blending for a deliciously nutty twist.
-
Coffee Oreo Shake: If you love your caffeine fix, add a shot of espresso or strong brewed coffee to give it a delightful kick!
-
Cookies and Cream Oreo Shake: For an ultra-creamy treat, use cookies and cream ice cream as the base, combining both flavors in every sip.
-
Vegan Version: Use dairy-free ice cream and plant-based milk for a version that everyone can enjoy, regardless of dietary restrictions!
Chef’s Notes
This recipe has transformed over time, reflecting the various delights of my own kitchen experiments. I once discovered that tossing in a sprinkle of cinnamon elevated the chocolatey experience further! I urge you to think outside the box and personalize your shake; it’s all about making memories and having fun! And hey, if you find yourself making a bit of a mess — embrace it! Every splash and spill is a story waiting to be told.
FAQs and Troubleshooting
-
Why is my milkshake too thick?
- If it’s too thick, just add a bit more milk until you get the desired consistency. Blend again to ensure everything mixes nicely.
-
Can I make this milkshake ahead of time?
- Milkshakes are best enjoyed fresh, but you can prepare the base ahead. Just blend the ice cream and milk, then add the Oreos just before serving.
-
What’s the best way to store leftovers?
- If you have any leftover milkshake (rare, but it happens!), store it in an airtight container in the freezer. Let it sit at room temperature for a few minutes before trying to blend again.
-
How do I adjust the sweetness?
- If it’s too sweet for your liking, add a pinch of sea salt or a dash of unsweetened cocoa powder to balance flavors.
Nutritional Info
While I don’t often dwell on numbers in my kitchen adventures, a typical serving of this Oreo milkshake contains around 540 calories, with varying amounts depending on specific brands of ingredients used. Don’t forget — it’s all about balance and treating ourselves now and then!
So there you have it! Your very own Oreo milkshake recipe, filled with love and kitchen tales that spark joy. I hope you enjoy making this rich and creamy drink as much as I do. Cheers to sweet indulgences and even sweeter memories! Happy cooking!
Print
Creamy Dreamy Oreo Milkshake
- Total Time: 10 minutes
- Yield: 2 servings 1x
- Diet: Vegetarian
Description
A rich and creamy Oreo milkshake that captures the joy of childhood memories with every sip.
Ingredients
- 4–5 Oreo Cookies
- 3–4 scoops Vanilla Ice Cream
- 1 cup Whole Milk
- 2 tablespoons Chocolate Syrup
- Whipped Cream (optional)
- Chocolate Shavings or Crushed Oreos for garnish
Instructions
- Crush the Oreos: Start by crushing about 4-5 Oreo cookies in a food processor or zip-lock bag.
- Blend the Ingredients: In a blender, combine 3-4 scoops of vanilla ice cream, 1 cup of whole milk, and the crushed cookies.
- Add Chocolate Syrup: Drizzle in 2 tablespoons of chocolate syrup.
- Blend Again: Blend until combined and smooth, about 30 seconds to a minute.
- Taste Test: Pour a little into a glass to taste. Adjust sweetness or thickness as needed.
- Serve it Up: Pour the milkshake into tall glasses, drizzling chocolate syrup inside the glass if desired.
- Top with Whipped Cream & Oreos: Add whipped cream, and garnish with reserved Oreo crumbs and/or chocolate shavings.
Notes
For a richer flavor, consider adding a splash of vanilla extract. Serve with extra Oreos for dipping!
- Prep Time: 10 minutes
- Cook Time: 0 minutes
- Category: Dessert
- Method: Blending
- Cuisine: American
Nutrition
- Serving Size: 1 serving
- Calories: 540
- Sugar: 45g
- Sodium: 170mg
- Fat: 25g
- Saturated Fat: 14g
- Unsaturated Fat: 6g
- Trans Fat: 0g
- Carbohydrates: 53g
- Fiber: 2g
- Protein: 8g
- Cholesterol: 70mg
Keywords: Oreo Milkshake, Dessert, Ice Cream, Summer Treat
Vanilla Milkshake Recipe (Vanilla Shake)
The Creamy, Dreamy Vanilla Milkshake: A Slice of Nostalgia
Welcome back to my cozy corner of the kitchen! Today, we’re diving into a treat that’s as classic as they come: the vanilla milkshake. With its smooth, creamy texture and the sweet aroma of fresh vanilla, there’s something so comforting and nostalgic about sipping on one of these delightful drinks. Whether it’s a hot summer day or a chilly evening, who can resist a milkshake?
I have fond memories of making vanilla milkshakes in my childhood kitchen alongside my family. It wasn’t just about the milkshake itself; it was the mini celebration we had every time we blended those ingredients together. My siblings and I would take turns walking on our tiptoes to peek into the blender, eagerly anticipating the moment when smooth, frothy goodness would emerge. We would race to claim our favorite glass, often ending up with sticky hands and big smiles, sharing stories about our day while we sipped on our creamy creations.
Today, I’m excited to share that same joy with you! This recipe is simple, fun, and uses ingredients you probably already have at home. Plus, it comes with some twists to make it your own. Ready? Let’s get blending!
Ingredients
Here’s what you’ll need for your luscious vanilla milkshake:
-
Ice Cream (Vanilla)
- The star of the show! Use high-quality vanilla ice cream for the best flavor. If you’re looking for lighter options, try frozen yogurt or even a non-dairy ice cream.
-
Milk
- You can use whole milk for a rich shake or opt for almond milk or oat milk for a lighter alternative. Adjust the quantity based on how thick or thin you like your milkshake!
-
Vanilla Extract
- This adds a depth of flavor that elevates your milkshake. Think about substituting with almond extract for a unique twist, but start with half the amount as it can be quite strong.
-
Whipped Cream (optional)
- Perfect for that finishing touch! Want to make it extra special? Consider adding a drizzle of chocolate or caramel sauce on top for a mouth-watering presentation.
-
Maraschino Cherries (optional)
- These sweet little cherries are the cherry on top of your classic vanilla shake! If you don’t have them, you can always skip this or garnish with fresh berries instead.
Quick Chef Insight:
The key to the perfect milkshake is the ice cream-to-milk ratio, which will determine its thickness. If you want it really thick, use less milk; for a thinner milkshake, add more!
Step-by-Step Instructions
Now that you have everything ready, let’s get to the fun part—making the milkshake!
-
Scoop the Ice Cream
- Start by scooping about 2 cups of vanilla ice cream into your blender. This is where the magic begins! Use an ice cream scooper if you have one—trust me, it makes the task much easier.
-
Pour in the Milk
- Add ½ to 1 cup of milk, depending on how thick you want your shake. Feel free to start with less; you can always add more after blending if you want it thinner. If you’re using a high-speed blender, it might blend up faster than you think!
-
Add Vanilla Extract
- Pour in about a teaspoon of pure vanilla extract. This is my secret to a shake that sings with flavor! It enhances the creamy taste and makes the whole thing smell heavenly.
-
Blend it Up
- Seal the lid tightly and blend on medium speed for about 30 seconds. If there’s ice cream stuck to the sides, pause and scrape it down with a spatula before blending again. Welcome the wonderful whir of the blender—it’s like music to my kitchen-loving heart! Blend until it’s smooth and mixed thoroughly.
-
Taste Test
- Don’t forget this step! Grab a spoon and taste your concoction. If you want it sweeter, you can add a bit more vanilla extract or even a spoon of sugar until it hits the right note for your taste buds.
-
Serve in Style
- Now for the fun part! Pour your milkshake into tall glasses—this is where you can get creative. Add whipped cream on top if you’d like, and don’t hold back on garnishing with a cherry right on top.
Serving Suggestions
For an Instagram-worthy presentation, consider interesting glassware. Mason jars add a cute farmhouse vibe, while classic milkshake glasses bring back that retro diner feel. And let’s be real—what’s a milkshake without a couple of straws? Opt for fun, colorful ones to add to that bright, cheerful vibe you’re creating!
Recipe Variations
Feeling like adding a personal touch? Here are some delightful variations you can try:
-
Chocolate Vanilla Milkshake
- Add chocolate syrup or cocoa powder for a chocolatey twist. Mix things up by drizzling chocolate sauce inside the glass before pouring!
-
Biscoff Cookie Shake
- Blend in crushed Biscoff cookies for a cookie-cinnamon flavor that’ll have your taste buds dancing!
-
Fruit-Infused Shake
- Toss in some fresh fruit while blending, like strawberries or bananas, for an added health kick.
-
Malted Vanilla Milkshake
- For a nostalgic creamy taste reminiscent of childhood ice cream parlors, mix in some malt powder along with the other ingredients.
-
Nutty Vanilla Shake
- Add a spoonful of peanut butter or almond butter for that nutty flavor that pairs perfectly with vanilla!
Chef’s Notes
I truly cherish the memories connected with making milkshakes. Over the years, my recipe has evolved from simply ice cream and milk into this more intricate (but still straightforward) version. Sometimes I experiment by adding a sprinkle of sea salt to bring out the sweetness, and instead of always opting for vanilla, I look at whatever we have in our pantry. You can even throw in a dollop of Nutella when I’m feeling cheeky! A perfect blend of salty and sweet can be just what you need to elevate your homemade treats.
One of my fondest moments in the kitchen was when my niece, who was about six at the time, decided she wanted to help me make milkshakes. She reached for the ice cream tub—but instead of grabbing the scoop, she took a cheeky spoonful and promptly declared she could totally help! Watching her giggle and giggle with every bite was a reminder that cooking is as much about the memories we create as the delicious food we make.
FAQs and Troubleshooting
1. My milkshake is too thick! What now?
- No worries! Just add a little more milk a tablespoon at a time until it reaches your desired consistency.
2. How can I make a vegan version?
- Simple! Choose a dairy-free ice cream and use plant-based milk. Almond milk or oat milk works wonders.
3. Can I use flavorings other than vanilla?
- Absolutely! Feel free to get creative with flavors like chocolate, strawberry, or even mint. Just remember, the base principle remains the same—ice cream, milk, and your chosen flavoring.
4. How do I store leftover milkshake?
- While it’s best enjoyed fresh, you can store any leftovers in an airtight container in the freezer. Just give it a little stir or blend again before serving!
Nutritional Info (Optional)
When you combine all these ingredients, you’ll likely yield two servings of milkshake, each containing:
- Calories: 450-550 (depending on ingredients)
- Protein: 8-10g
- Fat: 20-25g
- Carbohydrates: 50-70g
- Sugars: 35-50g
(Note that these values can vary based on specific brands and substitutions made.)
Well, friends, there you have it—your simple, homey, and absolutely delightful vanilla milkshake recipe! I hope you walk away inspired to whip up something sweet in your kitchen today. Gather some loved ones, raise those glasses, and let the buttery, vanilla-nutty flavors take you back to simpler times. Until next time, happy cooking!
Remember, it’s all about having fun and enjoying the process—get those aprons on and let’s shake it up!
Print
Creamy, Dreamy Vanilla Milkshake
- Total Time: 5 minutes
- Yield: 2 servings 1x
- Diet: Vegetarian
Description
A classic vanilla milkshake that’s smooth, creamy, and nostalgic, perfect for any occasion.
Ingredients
- 2 cups Vanilla Ice Cream
- ½ to 1 cup Milk (whole, almond, or oat)
- 1 teaspoon Vanilla Extract
- Whipped Cream (optional)
- Maraschino Cherries (optional)
Instructions
- Scoop the ice cream into your blender.
- Pour in the milk, adjusting for thickness.
- Add the vanilla extract.
- Blend on medium speed until smooth.
- Taste and adjust sweetness if needed.
- Serve in tall glasses with optional garnishes.
Notes
For a thicker shake, use less milk. You can also experiment with different flavorings or add-ins for a unique twist!
- Prep Time: 5 minutes
- Cook Time: 0 minutes
- Category: Dessert
- Method: Blending
- Cuisine: American
Nutrition
- Serving Size: 1 serving
- Calories: 500
- Sugar: 40g
- Sodium: 150mg
- Fat: 25g
- Saturated Fat: 15g
- Unsaturated Fat: 5g
- Trans Fat: 0g
- Carbohydrates: 60g
- Fiber: 0g
- Protein: 10g
- Cholesterol: 70mg
Keywords: milkshake, vanilla, dessert, classic, easy recipe

Hawaiian Chicken Salad
Hawaiian Chicken Salad: A Taste of Aloha Right at Home
Introduction
Hello, fellow food lovers! Welcome back to my cozy kitchen, where the magic of cooking unfolds and delicious aromas dance in the air. Today, we’re making something that transports me right to the beautiful beaches of Hawaii with just one bite—Hawaiian Chicken Salad! This dish is a delightful mélange of flavors that harmonize perfectly, combining the savory comfort of chicken with the refreshing touches of pineapple, crunchy nuts, and vibrant veggies.
Let me tell you—this isn’t just any salad. It’s a celebration of sunshine, warmth, and tropical vibes, even on the grayest of days. I remember the very first time I tasted Hawaiian Chicken Salad. I was at a small beachside café, the kind where the wind tousles your hair and the ocean breeze carries the scent of salt and pine. I sat with a group of friends, sharing laughter as we dug into this incredible salad that perfectly balanced savory and sweet. The crunch of the macadamia nuts, the juicy bursts of pineapple, and the tender chicken just sang together in perfect harmony.
As you can probably guess, I couldn’t get that dish out of my mind! When I came home, I immediately set to work trying to replicate those vibrant flavors in my own kitchen. After some tinkering and tweaking (because we all know that every great recipe starts with a little bit of love, creativity, and sometimes a dash of trial and error!), I finally nailed it.
Whether you’re planning a family barbecue, a picnic in the park, or just want to stir up something fabulous for your next lunch, this Hawaiian Chicken Salad hits all the right notes. So, roll up those sleeves and let’s dive into this delicious journey together. Grab a seat at my kitchen table, and let’s cook up some aloha!
Personal Story
Growing up, my family had a tradition of hosting summer barbecues in our backyard. The warmth of the sun, the laughter of family, and of course, the smell of good food grilling filled the air. One summer, my Auntie Lila, the ultimate home cook, introduced us to her version of Hawaiian Chicken Salad. As she mixed shredded chicken with fresh pineapple, crisp celery, and crunchy macadamia nuts, the whole family gathered around her, captivated by her effortless charm and the vibrant colors of the dish.
I can still picture her in the kitchen, wearing her favorite floral apron, her laughter filling the space as she shared funny stories about her travels to Hawaii. She always emphasized how food brings people together, and this salad was no exception. It became the star of our summer parties, with everyone making their own little adjustments—some added mango, others swore by swapping out the chicken for chickpeas.
In those moments, I learned that cooking isn’t just about the flavors but the memories and connections we create around the table. The Hawaiian Chicken Salad became more than a recipe; it transformed into a symbol of joy, laughter, and love. That’s why I love sharing it with you today!
Ingredients
Let’s gather our lovely ingredients! Each component is essential to the the delightful fusion of flavors we’re creating. Here’s what you need:
-
Shredded Chicken
Use shredded rotisserie chicken for convenience or poach your own chicken breast for a fresher taste. It’s an excellent source of protein! Prefer a lighter option? Swap it with canned chickpeas for a vegetarian version. -
Fresh Pineapple
Choose ripe pineapple for the best sweetness. If fresh isn’t available, you can use canned pineapple chunks in juice—just be sure to drain them well. Bonus points if you grill your pineapple for an amazing smoky flavor! -
Celery Stalks
Celery adds a lovely crunch to the salad. If you want a bit more flavor, finely chop bell peppers or even jicama as alternatives. -
Green Onions
These add a mild onion flavor and a pop of color. If you’re not a fan, try using red onion sparingly or chives for a subtle alternative. -
Macadamia Nuts
Essential for that perfect crunch! If macadamia nuts are hard to find, feel free to use almonds or walnuts. They’ll bring a different flavor profile but still delicious! -
Mayonnaise
A creamy base for the dressing! For a lighter touch, Greek yogurt works wonderfully as a substitute. You can also explore mixing in avocado for a richer taste. -
Lime Juice
Fresh lime juice brightens the entire dish! In a pinch, you can use lemon juice, but lime truly captures that tropical vibe. -
Seasoning
Salt and pepper to taste, and consider a sprinkle of garlic powder or even a dash of cayenne pepper for a kick!
Now that we have our roster of ingredients ready, let’s get cooking!
Step-by-Step Instructions
-
Prepare the Chicken
If you’re using a rotisserie chicken, start by shredding it. Just hold onto the chicken with one hand and use a fork in the other to pull apart the meat. It’s super easy and requires no fussy cutting. If cooking your own chicken, poach a boneless breast in boiling water with a pinch of salt until it’s cooked through (about 15-20 minutes), then shred. -
Chop the Veggies
Dice your celery stalks and slice the green onions. Aim for uniform sizes—they make for a prettier salad and distribute flavors evenly. If you’re feeling adventurous, toss in additional veggies like diced bell peppers for a splash of color. -
Mango Time (Optional)
If you’re adding mango, peel and cube it at this point. The sweet and juicy addition is simply delightful in this salad! -
The Pineapple Love
If using fresh pineapple, peel, core, and cut it into small chunks. As mentioned earlier, canned pineapple can also be a great shortcut. Drain and pat dry with a paper towel to avoid extra moisture. -
Mix It All Together
In a large mixing bowl, combine shredded chicken, chopped celery, green onions, and pineapple. Gently toss them together using a spatula or your hands. Embrace your inner chef and enjoy the tactile experience! -
Add the Creaminess
In a separate bowl, whisk together your mayonnaise, lime juice, and any additional seasoning you prefer. If using Greek yogurt instead, this mixture will still stay creamy and delicious! Once it’s well blended, fold it gently into the chicken mixture until everything is coated evenly. -
Incorporate Those Nuts
Add macadamia nuts last so they stay crunchy. Give everything a gentle toss—be careful not to squish them. -
Chill It Out
Cover the bowl with plastic wrap and refrigerate the salad for at least 30 minutes before serving. This resting time allows all the flavors to mingle beautifully—trust me, patience is a virtue here! -
Taste Test
Before serving, taste your salad and adjust seasoning if necessary. A sprinkle of salt or a squeeze of fresh lime juice can really elevate the dish.
Serving Suggestions
When it’s time to dig in, serve this Hawaiian Chicken Salad on a bed of fresh greens like arugula or spinach for added nutrients and vibrancy. It also works beautifully in a sandwich, on a croissant, or even wrapped in lettuce leaves for a lighter option. Garnish with additional chopped green onions and a few more macadamia nuts to impress your guests—and yourself!
Recipe Variations
Feel free to have fun with this recipe! Here are some creative twists you might want to try:
- Tropical Twist: Add diced mango or kiwi for an extra layer of sweetness and color.
- Spicy Hawaiian: Toss in some diced jalapeños for those who enjoy a spicy kick.
- Nut-Free Version: Omit the macadamia nuts and use sunflower seeds for a satisfying crunch.
- Curry Infusion: Stir in a teaspoon of curry powder for a unique spin on the classic flavor profile.
- Dairy-Free: Substitute mayonnaise with avocado or tahini for a creamy texture without the dairy.
Chef’s Notes
Isn’t it funny how recipes can evolve over time? I often look back at my original version of Hawaiian Chicken Salad and chuckle. I started with a simple mayo base and chicken, but as I experimented more, it became this delicious celebration of flavors! I’m always learning something new—whether it’s a new trick to cut down on prep time or a fresh ingredient I stumbled upon at the farmer’s market.
Every time I make this dish, I’m reminded of that summer barbecue and how a simple salad can become a cherished family recipe. Cooking in my kitchen still fills me with joy, and I hope you feel the same when you make this dish!
FAQs and Troubleshooting
-
What if I don’t have rotisserie chicken?
You can always poach or grill your own chicken! Just make sure to season it well before cooking for the best flavor. -
Can I prep this salad ahead of time?
Absolutely! Just keep the salad in the refrigerator for up to 2 days. To prevent sogginess, avoid adding the macadamia nuts until you’re ready to serve. -
How can I make this salad more filling?
Serve it over a bed of grains like quinoa or brown rice, or toss in some cooked pasta for a heartier meal. -
Why is my salad too soggy?
If you find your salad is too wet, try straining the pineapple or cutting back on the mayonnaise. Also, ensure that your veggies, especially the celery, are well-drained.
Nutritional Info (Optional)
While the nutritional values can vary based on specific ingredient brands and quantities, a general serving of this Hawaiian Chicken Salad is approximately:
- Calories: 350
- Protein: 20g
- Fat: 24g
- Carbohydrates: 15g
- Fiber: 2g
There you have it—my love letter to Hawaiian Chicken Salad! I hope this recipe becomes a delightful addition to your kitchen repertoire. Let’s keep cooking, sharing stories, and spreading that cozy feeling, one delicious recipe at a time. Happy cooking! 🌺
Print
Hawaiian Chicken Salad
- Total Time: 35 minutes
- Yield: 4 servings 1x
- Diet: Paleo
Description
A delightful blend of shredded chicken, fresh pineapple, crunchy macadamia nuts, and vibrant veggies that brings a taste of Hawaii to your table.
Ingredients
- 2 cups shredded chicken (preferably rotisserie)
- 1 cup diced fresh pineapple (or canned, drained)
- 2 celery stalks, diced
- 2 green onions, chopped
- 1/2 cup macadamia nuts, chopped
- 1/2 cup mayonnaise (or Greek yogurt)
- Juice of 1 lime
- Salt and pepper to taste
- Optional: 1 mango, diced
- Optional: garlic powder and cayenne pepper for seasoning
Instructions
- Prepare the chicken by shredding it or poaching it until cooked through.
- Chop the celery and green onions into uniform sizes.
- Mango time: peel and cube the mango if using.
- Prepare the pineapple by cutting it into small chunks.
- Mix the chicken, celery, green onions, and pineapple in a large bowl.
- Add mayonnaise, lime juice, and seasoning in a separate bowl, then fold it into the chicken mixture.
- Incorporate the macadamia nuts gently.
- Chill the salad for at least 30 minutes.
- Taste and adjust seasoning before serving.
Notes
Serve over greens, in a sandwich, or wrapped in lettuce leaves. Experiment with different additions like mango or spices for variety!
- Prep Time: 15 minutes
- Cook Time: 20 minutes
- Category: Salad
- Method: Mixing
- Cuisine: Hawaiian
Nutrition
- Serving Size: 1 serving
- Calories: 350
- Sugar: 10g
- Sodium: 400mg
- Fat: 24g
- Saturated Fat: 3g
- Unsaturated Fat: 10g
- Trans Fat: 0g
- Carbohydrates: 15g
- Fiber: 2g
- Protein: 20g
- Cholesterol: 30mg
Keywords: Hawaiian Chicken Salad, tropical salad, chicken salad recipe, easy salad, summer recipe
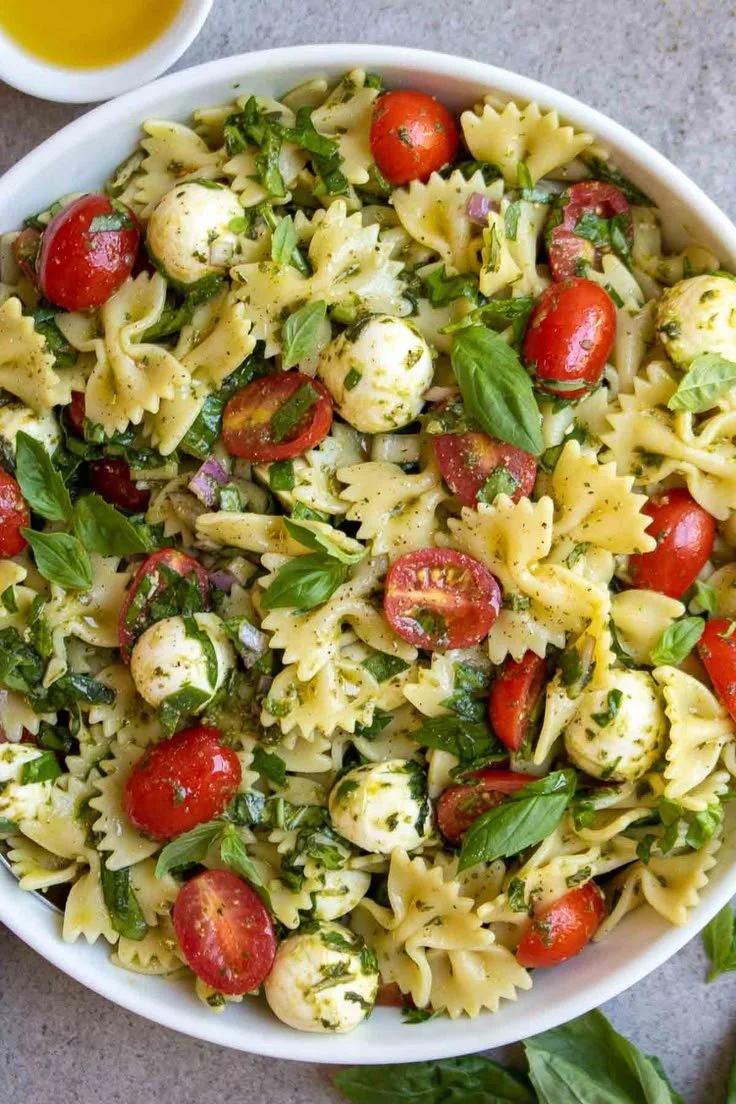
Colorful Bow Tie Pasta Salad
The Ultimate Colorful Bow Tie Pasta Salad: A Delightful Journey Through Flavor
Hello, fellow foodies! Welcome back to my cozy corner of the culinary world. I’m Olivia Bennett, your guide on a flavor-filled adventure. Today, we’re diving into a dish that’s not only a feast for the eyes but also a celebration of taste — a Colorful Bow Tie Pasta Salad.
Picture this: It’s a sun-soaked afternoon, you’re out in your garden, the veggies are thriving, and the herbs are bursting with fragrance. What better way to celebrate the bounty of the season than with a pasta dish that captures all that freshness and joy? This salad is the epitome of vibrant eating, boasting brilliant colors and fantastic flavors that will make your palate dance.
Whether it’s a picnic in the park, a delightful potluck with friends, or just a cozy night in at home, this colorful creation fits every occasion. It’s packed full of seasonal vegetables, aromatic herbs, and, of course, bow tie pasta that gives it that playful flair.
I can almost hear the laughter, see the smiles, and smell that fragrant basil and sweet tomatoes wafting through the air. For me, cooking is more than just making food; it’s about nurturing connections and creating memories around the table. So, roll up your sleeves, grab your apron, and let’s embark on this delicious journey together as we whip up a bowl of happiness!
Personal Story
This pasta salad doesn’t just come from a cookbook; it’s stitched together from treasured memories shared with my family. I vividly remember my grandmother’s backyard cookouts during the summer. She’d gather everyone—family, friends, neighbors—under the giant oak tree, where the laughter flowed as easily as the lemonade.
One of her signature dishes was a tangy pasta salad that she’d prepare in a giant bowl, flavor bomb after flavor bomb carefully mixed in. Every bite was packed with a story, a sprinkle of love, and a sprinkle of nostalgia. Now, every time I make this colorful bow tie pasta salad, I’m transported back to those sun-kissed days, the sound of laughter, and the indescribable warmth of being surrounded by loved ones.
Though my version is a little jazzier with its vibrant colors and even more fresh flavors, the heart of my grandmother’s salad remains — the joy of sharing something homemade with the people we cherish most.
Ingredients
Here’s what you’ll need to whip up this deliciously colorful bowl of goodness:
-
Bow Tie Pasta (Farfalle):
- What It Is: The star of our dish! These charming, butterfly-shaped pasta adds both texture and whimsy to your salad.
- Substitution Tip: If you can’t find bow tie pasta, feel free to substitute it with any short pasta like fusilli or penne—but trust me, the bow ties are extra fun!
-
Cherry Tomatoes:
- What They Are: Bursting with sweetness, these little gems are the perfect pop of color and flavor.
- Chef Insight: Opt for a mix of red, yellow, and even black cherry tomatoes for an eye-catching presentation!
-
Cucumber:
- What It Is: Crunchy, refreshing, and oh-so-hydrating! Cucumber adds a crisp bite to your salad.
- Substitution Tip: If you’re feeling adventurous, try using diced bell peppers for a sweeter crunch.
-
Bell Peppers (red, yellow, and green):
- What They Are: These colorful veggies bring sweetness, crunch, and vibrancy to the party.
- Quick Chef Tip: For added flavor, consider roasting your bell peppers beforehand to enhance their sweetness!
-
Red Onion:
- What It Is: A little sharpness here goes a long way in balancing the dish.
- Substitution Tip: You can use scallions or white onions if you want a milder taste.
-
Feta Cheese or Mozzarella Balls:
- What They Are: Creamy goodness that adds richness and tang.
- Substitution Tip: For a dairy-free option, try using a vegan feta or omit the cheese altogether for a lighter salad.
-
Fresh Basil:
- What It Is: Herbaceous magic! Fresh basil elevates the flavor profile, adding aromatic sweetness.
- Chef Insight: Tear the leaves gently to release their essential oils — it makes a world of difference.
-
Olive Oil:
- What It Is: Extra virgin olive oil is our dressing base, adding a luxurious richness.
- Substitution Tip: You can also use avocado oil if you prefer a milder flavor.
-
Lemon Juice:
- What It Is: Bright and zesty, lemon juice ties everything together with a refreshing kick.
- Substitution Tip: Balsamic vinegar makes a good alternative for a deeper, sweeter tang.
-
Salt and Pepper:
- What They Are: The essential flavor boosters you can’t forget!
- Quick Tip: Always taste as you go to adjust the seasoning to your liking.
Step-by-Step Instructions
1. Cook the Pasta
Start by bringing a large pot of salted water to a boil. Once boiling, add your bow tie pasta and cook according to the package instructions until al dente (usually around 8-10 minutes).
Chef’s Tip: Make sure to stir the pasta occasionally to prevent it from sticking.
2. Drain and Rinse
Once the pasta is cooked, drain it in a colander and give it a quick rinse under cold water. This will stop the cooking process and cool the pasta down, preventing it from getting mushy.
Chef Hack: A splash of olive oil when rinsing can help keep the pasta loose and prevent it from clumping together.
3. Prepare the Veggies
While the pasta cools, it’s time to chop your colorful veggies! Dice the cucumbers, halve the cherry tomatoes, and chop the bell peppers and red onion into bite-sized pieces.
Fun Tip: Get your knife skills in check and turn this into a mini-chop-a-thon with your loved ones — it makes the prep work so much more enjoyable!
4. Mix the Ingredients Together
In a large mixing bowl, combine your cooled bow tie pasta, diced cucumbers, cherry tomatoes, bell peppers, red onion, and torn basil.
Get ready, because this is where the magic happens! Toss everything together gently to combine, ensuring the pasta is coated in the vibrant mix of vegetables.
5. Make the Dressing
In a small bowl, whisk together the olive oil, fresh lemon juice, salt, and pepper.
Chef Insight: If you can, let it sit for a few minutes to allow the flavors to meld before drizzling it over your pasta salad.
6. Combine Everything
Drizzle the dressing over the pasta and veggies. Toss gently until everything is coated evenly. Sprinkle crumbled feta or mozzarella balls on top and give it one last toss.
7. Taste & Adjust
Give your pasta salad a taste. Does it need more salt? A little more lemon juice? Tweak until it suits your palate perfectly.
Friendly Reminder: Remember, this is your salad — make it as vibrant and flavorful as you wish!
Serving Suggestions
This colorful bow tie pasta salad is best served chilled or at room temperature. I love to serve it in a big, rustic wooden bowl to showcase its vibrant colors. For a charming touch, garnish with extra basil leaves or a sprinkle of feta on top. Enjoy it as a side dish or make it the star of your meal!
Recipe Variations
Want to mix things up? Here are a few ideas to get your creative juices flowing:
- Mediterranean Twist: Add olives, sun-dried tomatoes, and artichoke hearts for a briny explosion of flavors.
- Protein Boost: Toss in grilled chicken, shrimp, or chickpeas to make it a hearty main dish.
- Pesto Perfection: Swap out the dressing for basil pesto to infuse a robust herb flavor that’s irresistible.
- Spicy Kick: Add crushed red pepper flakes or diced jalapeños for a zesty twist.
- Vegan Delight: Omit the cheese and swap the pasta for whole-grain or chickpea pasta for a nutrient-packed meal.
Chef’s Notes
This colorful bow tie pasta salad has evolved over the years, adapting to whatever fresh veggies are in season and inspiring a frenzy of flavors at every gathering. It’s funny how recipes can take on a life of their own; one day it might be swimming in pesto, while the next it’s drizzled with balsamic glaze. Each rendition tells a story, and each forkful carries a promise of new memories to come.
Whether you’re cooking for one or feeding a crowd, this pasta salad is as dynamic as your culinary imagination allows it to be. Plus, the more colors you add, the happier it looks on the table!
FAQs and Troubleshooting
-
Why did my pasta stick together?
- This can happen if the pasta isn’t stirred while cooking, or if it isn’t rinsed with cold water afterward. A little olive oil can do wonders to keep it from sticking!
-
Can I make this salad ahead of time?
- Absolutely! In fact, letting it sit in the fridge for a few hours (or overnight) allows the flavors to meld beautifully. Just save the cheese for the last minute to keep it fresh!
-
What if my salad is too dry?
- If you find your salad needs a bit more moisture, stir in a splash of olive oil or lemon juice for a flavorful boost.
-
How long will this salad last in the fridge?
- This colorful salad is best enjoyed within 3-4 days. Just remember to give it a stir before serving as the ingredients may settle.
Nutritional Info (Optional)
- Calories: Approximately 250 per serving (excluding cheese)
- Protein: 8g
- Fat: 10g
- Carbohydrates: 35g
- Fiber: 3g
And there you have it! A delightful, colorful bow tie pasta salad that will undoubtedly become a staple in your home. I can’t wait for you to try it and share your own kitchen stories with me. Remember: cooking is all about creativity, connection, and joy. Happy cooking, friends! 🍽️🌼
Print
The Ultimate Colorful Bow Tie Pasta Salad
- Total Time: 25 minutes
- Yield: 4 servings 1x
- Diet: Vegetarian
Description
A vibrant and refreshing pasta salad packed with seasonal vegetables, aromatic herbs, and bow tie pasta for a delightful dish that fits any occasion.
Ingredients
- 2 cups Bow Tie Pasta (Farfalle)
- 1 cup Cherry Tomatoes, halved
- 1 cup Cucumber, diced
- 1 cup Bell Peppers (red, yellow, green), chopped
- 1/2 cup Red Onion, diced
- 1/2 cup Feta Cheese or Mozzarella Balls
- 1/4 cup Fresh Basil, torn
- 1/4 cup Extra Virgin Olive Oil
- 2 tbsp Lemon Juice
- Salt and Pepper, to taste
Instructions
- Cook the Pasta: Bring a large pot of salted water to a boil. Once boiling, add the bow tie pasta and cook according to package instructions until al dente (8-10 minutes).
- Drain and Rinse: Drain the cooked pasta and rinse under cold water to cool it down and stop the cooking process.
- Prepare the Veggies: Dice the cucumbers, halve the cherry tomatoes, and chop the bell peppers and red onion into bite-sized pieces.
- Mix the Ingredients Together: In a large mixing bowl, combine the cooled pasta, diced cucumbers, cherry tomatoes, bell peppers, red onion, and torn basil. Toss gently to combine.
- Make the Dressing: In a small bowl, whisk together the olive oil, lemon juice, salt, and pepper, letting it sit for a few minutes to meld flavors.
- Combine Everything: Drizzle the dressing over the pasta and veggies, tossing gently to coat. Top with crumbled feta or mozzarella balls.
- Taste & Adjust: Taste your pasta salad and adjust the seasoning as needed.
Notes
Serve chilled or at room temperature. Garnish with extra basil leaves or feta for presentation. Can be made ahead for better flavor melding.
- Prep Time: 15 minutes
- Cook Time: 10 minutes
- Category: Salad
- Method: Mixing
- Cuisine: Mediterranean
Nutrition
- Serving Size: 1 serving
- Calories: 250
- Sugar: 4g
- Sodium: 300mg
- Fat: 10g
- Saturated Fat: 3g
- Unsaturated Fat: 6g
- Trans Fat: 0g
- Carbohydrates: 35g
- Fiber: 3g
- Protein: 8g
- Cholesterol: 15mg
Keywords: pasta salad, colorful salad, summer salad, vegetarian recipe, bow tie pasta
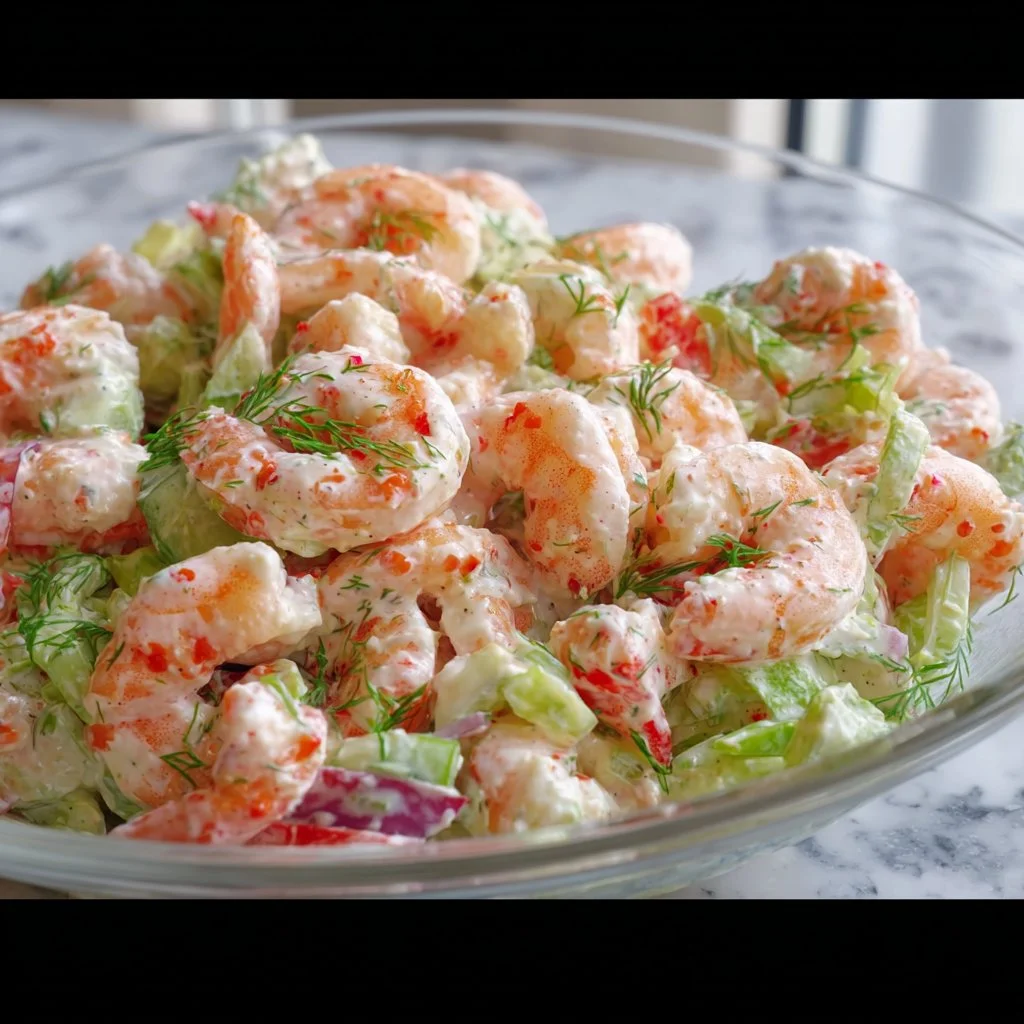
Classic Shrimp Salad
The Ultimate Classic Shrimp Salad Recipe: A Cherished Favorite
Welcome to my kitchen! I’m Olivia Bennett — your friendly guide in the culinary world. Today, I’m bubbling with excitement to share a recipe that’s close to my heart: the Classic Shrimp Salad. Whether you’re hosting a summer barbecue, planning a cozy family dinner, or simply craving something fresh and delicious, this shrimp salad might just become your go-to dish!
Shrimp salad is more than just a meal; it’s a celebration of flavors and textures, sunshine on a plate, and an ode to warm memories spent with loved ones. Each bite bursts with the taste of succulent shrimp, crunchy veggies, and zesty dressing that transports you straight to a sun-drenched picnic by the beach. And trust me, once you get a whiff of that shrimp sizzling in garlic, you’ll be hooked!
Growing up, my family had a tradition every summer: we would gather in our backyard, the grill fired up, and everyone contributing a dish. My mom would often make shrimp salad that was a hit among friends and family alike. The kitchen would fill with laughter and the scent of garlic, lemon, and fresh herbs wafting through the air. It was a simple recipe, yet it seemed to bring together an extraordinary mix of flavors and joy. I can still picture each family member diving into the bowl, eagerly picking at the shrimp and the colorful veggies. Sometimes, I would sneak a few pieces before it hit the serving table—it was just too tempting!
Today, I aim to recreate that bliss in this recipe, with a few tweaks that keep it vibrant and relevant. So roll up those sleeves, grab your apron, and let’s dive into this culinary journey together!
Ingredients
Here’s what you’ll need for this delightful Classic Shrimp Salad. Don’t worry if you don’t have everything; I’ve included substitution tips too!
Ingredients List
-
1 pound of shrimp
Use fresh or frozen! If using frozen, make sure to thaw thoroughly before cooking. You can also swap shrimp for cooked lobster or crab for a luxurious twist. -
2 cups of mixed greens
Any salad green will work—spinach, romaine, or arugula. For a heartier option, try using kale, but massage it with a bit of oil to soften it up beforehand. -
1 cup of cherry tomatoes, halved
These add a sweet burst! Substitute with diced cucumbers for crunch or bell peppers for a pop of color and sweetness. -
½ cup of finely chopped red onion
Adds a zing! If red onion is too strong for you, use green onions or omit them entirely. -
½ cup of diced avocado
Creamy goodness here! If you’re not a fan of avocado, consider adding hard-boiled eggs for richness or replacing it with a dollop of Greek yogurt for creaminess. -
¼ cup of parsley, finely chopped
Fresh herbs elevate the dish! If you don’t have parsley, cilantro or dill would also work beautifully here. -
Juice of 1 lemon
For brightness! Lime juice can be a great substitute for a more tropical flair. -
2 tablespoons of olive oil
Good quality oil is key! Lemon-infused olive oil adds a lovely, zesty kick. If you need a neutral taste, avocado oil works wonders as well. -
Salt and pepper, to taste
Essential for seasoning! Experiment with smoked salt or freshly cracked pepper for enhanced flavor. -
Optional: Dash of hot sauce (like Tabasco or Sriracha)
If you like a little heat, this is a great addition! Feel free to leave this out if spice isn’t your thing.
Step-by-Step Instructions
Now let’s get cooking! Here’s a step-by-step guide to whip up this shrimp salad, along with some of my best kitchen tips:
Step 1: Cook the Shrimp
Start by bringing a medium pot of water to a gentle boil. Add a pinch of salt—this will help flavor the shrimp as they cook. Once the water is boiling, carefully add the shrimp. You’ll know they’re ready when they turn a lovely pink color and curl up slightly, about 2–3 minutes.
Note: Don’t overcook your shrimp. They’ll become tough and rubbery, and we want them juicy and tender!
Step 2: Prepare the Ice Bath
While the shrimp are cooking, prepare an ice bath in a large bowl filled with ice and cold water. Once the shrimp are cooked, transfer them immediately to the ice bath using a slotted spoon. This halts the cooking process and helps them maintain their tender texture.
Step 3: Chop the Veggies
Next, chop your veggies while the shrimp cool down. Dice your cherry tomatoes, finely chop the red onion and parsley, and cube that creamy avocado. Each bite will bring together these vibrant colors, making the salad as visually appealing as it is delicious!
Step 4: Mix the Dressing
In a small bowl, whisk together the lemon juice, olive oil, salt, pepper, and optional hot sauce. This bright dressing will bring all your ingredients to life. Taste and adjust—you can always add a bit more lemon for zing or a pinch of salt!
Step 5: Assemble the Salad
In a large bowl, combine the mixed greens with the chopped veggies, cooled shrimp, and parsley. Drizzle with your dressing and toss gently—just enough to coat everything without bruising the delicate greens.
Step 6: Taste and Adjust
Give the salad a taste and adjust your seasoning as needed. Sometimes, all it takes is a little more fresh lemon juice or a dash of salt to really pull it together.
Serving Suggestions
Now it’s time to serve your masterpiece! I love to present my shrimp salad on a large platter, garnished with extra parsley and lemon wedges. This makes it inviting and shareable—perfect for gatherings. You can also serve it in individual bowls, alongside some crusty bread or pita chips for a delightful crunch.
Recipe Variations
Feel free to get creative! Here are some fun twists on this classic shrimp salad:
-
Tropical Twist: Add diced mango or pineapple for a refreshing,
fruity flavor. The sweetness balances beautifully with the shrimp! -
Mediterranean Style: Incorporate olives, feta cheese, and a sprinkle of oregano for a Mediterranean flair. It’s perfect with the bright lemon dressing!
-
Creamy Version: Swap the olive oil for a creamy dressing, such as ranch or yogurt-based dressing. This adds a rich twist that’s deliciously indulgent.
-
Pasta Salad: Mix in cooked pasta for a hearty dish that can easily serve a crowd. Use farfalle or rotini for a fun shape that’ll hold all those tasty bits!
-
Spicy Cilantro: Replace parsley with chopped cilantro and add diced jalapeño for a refreshing kick!
Chef’s Notes
Cooking is a journey filled with experimentation, and this shrimp salad has evolved over the years. Sometimes, I find myself adding ingredients I have on hand, and you should feel free to do the same! I once made this salad with pear slices and walnuts, and it turned out to be an incredible fall dish. And let’s not forget that kitchen mishap when I reached for hot sauce, only to grab a jar of pickled jalapeños instead—delicious in a whole new way!
Remember, every recipe is only a starting point. Allow this dish to evolve based on your tastes, the seasons, and what you have available. The heart of any great recipe is the joy of cooking and sharing!
FAQs and Troubleshooting
1. What if my shrimp are rubbery?
Avoid overcooking! Keep an eye on them and remove from heat as soon as they turn pink. The ice bath immediately stops the cooking.
2. Can I make this salad ahead of time?
Absolutely! You can prep the veggies and shrimp in advance; store them in the fridge separately until you’re ready to mix them with the dressing. Just keep the avocado for last to prevent browning.
3. What should I do if I don’t like seafood?
No worries! Substitute shrimp with grilled chicken, tofu, or chickpeas for a delicious salad that’s still packed with flavor.
4. Do I have to use fresh ingredients?
While fresh is always best, frozen ingredients can work in a pinch! Just be sure they’re properly thawed and drained.
Nutritional Info
While I don’t usually delve into the numbers, here’s a quick insight:
- Serving Size: 1 cup
- Calories: Approx. 200
- Protein: 22g
- Carbs: 9g
- Fat: 10g
(The precise values will vary based on specific ingredients and serving sizes.)
There you have it—my classic shrimp salad recipe that’s simple, delicious, and filled with memories. I hope you love making and sharing this dish as much as I do! Here’s to flavorful meals that bring us together. Happy cooking, and don’t forget to share your kitchen stories with me!
Print
Classic Shrimp Salad
- Total Time: 20 minutes
- Yield: 4 servings 1x
- Diet: Paleo
Description
A delightful shrimp salad bursting with flavors and textures, perfect for summer barbecues or cozy family dinners.
Ingredients
- 1 pound of shrimp
- 2 cups of mixed greens
- 1 cup of cherry tomatoes, halved
- ½ cup of finely chopped red onion
- ½ cup of diced avocado
- ¼ cup of parsley, finely chopped
- Juice of 1 lemon
- 2 tablespoons of olive oil
- Salt and pepper, to taste
- Optional: Dash of hot sauce (like Tabasco or Sriracha)
Instructions
- Cook the shrimp by bringing a medium pot of water to a gentle boil. Add a pinch of salt and carefully add the shrimp. Cook until they turn pink and curl up, about 2–3 minutes.
- Prepare an ice bath in a large bowl filled with ice and cold water. Transfer the cooked shrimp to the ice bath immediately.
- Chop your veggies: dice cherry tomatoes, finely chop red onion and parsley, and cube avocado.
- Mix the dressing in a small bowl by whisking together lemon juice, olive oil, salt, pepper, and optional hot sauce.
- Assemble the salad by combining mixed greens, chopped veggies, cooled shrimp, and parsley in a large bowl. Drizzle with dressing and toss gently.
- Taste and adjust seasoning as needed before serving.
Notes
Serve on a platter garnished with extra parsley and lemon wedges for an inviting presentation. Feel free to modify the salad with your favorite ingredients.
- Prep Time: 15 minutes
- Cook Time: 5 minutes
- Category: Salad
- Method: Boiling
- Cuisine: American
Nutrition
- Serving Size: 1 cup
- Calories: 200
- Sugar: 3g
- Sodium: 400mg
- Fat: 10g
- Saturated Fat: 2g
- Unsaturated Fat: 8g
- Trans Fat: 0g
- Carbohydrates: 9g
- Fiber: 3g
- Protein: 22g
- Cholesterol: 180mg
Keywords: shrimp salad, summer salad, seafood salad, easy recipes, healthy recipes

Shrimp Salad Recipe
The Ultimate Shrimp Salad Recipe: A Flavorful Dive into Summer Freshness
Welcome to my cozy kitchen, where the appliances hum a sweet tune and the aroma of fresh ingredients wafts through the air! I’m Olivia Bennett, and today we’re diving into one of my all-time favorite recipes: a vibrant, zesty Shrimp Salad that’s perfect for any occasion. Whether you’re gearing up for a beautiful summer gathering, prepping a quick lunch, or simply craving something deliciously fresh, this salad is here to bring a smile to your face and a little sunshine to your plate.
I remember the first time I had a shrimp salad that made my heart dance. I was at a seaside restaurant, the waves crashing in the background, and I could smell the salty sea breeze mingling with the inviting aromas of grilled seafood. When my shrimp salad arrived, it was beautifully plated — a colorful array of crisp greens, succulent shrimp, and a dressing that made my taste buds sing. As I took that first bite, it felt like summer itself exploded in my mouth! It was a dish rich in flavor and nostalgia, instantly transporting me back to lazy beach days and laughter-filled gatherings.
That experience sparked my love for shrimp salads, and I took the memory home with me. With a few tweaks and personal touches over the years, I’ve crafted a recipe that is sure to bring you the same joy. Are you ready? Let’s get cooking!
Ingredients
Here’s a list of simple yet high-quality ingredients you’ll need to whip up this delightful Shrimp Salad. Each ingredient adds its own flair, and I’ll include some handy tips for substitutions and insights along the way:
-
1 lb (450g) shrimp (peeled and deveined): Choose fresh or frozen shrimp; both work well! If you’re feeling adventurous, try swapping in grilled chicken or even tofu for a vegetarian version.
-
4 cups mixed greens (spinach, arugula, and kale): Use whatever greens you love! Mixed greens add a beautiful crunch. If you’re looking for a low-carb option, opt for a bed of zucchini noodles.
-
1 cup cherry tomatoes (halved): Sweet cherry tomatoes add a burst of flavor. You can substitute these with grape tomatoes or even roasted heirlooms for a bit more depth.
-
1 avocado (sliced): Creamy avocado brings richness to the salad. If you’re avoiding avocados, try a sprinkle of sunflower seeds for crunch or a dollop of hummus on top.
-
1/2 cucumber (diced): Crisp cucumber balances the tanginess of the dressing beautifully. For a twist, try pickled cucumbers for some zesty zing.
-
1/4 red onion (thinly sliced): A little sharpness from red onions enhances the overall taste. If you’re sensitive to onion flavors, green onions or chives make a great substitute.
-
1/4 cup fresh herbs (cilantro, parsley, or dill): Fresh herbs elevate the flavors—feel free to mix and match! Basil would pair beautifully if you’re going for an Italian vibe.
-
1/3 cup olive oil: A good-quality olive oil is essential for the dressing; it adds richness. You can switch to sesame oil for an Asian twist or use a lighter oil if that’s your preference.
-
Juice of 1 lemon: Fresh lemon juice brightens everything up! Lime or even orange juice can work wonders if you’re feeling experimental.
-
Salt and pepper to taste: Always season to perfection! You can experiment with flavored salts for an added kick.
-
Optional toppings: Try goat cheese, feta, or toasted nuts for extra flavor and texture. Remember, it’s all about what you love!
Step-by-Step Instructions
Let’s get down to the nitty-gritty of making this delicious Shrimp Salad. Follow these steps, and I promise you’ll impress yourself (and maybe even a few friends)!
-
Prep Your Shrimp: If using frozen shrimp, make sure to thaw them in advance by placing them in a bowl of cold water for 15-20 minutes. While you’re at it, let’s bring some flavor to those shrimp! In a medium bowl, toss the shrimp with a drizzle of olive oil, a pinch of salt, a pinch of pepper, and a sprinkle of your favorite herbs. Let them marinate while we prepare the rest!
-
Sauté the Shrimp: Heat a skillet over medium-high heat and add a splash of olive oil. Once the pan is hot, add the seasoned shrimp. Sauté for about 2-3 minutes on each side, or until they turn pink and opaque. Be careful not to overcook them; we want them tender and juicy! Once cooked, remove the shrimp from the heat and let them cool slightly.
-
Prepare Your Greens: In a large bowl, add your mixed greens, diced cucumber, halved cherry tomatoes, and sliced red onion. Give them a gentle toss to combine. This creates a colorful base for our salad!
-
Make the Dressing: In a small bowl, whisk together olive oil, lemon juice, salt, and pepper. Taste it, and adjust the flavors to your liking. If you like an extra zing, add a touch more lemon!
-
Combine It All: Now, add the sautéed shrimp to the bowl of greens. Pour the dressing over the top and gently toss everything together until it’s well coated. Don’t be afraid to get your hands in there for this one — it’s how the magic happens!
-
Plate Your Creation: To serve, layer the salad onto plates and top with sliced avocado and fresh herbs. If you’re feeling fancy, drizzle with a bit of balsamic glaze for a beautiful finish.
Serving Suggestions
This Shrimp Salad is as beautiful as it is tasty! For an elegant presentation, consider using a large platter to showcase the colorful ingredients. Add some grilled corn, or sprinkle your favorite cheese over the top for a gourmet touch. Serve with crusty bread or delightful pita chips for crunch, and don’t forget a chilled glass of white wine or sparkling water with a splash of lemon—it’s the perfect pairing!
Recipe Variations
Get creative with your Shrimp Salad by adapting it in unique ways! Here are a few ideas to inspire you:
-
Mediterranean Shrimp Salad: Toss in Kalamata olives, feta cheese, and a splash of red wine vinegar to create a Greek twist.
-
Tropical Shrimp Salad: Add diced mango, pineapple, or fresh coconut for a refreshing summer vibe.
-
Spicy Shrimp Salad: Mix in a little sriracha or chopped jalapeños to give it some heat!
-
Pasta Shrimp Salad: Mix in cooked pasta (like orzo or penne) for a heartier dish that works great as a meal prep option.
-
Asian-Inspired Shrimp Salad: Swap the herbs for cilantro and add sesame seeds and shredded carrots, drizzled with soy sauce or a ginger dressing.
Chef’s Notes
Over the years, this Shrimp Salad has evolved in my kitchen, inspired by the seasons and the fresh produce available at the farmers’ market. Sometimes, I even sneak in leftovers from last night’s dinner for an extra flavor pop! I recall a time when I forgot the lemon juice in a batch, and it turned out to be an unexpected success with a touch of lime instead. Remember, cooking is all about experimenting and having fun. Don’t be afraid to put your spin on it!
FAQs and Troubleshooting
1. Can I make this salad ahead of time?
Absolutely! Just keep the dressing separate until you’re ready to serve, as this will prevent the greens from wilting.
2. How do I prevent shrimp from becoming rubbery?
Cooking shrimp quickly over medium-high heat keeps them tender. As soon as they turn pink, remove them from the heat. A little undercooking is okay; they’ll continue to cook after you take them off the pan!
3. What’s the best way to store leftovers?
Place any leftovers in an airtight container in the fridge. The salad will keep for 1-2 days but best enjoyed fresh.
4. I don’t like shrimp; what alternative protein can I use?
Feel free to substitute grilled chicken or chickpeas for a lean protein twist! Both will integrate seamlessly into the salad and will be just as delicious.
Nutritional Info
For those mindful of nutrition, here’s a quick breakdown per serving (without added toppings):
- Calories: Approximately 330
- Protein: 25g
- Carbohydrates: 15g
- Fats: 18g
- Fiber: 5g
Whether it’s a cozy night in or a lively gathering with friends, this Shrimp Salad is bound to become a favorite in your recipe repertoire. So roll up your sleeves, throw on that apron, and let’s savor the good moments one bite at a time! Happy cooking!
Print
Ultimate Shrimp Salad
- Total Time: 25 minutes
- Yield: 4 servings 1x
- Diet: Gluten-Free
Description
A vibrant and zesty Shrimp Salad perfect for summer gatherings or a quick lunch.
Ingredients
- 1 lb (450g) shrimp (peeled and deveined)
- 4 cups mixed greens (spinach, arugula, kale)
- 1 cup cherry tomatoes (halved)
- 1 avocado (sliced)
- 1/2 cucumber (diced)
- 1/4 red onion (thinly sliced)
- 1/4 cup fresh herbs (cilantro, parsley, or dill)
- 1/3 cup olive oil
- Juice of 1 lemon
- Salt and pepper to taste
- Optional toppings: goat cheese, feta, or toasted nuts
Instructions
- Prep your shrimp: If using frozen shrimp, thaw them in a bowl of cold water for 15-20 minutes. Toss with olive oil, salt, pepper, and herbs.
- Sauté the shrimp in a skillet over medium-high heat for 2-3 minutes on each side until pink and opaque.
- Prepare your greens in a large bowl: combine mixed greens, diced cucumber, halved cherry tomatoes, and sliced red onion.
- Make the dressing by whisking together olive oil, lemon juice, salt, and pepper in a small bowl.
- Combine the sautéed shrimp with the greens and pour the dressing over. Toss gently.
- Plate your creation with sliced avocado and fresh herbs on top.
Notes
For an elegant presentation, serve on a large platter and pair with crusty bread or pita chips.
- Prep Time: 15 minutes
- Cook Time: 10 minutes
- Category: Salad
- Method: Sautéing
- Cuisine: American
Nutrition
- Serving Size: 1 serving
- Calories: 330
- Sugar: 3g
- Sodium: 350mg
- Fat: 18g
- Saturated Fat: 3g
- Unsaturated Fat: 5g
- Trans Fat: 0g
- Carbohydrates: 15g
- Fiber: 5g
- Protein: 25g
- Cholesterol: 180mg
Keywords: shrimp salad, summer salad, healthy salad, fresh ingredients
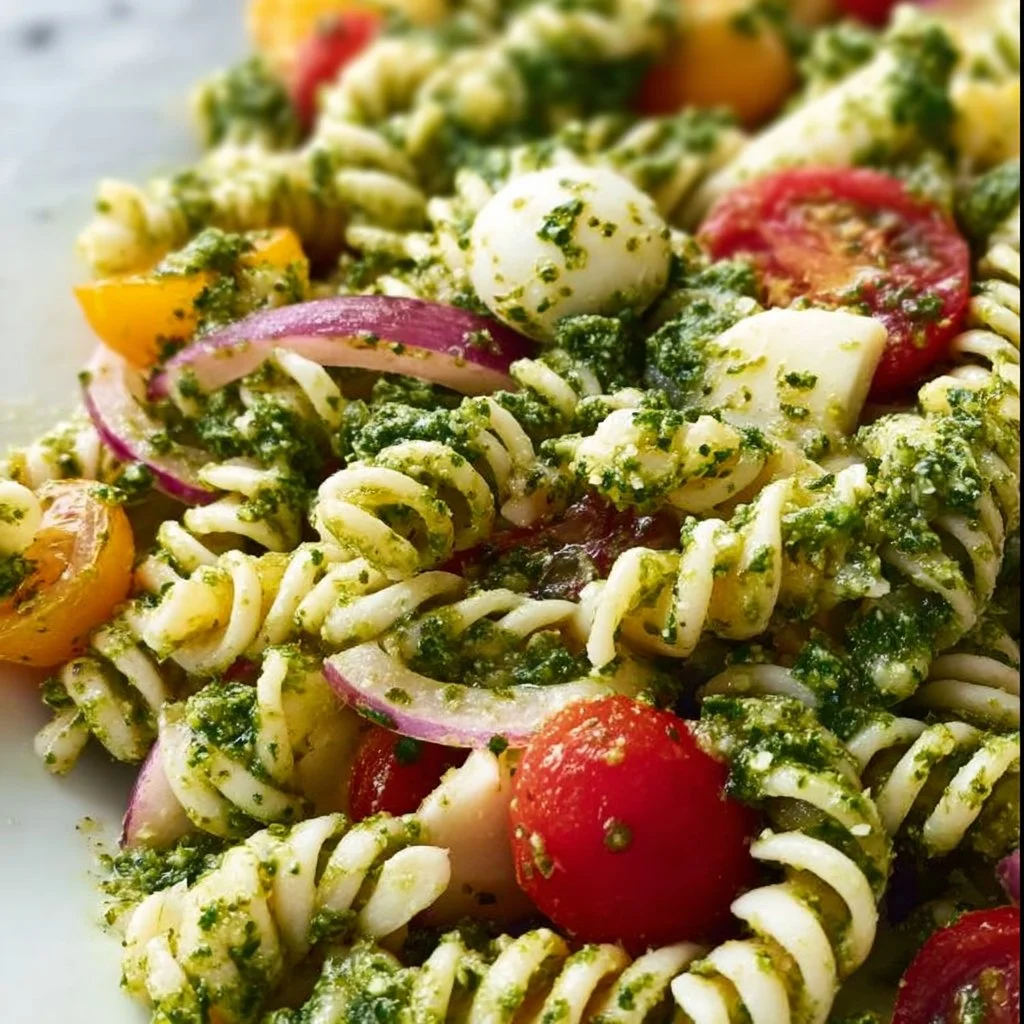
Easy Kale Pesto Pasta Salad
Easy Kale Pesto Pasta Salad: A Deliciously Green Delight!
Hey there, fellow foodies! Welcome back to my cozy corner of the internet where the kitchen is always buzzing with flavor and the air is filled with the delightful aroma of something scrumptious. Today, I’m thrilled to share one of my absolute favorite recipes: Easy Kale Pesto Pasta Salad! This cheeky dish combines the goodness of vibrant greens with the hearty satisfaction of pasta — all tied together with a zesty homemade kale pesto that’s so good, you might just want to slather it on everything.
Now, I understand that life can often feel like a whirlwind, but that doesn’t mean we have to sacrifice taste for convenience. This kale pesto pasta salad is perfect for busy weeknights, leisurely weekend brunches, or even a delightful potluck contribution! It’s filled with fresh, wholesome ingredients and comes together in under 30 minutes. Plus, it can be made ahead of time and stored in the fridge, making it an excellent grab-and-go lunch option.
Whenever I whip up this salad, I’m transported back to those sunny days in my childhood when my mom would take us to local farmer’s markets. We’d come home bursting with excitement, bags filled with crisp greens, juicy tomatoes, and fragrant herbs. Those vibrant colors and earthy smells sparked a love for fresh ingredients that drives my cooking today.
And how about that pesto? Oh boy, it’s a game-changer! When I first made pesto using kale instead of basil on a whim, I couldn’t believe how delicious it was. It’s nutrient-packed, eco-friendly, and adds a delightful twist to the traditional recipe. I can’t wait for you to give it a whirl!
So grab your aprons and let’s dive into this Easy Kale Pesto Pasta Salad together!
Personal Story
Let me take you back to a moment filled with laughter and the sweet echo of childhood memories. Picture this: the sun was shining, and my mom and I were digging through vibrant crates overflowing with fresh produce at our local market. We stumbled across a stall bursting with fresh greens—kale, arugula, and more! It was kale that caught my eye, and I insisted we bring some home.
That weekend, we decided to make homemade pesto, and it turned into a kale-inspired culinary adventure. While my mom expertly chopped and blended, I experimented with flavors by tossing in garlic and pine nuts to the mix. You could feel the excitement in the air as the warm, nutty smell wafted through our kitchen. It was pure magic when we tossed the bright green pesto with our warm pasta, watching the vibrant colors meld together. That first bite was a game-changer—rich, creamy, and just awesomely fresh!
Now, every time I make this kale pesto pasta salad, I’m reminded of those sun-soaked days where simple, fresh ingredients created a feast of flavors and memories. It’s those beautiful moments that inspire me to keep cooking and sharing with all of you. And believe me, once you try this dish, you’ll understand why it holds such a special place in my heart!
Ingredients
Here’s a simple shopping list for everything you’ll need to create your kale pesto pasta salad masterpiece:
-
Pasta (your choice!)
I love using whole wheat or gluten-free pasta for an earthy touch, but any shape works! Penne, fusilli, or even spaghetti are all great options. -
Fresh Kale (about 4 cups, chopped)
Kale packs a nutrient punch and makes the best pesto! You can substitute with spinach or Swiss chard if you prefer a milder taste. -
Garlic (3 cloves)
A must-have for flavor! For a milder pesto, try roasting the garlic first for a sweeter profile. -
Nuts (1/4 cup, pine nuts or walnuts)
Adds creaminess to your pesto! If you’re nut-free, sunflower seeds or hemp seeds are great alternatives! -
Parmesan Cheese (1/2 cup, grated)
This gives it a savory depth. For a vegan option, nutritional yeast can provide a cheesy flavor without dairy. -
Olive Oil (1/3 cup)
Use high-quality extra virgin olive oil for the best flavor! Avocado oil or grapeseed oil can be substituted for a different twist. -
Lemon Juice (from 1 lemon)
A splash of citrus keeps the flavors vibrant! If you’re out of lemons, vinegar can also add a nice zing. -
Salt & Pepper (to taste)
Essential for bringing out the flavors! Don’t skimp here; a pinch can really elevate your dish!
With this lineup of ingredients, your taste buds are in for a treat!
Step-by-Step Instructions
Alright, let’s dive into the nitty-gritty of making this kale pesto pasta salad! Put on some good tunes, and let’s get cooking!
-
Cook Your Pasta
Start by bringing a large pot of salted water to a boil. Toss in your pasta and cook according to the package directions until al dente. Don’t forget to taste! Once cooked, reserve about 1/2 cup of pasta water and then drain the rest. A little pasta water can be the secret weapon for making your pesto cling beautifully to your pasta.Tips: If you’re using a pasta that tends to stick, a drizzle of olive oil in the water can help!
-
Prepare the Kale Pesto
While the pasta is cooking, it’s time to make the star of the show: the kale pesto! In a food processor, combine chopped kale, garlic, nuts, Parmesan cheese, and lemon juice. Pulse until the mixture begins to blend, scraping down the sides as needed.Chef hack: To really amp up the flavor, add a few basil leaves or a sprinkle of chili flakes for a little heat!
-
Incorporate Olive Oil
With the food processor running, slowly drizzle in the olive oil until it reaches a smooth, creamy consistency. If it seems a bit thick, add a tablespoon of that reserved pasta water until it’s just right. Taste and adjust with salt and pepper! -
Combine Pasta and Pesto
In a large bowl, toss the warm pasta with the luscious kale pesto. Mix until the pasta is generously coated, giving it that lovely green hue we all adore. Add more pasta water if it feels too dry!Chef tip: Mixing the pesto with warm pasta helps the flavors meld beautifully!
-
Chill or Serve Immediately
You can enjoy this pasta salad warm, or refrigerate it for about 30 minutes for a refreshing cold dish! If you’re serving it cold, it’s great with an additional squeeze of lemon juice to brighten the flavors. -
Garnish and Enjoy!
Just before serving, give it a final sprinkle of grated Parmesan, a drizzle of olive oil, and a dash of fresh pepper. Yum!
And there you have it—a dazzling bowl of Easy Kale Pesto Pasta Salad ready to be devoured.
Serving Suggestions
Plating this pasta salad is super fun and casual—just how I like it! Grab a large serving bowl and pile your kale pesto pasta salad high, allowing those vibrant green tones to shine through. For extra flair, you can garnish with toasted nuts or a few fresh basil leaves on top. Oh, and don’t forget a wooden serving spoon for that rustic touch! This dish is tasty, pretty, and best enjoyed among good company.
Recipe Variations
Feeling adventurous? Here are some fun variations to switch up your Easy Kale Pesto Pasta Salad:
-
Mediterranean Twist: Add sun-dried tomatoes, olives, and feta cheese for a burst of Mediterranean flavor!
-
Protein Power: Toss in grilled chicken, shrimp, or chickpeas to amp up the protein content!
-
Roasted Veggie Medley: Roast seasonal veggies like bell peppers, zucchini, or broccoli and fold them into your salad for added flavor and nutrients.
-
Creamy Avocado: Fold in diced avocado for a creamy texture that pairs beautifully with the pesto.
-
Spicy Kick: Add diced jalapeños or a sprinkle of red pepper flakes to fire things up!
Chef’s Notes
Now, let’s chat a bit about the evolution of this recipe. When I first experimented with kale in my pestos, I was a bit skeptical. After all, who could compete with the vibrant flavor of basil? But as I tasted each version, I realized that kale has a unique earthiness that offers something new and delightful. Plus, it’s a leafy green powerhouse packed with vitamins A, K, and C—now that’s a win-win!
Over the years, I’ve refined this recipe, swapped out nuts, played with various cheese types, and even experimented with different herbs (the addition of mint is a surprising delight!). Each version is delicious, bringing a little piece of my kitchen adventures right to your table.
FAQs and Troubleshooting
1. What can I do if my pesto is too bitter?
If your pesto tastes a bit bitter, try adding a pinch of salt or a bit more lemon juice. Balancing flavors can be key!
2. Can I use frozen kale or store-bought pesto?
Absolutely! Just be sure to thaw and drain any excess moisture from frozen kale before blending. Store-bought pesto can also be a huge time-saver—just toss in some fresh garlic or lemon for a personal touch!
3. How do I store leftovers?
Store any leftovers in an airtight container in the fridge for up to 3 days. You may want to add a splash of olive oil to keep it fresh and vibrant!
4. Can I make this vegan?
Totally! Replace the Parmesan cheese with nutritional yeast, and use a substitute for pasta that aligns with your dietary needs.
Nutritional Info (optional)
While specific nutritional information can vary, here’s a rough breakdown for one serving (based on 4 servings total):
- Calories: Approx. 350
- Protein: 12g
- Fat: 18g
- Carbohydrates: 40g
- Fiber: 6g
- Sodium: 250mg
And there you have it, my food-loving friends! I hope you give this Easy Kale Pesto Pasta Salad a try and let it spark joy in your kitchen just like it does in mine. Remember, cooking is all about exploration and enjoyment, so don’t be afraid to make it your own! Happy cooking! 🥗✨
Print
Easy Kale Pesto Pasta Salad
- Total Time: 30 minutes
- Yield: 4 servings
- Diet: Vegetarian
Description
A delightful kale pesto pasta salad that’s perfect for busy weeknights or potlucks, combining vibrant greens with hearty pasta.
Ingredients
- Pasta (your choice! Penne, fusilli, or spaghetti)
- Fresh Kale (about 4 cups, chopped)
- Garlic (3 cloves)
- Nuts (1/4 cup, pine nuts or walnuts)
- Parmesan Cheese (1/2 cup, grated)
- Olive Oil (1/3 cup)
- Lemon Juice (from 1 lemon)
- Salt & Pepper (to taste)
Instructions
- Cook your pasta by bringing a large pot of salted water to a boil. Toss in your pasta and cook according to the package directions until al dente, reserving about 1/2 cup of pasta water, then drain.
- Prepare the kale pesto by combining chopped kale, garlic, nuts, Parmesan cheese, and lemon juice in a food processor and pulsing until it starts to blend.
- Incorporate olive oil by drizzling it in while the processor is running until smooth, adjusting with reserved pasta water if too thick.
- Combine the warm pasta with the kale pesto in a large bowl, mixing until the pasta is coated.
- Chill it for about 30 minutes for a refreshing cold dish, or serve immediately.
- Garnish before serving with grated Parmesan, olive oil, and fresh pepper.
Notes
For a vegan option, replace Parmesan with nutritional yeast. Leftovers can be stored in an airtight container for up to 3 days.
- Prep Time: 10 minutes
- Cook Time: 20 minutes
- Category: Salad
- Method: No-Cook
- Cuisine: Italian
Nutrition
- Serving Size: 1 serving
- Calories: 350
- Sugar: 2g
- Sodium: 250mg
- Fat: 18g
- Saturated Fat: 5g
- Unsaturated Fat: 10g
- Trans Fat: 0g
- Carbohydrates: 40g
- Fiber: 6g
- Protein: 12g
- Cholesterol: 20mg
Keywords: pasta salad, kale, pesto, vegetarian, easy recipes


