

No Fat Brownies
Delightfully Decadent No Fat Brownies: Indulge Without Guilt!
Welcome to my cozy corner of the kitchen! I’m Olivia Bennett, your friendly home cook and flavor enthusiast, here to whip up something truly delightful today—No Fat Brownies! Now, before you raise an eyebrow and let the skepticism set in, let me assure you that these brownies are nothing short of delicious. They’re rich, fudgy, and utterly satisfying, proving that you can indulge without the added fat. You can thank me later!
Introduction
Let’s be honest, brownies have an almost magical ability to transform any day into something special. Their rich aroma wafting through the kitchen, the moment you pop them into the oven, and the sheer delight on the faces of anyone who gets to enjoy a warm square of chocolate-y goodness—every moment is a celebration of life! But you might be wondering, how can we recreate that magic without the fat? Fear not, my friend! These No Fat Brownies are here to show you how.
By using applesauce and other wholesome ingredients, we’ll craft a treat that doesn’t skimp on flavor but is kinder to your waistline. You see, cooking is all about creativity and making it fun, like a dance party where flavors come together! Today, we’ll dive deep into a delightful recipe that not only caters to your cravings but also invites everyone—whether they they’re health-conscious or simply looking for a guilt-free treat—to join the brownie movement!
But before we whisk our way into the kitchen, let’s embrace the moments and memories associated with these satisfying squares.
Personal Story
Ah, brownies! They remind me of Sundays spent in my grandma’s kitchen, the heart of our family home. I remember one particular afternoon; it was stormy outside, the skies dark gray, and the perfect excuse for a bake-off! Grandma and I decided to turn the gloomy day into a cozy masterpiece.
She pulled out her old, well-loved cookbook, and I still can’t forget how her eyes lit up the moment we landed on the brownie recipe. But, there was a twist. Instead of the usual oil and butter that traditionally graced the recipe, Grandma suggested we use her prized applesauce. I was skeptical—“But Grandma, brownies need fat!”—I argued. Little did I know, she was about to open my eyes to a whole new world of flavor and texture.
As we mixed the ingredients, I couldn’t shake my doubts but decided to have faith—and oh boy, what a treat they turned out to be! Fudgy, delicious, and with a whimsical note of sweetness from the applesauce, those brownies made my giggles echo throughout the house. They taught me that food, like life, is all about experimenting, embracing new ideas, and creating beautiful memories.
And now, it’s your turn to create your own best memories in the kitchen with these delightful No Fat Brownies!
Ingredients
Let’s gather our ingredients! This recipe is all about straightforward, wholesome components. Here’s what you’ll need:
-
1 cup unsweetened applesauce
Talk about my secret weapon! It adds moisture and sweetness, making these brownies incredibly fudgy without any fat. You can substitute it with mashed bananas or pumpkin puree for a different flavor profile. -
1 cup granulated sugar
Sweetness is key! Feel free to swap this out for coconut sugar or a sugar substitute like Stevia for a lower-calorie option. Just keep in mind that it might alter the texture slightly. -
2 teaspoons vanilla extract
A sprinkle of flavor! This elevates the overall taste and provides that familiar sweetness. Try almond extract for a unique twist! -
1 cup all-purpose flour
The foundation of our brownies! For a gluten-free version, use almond flour or a gluten-free flour blend to ensure that you can still enjoy this decadent treat. -
1/2 cup unsweetened cocoa powder
This is what gives brownies that rich chocolatey goodness. You can use dark cocoa powder for a more intense flavor or even carob powder if you’re exploring new tastes! -
1 teaspoon baking powder
A little boost for those brownies! This helps them rise while keeping that delicious fudgy texture. You can also substitute baking soda, but keep an eye on the measurements! -
1/4 teaspoon salt
A pinch of salt helps balance out the sweetness. It brings out the flavors in cocoa and makes everything taste that much better! -
1/2 cup chocolate chips (optional)
Because sometimes you just need that extra chocolatey goodness! You can use dark chocolate, dairy-free chips, or even white chocolate for a fun contrast.
Step-by-Step Instructions
Let’s get to the fun part—baking! Follow these step-by-step instructions, and you’ll be on your way to brownie bliss in no time.
-
Preheat Your Oven
Preheat your oven to 350°F (175°C). This is the magic number for perfect baking. You want your brownies to rise and become that lovely fudgy texture, so don’t skip this step! -
Get Your Mixing Bowl Ready
Grab a large mixing bowl and add the applesauce and sugar. Whisk these together until well combined. This step is like creating a bond; the sugars blend beautifully with the applesauce, paving the way for deliciousness. -
Introduce Vanilla Extract
Pour in the vanilla extract and continue whisking. Feel free to dance around your kitchen while you whisk because why shouldn’t we have a little fun while baking? -
Dry Ingredients Time!
In a separate bowl, sift together the flour, cocoa powder, baking powder, and salt. Sifting is essential; it breaks up clumps and aerates your flour, helping your brownies to be lighter and fluffier. -
Combine Wet and Dry
Gradually fold the dry ingredients into the wet mixture. Use a spatula for this so that you don’t overmix—this is key for achieving that fudgy brownie goodness. Mix just until combined, and don’t worry if there are a few lumps; they’ll smooth out during baking. -
Chocolate Chips Add-Ins (optional)
If you’re going the chocoholic route, fold in your chocolate chips now. It’s not a step to skip if you want chocolatey explosions in every bite! -
Grease Your Baking Pan
Grab an 8×8 inch baking pan or a 9×9 inch for thinner brownies. Lightly grease it or line it with parchment paper for easy removal after baking. Nobody likes brownies that stick! -
Pour and Spread
Pour the batter into your greased pan and spread it evenly. Don’t worry about being perfect; rustic is the name of the game when it comes to homemade goodies! -
Bake Time
Pop the tray into your preheated oven and bake for 25-30 minutes. You can check for doneness by inserting a toothpick into the center. If it comes out with a few moist crumbs (not wet batter), they’re ready! -
Cool and Cut
Remove the brownies from the oven and allow them to cool in the pan for at least 15 minutes. Once cool, use a sharp knife to cut them into squares. It doesn’t matter if they’re perfectly even; what matters is the love baked into each piece!
Serving Suggestions
Now, how do we serve these glorious No Fat Brownies? You can plate them up on a colorful platter with a dusting of powdered sugar for a charming touch. Feeling fancy? Scoop a generous dollop of unsweetened whipped coconut cream or serve them alongside a scoop of your favorite low-calorie ice cream! Need something extra? A drizzle of homemade chocolate sauce or a handful of fresh berries on the side elevates your dessert game to new heights.
Recipe Variations
Feeling adventurous? Here are some creative twists to try with your No Fat Brownies:
- Nutty Brownies: Add a 1/2 cup of chopped nuts, like walnuts or pecans, to give an added crunch and flavor.
- Mint Fudge: Stir in peppermint extract for a refreshing minty brownie experience—perfect for a festive treat!
- Spicy Chocolate: Add a pinch of cayenne pepper or a dash of cinnamon to the batter for a cozy, spicy kick.
- Fruit Swirl: Drop a few spoonfuls of fruit puree, such as raspberry or cherry, on top of the brownie batter before baking, then swirl it in lightly for a marbled effect.
- Vegan Delight: Substitute the sugar with coconut palm sugar or maple syrup and choose dairy-free chocolate chips to make it completely vegan!
Chef’s Notes
These brownies have evolved over time, and I’ve made countless variations—sometimes even throwing in a little bit of leftover coffee to amplify that chocolate flavor! Each iteration brings back the sweet memories of baking with Grandma, who always encouraged me to experiment and have fun in the kitchen. I can’t tell you how many times I’ve turned an “oops” into an “oh wow!”—like the time I forgot the baking powder but added another cup of chocolate chips instead. You live, you learn, and you bake!
FAQs and Troubleshooting
1. My brownies came out too dry. What happened?
That could be due to overbaking! Check them a few minutes early next time. We love that fudgy texture, so if there are moist crumbs on the toothpick, you’re golden!
2. Why did my brownies sink in the middle?
This can happen from too much mixing after adding the flour or not enough baking time. Make sure to fold gently and keep an eye on that timer!
3. Can I use gluten-free flour?
Absolutely! Using a gluten-free flour blend works beautifully here. Just remember, some brands may absorb more liquid, so keep an eye on the batter’s consistency.
4. How do I store the brownies?
In an airtight container at room temperature, they’ll keep for about 3-4 days. Or, you can freeze them for up to three months! Just slice them into squares and wrap them individually in plastic wrap before placing them in a freezer bag.
Getting creative in the kitchen should never come with a ton of stress. Cooking binds us all together, and every batch of brownies we whip up is another chance to share some love. I hope you enjoy making these No Fat Brownies as much as I enjoyed sharing this journey with you. So grab that mixing bowl, throw on that apron, and let’s indulge in a little guilt-free decadence! Happy baking!
Print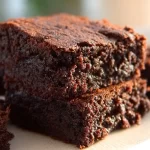
Delightfully Decadent No Fat Brownies
- Total Time: 40 minutes
- Yield: 16 servings 1x
- Diet: Vegetarian
Description
Indulge in these rich, fudgy No Fat Brownies made with applesauce for a delicious guilt-free treat.
Ingredients
- 1 cup unsweetened applesauce
- 1 cup granulated sugar
- 2 teaspoons vanilla extract
- 1 cup all-purpose flour
- 1/2 cup unsweetened cocoa powder
- 1 teaspoon baking powder
- 1/4 teaspoon salt
- 1/2 cup chocolate chips (optional)
Instructions
- Preheat your oven to 350°F (175°C).
- Grab a large mixing bowl and add the applesauce and sugar. Whisk until well combined.
- Pour in the vanilla extract and continue whisking.
- In a separate bowl, sift together the flour, cocoa powder, baking powder, and salt.
- Gradually fold the dry ingredients into the wet mixture.
- If using, fold in the chocolate chips now.
- Grab an 8×8 inch or 9×9 inch baking pan and grease it.
- Pour the batter into your greased pan and spread it evenly.
- Pop the tray into your preheated oven and bake for 25-30 minutes.
- Remove the brownies from the oven and let them cool in the pan for at least 15 minutes before cutting into squares.
Notes
For a gluten-free version, use gluten-free flour. Experiment with adding nuts or different extracts for a personalized touch.
- Prep Time: 10 minutes
- Cook Time: 30 minutes
- Category: Dessert
- Method: Baking
- Cuisine: American
Nutrition
- Serving Size: 1 brownie
- Calories: 200
- Sugar: 15g
- Sodium: 50mg
- Fat: 1g
- Saturated Fat: 0g
- Unsaturated Fat: 1g
- Trans Fat: 0g
- Carbohydrates: 45g
- Fiber: 2g
- Protein: 2g
- Cholesterol: 0mg
Keywords: brownies, no fat brownies, healthy desserts, guilt-free treats
Sugar-Free Sex In A Pan
Sugar-Free Sex In A Pan: A Deliciously Decadent Dessert Recipe
Welcome, fellow foodies! Today, we’re diving into a recipe that’s as cheeky as its name — Sugar-Free Sex In A Pan. Now, before you raise your eyebrows or giggle behind your hands, let me clarify! This dessert is not just a playful title; it’s a delightful, layered creation that’s bound to impress your guests and fill your kitchen with the sweet scent of love and happiness.
Imagine a dessert that captivates with its rich creamy layers, chocolatey goodness, and the best part? It’s entirely sugar-free! Yes, you read that right! With the right ingredients, you can have all the indulgence without the guilt. I’ve designed this dessert to cater to various dietary needs, while still delivering on flavor. It’s perfect for those of us looking to indulge without compromising our healthy lifestyles or giving in to a sugar crash!
What makes Sugar-Free Sex In A Pan so special? It’s the perfect blend of textures and flavors: a silky cream cheese filling, a decadent chocolate layer, and a satisfying crust that ties it all together. It’s the kind of dessert that makes you melt, both in terms of flavor and in the warm, cozy vibe it brings to any gathering.
So roll up those sleeves, preheat that oven, and let’s create some magic together. Whether it’s a special occasion or just a cozy night in, this dessert will make your kitchen feel like a warm hug. Are you ready? Let’s jump right in!
Personal Story
Let’s rewind to my childhood for a moment. I vividly remember my grandmother, dressed in her flowery apron and with flour dusted on her cheek, creating her own version of layered desserts. Every Sunday, she’d whip up something delicious, and we kids would eagerly gather ’round the kitchen table, our eyes wide with anticipation, just waiting to hear the story behind each treat.
One particular Sunday, she introduced us to a dish that would become a family favorite — a decadent layered dessert in a pan, rich with chocolate and cream. As she prepared it, she’d weave tales of her own childhood, and we’d all revel in the warmth and love that filled the room. That dessert, which I later learned was affectionately dubbed “Sex In A Pan” by some, left an indelible mark on my heart (and taste buds!).
Years later, when I embarked on my journey as a home cook, I wanted to recreate that sense of warmth but with a healthier twist. That’s how this sugar-free version was born! It carries all the delightful memories and flavors of my grandmother’s cooking while being something I can enjoy guilt-free. Now, I’m excited to share it with all of you!
Ingredients
To create your very own Sugar-Free Sex In A Pan, you’ll need some simple yet impactful ingredients. Let’s break them down:
For the Crust:
- Almond Flour (1 ½ cups)
A great base for a gluten-free crust! If you’re not a fan of almond flour, you can substitute it with coconut flour, but make sure to reduce the quantity, as coconut flour is more absorbent. - Unsweetened Cocoa Powder (¼ cup)
This adds a rich chocolate flavor. Look for high-quality cocoa powder for the best taste! If you want to keep it lighter, you can use carob powder for a different but delightful flavor. - Salt (½ teaspoon)
Just a pinch to enhance all the flavors. A little salt goes a long way in balanced baked goods! - Sugar-Free Granulated Sweetener (½ cup)
This is your sugar substitute. I recommend erythritol or a stevia blend for a zero-calorie option. If you prefer something with a bit more flavor, coconut sugar can also work, but it’s not entirely sugar-free! - Unsalted Butter, melted (½ cup)
This binds the crust together beautifully. If you’re opting for a dairy-free version, coconut oil works wonderfully too!
For the Cream Cheese Layer:
- Cream Cheese (8 oz, softened)
Always make sure your cream cheese is at room temperature for the creamiest texture. Vegan cream cheese can be a great substitution if you need a dairy-free option! - Vanilla Extract (1 teaspoon)
This adds a lovely depth of flavor. Use pure vanilla extract if possible for an authentic taste! - More Sugar-Free Granulated Sweetener (½ cup)
Your go-to sweetener here again! Adjust according to your preferred sweetness!
For the Chocolate Layer:
- Sugar-Free Chocolate Pudding Mix (1 box, prepared according to package instructions)
A quick and easy way to add a chocolatey layer. If homemade pudding is your thing, go ahead and make it from scratch! (Just keep it sugar-free!) - Milk (2 cups, or any dairy-free milk of your choice)
This is used to prepare the pudding. You can also use almond milk or coconut milk for a different creaminess.
Topping:
- Whipped Cream (for garnish)
Use any kind you like, whether store-bought or homemade! For a dairy-free option, coconut whipped cream is a luscious choice!
Step-by-Step Instructions
Now that we’ve gathered our ingredients, let’s get down to the fun part — making this fabulous dessert!
Step 1: Prepare the Crust
- Preheat Your Oven: Preheat your oven to 350°F (175°C). This allows the crust to bake evenly.
- Mix the Dry Ingredients: In a large mixing bowl, combine the almond flour, cocoa powder, salt, and sweetener. Don’t skimp on mixing! You want everything to be well-integrated for a consistent crust.
- Add the Wet Ingredients: Pour in the melted butter and mix until your dough holds together. The texture should be slightly crumbly, but it should stick when pressed.
- Press into the Pan: Grease a 9×13 inch pan and evenly press the crust mixture into the bottom. Aim for an even layer, and don’t forget to press down firmly!
- Bake: Pop it into the oven for about 10-12 minutes, or until it’s set. Let it cool completely before adding the next layers. A little patience goes a long way here!
Step 2: Create the Cream Cheese Layer
- Cream the Cheese: In a medium bowl, beat the softened cream cheese until smooth. You can use a hand mixer or a whisk—whatever you have on hand!
- Add Sweetener and Vanilla: Gradually add in the sugar-free sweetener and vanilla extract, mixing until fully incorporated. The mixture should be smooth and creamy.
- Spread the Layer: Once the crust is cooled, spread the cream cheese mixture evenly over it. Don’t worry if it seems thick; just use a spatula to smooth it out!
Step 3: Make the Chocolate Layer
- Prepare the Pudding: Follow the instructions on your sugar-free pudding mix. Whisk with your milk of choice until it reaches the desired pudding-like consistency, which usually takes a few minutes.
- Spread Over Cream Cheese: Once the pudding is ready, pour it over the cream cheese layer, carefully spreading it to avoid disturbing the layer beneath.
- Chill: Cover the pan with plastic wrap and refrigerate for at least 4 hours (or overnight if you can wait!). This helps the layers to set beautifully!
Step 4: Serve Time!
- Top with Whipped Cream: Right before serving, generously dollop whipped cream on top. The lightness of the cream offsets the rich layers below, creating a perfect balance!
- Garnish (optional): Sprinkle a little cocoa powder or some shaved dark chocolate on top for an extra touch of elegance.
- Cut and Serve: Slice into squares (or rectangles if you’re feeling rebellious) and serve to your lucky guests. They won’t believe it’s sugar-free!
Serving Suggestions
To make your presentation even more special, serve Sugar-Free Sex In A Pan with fresh berries on the side or drizzle some unsweetened chocolate sauce for added flair. Consider garnishing with mint leaves for that extra touch — it’s all about making your dessert look as delightful as it tastes!
Recipe Variations
- Flavored Cream Cheese Layer: Add some lemon or orange zest into the cream cheese layer for a fresh twist!
- Nutty Crust: Mix in some chopped nuts like pecans or walnuts into the crust for an extra crunch.
- Boozy Chocolate: For the adults, add a splash of coffee liqueur to the chocolate pudding for an irresistibly rich flavor!
- Fruit Layer: Layer in some sliced strawberries or raspberries between the cream cheese and pudding layers for a fruity touch!
Chef’s Notes
One of my favorite things about this recipe is how easy it is to assemble and customize! Whenever I have friends over, this dessert is my go-to. I even remember one time I experimented with adding a hint of hazelnut flavor to the chocolate layer, and oh my goodness, it was a game changer!
Also, don’t be shy about inviting your friends into the kitchen to help. Cooking together not only makes the process more fun but also gives you the chance to create new memories, just like I did with my grandmother!
FAQs and Troubleshooting
Q1: My crust came out too crumbly. What went wrong?
Don’t lose hope! If your crust isn’t holding together, it might be due to too much dry ingredient or not enough binding from the butter. Add a splash of water or a bit more melted butter to help it come together in the future.
Q2: How do I know if the cream cheese layer is set enough?
It should feel firm to the touch and not jiggle when you lightly shake the pan! If you’re unsure, let it chill for a bit longer.
Q3: My pudding layer isn’t thickening. What can I do?
Ensure you’ve mixed it well with the proper amount of milk. If it’s still runny, you might want to refrigerate it for a little while longer until it sets.
Q4: Can I make this dessert dairy-free?
Absolutely! Substitute the cream cheese with a dairy-free or nut-based cream cheese and opt for plant-based milk for the pudding as well.
Nutritional Info
This delightful dessert is not only indulgent but also a guilt-free treat. Assuming a yield of 16 squares, here’s an approximate breakdown per square (without toppings):
- Calories: 160
- Protein: 4g
- Fat: 12g
- Carbohydrates: 8g
- Sugar: 2g (from sugar-free sweeteners)
Well, there you have it! A delectable, sugar-free dessert that’s sure to tantalize the taste buds and warm the heart. I hope you enjoy making and sharing this Sugar-Free Sex In A Pan as much as I have. Happy cooking, friends!
PrintSugar-Free Sex In A Pan
- Total Time: 240 minutes
- Yield: 16 servings 1x
- Diet: Sugar-Free
Description
A deliciously decadent dessert that features rich creamy layers and chocolatey goodness, all without the guilt of sugar.
Ingredients
- 1 ½ cups Almond Flour
- ¼ cup Unsweetened Cocoa Powder
- ½ teaspoon Salt
- ½ cup Sugar-Free Granulated Sweetener
- ½ cup Unsalted Butter, melted
- 8 oz Cream Cheese, softened
- 1 teaspoon Vanilla Extract
- ½ cup More Sugar-Free Granulated Sweetener
- 1 box Sugar-Free Chocolate Pudding Mix, prepared according to package instructions
- 2 cups Milk (or any dairy-free milk)
- Whipped Cream (for garnish)
Instructions
- Preheat your oven to 350°F (175°C).
- Mix the dry ingredients: Combine almond flour, cocoa powder, salt, and sweetener.
- Add the wet ingredients: Pour melted butter and mix until the dough holds together.
- Press the mixture into a greased 9×13 inch pan.
- Bake for 10-12 minutes, and let it cool completely.
- Cream the cream cheese until smooth.
- Add sweetener and vanilla, mixing until creamy.
- Spread the cream cheese layer over the cooled crust.
- Prepare the pudding according to the package instructions.
- Spread the pudding over the cream cheese layer.
- Chill in the fridge for at least 4 hours.
- Top with whipped cream before serving.
- Cut into squares and serve.
Notes
Feel free to customize with different flavors or toppings. This dessert is also fully dairy-free if you use the right substitutes!
- Prep Time: 15 minutes
- Cook Time: 12 minutes
- Category: Dessert
- Method: Baking
- Cuisine: American
Nutrition
- Serving Size: 1 serving
- Calories: 160
- Sugar: 2g
- Sodium: 200mg
- Fat: 12g
- Saturated Fat: 7g
- Unsaturated Fat: 5g
- Trans Fat: 0g
- Carbohydrates: 8g
- Fiber: 3g
- Protein: 4g
- Cholesterol: 40mg
Keywords: sugar-free dessert, layered dessert, creamy dessert, chocolate dessert, healthy dessert


