
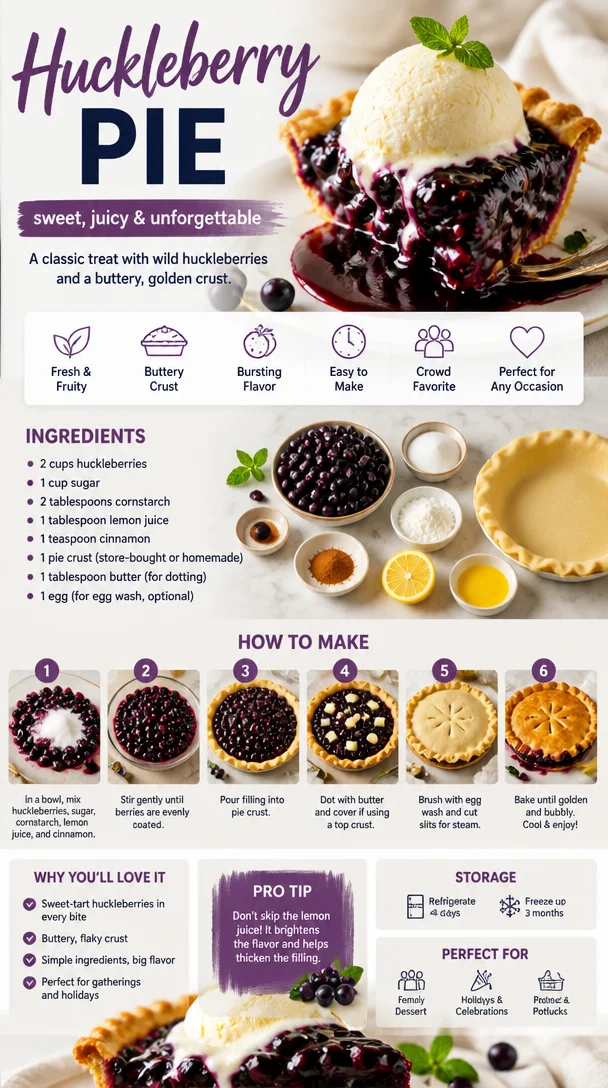
Huckleberry Pie
The Delights of Huckleberry Pie: A Slice of Nostalgia
Welcome back to my kitchen, friends! Today, we’re diving into one of my favorite desserts that brings a smile to my face every time I make it — huckleberry pie. Whether you’re a huckleberry aficionado or someone who has yet to be introduced to these tiny, tart beauties, this pie is bursting with flavor and love.
Imagine this: it’s a splendid summer day, and you’re surrounded by the lush greenery of the forest. You’ve got a basket in hand, and you’re on a quest to gather wild huckleberries. One by one, you pluck these plump little gems from their leafy homes, their sweet-tart aroma filling the air. The thrill of foraging them with loved ones, the laughter that floats through the trees, and the storytelling that follows those harvests make these moments truly special. And when we get back home? Well, it’s time to transform those huckleberries into a pie that’s sure to spark joy and nostalgia.
For me, making huckleberry pie is more than just a cooking process; it’s a tradition that connects me to the moments spent with my family. My grandmother had her special recipe, and every summer, she’d invite us into her cozy kitchen to help her with the filling. I remember standing on a stool to reach the countertop, rolling out dough with my tiny hands, laughing with my siblings, and occasionally sneaking a huckleberry or two! Those memories are ingrained in my heart and have become a cherished part of my culinary journey.
So, whether you’re dusting off grandma’s old recipe or trying your hand at making this delightful dessert for the first time, I promise that huckleberry pie is an experience that will create sweet memories. Let’s get started, so you can fill your home with that irresistible scent of baking pie!
Ingredients
To make this huckleberry pie, here’s what you’ll need:
- Fresh Huckleberries (4 cups): The star of our show! Fresh huckleberries are deep purple and burst with flavor. If you can’t find them, blueberries or blackberries can be fantastic substitutes. Just make sure to adjust the sugar level depending on the sweetness of the fruit.
- Granulated Sugar (1 cup): This balances the tartness of the huckleberries. For a healthier option, feel free to use coconut sugar or honey, but keep in mind that it might change the texture slightly.
- All-Purpose Flour (1/4 cup): This is a thickening agent that helps form a beautiful filling. If you need a gluten-free option, you can replace it with a gluten-free flour blend.
- Lemon Juice (2 tablespoons): This brightens the flavors and enhances the huckleberries’ natural tartness. You can also experiment with lime juice for a fun twist.
- Butter (2 tablespoons, unsalted): For richness, this ingredient brings a lovely flavor to the filling. You can quickly swap with coconut oil for a dairy-free version.
- Ground Cinnamon (1 teaspoon): A sprinkle of this adds warmth to the pie’s flavor. If you’re feeling adventurous, cardamom or nutmeg could be a delightful touch!
- Pie Crust (1 double-crust recipe): You can use either a homemade pie crust or store-bought, depending on your time situation. For a twist, try a graham cracker crust for a sweeter, crunchier base.
Step-by-Step Instructions
1. Preheat Your Oven
First things first, let’s set the vibe for your kitchen! Preheat your oven to 425°F (220°C). This will ensure your pie bakes beautifully with that perfect golden crust and bubbling filling.
2. Prepare the Pie Crust
If you’re making your own crust, roll it out to fit your 9-inch pie dish. Make sure to keep it thick enough for structure but thin enough to enjoy that buttery goodness. Don’t worry if it doesn’t look perfect; we’re going for homemade charm here! If you’re using a store-bought crust, just follow the instructions on the package. Once you have your bottom crust in place, trim the edges and set it aside.
3. Mix the Filling
In a large mixing bowl, combine your huckleberries, sugar, flour, lemon juice, butter, and cinnamon. Gently fold the ingredients together to avoid squishing those lovely berries. Take a moment to relish the vibrant colors and enchanting smell — it’s all about those little joys in the kitchen!
Chef Tip: Make sure your huckleberries are clean! Rinse them gently under cold water and pat them dry to avoid excess moisture in the filling.
4. Fill the Pie
Pour the huckleberry mixture into the prepared bottom crust, giving it a little shake to settle everything. It should look luscious and inviting! If you like, you can add some lattice work on top or simply cover it with another sheet of pie crust. If you choose to go with the latter, make sure to cut a few slits for steam to escape — we don’t want it to explode in the oven!
5. Bake Your Pie
Place the pie on a baking sheet (to catch any drips) and pop it in the oven. Bake for 15 minutes at 425°F, then reduce the temperature to 350°F (175°C) and continue baking for an additional 30-35 minutes. You want that crust to be a delightful golden brown, and the filling to be bubbling up through the openings.
Chef Hack: If you notice the crust browning too fast, you can gently cover the edges with aluminum foil to protect them from burning.
6. Cool and Serve
Once your huckleberry pie is beautifully baked, remove it from the oven and let it cool for at least 1-2 hours. This cooling time allows the filling to set perfectly. It’s tough to wait, but trust me, it’ll be worth it when you slice into it later!
Serving Suggestions
For that extra cozy touch, serve your huckleberry pie warm with a scoop of vanilla ice cream or a dollop of freshly whipped cream. You can even sprinkle a bit of cinnamon on top for a charming finish. If you’re feeling fancy, pair it with a pot of herbal tea or a cup of freshly brewed coffee — it’s a match made in culinary heaven!
Recipe Variations
Here are some creative twists you might like to try with this huckleberry pie:
- Huckleberry-Lemon Pie: Add a bit more lemon zest for a refreshing zing that elevates the flavor profile.
- Mixed Berry Pie: Combine huckleberries with blueberries, raspberries, or chopped strawberries for a delightful mixed berry experience.
- Nutty Crust: Use ground almonds or pecans in your pie crust for a nutty flavor that pairs perfectly with the huckleberries.
- Vegan Version: Substitute butter with vegan margarine and use a vegan pie crust; swap out sugar for your favorite vegan-friendly sweetener!
- Spiced Huckleberry Pie: Add a touch of ginger or cardamom to the filling for a warm and inviting flavor.
Chef’s Notes
As I’ve made this pie over the years, I’ve learned a few things along the way. One of my favorite moments was when I decided to throw in a hint of almond extract into the filling, and oh my goodness! The twist was simply delightful. Watching smiles spread across my family’s faces as they tasted my latest creation is what keeps me going in the kitchen. Every batch is an opportunity for a sweet surprise and a new memory in making!
FAQs and Troubleshooting
Q1: Why did my huckleberry pie become runny?
Sometimes, it’s all about moisture in the fruit. If your huckleberries were too juicy, adding an extra tablespoon of flour in the filling can help absorb that excess moisture.
Q2: How do I keep my crust from getting soggy?
Use a light brush of egg wash or melted butter on the bottom of your crust before adding the filling. This helps create a barrier and keeps it crisp.
Q3: Can I freeze huckleberry pie?
Absolutely! Just make sure it’s completely cooled, wrap it tightly in plastic wrap and then in foil. It should hold up nicely for about 2-3 months. To serve, bake directly from the freezer, just add a few extra minutes to the baking time.
Q4: Is there a way to make my huckleberry pie less sweet?
You can reduce the amount of sugar you use in the filling. I recommend gradually reducing it instead of cutting it out completely to maintain a balance of flavors.
Nutritional Info
Each slice of huckleberry pie (1/8 of the pie) typically contains around 200-250 calories, depending on your crust and ingredients. It’s packed with antioxidants from the huckleberries and can absolutely be part of a balanced diet!
Now that you have all the tips and tricks, it’s time for you to grab your apron and get to baking! I can’t wait to hear about your huckleberry pie adventures. Remember, cooking is about joy, share it, and create those beautiful moments. Happy baking!
Print
Huckleberry Pie
- Total Time: 1 hour 5 minutes
- Yield: 8 servings
- Diet: Vegetarian
Description
This delightful huckleberry pie is bursting with flavor and nostalgia, perfect for summer gatherings and creating sweet memories.
Ingredients
- Fresh Huckleberries (4 cups)
- Granulated Sugar (1 cup)
- All-Purpose Flour (1/4 cup)
- Lemon Juice (2 tablespoons)
- Butter (2 tablespoons, unsalted)
- Ground Cinnamon (1 teaspoon)
- Pie Crust (1 double-crust recipe)
Instructions
- Preheat your oven to 425°F (220°C).
- Prepare the pie crust by rolling it out to fit a 9-inch pie dish.
- Mix the huckleberries, sugar, flour, lemon juice, butter, and cinnamon in a large mixing bowl.
- Fill the prepared bottom crust with the huckleberry mixture.
- Bake the pie: Bake for 15 minutes at 425°F, then reduce the temperature to 350°F (175°C) for an additional 30-35 minutes.
- Cool the pie for at least 1-2 hours before serving.
Notes
For a twist, serve warm with ice cream or whipped cream. Can substitute huckleberries with blueberries or blackberries if necessary.
- Prep Time: 20 minutes
- Cook Time: 45 minutes
- Category: Dessert
- Method: Baking
- Cuisine: American
Nutrition
- Serving Size: 1 slice
- Calories: 225
- Sugar: 20g
- Sodium: 50mg
- Fat: 8g
- Saturated Fat: 5g
- Unsaturated Fat: 3g
- Trans Fat: 0g
- Carbohydrates: 36g
- Fiber: 3g
- Protein: 2g
- Cholesterol: 15mg
Keywords: huckleberry, pie, dessert, summer, berries
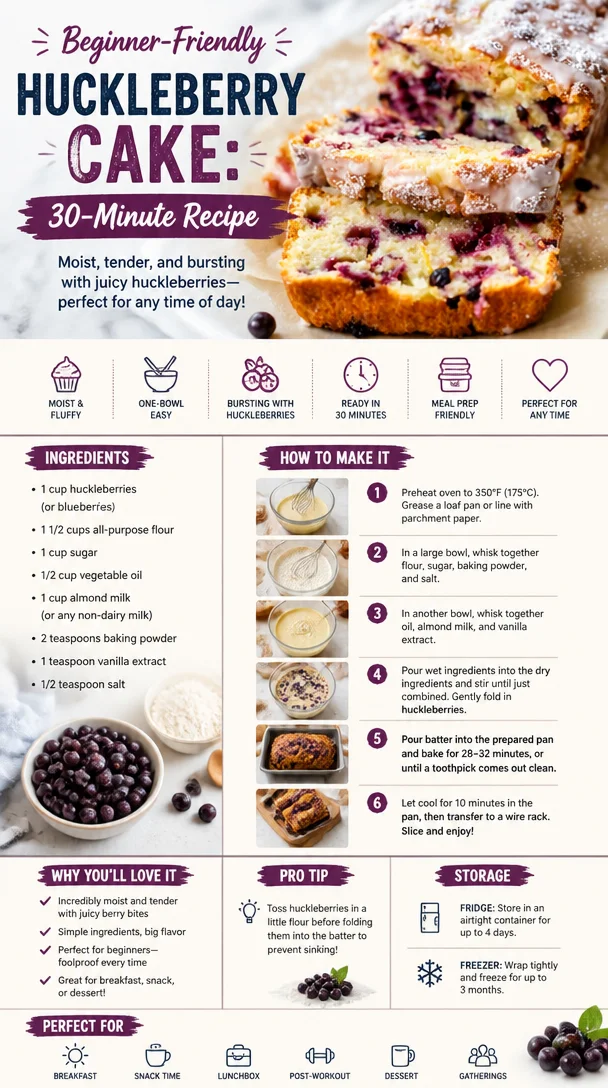
Beginner-Friendly Huckleberry Cake: 30-Minute Recipe
Welcome to Huckleberry Heaven: A Cozy Huckleberry Cake Recipe
Hello, foodie friends! It’s Olivia Bennett here, your go-to kitchen confidante and flavor enthusiast. Today, I’m thrilled to share a recipe that’s near and dear to my heart—the delightful Huckleberry Cake. This cake isn’t just a treat; it’s a flavor-packed journey through memories, nature’s bounty, and that special feeling of being at home. So, let’s roll up our sleeves, preheat that oven, and dive into this huckleberry-infused adventure!
A Slice of Nostalgia: My Huckleberry Memories
Growing up in the Pacific Northwest, my summers were often spent exploring lush forests and wandering along winding trails. The sweet, wild scent of huckleberries would beckon me closer, and I’d find myself in a berry-stained frenzy, plucking these little gems right off the bushes. My grandmother, an exceptional home cook, introduced me to huckleberries not just as delicious snacks, but as precious ingredients in her kitchen.
One summer afternoon, we decided to turn our freshly picked huckleberries into a cake that whispered sweet nothings of summer sunshine. The kitchen was alive with laughter, the chatter of memories, and the irresistible aroma of butter and sugar mingling in the air. That cake not only tasted heavenly but also solidified my love for creating comforting dishes that bring people together. Each bite was a reminder that food has the power to connect us to our roots, to our family, and to the wild, beautiful treasures of nature.
Ingredients: What You’ll Need
To create this huckleberry magic, you’ll need the following ingredients:
-
2 cups fresh huckleberries: The star of the show! If you can’t find fresh huckleberries, blueberries or blackberries are fantastic substitutes. Just know that huckleberries have a unique, sweet-tart flavor!
-
1 ½ cups all-purpose flour: The backbone of our cake. If you’re gluten-free, try using a 1:1 gluten-free flour blend; the texture will still be delightful.
-
1 cup granulated sugar: For sweetness! You can swap it out for coconut sugar or even maple syrup for a deeper flavor.
-
½ cup unsalted butter, softened: This gives our cake a rich, creamy texture. If you want to make it dairy-free, coconut oil or vegan butter does the trick!
-
2 large eggs: For binding and moisture. If you want to keep it egg-free, try using flax eggs (1 tablespoon ground flaxseed mixed with 2.5 tablespoons water = 1 egg).
-
1 tsp vanilla extract: This adds warmth and depth. Always opt for pure vanilla extract for the best flavor.
-
1 tsp baking powder: This helps the cake rise and gives it a light texture. Ensure your baking powder is fresh for the best results!
-
½ tsp baking soda: This is our secret weapon for a fluffy cake. It works beautifully alongside the baking powder.
-
½ tsp salt: Balances out the sweetness and enhances the flavors.
-
¾ cup milk: For richness. You can also use almond milk, oat milk, or any milk substitute you love!
Step-by-Step Instructions: Let’s Bake!
Now that we have our ingredients lined up, let’s jump into the step-by-step process to create this scrumptious huckleberry cake!
-
Preheat Your Oven: Preheat your oven to 350°F (175°C). This is important for ensuring even baking, so don’t skip this step!
-
Prepare Your Pan: Grease a 9-inch round cake pan with butter and dust it lightly with flour, or line it with parchment paper. This will help the cake come out easily once baked.
-
Mix the Dry Ingredients: In a medium bowl, whisk together the flour, baking powder, baking soda, and salt. This step ensures that everything is evenly distributed throughout the batter.
-
Cream the Butter and Sugar: In a large mixing bowl, beat the softened butter and granulated sugar until light and fluffy—about 3-4 minutes with a hand mixer. This process is key for incorporating air into your batter for a fluffy cake!
-
Add the Eggs and Vanilla: Beat in the eggs one at a time, mixing well after each addition. Then, add the vanilla extract and mix until combined.
-
Combine Dry and Wet Ingredients: Gradually add the dry ingredients into the butter mixture, alternating with the milk. Start and end with the flour mixture. This helps to create a well-balanced batter without overmixing!
-
Fold in the Huckleberries: Gently fold in the fresh huckleberries using a spatula. Be careful not to overmix here—this will help keep those little berries intact and brighten up every bite!
-
Pour and Smooth: Transfer the batter into your prepared cake pan. Use the spatula to smooth the top and create an even layer.
-
Bake It to Perfection: Pop your cake into the preheated oven and bake for 30-35 minutes, or until a toothpick inserted into the center comes out clean. Your kitchen will start to smell heavenly—this is the best part!
-
Cool Down: Once baked, remove the cake from the oven and let it cool in the pan for about 10 minutes. Then, turn it out onto a wire rack to cool completely. This prevents it from becoming soggy in the pan.
Serving Suggestions: Time to Delight!
Once your huckleberry cake is cool, you can serve it up simply or fancy it up. Dust a little powdered sugar on top, or drizzle with a simple lemon glaze made from powdered sugar and lemon juice for a zesty kick. Pair it with a dollop of whipped cream or a scoop of vanilla ice cream for an extra special touch. This cake is perfect for afternoon tea, a bright brunch spread, or as a sweet ending to any dinner!
Recipe Variations: Add Your Own Twist!
The beauty of this huckleberry cake lies in its versatility! Here are a few creative twists you might consider:
-
Lemon Zest: Add the zest of one lemon to the batter for a refreshing, citrusy flavor that complements the huckleberries beautifully.
-
Nutty Crunch: Toss in ½ cup of chopped walnuts or pecans for added texture and nuttiness.
-
Spiced Version: Add ½ tsp of ground cinnamon or nutmeg for a warm spice twist.
-
Swirl in Cream Cheese: Create a delicious cream cheese swirl by mixing 4 oz of softened cream cheese with ¼ cup of sugar and 1 egg, and then dolloping this into the batter before baking.
-
Fruit Fusion: Mix huckleberries with other berries like raspberries or strawberries for a mixed berry cake that celebrates all the summer flavors!
Chef’s Notes: A Little Love from My Kitchen
This huckleberry cake is more than just a recipe; it’s a love letter to summer days spent in the wild, and a reminder of the sweet moments spent in the kitchen with family. Over the years, I’ve experimented with this cake and have fallen in love with its adaptability. Every time I make it, I’m reminded of my grandmother’s laughter and the sunny afternoons we shared.
One of my funniest kitchen stories involves a huckleberry-staining incident. Let’s just say that berry juice can be quite the culprit! I once had huckleberry handprints all over the kitchen—even the ceiling! It’s these little mishaps that make cooking such a joy and creates lasting memories. So, embrace the mess; it means you’re cooking with love!
FAQs and Troubleshooting: Let’s Clear Things Up!
1. Why did my cake sink in the middle?
A sinking cake usually indicates that it didn’t bake long enough or was too wet. Make sure your oven is at the correct temperature, bake it until a toothpick comes out clean, and avoid opening the oven door too early!
2. How do I store leftovers?
Keep any leftover cake in an airtight container at room temperature for up to 3 days. If you wish to store it longer, you can freeze it! Just wrap it tightly in plastic wrap and then foil. It will stay fresh for about 2-3 months.
3. Can I use frozen huckleberries?
Absolutely! Just make sure not to thaw them before mixing them into the batter. This helps prevent too much purple bleeding and keeps your cake looking delightful.
4. What if I want to make a layered cake?
To make a layered huckleberry cake, simply double the recipe and bake in two 9-inch pans. Once cooled, you can layer them and add your favorite frosting or whipped cream between the layers for a showstopper dessert!
Nutritional Info (Optional)
For those who like to keep an eye on their dietary needs, here’s a quick glance at the nutritional breakdown for one slice of huckleberry cake, based on standard serving (assuming approximately 12 slices):
- Calories: 220
- Protein: 3g
- Fat: 8g
- Carbohydrates: 36g
- Fiber: 1g
- Sugar: 10g
This little treat is certainly indulgent, but it’s made with love and nature’s treasures—so enjoy every delicious bite!
Thank you for joining me on this huckleberry cake journey! I hope you find joy, warmth, and a splash of grandmother’s love in every bite. Happy baking, and as always, remember that the best ingredient in any recipe is a pinch of passion and a sprinkle of joy!
Print
Huckleberry Cake
- Total Time: 50 minutes
- Yield: 12 servings 1x
- Diet: Vegetarian
Description
A delightful huckleberry cake that captures the essence of summer with its sweet-tart flavor and nostalgic memories.
Ingredients
- 2 cups fresh huckleberries
- 1 ½ cups all-purpose flour
- 1 cup granulated sugar
- ½ cup unsalted butter, softened
- 2 large eggs
- 1 tsp vanilla extract
- 1 tsp baking powder
- ½ tsp baking soda
- ½ tsp salt
- ¾ cup milk
Instructions
- Preheat your oven to 350°F (175°C).
- Prepare a 9-inch round cake pan with butter and flour or parchment paper.
- Mix the dry ingredients in a medium bowl.
- Cream the butter and sugar until light and fluffy.
- Add the eggs one at a time and then mix in the vanilla.
- Combine dry and wet ingredients, alternating with milk.
- Fold in the huckleberries gently.
- Pour the batter into the prepared cake pan.
- Bake for 30-35 minutes until a toothpick comes out clean.
- Cool the cake for 10 minutes, then turn out to cool completely.
Notes
Dust with powdered sugar or drizzle with lemon glaze. Enjoy with whipped cream or vanilla ice cream.
- Prep Time: 15 minutes
- Cook Time: 35 minutes
- Category: Dessert
- Method: Baking
- Cuisine: American
Nutrition
- Serving Size: 1 slice
- Calories: 220
- Sugar: 10g
- Sodium: 200mg
- Fat: 8g
- Saturated Fat: 5g
- Unsaturated Fat: 3g
- Trans Fat: 0g
- Carbohydrates: 36g
- Fiber: 1g
- Protein: 3g
- Cholesterol: 60mg
Keywords: huckleberry cake, dessert, summer recipe, baking
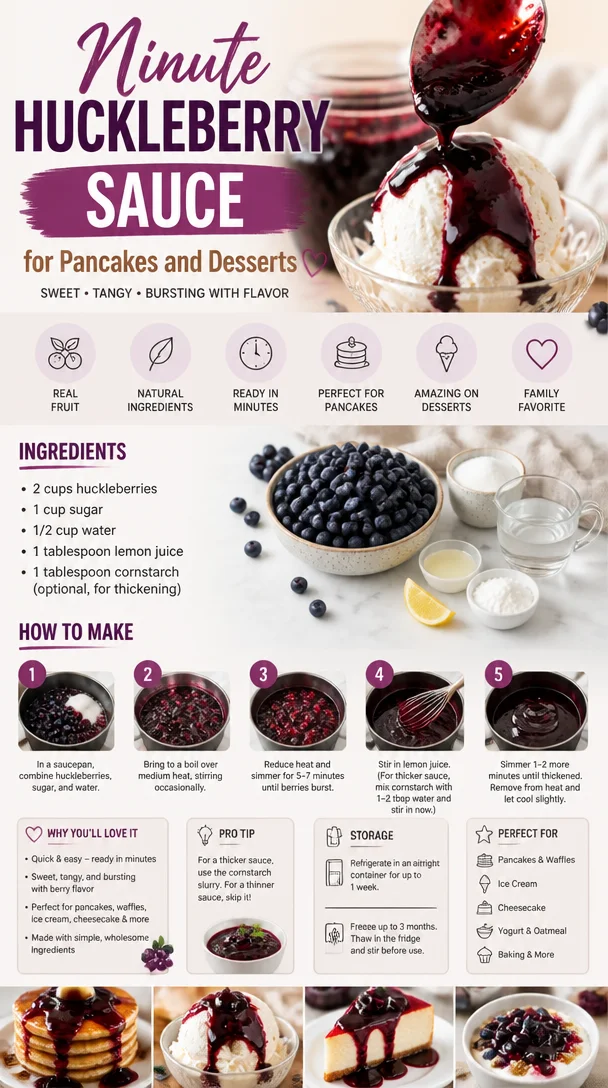
Minute Huckleberry Sauce for Pancakes and Desserts
Easy Homemade Huckleberry Sauce: A Sweet Serenade for Your Taste Buds
Welcome to my kitchen, dear friends! Today, we’re diving into the enchanting world of huckleberries with a simple yet delightful recipe for homemade huckleberry sauce. Oh, the joy of making this sauce! It encapsulates everything I love about cooking: nostalgia, creativity, and, above all, irresistible flavor. Whether drizzled over fluffy pancakes, slathered on a warm slice of bread, or elegantly paired with a dollop of whipped cream on dessert, this sauce opens the door to a host of delicious possibilities.
Imagine it’s a lazy Sunday morning. The sun peeks in through the kitchen window, casting a golden glow onto your countertop. The aroma of freshly brewed coffee wafts through the air, and there’s an undeniable urge to create something special. That’s where this huckleberry sauce comes into play! It’s incredibly easy to make, and it brings an air of sophistication to your brunch table without breaking a sweat.
You might wonder what makes huckleberries so special. These little gems are not only delicious but also showcase a fantastic balance of sweet and tart flavors. If you’re lucky enough to live in a region where huckleberries grow wild — or if you’ve secretly stashed some in your freezer from a summer harvest — you’re in for a treat! Let this sauce whisk you away to blissful memories of berry-picking adventures or those delightful moments spent working alongside loved ones in the kitchen.
By the end of this post, I promise you’ll feel confident and excited to whip up this luscious huckleberry sauce, no matter the occasion. So grab your apron, and let’s get started!
A Walk Down Memory Lane: An Ode to Huckleberries
I’ll never forget my first experience with huckleberries. It was a rainy summer afternoon in my grandmother’s kitchen, where the scent of something sweet was constantly floating through the air. As a child, I loved nothing more than helping her out. We’d wait for the rain to let up, and as soon as we could, we’d toss on our rain jackets and head out to the nearby woods, where we knew of a secret spot filled with wild huckleberries.
With baskets in hand, we’d spend hours searching for those tiny, purple-blue orbs, all the while chatting and laughing. The thrill of finding the perfect berries was always exhilarating! When we returned home, we transformed our huckleberry bounty into a sweet sauce that would adorn everything from pancakes to ice cream. Each spoonful was a reminder of those magical summers spent with my grandmother, and today, I carry that love and memory into my kitchen as I share this recipe with you.
Ingredients: The Key Players in Our Huckleberry Sauce
Here’s what you’ll need to create this vibrant sauce:
-
2 cups fresh or frozen huckleberries
Huckleberries can be a bit elusive, but they’re worth seeking out! If you can’t find them, fresh blueberries make an excellent substitute. Just keep in mind that the flavor profile will slightly change. -
1 cup sugar
This sugar helps balance the tartness of the huckleberries. You can use fewer or opt for a sugar substitute if you’re watching your sugar intake — just keep an eye on the sweetness level. -
1 tablespoon lemon juice
A splash of lemon juice brightens the flavor and enhances the fruitiness. If you’re out of fresh lemons, feel free to use bottled lemon juice. -
1 tablespoon cornstarch
Cornstarch thickens the sauce for that luxurious, syrupy texture. If you’re looking for a gluten-free option, this one’s perfect! You can also swap it out for arrowroot powder if you prefer. -
1/2 cup water
This is just enough to help the huckleberries cook down and release their natural juices. If you’d like a more intense flavor, consider using fruit juice, like apple or even cranberry juice.
Step-by-Step Instructions: Creating Huckleberry Heaven
Now, let’s roll up our sleeves and get cooking! Follow these simple steps for a luscious homemade huckleberry sauce:
-
Prepare Your Ingredients:
Start by rinsing your huckleberries if they’re fresh. Make sure to sort through them, discarding any that are mushy or spoiled. If you’re using frozen huckleberries, there’s no need to thaw them — they work beautifully straight from the freezer! -
Combine Ingredients:
In a medium saucepan, combine the huckleberries, sugar, lemon juice, cornstarch, and water. Gently stir everything together. A little tip: If you want a smoother sauce, you can mash some of the berries slightly with a fork or potato masher at this stage, as it helps to release their juices. -
Cook and Simmer:
Place the saucepan on medium heat and cook while stirring gently. As the mixture heats up, the sugar will dissolve, and the huckleberries will begin to burst and release their natural juices. This might take about 5-7 minutes. Keep an eye on it, and don’t forget to stir occasionally — it prevents sticking and ensures an even cooking process. -
Thicken the Sauce:
Once the mixture starts to bubble beautifully, reduce the heat to low and let it simmer for another 5 minutes. This will allow the sauce to thicken. If you prefer a thicker sauce, feel free to simmer it a bit longer while stirring. Here’s a chef hack: If you find it’s not thickening to your liking, sprinkle in a bit more cornstarch mixed with a couple of teaspoons of water to avoid clumping. -
Cool and Store:
Once your sauce has reached the desired thickness, remove it from the heat and let it cool for a few minutes. Transfer it to a glass jar or an airtight container once cooled. Your huckleberry sauce can store in the fridge for about two weeks, so you can enjoy it throughout the week!
Serving Suggestions: The Final Touch
Now for the fun part — serving the huckleberry sauce! Here are some delightful ways to elevate your dish:
- Pancakes or Waffles: Drizzle the sauce generously over a stack of fluffy pancakes or crispy waffles for a breakfast that feels indulgent.
- Ice Cream: Swirl the huckleberry sauce over a scoop of vanilla or caramel ice cream for a refreshing dessert.
- Cheesecake: Pour it over a slice of creamy cheesecake before serving for an elegant touch.
- Yogurt Parfaits: Layer huckleberry sauce between yogurt and granola in a glass for a delightful brunch treat.
Recipe Variations: Get Creative!
Feeling adventurous? Here are a few fun variations for your huckleberry sauce:
- Spiced Huckleberry Sauce: Add a pinch of cinnamon or nutmeg for a warm, cozy twist.
- Lemon-Huckleberry Sauce: Replace the lemon juice with lime juice for a zesty kick.
- Herbed Huckleberry Sauce: Toss in some finely chopped fresh mint or rosemary for a fresh herbal note.
- Maple-Cinnamon Huckleberry Sauce: Substitute half the sugar with maple syrup for a unique depth of flavor.
Chef’s Notes: A Dash of Inspiration
This huckleberry sauce has become one of my kitchen staples over the years, thanks to its versatility. I’ve used it in everything from breakfast to dessert, and each time, I’m amazed at how it transforms a dish. If you enjoy experimenting, don’t hesitate to add your own unique flair to the recipe! And remember, cooking is all about enjoying the process and making it your own.
I also love to reminisce about the first time I tried making this sauce on my own after countless afternoons spent with my grandmother. I’ll admit, I spilled the sugar all over the counter, and it felt like my huckleberry adventure was off to a rocky start! But that little mishap made everything taste even better, both from the laughter shared and the delicious outcome.
FAQs and Troubleshooting: Your Kitchen Companion
1. Why did my huckleberry sauce turn out too thin?
If your huckleberry sauce is too thin, it might need to cook a bit longer to allow more water to evaporate and thicken up. Alternatively, you can mix a bit more cornstarch with water and stir it in during the simmering phase.
2. Can I use other berries instead?
Absolutely! This recipe works wonderfully with blueberries, raspberries, or even blackberries. Just adjust the sugar level according to the sweetness of the berries you choose.
3. How long can I store the sauce in the fridge?
Your homemade huckleberry sauce will stay fresh for about two weeks in an airtight container in the refrigerator.
4. Can I can this sauce for later use?
Yes, you can! Just ensure that you follow proper canning procedures for fruit preserves to extend its shelf life.
Now you’ve got everything you need to make this easy and delicious homemade huckleberry sauce! With its balancing sweetness, tartness, and vibrant color, it’s a dish that will surely impress your family and friends. So roll up your sleeves, unleash your inner chef, and enjoy crafting a nostalgic moment right in your kitchen. Happy Cooking!
Print
Easy Homemade Huckleberry Sauce
- Total Time: 25 minutes
- Yield: 2 cups 1x
- Diet: Vegetarian
Description
A simple and delightful recipe for homemade huckleberry sauce, perfect for pancakes, desserts, and more.
Ingredients
- 2 cups fresh or frozen huckleberries
- 1 cup sugar
- 1 tablespoon lemon juice
- 1 tablespoon cornstarch
- 1/2 cup water
Instructions
- Prepare your ingredients: Rinse fresh huckleberries and discard any mushy ones.
- Combine ingredients: In a medium saucepan, stir together huckleberries, sugar, lemon juice, cornstarch, and water.
- Cook and simmer: Heat on medium and stir until sugar dissolves and berries burst, about 5-7 minutes.
- Thicken the sauce: Reduce heat to low, simmer for 5 minutes until thickened.
- Cool and store: Let the sauce cool before transferring it to an airtight container.
Notes
This sauce can be enjoyed for up to two weeks in the refrigerator.
- Prep Time: 10 minutes
- Cook Time: 15 minutes
- Category: Sauce
- Method: Cooking
- Cuisine: American
Nutrition
- Serving Size: 2 tablespoons
- Calories: 100
- Sugar: 21g
- Sodium: 2mg
- Fat: 0g
- Saturated Fat: 0g
- Unsaturated Fat: 0g
- Trans Fat: 0g
- Carbohydrates: 25g
- Fiber: 3g
- Protein: 0g
- Cholesterol: 0mg
Keywords: huckleberry sauce, homemade sauce, dessert topping, berry sauce
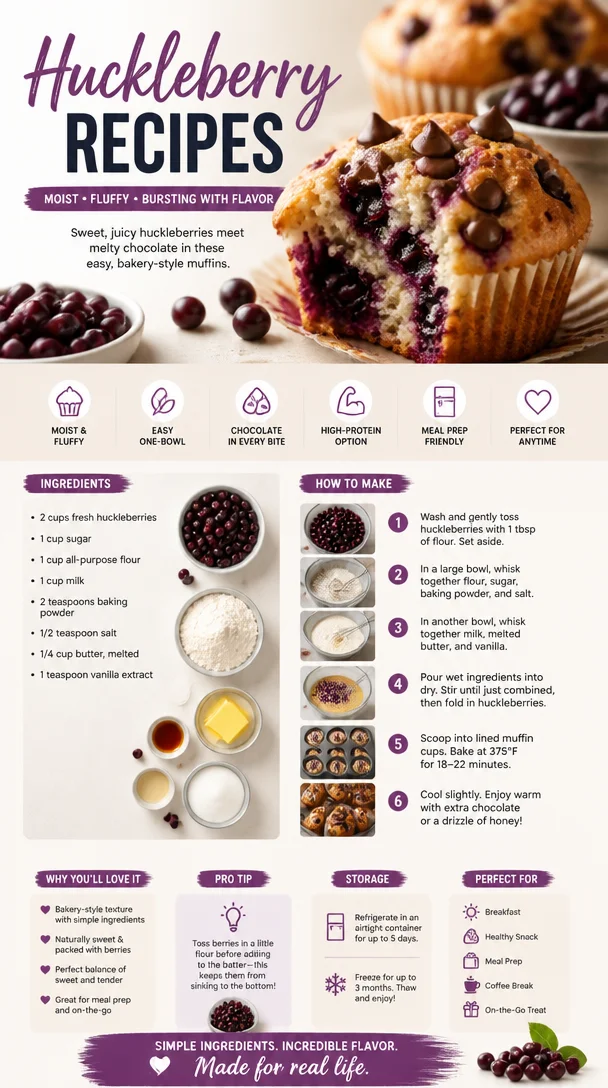
Huckleberry Recipes
Discover the Joy of Cooking with Huckleberries: An Enthusiastic Guide to Flavorful Recipes
Welcome to my cozy little kitchen, dear friends! Today, I’m buzzing with excitement to share one of my all-time favorite ingredients that bursts with flavor and nostalgia: huckleberries! Yes, those tiny, vibrant berries that remind us of summer days spent outdoors, searching for treasures in the wild. If you are a fan of sweet and tart flavors, you’re in for a treat as we dive into the world of huckleberries and whip up some delightful recipes together.
Huckleberries have always had a special place in my heart. It’s not just their wild, adventurous spirit or their brilliant hues; it’s the memories they evoke. Imagine wandering through the woods, the sun filtering through the leaves, and discovering a hidden patch of lush berries, just waiting to be picked. Each bite of a huckleberry is like a tiny explosion of summer—sweet, a bit tart, and full of life. My trusty old huckleberry picking basket is filled with stories of laughter, shared snacks, and a few too many bug bites, but those stories are part of the magic.
In this post, I’ll share my cherished huckleberry recipe that has brought friends and family together at my table time and again. I truly believe in the power of cooking to create bonds and spark joy, so let’s get our aprons on and embark on this delicious journey! Ready? Let’s dive in!
A Taste of Nostalgia: The Huckleberry Magic
Back when I was a little girl, summer meant one thing: huckleberry season! My family would pack a picnic basket with sandwiches, juice boxes, and the promise of sweetness that awaited us in the woods. We’d drive out to our favorite spot and spend hours searching for those elusive berries. My dad was convinced he had an innate talent for finding them, while my mom would point out the more subtle patches as we laughed and picked to our hearts’ content.
One summer, after a long day of picking, we returned home with buckets brimming with our fruity treasures. That evening, my mother transformed our haul into the most incredible huckleberry pie. The kitchen was filled with the sweet aroma of baking crust and bubbling berries, and I can still hear the laughter and chatter while we anxiously awaited the first slice. That pie sparked my love for cooking and the joyous act of sharing a meal with loved ones—a tradition that I carry into my kitchen today.
With this vivid memory in mind, I can’t wait to show you how to create your own huckleberry masterpiece! Whether you grew up foraging for berries or you’re just discovering their goodness, I promise you’ll find joy in every step.
Ingredients: The Heart of the Recipe
To make this scrumptious huckleberry pie, let’s gather everything we need. Here’s what you’ll need to create this delightful dish:
- 2 cups fresh huckleberries: The star of our show! Look for plump, juicy berries. If you can’t find huckleberries, blueberries or even mixed berries could work in a pinch, but they each have their own distinct flavor.
- 1 cup granulated sugar: This sweetener will help balance the tartness of the huckleberries. If you’re watching your sugar intake, consider using coconut sugar or a sugar substitute like Stevia.
- 2 tablespoons cornstarch: This thickener helps give our filling the right texture. You could swap with arrowroot powder for a gluten-free option.
- 1 tablespoon lemon juice: A splash of acidity brightens the flavors beautifully. If you’re out of lemons, lime juice is a great alternative!
- 1 teaspoon vanilla extract: For a touch of warmth and depth, enhancing the fruity flavor. Feel free to use almond extract for a different flavor profile.
- 1 tablespoon butter: My secret touch to enrich the filling. If you prefer, you can try a dairy-free margarine or skip it entirely, although it does add a lovely richness.
- 1 prepared pie crust (store-bought or homemade): If time allows, I encourage you to try making your own crust! It’s really a labor of love, but store-bought is perfectly fine for those busy days.
These ingredients come together to create a beautiful pie that not only tastes amazing but also fills your home with the sweetest aroma. Let’s get a little messy and bring this recipe to life!
Step-by-Step Instructions: Let’s Get Cooking!
Alright, it’s time to roll up our sleeves and get cooking! Here’s how to whip up a mouthwatering huckleberry pie:
-
Preheat your oven to 425°F (220°C): This step prepares our kitchen for the magic to come! A hot oven is essential for a perfectly flaky pie crust.
-
Prepare your pie crust: If you’re making a homemade crust, roll it out on a floured surface until it’s about 1/8 inch thick. Gently place it in your pie pan, trimming any excess around the edges. If you’re using a store-bought crust, make sure it’s thawed.
-
Wash the huckleberries: Rinse your huckleberries gently under cool water, being careful not to bruise them. Pat them dry with a clean towel or paper towel.
-
Mix the filling: In a large mixing bowl, combine the huckleberries, sugar, cornstarch, lemon juice, and vanilla extract. Gently fold everything together until the berries are fully coated. This is where the magic starts!
-
Fill the pie crust: Pour the huckleberry mixture into the prepared crust, spreading it evenly. Dot the top with small pieces of butter (it will melt and create a lovely filling).
-
Cover with a second crust (optional): If you’re feeling fancy, roll out a second pie crust to cover the top! Cut slits for steam to escape or use a lattice technique for a beautiful finish.
-
Bake the pie: Place your pie in the preheated oven and let it bake for 15 minutes. Lower the temperature to 350°F (175°C) and bake for an additional 30-40 minutes, until the filling is bubbly and the crust is golden brown.
-
Cool and serve: Once done, take the pie out of the oven and let it cool for at least 2 hours. This waiting period allows the filling to set and keeps you from burning your tongue—trust me on this one!
Chef’s Tips:
- Avoid bubbling over: To prevent any spills in your oven, place a baking sheet underneath your pie while it bakes.
- Don’t rush the cooling: I know it’s tempting, but cooling is critical. Warm huckleberry pie is delicious, but cooling ensures it holds its shape when you slice into it.
- Pair with ice cream: When serving, a scoop of vanilla ice cream or whipped cream on top takes this pie to the next level!
Serving Suggestions: Bring It to the Table
Once your huckleberry pie has cooled and is ready to serve, you’ll want to present it beautifully! Here’s how you can make it visually appealing:
- Serve it on a rustic wooden board alongside a fresh sprig of mint for that pop of color.
- Cut into generous slices and serve with a scoop of vanilla ice cream or a dollop of whipped cream on top—let it melt slightly for that perfect balance.
- Add a few fresh huckleberries on the side for a garnish. Not only do they look great, but they’re also a tasty addition!
Whatever your styly, this pie is sure to be the star of your dessert table.
Recipe Variations: Put Your Spin on It
While this huckleberry pie is a classic, there’s always room for creativity! Here are some variations to try:
- Mixed Berry Delight: Combine huckleberries with blueberries, raspberries, or blackberries for a beautiful mixed berry pie that’s bursting with flavor.
- Coconut Crust: Switch things up by using a shredded coconut crust for a tropical twist.
- Spiced Up Filling: Add a dash of cinnamon or nutmeg to the filling for a warm, spiced flavor that complements the huckleberries perfectly.
- Vegan Option: Use coconut oil in place of butter and a dairy-free crust to make this pie completely plant-based.
- Huckleberry Crumble: Can’t go without that crispy topping? Instead of a pie, make a crumble by topping the huckleberries with a mixture of oats, brown sugar, and butter, and baking until golden.
Chef’s Notes: More than Just a Recipe
I could regale you with stories for hours about my huckleberry adventures, from spot-hopping secret picking locations to the epic contest of whose pie was the best (spoiler: mine!). My huckleberry pie recipe has evolved over the years, shaped by family traditions, experimentation, and, let’s be honest, a few delightful kitchen disasters.
I learned early on: it’s okay if things don’t go perfectly. The best recipes come from fun mishaps and little surprises, and these moments are what add flavor to our cooking adventures. Every time I make this pie, it serves as a reminder to cherish both the journey and the delicious end result.
FAQs and Troubleshooting: Your Huckleberry Helper
As you step into the world of huckleberry baking, you might have a few questions. Here are some common ones:
-
What if I can’t find huckleberries?
Not to worry! Blueberries make a fantastic substitute. You might need to adjust the sugar level, as they are typically sweeter. -
How can I tell when the pie is done?
Look for a bubbly filling and a golden-brown crust. If you use a top crust, the slits should be slightly puffed. -
Can I make it ahead of time?
Absolutely! You can prepare the pie and refrigerate it before baking, or bake it in advance and store it in the fridge. Just reheat in the oven before serving. -
What if my filling is too runny?
This can happen if the huckleberries are particularly juicy. Next time, you can try adding a bit more cornstarch to help thicken it.
Nutritional Info
(If you are tracking your macros, here’s a quick breakdown based on one slice of huckleberry pie, assuming 8 servings total):
- Calories: 270
- Total Fat: 12g
- Saturated Fat: 5g
- Carbohydrates: 40g
- Fiber: 2g
- Sugar: 18g
- Protein: 2g
Keep in mind that these numbers can vary depending on your specific ingredients, especially if you use substitutes!
Thank you for joining me on this huckleberry adventure! I hope you’re inspired to try your hand at creating something delicious and to share it with the people you love. Happy cooking, and may your kitchen always be filled with laughter!
Print
Huckleberry Pie
- Total Time: 70 minutes
- Yield: 8 servings 1x
- Diet: Vegetarian
Description
A delightful huckleberry pie recipe that brings sweet and tart flavors together, evoking nostalgia and joy.
Ingredients
- 2 cups fresh huckleberries
- 1 cup granulated sugar
- 2 tablespoons cornstarch
- 1 tablespoon lemon juice
- 1 teaspoon vanilla extract
- 1 tablespoon butter
- 1 prepared pie crust
Instructions
- Preheat your oven to 425°F (220°C).
- Prepare your pie crust by rolling it out and placing it in your pie pan.
- Wash the huckleberries gently under cool water.
- Mix the filling by combining huckleberries, sugar, cornstarch, lemon juice, and vanilla extract.
- Fill the pie crust with the huckleberry mixture.
- Cover with a second crust if desired.
- Bake the pie for 15 minutes, then lower the temperature and bake for an additional 30-40 minutes.
- Cool the pie for at least 2 hours before serving.
Notes
For a delicious twist, serve with vanilla ice cream or whipped cream.
- Prep Time: 20 minutes
- Cook Time: 50 minutes
- Category: Dessert
- Method: Baking
- Cuisine: American
Nutrition
- Serving Size: 1 slice
- Calories: 270
- Sugar: 18g
- Sodium: 200mg
- Fat: 12g
- Saturated Fat: 5g
- Unsaturated Fat: 4g
- Trans Fat: 0g
- Carbohydrates: 40g
- Fiber: 2g
- Protein: 2g
- Cholesterol: 30mg
Keywords: huckleberry pie, dessert, summer recipe, nostalgic recipes, baking, fruit pie
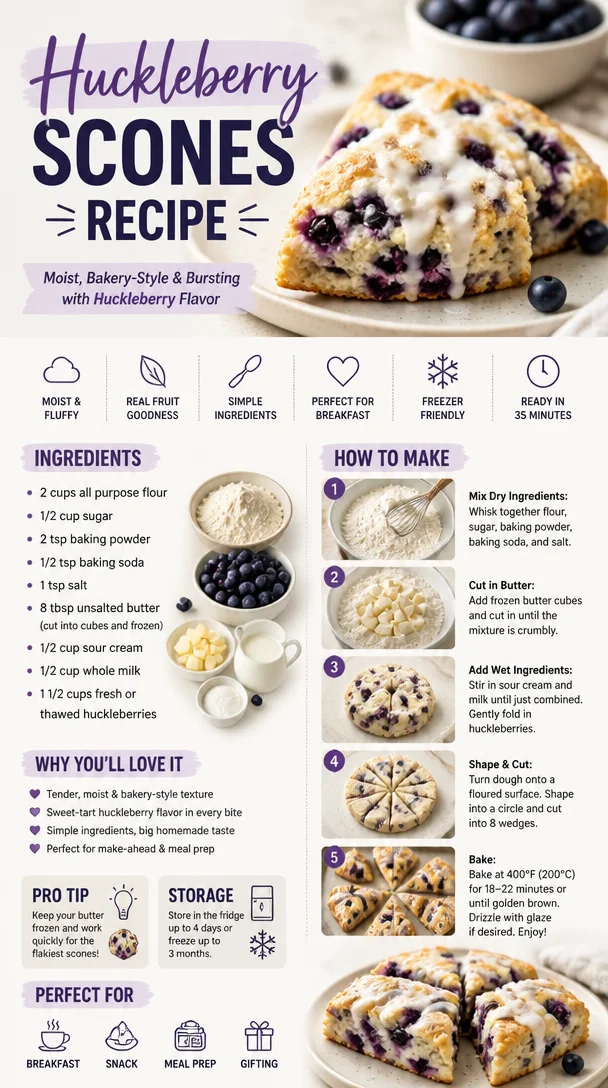
Huckleberry Scones Recipe
The Ultimate Huckleberry Scones Recipe: Cozy Mornings in Your Kitchen
Welcome to my kitchen, fellow food lovers! Today, we’re diving into the delightful world of huckleberry scones. There’s something incredibly special about the smell of baked goods wafting through your home, especially when those goodies come together so effortlessly. As someone who believes in the power of homemade treats, these scones have a way of bringing a sprinkle of magic to your breakfast table or afternoon tea.
Picture this: you wake up on a lazy weekend morning, the sun peeking through your kitchen window. You can hear the birds chirping outside, and the aroma of freshly brewed coffee fills the air. What better way to complement that cup of joe than with warm, flaky huckleberry scones? Not only are they incredibly easy to whip up, but they also capture the essence of cozy gatherings, offering a bit of delicious nostalgia with every bite.
Huckleberries have an enchanting sweetness and tartness that dances on your palate. If you haven’t had the pleasure of tasting these little gems, now’s your chance! When my dear friend Mia first introduced me to these delightful berries during a hiking trip in the Pacific Northwest, I was smitten. We’d picked them right off the bush, laughing as we tried to fill our baskets, and then we headed back to her cozy cabin where I had the joy of baking my first batch of huckleberry scones. The combination of fresh berries, rich butter, and the fragrant scent of vanilla filled the air, and I decided right then that scones would hold a special place in my heart (and my kitchen). Today, I’ll share that very recipe with you!
In this blog post, you will learn not only how to make these scrumptious scones but also some little tips and tricks, variations to tickle your tastebuds, and stories that make the kitchen a second home. So, grab your apron, preheat that oven, and let’s get into the magic of huckleberry scones!
Personal Story: A Huckleberry Adventure
I can still recall the thrill of our huckleberry-picking adventure like it was yesterday. It was the height of summer, and Mia and I had no idea the treasure we were about to uncover. With our backpacks filled with water, snacks, and ample enthusiasm, we set out on a hiking trail known for its vibrant wildflowers and luscious huckleberry bushes. We laughed at our amateur navigating skills and our constant chatter about what we’d make with the huckleberries we so hoped to find.
After a few hours filled with stunning views and laughter, we found ourselves surrounded by bushes bursting with plump, juicy huckleberries. With every handful we picked, we couldn’t contain our joy! Once we returned to Mia’s cabin, we set about creating something memorable. That’s how a spontaneous session in the kitchen turned into an afternoon of baking and bonding. The first bite of those warm scones, fresh from the oven, was a blissful moment. It sparked something in me—the realization that simple ingredients can create cherished memories. I knew I had to share this recipe, and now, I’m thrilled to pass that joy on to you!
Ingredients
Let’s gather our ingredients for these delightful huckleberry scones! Here’s what you’ll need:
-
2 cups all-purpose flour
A must-have for structure; if gluten-free is your style, use a gluten-free all-purpose blend! It will work beautifully! -
1/4 cup granulated sugar
For a hint of sweetness; consider using coconut sugar for a deeper flavor or a sugar substitute if you’re watching your intake. -
1 tablespoon baking powder
This ingredient is key for that rise. Be sure it’s fresh for the best results! -
1/2 teaspoon salt
A pinch of salt enhances all the flavors. You can sub with sea salt for a gourmet touch! -
1/2 cup unsalted butter, cold and cubed
Butter brings that rich flavor and flaky texture. Cold is the secret for delicious scones! If you’re dairy-free, coconut oil or vegan butter can work as a substitute. -
1/2 cup heavy cream
Add richness; half-and-half can be a great substitute if you’re in a pinch! -
1 large egg
The binding agent; if you need a vegan option, a flax egg works wonders! Just mix 1 tablespoon of ground flaxseed with 2.5 tablespoons of water and let it sit for a few minutes. -
1 teaspoon vanilla extract
This adds a beautiful aroma and depth. Swap with almond extract if you want a twist! -
1 cup fresh or frozen huckleberries
The star ingredient! Fresh is best, but frozen works well too; just toss them in flour to avoid clumping.
Step-by-Step Instructions
Now to the fun part! Here’s how to whip up these huckleberry scones like a pro:
-
Preheat the oven to 425°F (220°C). This will ensure your scones bake quickly and evenly!
-
Mix dry ingredients. In a large bowl, whisk together the flour, sugar, baking powder, and salt until well combined. This step is crucial as it evenly distributes the leavening agents throughout the flour, which will help your scones rise beautifully.
-
Cut in the butter. Using a pastry cutter or your fingers, mix in the cold, cubed butter until the mixture resembles coarse crumbs. This process creates those coveted flaky layers, so don’t rush it!
-
Combine wet ingredients. In a separate bowl, whisk together the heavy cream, egg, and vanilla extract. Don’t skip the whisking—this adds air to the mixture!
-
Mix it all together. Pour the wet ingredients into the dry ingredients, and gently stir using a spatula or wooden spoon until just combined. DO NOT overmix! It’s okay if there are a few lumps; that’s what keeps our scones tender.
-
Fold in the huckleberries. Gently fold in your huckleberries, being careful not to crush them. The goal is to have those little gems spread evenly without turning the dough purple. Think of it as a dance; you want them to waltz into the mixture, not slam!
-
Shape the dough. Turn the dough onto a floured surface and knead it gently just a couple of times until it holds together. Pat it into a circle about 1 inch thick. Using a sharp knife, cut into 8 wedges (like a pizza!), or use a biscuit cutter for round shapes.
-
Prepare for baking. Place the scones on a lined baking sheet, about 2 inches apart. If you’d like, brush the tops with a bit of heavy cream for a golden crust, then sprinkle some sugar on top for that extra sweetness.
-
Bake. Pop those beauties in the oven for about 15-20 minutes, or until they’re golden brown and a toothpick comes out clean. The aroma will drive you wild!
-
Cool and enjoy! Let the scones cool on a wire rack for a few minutes before diving in. Serve them warm with a drizzle of honey or a slather of butter (or both if you’re feeling adventurous!).
Serving Suggestions
For a cozy breakfast or afternoon tea, plate your warm huckleberry scones on a lovely cake stand or a rustic wooden board. Pair them with a dollop of whipped cream, a side of fresh jam, or even a scoop of clotted cream—heavenly! I love to serve them alongside a hot cup of Earl Grey or freshly brewed coffee to elevate the experience.
Recipe Variations
Want to put a spin on this classic recipe? Try these delightful variations:
- Lemon Zest Addition: Add the zest of one lemon to the dry ingredients for a refreshing citrus kick.
- Chocolate Chip Delight: Fold in some dark chocolate chips with the huckleberries for a sweet twist.
- Berry Blend: Swap out huckleberries for blueberries or raspberries, or use a mix of all three!
- Spiced Version: Incorporate a teaspoon of cinnamon or ginger into the dry ingredients for a warm, spiced flavor!
- Oatmeal Upgrade: Substitute half a cup of flour for quick oats for added texture.
Chef’s Notes
I absolutely adore these scones, and they have a special place in my heart. I can’t help but laugh at my initial attempts—they were more like huckleberry hockey pucks! But with practice, I perfected the light and flaky texture. Over the years, I’ve also experimented with different flavors and substitutions, discovering the beauty of adaptability in baking. The kitchen should be fun, and it’s all about finding what works for you. So, don’t be afraid to play around with flavors, and keep that oven warm with delicious creations!
FAQs and Troubleshooting
Q: Why did my scones turn out too dry?
A: Overmixing the dough can lead to dry scones, as can using too much flour. Measure carefully and mix just until combined. Remember, lumps are okay!
Q: Can I use frozen huckleberries?
A: Absolutely! Just thaw them out and toss them in flour to prevent them from sinking in the dough.
Q: How can I store leftover scones?
A: These scones are best eaten fresh, but you can store them in an airtight container for up to 3 days. Reheat in the oven for a few minutes to bring that fresh-baked goodness back!
Q: Can I freeze the dough?
A: Yes! You can freeze shaped and unbaked scones. Just pop them in the oven directly from the freezer; add a few extra minutes to the baking time.
Warm, comforting, and utterly satisfying—these huckleberry scones are sure to become a cherished recipe in your home, just as they have in mine. So, gather your loved ones, put on a pot of tea, and enjoy the cozy memories created in your kitchen. Happy baking, and remember, the best ingredient is always joy!
Print
Huckleberry Scones
- Total Time: 30 minutes
- Yield: 8 servings 1x
- Diet: Vegetarian
Description
Delightful huckleberry scones that are flaky and perfect for breakfast or afternoon tea.
Ingredients
- 2 cups all-purpose flour
- 1/4 cup granulated sugar
- 1 tablespoon baking powder
- 1/2 teaspoon salt
- 1/2 cup unsalted butter, cold and cubed
- 1/2 cup heavy cream
- 1 large egg
- 1 teaspoon vanilla extract
- 1 cup fresh or frozen huckleberries
Instructions
- Preheat the oven to 425°F (220°C).
- Mix dry ingredients: whisk together the flour, sugar, baking powder, and salt until well combined.
- Cut in the butter until the mixture resembles coarse crumbs.
- Combine wet ingredients in a separate bowl and whisk together.
- Mix the wet ingredients into the dry until just combined.
- Fold in the huckleberries gently.
- Shape the dough and cut into 8 wedges or round shapes.
- Prepare for baking by placing the scones on a lined baking sheet; brush with heavy cream and sprinkle sugar on top.
- Bake for 15-20 minutes or until golden brown.
- Cool on a wire rack and enjoy warm!
Notes
Best served fresh with whipped cream or jam. Can freeze the dough for later use.
- Prep Time: 10 minutes
- Cook Time: 20 minutes
- Category: Bakery
- Method: Baking
- Cuisine: American
Nutrition
- Serving Size: 1 scone
- Calories: 250
- Sugar: 5g
- Sodium: 200mg
- Fat: 12g
- Saturated Fat: 7g
- Unsaturated Fat: 5g
- Trans Fat: 0g
- Carbohydrates: 30g
- Fiber: 1g
- Protein: 4g
- Cholesterol: 30mg
Keywords: scones, huckleberry, breakfast, baking, easy recipe
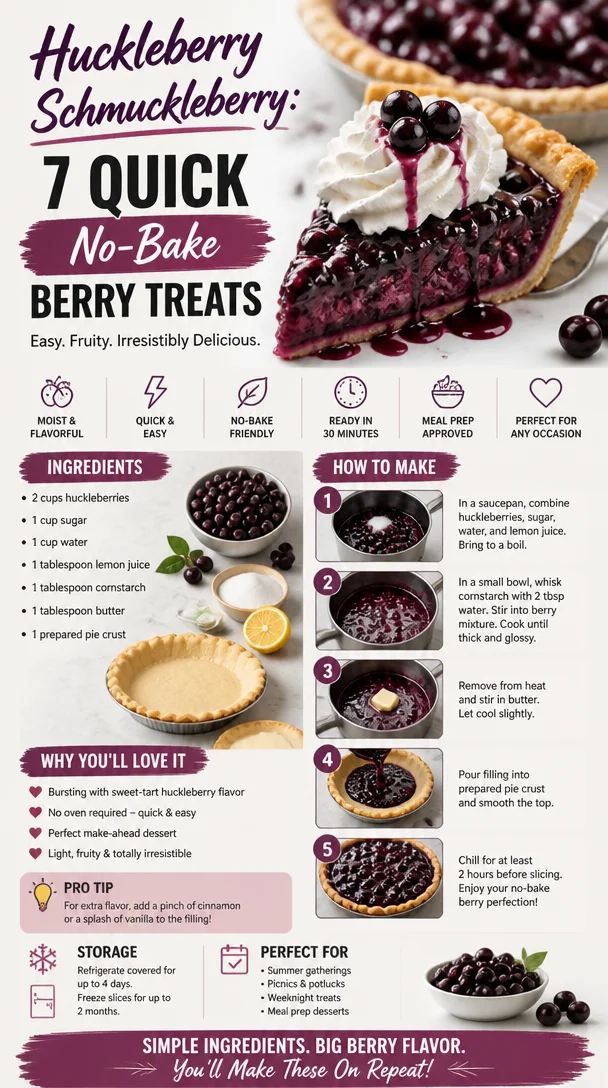
Huckleberry Schmuckleberry: 7 Quick No-Bake Berry Treats
Huckleberry Schmuckleberry: A Cozy Recipe for Sweet Memories
Welcome back to my kitchen, fellow food lovers! Today, I’m inviting you to whip up something that is not just delicious but also packed with warm, fuzzy nostalgia – the delectable Huckleberry Schmuckleberry! This dish isn’t just a recipe; it’s a journey through memories, flavors, and a dash of magic that comes from the heart.
Now, we’re diving into the enchanting world of huckleberries – those tiny, tart berries that are a hidden gem of nature. Growing up in the Pacific Northwest, I was lucky enough to experience the joy of huckleberry-picking with my family every summer. Imagine running through the woods, sun shining, with the sweet scent of wild berries hanging in the air. We’d fill our baskets to the brim, giggling and chatting about the best berry-picking spots. And the best part? Transforming our colorful haul into scrumptious desserts that filled our home with the incredible aroma of baking goodness!
Whether it’s a refreshing huckleberry crumble, a scrumptious pancake topping, or a heavenly jam, these tiny powerhouses of flavor have a way of making everything taste better. And trust me, when you combine huckleberries with some comforting, buttery goodness, you’re in for a real treat.
So, grab your favorite apron and let’s get cooking! I promise you’ll want to share this recipe with your family and friends – they’ll be begging for the secret to this mouthwatering dish!
A Sweet Memory with Huckleberries
Let me take you back to a sun-soaked afternoon in my childhood. It was one of those beautiful days where the sun painted everything golden, and the sweet smell of summer hung in the air like a gentle hug. My family and I ventured into the nearby woods, baskets in hand and excitement bubbling over. We were on the hunt for huckleberries, and let me tell you, it was a quest like no other!
As we trekked through the trails, my little feet would dart from bush to bush, my hands stained with berry juice and my laughter echoing through the trees. The huckleberry bushes seemed to be hiding their treasures just for us, and I remember the thrill of spotting those tiny, plump blue-black berries, glistening like jewels in the dappled sunlight.
Once our baskets were full, it was time for the best part – baking! My mom would turn our treasure into the most scrumptious huckleberry pie, filling our kitchen with warmth and sweet aromas. We’d sit around the kitchen table, eagerly awaiting that first slice, and I’ll never forget the delicious sense of pride that came from tasting something made with love and joy. That’s what I want to share with you today – the beauty of creating something from scratch that brings people together and fills your heart with warmth.
Let’s delve into the ingredients that will bring this huckleberry delight to life!
Ingredients You’ll Need
Here’s a little overview of the ingredients you’ll need to create your Huckleberry Schmuckleberry.
-
Fresh or Frozen Huckleberries (2 cups): These are the star of the show! If you can’t find huckleberries, blueberries or blackberries work too. Just note that huckleberries have a unique tartness that you may want to balance with a little extra sugar.
-
Granulated Sugar (¾ cup): This adds sweetness, balancing the tartness of the berries. Feel free to adjust it based on your preference. You could also substitute with honey or maple syrup for a natural sweetener.
-
Lemon Juice (2 tablespoons): The acidity of lemon juice elevates the flavor. Don’t skip it! If lemons aren’t handy, lime juice works like a charm, or even a splash of vinegar to mimic that tang.
-
Flour (1 cup): For binding everything together! You can use all-purpose flour, or if you’re going gluten-free, almond flour or oat flour can be good substitutes. Just keep an eye on the texture!
-
Old-Fashioned Rolled Oats (1 cup): This adds a fabulous chewy texture. If you’re looking for a gluten-free twist, ensure you choose certified gluten-free oats.
-
Brown Sugar (½ cup): For that hint of caramel flavor. If you don’t have brown sugar, granulated sugar can work as well, though the flavor will be a tad different.
-
Butter (½ cup, melted): The magic ingredient that makes everything come together! Coconut oil can be a fantastic dairy-free alternative.
-
Cinnamon (1 teaspoon): Adds warmth and depth. If you don’t have cinnamon, nutmeg or cardamom could make interesting substitutes.
-
Salt (½ teaspoon): Just a pinch to balance the sweetness.
Step-by-Step Instructions
Grab your apron and let’s get started! Here’s how to create your Huckleberry Schmuckleberry:
-
Preheat the Oven: Set your oven to 350°F (175°C). This way, it’s nice and hot by the time you’re ready to bake, ensuring a bubbly, golden topping!
-
Prepare the Huckleberries: In a medium bowl, combine the huckleberries, granulated sugar, and lemon juice. Stir gently, being careful not to mash the berries. Let this mixture sit for about 10 minutes – this helps the juices release and creates a delicious filling!
-
Mix the Dry Ingredients: In a large bowl, whisk together the flour, rolled oats, brown sugar, cinnamon, and salt until well blended. This is where the cozy aroma begins to fill your kitchen!
-
Incorporate the Butter: Pour the melted butter into the dry ingredients and mix with a fork until everything is combined and crumbly. You want a texture that’s similar to wet sand. If it feels too dry, a splash of milk or a bit of coconut oil can help bring it together.
-
Layer the Dish: Grab a baking dish (8×8 inches works perfectly) and spread half of your oat mixture evenly across the bottom. This is your base!
-
Add the Berry Filling: Spoon the huckleberry mixture on top of the base. Make sure to distribute the berries evenly for a tasty bite every time.
-
Top It Off: Sprinkle the remaining oat mixture over the huckleberries. This will create a lovely topping that crisps up beautifully in the oven.
-
Bake to Perfection: Place your dish in the preheated oven and bake for 30-35 minutes, or until the top is golden brown and bubbly. You’ll know it’s ready when your kitchen smells like a warm hug!
-
Cool and Serve: Once out of the oven, let it cool for about 10-15 minutes. This allows the filling to set up a bit for easier serving.
Serving Suggestions
To serve your delightful Huckleberry Schmuckleberry, scoop generous portions into bowls and top with a dollop of whipped cream or a scoop of vanilla ice cream for a beautiful contrast of temperatures and textures. Drizzling a bit of honey or maple syrup on top adds an extra touch of sweetness! Enjoy it warm, and embrace the wonderful company around you. Remember, this dish is all about sharing and celebrating the flavor!
Recipe Variations
Feel free to get creative with your Huckleberry Schmuckleberry. Here are a few fun twists to consider:
- Nutty Crumble: Add ½ cup of chopped nuts (like almonds or pecans) to the topping for a crunchy texture.
- Berry Duo: Mix huckleberries with raspberries or strawberries for an extra fruity flavor explosion!
- Spiced Up: Add a pinch of nutmeg or allspice to the filling for a warm, aromatic twist.
- Dairy-Free Delight: Swap out regular butter for coconut oil and use almond milk instead to make the recipe completely dairy-free.
- Vegan Version: Use flax eggs (1 tablespoon of ground flaxseed mixed with 3 tablespoons of water) in place of the butter and add maple syrup instead of granulated sugar.
Chef’s Notes
This recipe has evolved from countless kitchen experiments and cherished family gatherings. Each time I make it, I’m reminded of those sun-soaked afternoons spent berry-picking with my loved ones. My mom would often say that the messier I got with the dough and berry juices, the more delicious the dish would turn out. And let me tell you, that’s a philosophy I absolutely live by!
One of my most memorable kitchen mishaps happened when I accidentally forgot to add the sugar one day. I was so worried about making it perfect, I skipped it altogether! But when family arrived and tasted the “experiment,” we all laughed so hard at the unexpectedly tart version. Sometimes, the best memories evolve from little mistakes – just don’t forget the sugar!
FAQs and Troubleshooting
-
Q: My huckleberry filling is too runny. What did I do wrong?
- A: This can happen if your berries are super juicy. Next time, try adding a tablespoon of cornstarch to help thicken the filling while it bakes!
-
Q: How can I make this dish more flavorful?
- A: Adding a teaspoon of vanilla extract to the berry mixture or a citrus zest can amp up the flavors beautifully!
-
Q: Can I prepare this ahead of time?
- A: Absolutely! You can pre-mix the dry ingredients and the huckleberry filling, store them separately in the fridge, and assemble the topping just before you bake.
-
Q: Why is my crumbles topping too crumbly?
- A: If it’s separating too much, you might have added too much butter or flour. Just ensure the mixture stays a bit moist, like wet sand, when you’re mixing.
Nutritional Info
While I believe in enjoying every bite without guilt, it’s also helpful to have a sense of what you’re consuming. Here’s a rough estimate per serving (based on 8 servings):
- Calories: 280
- Carbohydrates: 42g
- Protein: 3g
- Fat: 12g
- Fiber: 4g
And there you have it – your very own Huckleberry Schmuckleberry. I hope this delightful recipe brings as much joy to your kitchen as it has to mine. Remember, the best dishes are made with love, laughter, and a hint of nostalgia. Now, get cooking and share those delicious moments with the people you love! Happy baking!
Print
Huckleberry Schmuckleberry
- Total Time: 50 minutes
- Yield: 8 servings
- Diet: Vegetarian
Description
A nostalgic and delightful dessert featuring huckleberries, perfect for sharing with loved ones.
Ingredients
- Fresh or Frozen Huckleberries (2 cups)
- Granulated Sugar (¾ cup)
- Lemon Juice (2 tablespoons)
- Flour (1 cup)
- Old-Fashioned Rolled Oats (1 cup)
- Brown Sugar (½ cup)
- Butter (½ cup, melted)
- Cinnamon (1 teaspoon)
- Salt (½ teaspoon)
Instructions
- Preheat the Oven: Set your oven to 350°F (175°C).
- Prepare the Huckleberries: In a medium bowl, combine the huckleberries, granulated sugar, and lemon juice. Let this mixture sit for about 10 minutes.
- Mix the Dry Ingredients: In a large bowl, whisk together the flour, rolled oats, brown sugar, cinnamon, and salt until well blended.
- Incorporate the Butter: Pour the melted butter into the dry ingredients and mix until everything is combined and crumbly.
- Layer the Dish: Spread half of your oat mixture evenly across the bottom of an 8×8 inch baking dish.
- Add the Berry Filling: Spoon the huckleberry mixture on top of the base, distributing evenly.
- Top It Off: Sprinkle the remaining oat mixture over the huckleberries.
- Bake to Perfection: Place your dish in the preheated oven and bake for 30-35 minutes.
- Cool and Serve: Let it cool for about 10-15 minutes before serving.
Notes
Serve warm with whipped cream or vanilla ice cream on top.
- Prep Time: 15 minutes
- Cook Time: 35 minutes
- Category: Dessert
- Method: Baking
- Cuisine: American
Nutrition
- Serving Size: 1 serving
- Calories: 280
- Sugar: 15g
- Sodium: 200mg
- Fat: 12g
- Saturated Fat: 7g
- Unsaturated Fat: 4g
- Trans Fat: 0g
- Carbohydrates: 42g
- Fiber: 4g
- Protein: 3g
- Cholesterol: 30mg
Keywords: huckleberry, dessert, nostalgic, baking, summer recipe
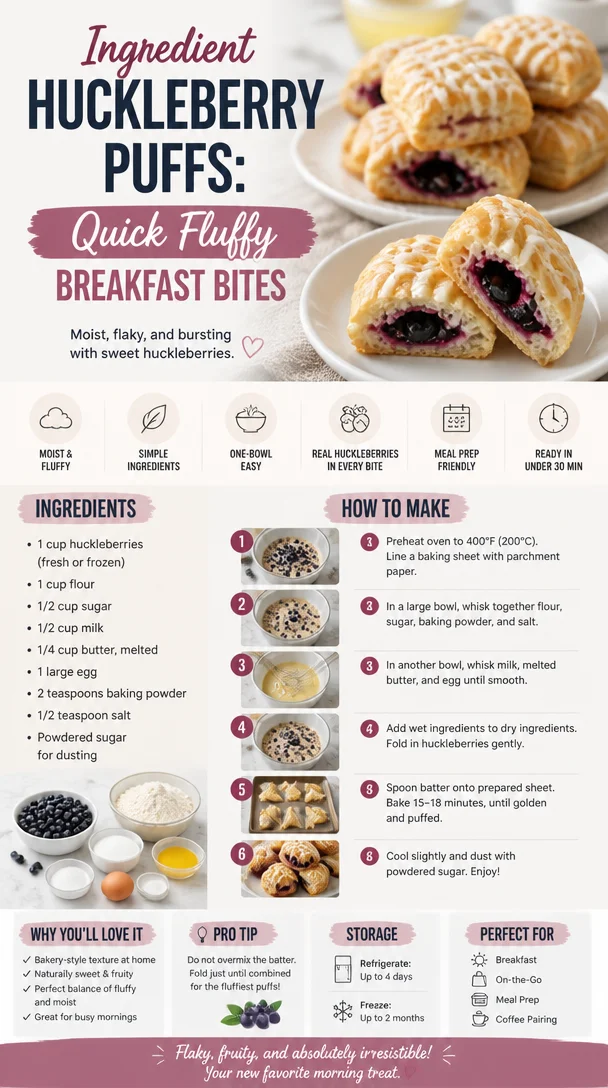
Ingredient Huckleberry Puffs: Quick Fluffy Breakfast Bites
Huckleberry Puffs: A Sweet Tale of Flavor and Nostalgia
Welcome back to my kitchen, friends! Today, I’m over the moon excited to share a recipe that’s incredibly close to my heart: Huckleberry Puffs! Imagine a light, airy pastry with pockets of sweet, tart huckleberries bursting through. It’s the kind of treat that not only satisfies your sweet tooth but also wraps you in cozy memories with every bite.
Huckleberries have always held a special place in my culinary adventures. When I was a kid, my family would go on end-of-summer hikes in the mountains, and one of our favorite activities was picking huckleberries. My dad would lead the charge, showing us the best spots to find those plump, dark purple berries hidden beneath the leaves. There’s something magical about standing in the serene woods, with birds chirping and the smell of earth and pine swirling around us while we collect these little gems. By the time we returned home, our hands would be stained with berry juice, and our stomachs full of impromptu snacks.
Once back in the kitchen, my mom would whip up her famous huckleberry pie. And let me tell you, the aroma of that pie baking would draw everyone in like a moth to a flame! Those summer afternoons spent cooking together, draping flour on the counters with giggles and sugar-fueled silliness, laid the foundation for my love of cooking. As I grew older, I wanted to mimic those joyous moments in my own way. And voila, here we are with my version – Huckleberry Puffs!
Not only are these little delights a way to celebrate huckleberries, but they also remind us of the importance of gathering in the kitchen and savoring life’s simple pleasures. So, put on your favorite apron, and let’s get baking together!
Ingredients
Here’s what you’ll need to create these delightful Huckleberry Puffs:
-
1 cup fresh huckleberries
Oh, the star of our show! These little beauties are sweet and a tad tart, bringing a burst of flavor that’s hard to resist. If you can’t find huckleberries, feel free to swap in blueberries or blackberries for a delicious alternative! -
1 sheet puff pastry (thawed)
This flaky, buttery pastry is a game changer! Store-bought makes it easy (we love a good shortcut), but for the adventurous at heart, you could always try your hand at making your own puff pastry. Just remember, keep it cold for the flakiest results! -
1 tablespoon sugar (plus extra for sprinkling)
A touch of sweetness to help the huckleberries shine! If you’re looking to reduce sugar, you can use coconut sugar or a sugar substitute. -
1 egg (for egg wash)
An egg wash gives the puffs that beautiful golden color. If you’d like a vegan option, use a brush of almond milk or aquafaba instead. -
1 teaspoon vanilla extract
Adding vanilla takes the flavor profile up a notch, complementing the huckleberries perfectly. You can also use almond extract for a different twist. -
Pinch of salt
Just a dash to balance the sweetness and elevate the flavors! -
Powdered sugar (for dusting, optional)
A finishing touch that adds a lovely sweetness and an elegant presentation. Who doesn’t love a little powdered sugar?
Step-by-Step Instructions
Let’s dive into the deliciousness! Follow these steps to create your very own Huckleberry Puffs.
-
Preheat the Oven
Start by preheating your oven to 400°F (200°C). This ensures that our puffs will rise beautifully when they hit the warm air. -
Prepare the Huckleberries
In a bowl, combine the fresh huckleberries, 1 tablespoon of sugar, and vanilla extract. Give it a gentle toss to coat the berries. If you’re using frozen huckleberries, be sure to thaw them and pat them dry to avoid soggy puffs. You want that juicy burst without the sog! -
Roll Out the Puff Pastry
Unroll your sheet of puff pastry on a floured surface. If it’s too thick, you can lightly roll it out to make it slightly thinner. Cut the pastry into squares or circles (about 4×4 inches or doodle-like circles). -
Add the Huckleberries
Place a heaping tablespoon of the huckleberry mixture in the center of each pastry square. Be careful not to overload them, or they’ll spill out during baking like a wild party! -
Seal the Puffs
Fold over one corner of the pastry to meet the opposite side, forming a triangle (or a pocket if you’re using circles). Press the edges together to seal, and then use a fork to crimp the edges for that adorable, rustic look. -
Brush with Egg Wash
Beat the egg in a small bowl and brush it over the tops of your puffs for that golden shine. If you’re vegan, go with almond milk or aquafaba – both work just as well to help the puffs get that gorgeous color! -
Sprinkle with Sugar
Don’t forget the extra sprinkle of sugar on top! It’s like giving your pastries a glittery finish that not only looks stunning but enhances that sweet crunch. -
Bake to Perfection
Pop them in the preheated oven and bake for about 15-20 minutes or until they’re puffed and golden brown. The scent wafting through your kitchen will be nothing short of heavenly! -
Cool and Dust
Once out of the oven, let them cool for a few minutes. Dust with powdered sugar right before serving for that extra touch of elegance!
Serving Suggestions
For a delightful serving experience, arrange your Huckleberry Puffs on a beautiful platter, preferably with a fresh sprig of mint or edible flowers to elevate the visual appeal. Pair them with a scoop of vanilla ice cream or a dollop of whipped cream to bring even more joy to this sweet indulgence. And don’t be shy – drizzle a little honey or maple syrup over the top for added decadence!
Recipe Variations
Feeling adventurous? Here are a few fun twists you can try with your Huckleberry Puffs:
- Lemon Zest: Add a teaspoon of lemon zest to the huckleberry filling for a zesty kick!
- Cheese Factor: Fold in some cream cheese or mascarpone cheese with the huckleberries for a richer, decadent version.
- Spicy Kick: Incorporate some cinnamon or cardamom into the sugar for those who love a little warmth in their desserts.
- Nutty Crunch: Toss in some chopped pecans or walnuts with the huckleberries for added texture and flavor.
Chef’s Notes
These Huckleberry Puffs are a lovely recipe that has evolved over time in my kitchen. Initially, I made them using various fruits depending on the season, from peaches in summer to apples in the fall. But there’s just something about huckleberries that keeps calling me back! Plus, I can’t get enough of that childhood nostalgia.
Whenever I make them, I remember my dad’s jovial spirit as we’d laugh and share stories in the wilderness. Now, I enjoy making them for family gatherings, sharing those lovely moments of joy with a new generation. It’s all about creating memories and cozy moments around the kitchen table – that’s what cooking is truly about!
FAQs and Troubleshooting
-
What if my puff pastry is soggy?
If your puff pastry appears soggy, you might have overloaded the filling or used frozen berries without thawing them properly. Make sure to pat them dry and avoid excess filling to keep that delightful puff! -
How can I make this recipe in advance?
You can prepare the puffs ahead of time and store them in the fridge for a day or two before baking. Just remember to brush them with the egg wash right before popping them in the oven for that fresh-baked taste! -
Can I freeze the puffs?
Absolutely! Before baking, you can freeze them on a baking sheet. Once frozen, transfer them into a freezer bag for up to a month. When you’re ready to enjoy, bake them straight from the freezer, adding an extra few minutes to the cooking time. -
What can I substitute for huckleberries?
If huckleberries are hard to find, don’t worry! Blueberries, blackberries, or even chopped strawberries can work beautifully. Just adjust the sugar type based on the sweetness of the substitute fruit used!
Nutritional Info (optional)
If you’re curious about the nutritional side of these puffs, here’s a rough estimate per puff (without powdered sugar):
- Calories: 200
- Fat: 9g
- Carbohydrates: 28g
- Protein: 2g
- Fiber: 1g
(Note: Values may vary based on specific ingredients used and serving sizes.)
Join me in relishing the warm, buttery goodness of Huckleberry Puffs, while cherishing the fond memories they create. I hope you feel inspired to bring a little bit of joy into your kitchen today! Remember, the best recipes are the ones that bring us together and celebrate life’s sweetest moments. Happy baking, my fellow foodies!
Print
Huckleberry Puffs
- Total Time: 35 minutes
- Yield: 8 servings 1x
- Diet: Vegetarian
Description
Delightful pastries filled with sweet and tart huckleberries, reminiscent of cherished childhood memories.
Ingredients
- 1 cup fresh huckleberries
- 1 sheet puff pastry (thawed)
- 1 tablespoon sugar (plus extra for sprinkling)
- 1 egg (for egg wash)
- 1 teaspoon vanilla extract
- Pinch of salt
- Powdered sugar (for dusting, optional)
Instructions
- Preheat the oven to 400°F (200°C).
- Combine the fresh huckleberries, 1 tablespoon of sugar, and vanilla extract in a bowl and toss gently.
- Unroll the puff pastry on a floured surface and cut into squares or circles.
- Place a heaping tablespoon of the huckleberry mixture in the center of each pastry piece.
- Fold the pastry to form a triangle and crimp the edges to seal.
- Brush the tops with egg wash or almond milk for a golden finish.
- Sprinkle with extra sugar on top.
- Bake for about 15-20 minutes or until golden brown.
- Cool for a few minutes and dust with powdered sugar before serving.
Notes
Feel free to substitute huckleberries with blueberries or blackberries. You can also add lemon zest or cream cheese to the filling for additional flavor.
- Prep Time: 15 minutes
- Cook Time: 20 minutes
- Category: Dessert
- Method: Baking
- Cuisine: American
Nutrition
- Serving Size: 1 pastry
- Calories: 200
- Sugar: 9g
- Sodium: 150mg
- Fat: 9g
- Saturated Fat: 3g
- Unsaturated Fat: 5g
- Trans Fat: 0g
- Carbohydrates: 28g
- Fiber: 1g
- Protein: 2g
- Cholesterol: 30mg
Keywords: Huckleberry Puffs, pastries, dessert, huckleberries, easy recipe, nostalgia
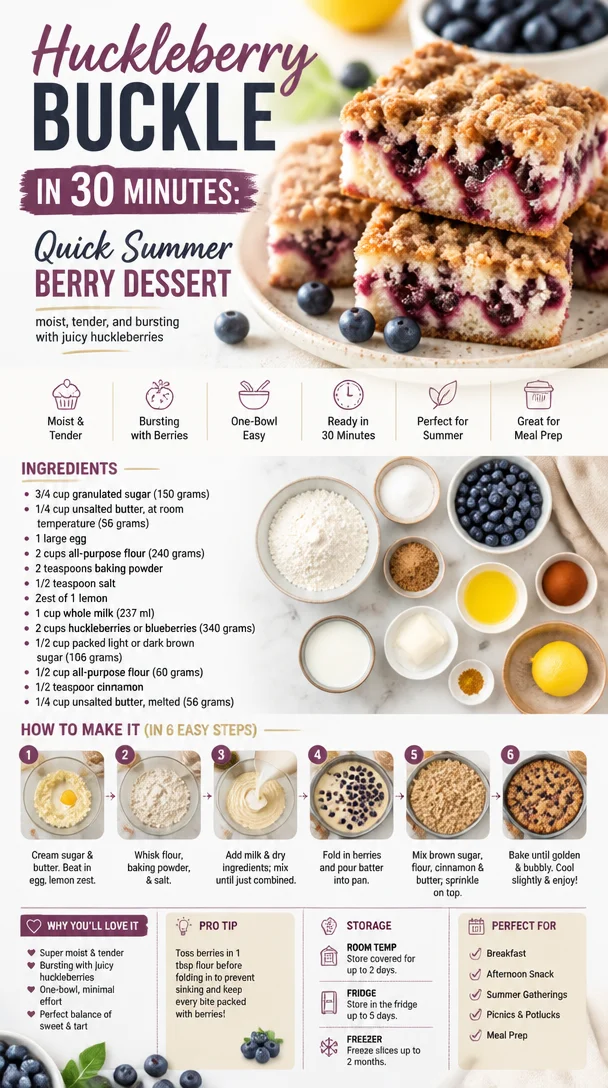
Huckleberry Buckle in 30 Minutes: Quick Summer Berry Dessert
Huckleberry Buckle: A Cozy, Berry-Laden Delight
Welcome back to my kitchen friends! I’m so thrilled you’re here today because we’re delving into one of my all-time favorite bakes: Huckleberry Buckle. Now, let me tell you, this isn’t just a dessert; it’s a slice of nostalgia, a warm hug on a chilly day, and a way to bring a little piece of summer into your home—all wrapped up in a delicious, buttery cake layered with sweet, tart huckleberries.
Huckleberries bring such a unique flavor to the table. Their sweet-tartness captures the essence of wild blueberries, but with a delightful hit of earthiness that makes them stand out. When I think of huckleberries, I’m reminded of my childhood adventures, foraging in the woods behind my grandparents’ house with my siblings. Those lazy summer days, sun beaming down, the smell of earth mixing with the sweet fragrance of berries—it was pure magic. We would return home, arms stained and fingers sticky, eager to help Grandma whip up a batch of her famous huckleberry pie or buckle. The kitchen would fill with the warmth of vanilla and butter, enticing the whole family to gather ’round.
Creating this Huckleberry Buckle is not just about the final product; it’s about the memories we make and the love we share as we create something special. Whether you’re whipping this up for a dinner party, a cozy family brunch, or just because you want to treat yourself, I promise you, it’ll become a cherished part of your own kitchen story. So, grab those huckleberries and let’s get started!
Personal Story
Picture this: I was no more than ten years old, immersed in a summer adventure. Armed with a small basket and a strong sense of adventure, I wandered through the wilds of my grandparents’ backyard, coaxing my siblings to join the hunt for the elusive huckleberry. With each tiny berry we plucked, we shared giggles and tales of mischief while trying to see who could fill their basket first. Eventually, we’d head inside, resonating with the laughter that echoed off the kitchen walls.
Grandma was waiting, apron tied firmly around her waist, a twinkle in her eye as she beckoned us to help her in the kitchen. The huckleberries would soon become something magical—a huckleberry buckle that filled the house with warmth, filling us with happiness for hours afterward. Fast forward to today, and every time I bake this buckle, I’m whisked back to that lovely kitchen filled with family, laughter, and the sweet scent of baked huckleberries. So here I am, ready to share this love with you. Let’s dive into the ingredients for this delightful dessert!
Ingredients
-
Fresh Huckleberries (2 cups)
The star of the show! If you can’t find huckleberries, blueberries or blackberries work well, but you’ll lose some of that unique huckleberry flavor. You can also try frozen huckleberries if fresh ones aren’t available, but make sure to thaw and drain them well to avoid excess moisture in the buckle. -
All-Purpose Flour (1 ½ cups)
A staple in almost every baking recipe! This will form the cake base. For gluten-free options, use a 1:1 gluten-free flour mix, but keep an eye on the texture—it might need a little more liquid. -
Granulated Sugar (1 cup)
Sweetness is key! If you prefer a less sweet dessert, feel free to reduce the sugar by ¼ cup. -
Unsalted Butter (½ cup or 1 stick, softened)
Butter brings richness and flavor. For a dairy-free option, you can use coconut oil or a vegan butter substitute. -
Large Eggs (2)
Helps bind everything together for a perfect texture. If you’re looking for an egg substitute, you can use ¼ cup of applesauce or a flaxseed meal mix (1 tbsp flaxseed meal combined with 2.5 tbsp water). -
Milk (½ cup)
A splash of milk adds moisture. You can replace it with almond milk, oat milk, or any other non-dairy milk if needed. -
Baking Powder (2 tsp)
This is our leavening agent, making the buckle rise. If you run out of baking powder, you can use baking soda mixed with an acid (like vinegar or lemon juice) in a pinch—1 tsp baking soda plus 1 tsp vinegar will do the trick! -
Salt (½ tsp)
A touch of salt enhances all the flavors, so don’t skip it! -
Vanilla Extract (1 tsp)
Adds warmth and depth to your buckle. For a twist, try almond extract! -
Cinnamon (½ tsp)
A warm spice that complements the huckleberries beautifully. You can also add a pinch of cardamom for a unique flavor.
Step-by-Step Instructions
Preheat the Oven
- Preheat your oven to 350°F (175°C).
While your oven warms up, this is a great time to gather and measure out your ingredients—organization is key in the kitchen!
Prepare Your Baking Dish
- Grease a 9×9-inch square baking dish or a round cake pan.
Use butter or non-stick spray liberally to prevent sticking. You can even line the bottom with parchment paper for an extra precaution.
Mix the Dry Ingredients
- In a large mixing bowl, whisk together the flour, baking powder, salt, and cinnamon.
Make sure everything is combined for even distribution of those beautiful flavors.
Cream the Butter and Sugar
- In another bowl, cream together the softened butter and sugar until light and fluffy.
This is key for a tender cake. Use an electric mixer if you have one; it takes less time and delivers a lighter texture.
Add the Eggs and Vanilla
- Add the eggs, one at a time, followed by the vanilla, mixing until smooth.
The mixture might look a bit curdled; that’s just fine—everything will come together beautifully with the dry ingredients.
Combine the Wet and Dry Ingredients
- Gradually add your dry ingredients to the butter mixture.
Mix on low speed until no flour is visible. The batter should be thick and creamy—don’t over-mix it, though!
Add Huckleberries
- Fold in the huckleberries gently, ensuring they are evenly distributed without breaking them too much.
This is a fun step—feel free to use your hands if you’re comfortable! Just be gentle.
Pour into Baking Dish
- Pour the batter into your prepared baking dish.
Use a spatula to spread it evenly; the batter may look a bit thick—that’s how we want it!
Bake!
- Bake in your preheated oven for 35–40 minutes, or until a toothpick inserted in the center comes out clean.
The edges should be golden brown and the top slightly puffed. Keep an eye on it! Every oven is a little different.
Cool and Serve
- Once baked, allow to cool in the pan for about 10 minutes before transferring to a wire rack.
This cooling step is crucial; it helps the buckle set. Serve slightly warm, perhaps with a drizzle of cream or scoop of ice cream on top!
Serving Suggestions
To plate your Huckleberry Buckle, cut it into squares or wedges and arrange them on a beautiful serving platter. Dust with a light sprinkling of powdered sugar for a touch of elegance. If you’re feeling indulgent, add a scoop of whipped cream or vanilla ice cream on top! You can also serve it warm with a generous dollop of Greek yogurt for a delightful balance of flavors. Enjoy it with your favorite coffee or tea—it’s the perfect pairing!
Recipe Variations
- Lemon Zest Addition: Add a tablespoon of fresh lemon zest to the batter for a bright citrus kick.
- Nutty Flavor: Stir in ½ cup of chopped walnuts or pecans for extra texture and nutty flavors.
- Dairy-Free Twist: Substitute all dairy ingredients with non-dairy alternatives without compromising the flavor or texture.
- Mixed Berries: Combine huckleberries with raspberries or strawberries for a colorful and flavorful twist.
- Spiced Buckle: Experiment with spices by adding nutmeg or ground ginger for a warming flavor profile.
Chef’s Notes
I’ve been making this Huckleberry Buckle for years now, and it has undergone a few delightful transformations along the way. One particularly funny story comes to mind: I once confused baking soda with baking powder, resulting in what I called “Berry Flatbread.” Not quite the fluffy buckle I was hoping for, but an impromptu brunch recipe was born! I’ve learned to keep my baking supplies organized since then, and it’s those little mishaps that keep cooking fun, right?
FAQs and Troubleshooting
Q: My buckle turned out too dense. What did I do wrong?
A: Density can come from over-mixing the batter or not enough leavening agents. Ensure you don’t over-mix once the dry ingredients are added, and double-check that your baking powder is fresh.
Q: How do I adjust this recipe for a larger group?
A: This recipe can easily be doubled for a 9×13-inch baking pan! Just keep an eye on baking time as it may require a few extra minutes.
Q: Can I make this ahead of time?
A: Absolutely! You can prepare it the day before and store it covered at room temperature. Reheat slices in the oven or microwave before serving.
Q: What can I use instead of huckleberries?
A: If huckleberries aren’t available, blueberries, blackberries, or even chopped strawberries can be delightful substitutes!
Nutritional Info
Nutritional values can vary, but one serving (1/16 of the finished buckle) typically has around 220 calories, 8g of fat, 35g of carbohydrates, and 2g of protein. Remember, it’s all about balance, so indulge and enjoy every bite!
There you have it, my friends—your ultimate guide to crafting a beautiful Huckleberry Buckle. I can’t wait to hear about your baking adventures, and I’m here to support you every step of the way. Happy baking, and may your kitchen be filled with joy and delicious scents!
Print
Huckleberry Buckle
- Total Time: 55 minutes
- Yield: 16 servings
- Diet: Vegetarian
Description
A cozy, berry-laden delight that brings a slice of summer into your home, layered with sweet, tart huckleberries in a buttery cake.
Ingredients
- Fresh Huckleberries (2 cups)
- All-Purpose Flour (1 ½ cups)
- Granulated Sugar (1 cup)
- Unsalted Butter (½ cup, softened)
- Large Eggs (2)
- Milk (½ cup)
- Baking Powder (2 tsp)
- Salt (½ tsp)
- Vanilla Extract (1 tsp)
- Cinnamon (½ tsp)
Instructions
- Preheat your oven to 350°F (175°C).
- Grease a 9×9-inch square baking dish or a round cake pan.
- In a large bowl, whisk together the flour, baking powder, salt, and cinnamon.
- Cream together the softened butter and sugar until light and fluffy.
- Add the eggs, one at a time, followed by the vanilla, mixing until smooth.
- Gradually add your dry ingredients to the butter mixture.
- Fold in the huckleberries gently.
- Pour the batter into your prepared baking dish.
- Bake for 35–40 minutes, or until a toothpick comes out clean.
- Once baked, allow to cool in the pan for about 10 minutes before transferring to a wire rack.
Notes
Dust with powdered sugar before serving. Can serve warm with whipped cream or yogurt.
- Prep Time: 15 minutes
- Cook Time: 40 minutes
- Category: Dessert
- Method: Baking
- Cuisine: American
Nutrition
- Serving Size: 1 serving
- Calories: 220
- Sugar: 10g
- Sodium: 200mg
- Fat: 8g
- Saturated Fat: 5g
- Unsaturated Fat: 3g
- Trans Fat: 0g
- Carbohydrates: 35g
- Fiber: 2g
- Protein: 2g
- Cholesterol: 30mg
Keywords: huckleberry, buckle, dessert, cake, summer, baking
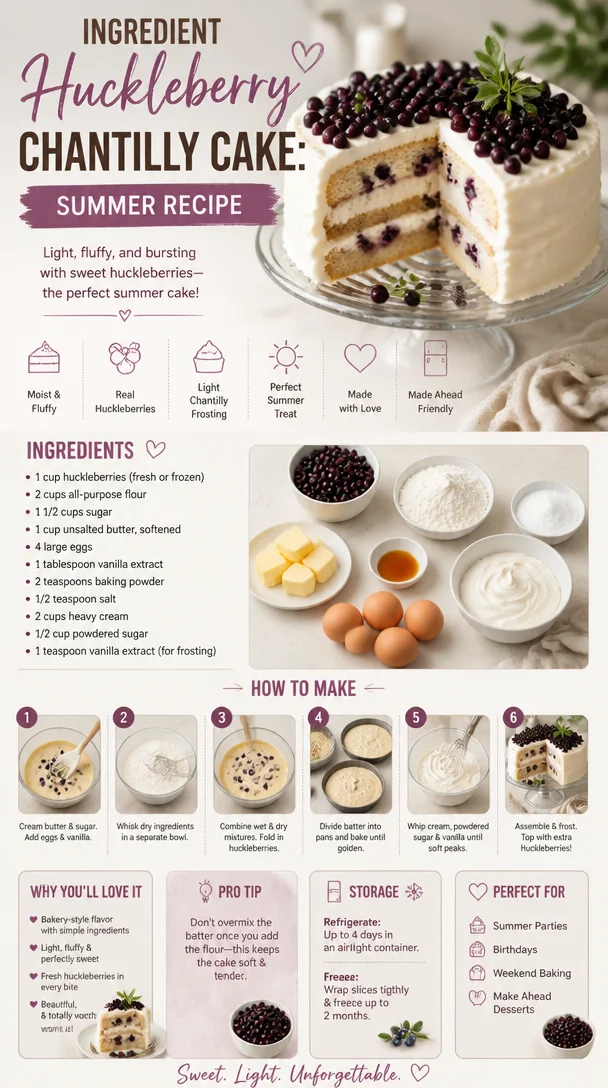
Ingredient Huckleberry Chantilly Cake: Summer Recipe
Huckleberry Chantilly Cake: A Slice of Joy
Welcome to my kitchen! Today, we’re diving into a delightful confection that embodies summer’s sweet embrace — the Huckleberry Chantilly Cake. As the season’s berries start to burst with color and flavor, there’s no better way to celebrate nature’s bounty than with a light and airy cake topped with a luscious chantilly cream. If the mention of huckleberries makes your heart flutter, then you’re in for a treat! This cake isn’t just a dessert; it’s a joyful explosion of happiness and nostalgia that can transport you back to lazy summer days filled with laughter and love.
But wait, let me take a moment to pull you into my little world. I remember the first time I stumbled upon huckleberries. I was about twelve, spending summer weekends with my grandparents in their cozy cabin tucked away in the woods. The moment we stepped outside, the air was rich with the scent of pine and the sounds of nature — the perfect backdrop for a little adventure. Armed with tiny pails and an insatiable curiosity, my grandfather and I ventured into the wild to forage for these little blue gems that grew in abundance.
Those days spent scouring the underbrush, discovering the sweet, juicy huckleberries hidden among the leaves, were magical. When we returned, sticky-fingered and beaming with pride, my grandmother would have all the ingredients ready to whip up her famous berry pie. While her recipe will always have a special place in my heart, I love to shake things up in the kitchen! Every year, as huckleberry season rolls around, I find new ways to incorporate these beauties into my cooking. This Huckleberry Chantilly Cake is one of my proudest creations — it brings all those cherished memories flooding back with every bite.
So, grab your apron, and let’s make this easy yet stunning cake that will have your friends asking for seconds (and maybe thirds!). Trust me, this recipe is a delightful celebration that’s meant to be shared.
Ingredients
Here’s what you’ll need to create this dreamy Huckleberry Chantilly Cake:
-
2 cups all-purpose flour
- This is the foundation of our cake. For a gluten-free option, try using a 1:1 gluten-free flour blend.
-
1 ½ cups granulated sugar
- Sweetness is key! If you want a lower-sugar version, you can substitute with coconut sugar, but adjust the liquids slightly as it absorbs more moisture.
-
½ cup unsalted butter (softened)
- Butter adds richness! If you’re aiming for a dairy-free cake, feel free to swap it with coconut oil or vegan butter.
-
1 cup buttermilk
- This helps in creating a moist cake with a tender crumb. No buttermilk? Mix 1 cup of milk with a tablespoon of vinegar or lemon juice and let it sit for five minutes.
-
3 large eggs
- Eggs provide structure. For an egg-free version, consider using flax eggs (1 tablespoon of flaxseed meal mixed with 3 tablespoons of water per egg) — just give it a few minutes to thicken.
-
1 tablespoon baking powder
- This ensures our cake rises beautifully and has a fluffy texture.
-
½ teaspoon baking soda
- Helps to balance the acidity of the buttermilk, promoting a nice rise.
-
1 teaspoon vanilla extract
- Always use pure vanilla for the best flavor. If you’re adventurous, try using almond extract for a deeper, nutty note.
-
2 cups huckleberries (fresh or frozen)
- The star of our show! If huckleberries are hard to find, blueberries make an excellent substitute. Just adjust the sweetness slightly since blueberries can be a tad sweeter.
-
2 cups heavy whipping cream
- Essential for our chantilly cream. If you want a lighter option, you can use a whipped coconut cream.
-
½ cup powdered sugar
- For sweetening the chantilly cream without the graininess of granulated sugar.
-
1 teaspoon vanilla extract
- Again, pure vanilla is key here for that lovely, aromatic flavor in your cream.
Step-by-Step Instructions
-
Preheat your oven to 350°F (175°C). Preheating is crucial so that your cake begins baking immediately, leading to a beautiful rise.
-
Prepare your cake pans. Grease two 9-inch round cake pans with butter or non-stick spray, then line the bottoms with parchment paper for easy removal. This little step ensures that your cake won’t stick and you’ll have picture-perfect layers.
-
Mix the dry ingredients. In a large mixing bowl, whisk together the flour, baking powder, baking soda, and a pinch of salt. This aerates the flour and distributes the leavening agents evenly.
-
Cream the butter and sugar. In another bowl, beat the softened butter and granulated sugar together until the mixture is light and fluffy — about 3-4 minutes. This step creates air pockets in the butter, which is essential for a light cake.
-
Add the eggs and vanilla. One at a time, mix in the eggs, scraping down the sides of the bowl as needed. Add the vanilla extract next and blend until just combined.
-
Combine wet and dry ingredients. Gradually stir in the flour mixture and buttermilk, alternating between both, starting and ending with the dry mix. Each addition needs to be mixed just until combined to avoid overworking the flour, which can lead to a tough cake.
-
Fold in the huckleberries. Gently fold the huckleberries into the batter, being careful to keep them whole to avoid purple swirls in your cake.
-
Divvy up the batter. Pour equal amounts of batter into the prepared cake pans and smooth the tops with a spatula.
-
Bake! Pop those pans into your preheated oven and bake for 25-30 minutes or until a toothpick inserted in the center comes out clean. Keep an eye on them, as overbaking can lead to dry cake.
-
Cool the layers. Once baked, remove the pans from the oven and let them cool in the pans for about 10 minutes. Then, carefully invert them onto a wire rack to cool completely. This helps prevent a soggy bottom.
-
Prepare the chantilly cream. Here comes the fun part! In a large mixing bowl, pour the heavy cream and add the powdered sugar and vanilla extract. Using an electric mixer, whip it on medium-high speed until soft peaks form. Don’t overwhip, or you’ll end up with butter!
-
Assemble the cake. Once the cake layers are completely cool, place one layer on a serving plate. Spread a thick layer of chantilly cream on top and scatter some more huckleberries over it. Place the second layer on top and spread the remaining chantilly cream over the top and sides.
-
Garnish and serve. Finish the cake by scattering more huckleberries on top for a stunning presentation. Your cake is now ready to impress!
Serving Suggestions
When it comes to serving, a slice of Huckleberry Chantilly Cake deserves a beautiful presentation. Place it on a nice cake stand, and serve with a side of fresh fruit or a drizzle of berry sauce for a pop of color. A thin dusting of powdered sugar on top creates an elegant finish. Encourage your guests to take their time, savoring the flavors of light sponge cake, fresh fruit, and fluffy cream.
Recipe Variations
Feeling adventurous? Here are a few variations to spice things up:
-
Lemon Zest: Add the zest of one lemon to the batter for a touch of citrus brightness.
-
Cream Cheese Frosting: Swap out the chantilly cream for a tangy cream cheese frosting, which pairs wonderfully with the sweetness of the huckleberries.
-
Nutty Addition: Fold finely chopped walnuts or pecans into the batter for a delightful crunch.
-
Layer it up: Make a three-tiered cake by adding an additional layer of your favorite flavor (like a vanilla or chocolate) for variety.
-
Gluten-Free: Substitute all-purpose flour with almond flour or a gluten-free flour blend for a gluten-free treat.
Chef’s Notes
This Huckleberry Chantilly Cake is a true reflection of my kitchen’s ethos — simple yet indulgent. Each year, I find myself experimenting with this recipe, whether it’s swapping berries or even trying different creams. One funny memory I treasure is the time I accidentally used salt instead of sugar in the chantilly cream. The reactions were priceless (and definitely not repeatable)! I love how recipes evolve over time. Each addition or change is like adding a new chapter to a beloved book. I hope this cake will inspire you to create your own kitchen stories and memories!
FAQs and Troubleshooting
-
Q: My cake turned out dense. What happened?
- A: This could be due to overmixing the batter. Mix until just combined, and be gentle when folding in the berries.
-
Q: How do I store leftovers?
- A: Store any leftover cake in an airtight container in the fridge for up to 3 days. Just know that the cream may soften the cake a bit over time.
-
Q: Can I freeze this cake?
- A: Absolutely! You can freeze the cake layers without frosting. Wrap them in plastic wrap, and use foil for extra protection. Thaw in the fridge before frosting.
-
Q: What do I do if the huckleberries are too tart?
- A: If you find huckleberries too tart for your taste, consider macerating them in a little sugar for 15-20 minutes before adding them to the batter. This helps to sweeten them!
So there you have it, my sweet friends — a detailed, scrumptious guide to creating a Huckleberry Chantilly Cake that’s sure to be the star of any gathering. Every slice brings back fond memories and creates new ones, so I hope you’ll whip this up and share it with your loved ones. Happy baking, and let the delicious flavors of huckleberries spark joy in your kitchen!
Print
Huckleberry Chantilly Cake
- Total Time: 50 minutes
- Yield: 8 servings 1x
- Diet: Vegetarian
Description
A delightful Huckleberry Chantilly Cake topped with luscious chantilly cream, celebrating summer’s fresh huckleberries.
Ingredients
- 2 cups all-purpose flour
- 1 ½ cups granulated sugar
- ½ cup unsalted butter (softened)
- 1 cup buttermilk
- 3 large eggs
- 1 tablespoon baking powder
- ½ teaspoon baking soda
- 1 teaspoon vanilla extract
- 2 cups huckleberries (fresh or frozen)
- 2 cups heavy whipping cream
- ½ cup powdered sugar
- 1 teaspoon vanilla extract
Instructions
- Preheat your oven to 350°F (175°C).
- Prepare your cake pans by greasing with butter or non-stick spray and lining with parchment paper.
- Mix the dry ingredients: whisk together flour, baking powder, baking soda, and salt in a large bowl.
- Cream the butter and sugar together until light and fluffy (about 3-4 minutes).
- Add the eggs one at a time, mixing in the vanilla extract until just combined.
- Combine wet and dry ingredients, alternating between flour mixture and buttermilk.
- Fold in the huckleberries gently to keep them whole.
- Divvy up the batter into prepared pans, smoothing the tops.
- Bake for 25-30 minutes until a toothpick comes out clean.
- Cool the layers in pans for about 10 minutes, then invert onto wire racks to cool completely.
- Prepare the chantilly cream: whip together heavy cream, powdered sugar, and vanilla extract until soft peaks form.
- Assemble the cake by stacking layers with chantilly cream and huckleberries between them.
- Garnish with additional huckleberries on top before serving.
Notes
For a gluten-free version, substitute the all-purpose flour with a gluten-free flour blend. Adjust the sweetness of the huckleberries if needed.
- Prep Time: 20 minutes
- Cook Time: 30 minutes
- Category: Dessert
- Method: Baking
- Cuisine: American
Nutrition
- Serving Size: 1 slice
- Calories: 400
- Sugar: 32g
- Sodium: 200mg
- Fat: 26g
- Saturated Fat: 15g
- Unsaturated Fat: 8g
- Trans Fat: 0g
- Carbohydrates: 45g
- Fiber: 2g
- Protein: 6g
- Cholesterol: 80mg
Keywords: cake, huckleberry, chantilly, dessert, summer
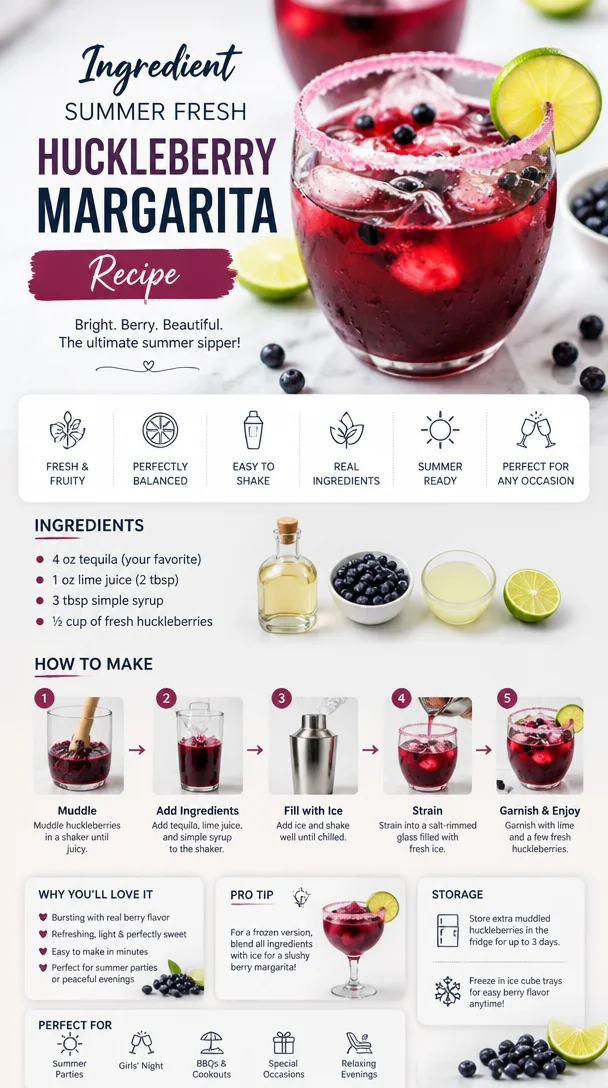
Ingredient Summer Fresh Huckleberry Margarita Recipe
The Refreshing Delight of Fresh Huckleberry Margaritas
Welcome to my kitchen! If you’re anything like me, your heart skips a beat at the thought of a refreshing cocktail on a warm day. Today, we’re diving into the world of vibrant flavors with a twist on the classic margarita — the Fresh Huckleberry Margarita. Imagine the taste of sweet, juicy huckleberries paired with zesty lime juice, smooth tequila, and a hint of sweetness! It’s the quintessential summer drink that’s not just refreshing; it’s also a delightful homage to the beautiful berries often found in the wild.
What I love most about a Fresh Huckleberry Margarita is its ability to transport you to a sun-soaked patio or a cozy gathering with friends. Picture this: you’re surrounded by good company, laughter fills the air, and the intoxicating aroma of huckleberries dances with the breeze. As we explore this delicious concoction, I’ll share a personal story, some pro tips, and unique twists to make this drink your own!
Get ready to grab your shaker and put on your favorite playlist because we’re about to mix up some magic in the kitchen. Not only will you impress your friends, but you’ll also create an unforgettable experience that turns every sip into a celebration of flavor.
A Flavorful Memory
Ah, huckleberries! They remind me of countless summers spent with my family in the Pacific Northwest. My favorite memories involve venturing into the woods with my mom, an old basket in hand, searching for these tiny, sweet gems. We’d wake up early, the sun just beginning to peek through the trees, and set off on our huckleberry hunts.
After gathering enough berries to fill our basket, we’d return home, our cheeks flushed with excitement. My mom would whip up her famous huckleberry pie, the kitchen filled with the heavenly scent of baking—not to mention the delicious juices from the huckleberries bubbling away.
Fast forward to today, and I still carry that love for huckleberries in my cooking. That’s where the inspiration for the Fresh Huckleberry Margarita comes from — a drink that captures the essence of those cherished family moments, while adding a modern twist. Let me show you how to recreate that nostalgia in a glass!
Ingredients
Here’s what you’ll need to whip up the perfect Fresh Huckleberry Margarita:
-
Fresh Huckleberries (1 cup)
These tiny fruits burst with flavor! If you can’t find fresh huckleberries, you can substitute with blueberries or even blackberries for a different but delicious twist. -
Tequila (2 ounces)
I recommend a good-quality blanco tequila for its smoothness. If you prefer a less alcoholic option, consider using a non-alcoholic tequila alternative that’s hitting the market! -
Lime Juice (1 ounce)
Fresh is always best! Bottled lime juice can work in a pinch, but fresh-squeezed juice elevates the flavor. You can also experiment with lemon juice for a unique citrus zing. -
Agave Syrup (1/2 ounce)
This adds sweetness without overwhelming the drink. Feel free to swap with simple syrup, or if you’re watching the sugar, try a liquid stevia or sugar substitute. -
Salt (for rimming the glass)
This is optional but recommended! It creates the perfect balance against the sweet huckleberries. Consider using flavored salts, like lime or chili salt, for an extra kick. -
Ice (for shaking/stirring)
Ice is essential to chill your drink and dilute it just right. Make sure your ice is fresh for the best results!
Let’s mix these ingredients to create a cocktail that’s more than just a drink — it’s a feel-good experience!
Step-by-Step Instructions
Step 1: Prepare Your Glass
Start by rimming your glass with lime. Shake a little salt onto a plate and gently press the rim of the glass into the salt until it’s evenly coated. Set it aside while you mix up the magic.
Step 2: Blend the Berries
In a cocktail shaker, add your fresh huckleberries. Using a muddler, gently mash them to release their juices. The key here is to be gentle — you want juice, not mush!
Tip: If you’re in a hurry, you can always use a blender to puree the huckleberries before adding them to the shaker! Just make sure to strain the purée to remove any seeds if you prefer a smoother drink.
Step 3: Shake It Up
Add the tequila, fresh lime juice, and agave syrup to the shaker. Fill it with ice and put the lid on tightly. Now, give it a good shake! You want to mix the ingredients thoroughly while chilling them at the same time.
Chef Hack: The longer you shake, the colder the drink! Aim for about 15-20 seconds of vigorous shaking.
Step 4: Strain and Pour
Take your prepared glass and fill it with fresh ice (if you like it on the rocks!). Strain the margarita mixture into your glass, letting the huckleberry goodness cascade in.
Pro Tip: If you enjoy a smoother drink, you can use a fine mesh strainer to sift out any remaining pulp or berry bits.
Step 5: Garnish and Serve
Finally, top your drink with a few whole huckleberries or a slice of lime for garnish. It adds a pop of color, making it as beautiful as it is tasty!
Enjoy! Take a moment to admire your handiwork before diving in.
Serving Suggestions
The best part about cocktails is that they’re meant to be shared! Serve your Fresh Huckleberry Margaritas in chilled glasses, perhaps alongside some lime wedges for added zest. Pair it with light appetizers like chips and salsa, shrimp tacos, or a fresh fruit platter to let those summer vibes flow.
For a fun twist, consider serving the margaritas in mason jars for a rustic feel—perfect for outdoor gatherings! Just remember to have extra napkins on hand; these drinks are too good not to savor.
Recipe Variations
- Frozen Huckleberry Margarita: Blend your ingredients with crushed ice for a frozen treat. Perfect for hot days!
- Spicy Twist: Add a slice of jalapeño while muddling the huckleberries for a hint of heat.
- Herbaceous Blend: Toss in some fresh mint leaves before shaking for a refreshing herb twist.
- Huckleberry Mimosa: Combine huckleberry syrup with Prosecco for a delightful brunch beverage.
- Non-Alcoholic Version: Swap the tequila for ginger beer and add a splash of soda water for a bubbly mocktail!
Chef’s Notes
Creating this Fresh Huckleberry Margarita has been a delightful journey for me. Over the years, I’ve dabbled with various fruits and liquors, but there’s a special place in my heart for huckleberries. Their unique flavor brings nostalgia, reminiscent of my family’s huckleberry pie adventures.
One of my funniest kitchen moments was when I tried to impress my friends with a “fancy” version of this margarita. I accidentally dropped a whole handful of huckleberries into my blender without measuring. Let me tell you, it’s fun to go bold in the kitchen—but I ended up with a huckleberry smoothie explosion! Lesson learned: precision is key, but so is having fun!
FAQs and Troubleshooting
Q: What do I do if I can’t find fresh huckleberries?
If you’re unable to find fresh huckleberries, don’t fret! Blueberries or blackberries work beautifully as a substitute and give a similar flavor profile.
Q: How can I enhance the flavor?
To enhance the flavors, consider adding a splash of orange liqueur (like Triple Sec or Cointreau) which complements the huckleberries and lime fantastically.
Q: Can I make this cocktail in advance?
Yes! You can mix the base (tequila, lime juice, agave syrup, and muddled huckleberries) in advance and store it in the fridge, but I recommend adding ice and shaking just before serving to keep it fresh.
Q: What if my margarita is too tart?
If you find your margarita a bit on the sour side, simply add a touch more agave syrup or even a splash of orange juice to balance out the flavors.
Nutritional Info
(If applicable, you can provide a rough estimate of calories, sugar, etc., based on the ingredients used. If not, you can skip this section. Just remember that moderation is key!)
Remember, every huckleberry margarita you make is more than just a drink. It’s a celebration of flavors and memories. So raise your glass and enjoy the journey! Cheers! 🥂
Print
Fresh Huckleberry Margarita
- Total Time: 10 minutes
- Yield: 1 serving 1x
- Diet: Vegetarian
Description
A refreshing twist on the classic margarita, made with sweet huckleberries and zesty lime juice. Perfect for summer gatherings!
Ingredients
- 1 cup Fresh Huckleberries
- 2 ounces Tequila
- 1 ounce Lime Juice
- 1/2 ounce Agave Syrup
- Salt (for rimming the glass)
- Ice (for shaking/stirring)
Instructions
- Prepare Your Glass: Rim the glass with lime and coat it with salt. Set aside.
- Blend the Berries: Muddle fresh huckleberries in a cocktail shaker to release their juices.
- Shake It Up: Add tequila, lime juice, and agave syrup to the shaker with ice and shake vigorously.
- Strain and Pour: Strain the mixture into the prepared glass filled with ice.
- Garnish and Serve: Top with whole huckleberries or a slice of lime to garnish.
Notes
Experiment with different fruits like blueberries or blackberries. For a frozen version, blend with crushed ice.
- Prep Time: 10 minutes
- Cook Time: 0 minutes
- Category: Cocktail
- Method: Mixing
- Cuisine: American
Nutrition
- Serving Size: 1 glass
- Calories: 200
- Sugar: 10g
- Sodium: 30mg
- Fat: 0g
- Saturated Fat: 0g
- Unsaturated Fat: 0g
- Trans Fat: 0g
- Carbohydrates: 22g
- Fiber: 2g
- Protein: 0g
- Cholesterol: 0mg
Keywords: huckleberry, margarita, cocktail, summer drink, refreshing




