

High-Protein Cottage Cheese Snickerdoodles: 15-Minute Bake
Protein Cottage Cheese Snickerdoodles: A Cozy Twist on a Classic Favorite
Welcome back, fellow foodies! Today, I’m thrilled to share a recipe that will not only satisfy your sweet tooth but also give a protein-packed twist to a classic treat — Protein Cottage Cheese Snickerdoodles. If you’ve ever lingered in a bakery, mesmerized by the delightful aroma of freshly baked cookies, you know there’s something magical about the combination of cinnamon and sugar.
Cottage cheese might not be the first ingredient that springs to mind when you think of cookies, but trust me, it adds a creamy richness and a boost of protein that will make these cookies your new favorite snack. Plus, they’re super easy to make and perfect for sharing with loved ones — or keeping all to yourself, no judgment here!
So, roll up those sleeves and let’s dive into this delectable recipe that will have your home smelling like a cozy café.
A Whiff of Nostalgia: My Cookie-Making Adventures
Growing up, my grandmother’s kitchen was my playground. I can still hear her laughter as we sifted flour, messily dusting the countertops in our quest to make the perfect cookie. Snickerdoodles were always a staple at our family gatherings, their delightful aroma wafting through the air as they baked to golden perfection.
I vividly remember one particular winter afternoon when my grandma decided to experiment. We were running low on ingredients, and she had just discovered a tub of cottage cheese lurking in the fridge. Instead of a disaster, we ended up creating an unforgettable hybrid of our beloved snickerdoodles, and those cookies became a hit – crunchy on the outside, soft and chewy on the inside, and a little bit healthier, too! It’s a fond memory that always brings a smile to my face, and now I’m excited to pass on that legacy with a modern twist.
Ingredients
Here’s what you’ll need to create these delightful Protein Cottage Cheese Snickerdoodles:
-
1 cup cottage cheese
Provides moisture and protein. Opt for low-fat or regular cottage cheese depending on your preference. For a dairy-free version, try a nut-based yogurt. -
1/2 cup coconut oil or unsalted butter
Adds richness and helps with texture. Coconut oil will lend a subtle flavor, while butter offers that classic taste. If you’re looking for a vegan option, use a plant-based butter. -
1/2 cup brown sugar
Offers sweetness and a hint of caramel flavor. You can substitute with coconut sugar for a less refined option, or use a sugar replacement if you’re cutting back on sugar. -
1/4 cup granulated sugar
This adds a crystal-like surface when rolling the cookies. For a less sweet version, reduce the granulated sugar slightly. -
1 large egg
Acts as a binding agent. For a vegan swap, try a flax egg (1 tablespoon flaxseed meal + 2.5 tablespoons water) instead! -
2 cups all-purpose flour
The base of our cookie. For a healthier twist, use whole wheat flour or even almond flour for a gluten-free option, but be aware it might change the texture. -
1 teaspoon baking powder
Helps the cookies rise! If you’re out of baking powder, you can make a substitute by mixing 1/2 teaspoon cream of tartar with 1/4 teaspoon baking soda. -
1 teaspoon baking soda
Enhances the texture and helps the cookies spread. If baking soda is unavailable, use an equal amount of baking powder. -
1 tablespoon ground cinnamon
The star of the snickerdoodle flavor. Add a pinch of extra cinnamon into the dough for additional flavor! -
1/2 teaspoon salt
Balances the sweetness and enhances the flavors. If you’re using salted butter, you can omit this entirely.
Now that we have our ingredients set, let’s move on to the fun part — the cooking!
Step-by-Step Instructions
-
Preheat Your Oven
Begin by preheating your oven to 350°F (175°C). As it heats up, the anticipation of fresh cookies filling your home is absolutely mouthwatering! -
Blend the Cottage Cheese
In a medium bowl, place your cottage cheese and give it a quick whirl with a fork or, for creamier results, blend it in a food processor until smooth. This step is crucial as it helps evenly distribute the cottage cheese into your cookie dough. -
Cream the Fats and Sugars
In a separate large mixing bowl, beat together the coconut oil (or butter) and both sugars until light and fluffy. This should take about 2-3 minutes. The fluffiness you achieve here will contribute to a chewy and soft cookie. -
Add in the Egg
Crack in your egg and mix until well incorporated. If you’re using a flax egg, make sure to let it sit for a minute to thicken before adding it in. -
Incorporate the Cottage Cheese
Next, fold in your blended cottage cheese mixture into the wet ingredients. At this point, your batter might look a bit lumpy; that’s normal! We want that cottage cheese to shine through. -
Combine Dry Ingredients
In another bowl, whisk together the flour, baking powder, baking soda, cinnamon, and salt. Gradually add this dry mix into your wet mixture, stirring gently until just combined. Don’t overmix; a few lumps are perfectly okay! -
Shape the Cookies
Here comes the fun part! Use a spoon or a cookie scoop to form balls of dough (about 1-2 tablespoons each). Roll them in a mixture of granulated sugar and extra cinnamon for that signature snickerdoodle finish. -
Bake the Cookies
Arrange the dough balls on a baking sheet lined with parchment paper, leaving enough space between them (about 2 inches). Pop them into the preheated oven and bake for 10-12 minutes, or until the edges are lightly golden. They might look soft in the center, but they’ll firm up as they cool. -
Cool and Enjoy
Let your cookies cool on the baking sheet for about 5 minutes before transferring them to a wire rack to cool completely. Trust me, the aroma wafting through your home is worth the wait!
And just like that, you’ve whipped up a batch of Protein Cottage Cheese Snickerdoodles that are sure to become a staple in your kitchen!
Serving Suggestions
You can serve these snickerdoodles warm with a glass of cold milk or a cup of your favorite tea or coffee. For an extra indulgent treat, consider pairing them with a scoop of vanilla ice cream or drizzling with a simple homemade glaze made from powdered sugar and milk.
Recipe Variations
- Nutty Option: Add 1/2 cup of chopped pecans or walnuts for a delightful crunch.
- Chocolate Chip Delight: Fold in 1/2 cup of mini chocolate chips for a chocolatey twist.
- Pumpkin Spice Snickerdoodles: Substitute 1/2 cup of cottage cheese with pumpkin puree and add pumpkin spice for a fall-inspired flavor.
- Gluten-Free Version: Swap out the all-purpose flour for a gluten-free 1:1 baking flour mix to enjoy the same great flavor without the gluten.
- Vegan Delight: Substitute the egg and butter with flax eggs and coconut oil for a completely vegan option.
Chef’s Notes
These Protein Cottage Cheese Snickerdoodles have a special place in my heart. Over the years, my recipe has evolved, but the key elements – comfort and nostalgia – remain the same. There’s something incredibly rewarding about seeing friends and family light up as they take their first bite. It’s a reminder that cooking is all about creating memories and connecting with those we love.
Oh, and let’s talk about that time my dog, Charlie, made a surprise appearance while I was mixing the dough. He managed to knock over a bag of flour, sending it flying everywhere! It turned into a mini snowstorm in my kitchen, and we both ended up a bit floury but laughing. Just another reminder to embrace the chaos of the kitchen!
FAQs and Troubleshooting
-
Why are my cookies flat?
Flat cookies can result from overmixing the dough or not having enough flour. Make sure to gently fold in the dry ingredients and measure your flour correctly for the best results. -
Can I freeze these cookies?
Absolutely! You can freeze them before or after baking. Just ensure you place them in an airtight container. They’ll last for about a month in the freezer. -
What if I don’t have cottage cheese?
If you’re fresh out of cottage cheese, you can substitute with Greek yogurt or ricotta cheese. Both will provide a similar texture and flavor! -
How do I store the leftover cookies?
Keep your cookies in an airtight container at room temperature for up to a week. If you like them a bit chewy, store them with a slice of bread to keep moisture in.
Nutritional Info (Optional)
While the exact nutritional info can vary based on specific ingredients, here’s a rough breakdown per cookie (assuming 24 cookies total):
- Calories: 95
- Protein: 2.6g
- Fat: 4g
- Carbohydrates: 12.1g
- Fiber: 0.5g
- Sugar: 6g
There you have it! A delightful healthier take on a classic cookies that are sure to be a hit with everyone. I hope you try this recipe out and create delicious memories in your kitchen. Remember, cooking is all about love and joy — so embrace the process and enjoy every bite! Happy baking, everyone!
Print
Protein Cottage Cheese Snickerdoodles
- Total Time: 27 minutes
- Yield: 24 cookies 1x
- Diet: Vegetarian
Description
A protein-packed twist on classic snickerdoodle cookies featuring creamy cottage cheese for added richness.
Ingredients
- 1 cup cottage cheese
- 1/2 cup coconut oil or unsalted butter
- 1/2 cup brown sugar
- 1/4 cup granulated sugar
- 1 large egg
- 2 cups all-purpose flour
- 1 teaspoon baking powder
- 1 teaspoon baking soda
- 1 tablespoon ground cinnamon
- 1/2 teaspoon salt
Instructions
- Preheat your oven to 350°F (175°C).
- Blend the cottage cheese until smooth.
- Cream the coconut oil (or butter) and both sugars until light and fluffy.
- Add in the egg and mix until well incorporated.
- Incorporate the blended cottage cheese mixture into the wet ingredients.
- Combine the flour, baking powder, baking soda, cinnamon, and salt in another bowl.
- Gradually add the dry mix to the wet mixture, stirring gently.
- Shape the dough into balls and roll in a mixture of granulated sugar and cinnamon.
- Bake for 10-12 minutes or until the edges are lightly golden.
- Cool the cookies on a wire rack.
Notes
For a vegan option, substitute the egg with a flax egg and use plant-based butter.
- Prep Time: 15 minutes
- Cook Time: 12 minutes
- Category: Dessert
- Method: Baking
- Cuisine: American
Nutrition
- Serving Size: 1 cookie
- Calories: 95
- Sugar: 6g
- Sodium: 100mg
- Fat: 4g
- Saturated Fat: 3g
- Unsaturated Fat: 1g
- Trans Fat: 0g
- Carbohydrates: 12g
- Fiber: 0.5g
- Protein: 2.6g
- Cholesterol: 30mg
Keywords: snickerdoodles, cookies, protein cookies, cottage cheese cookies, dessert
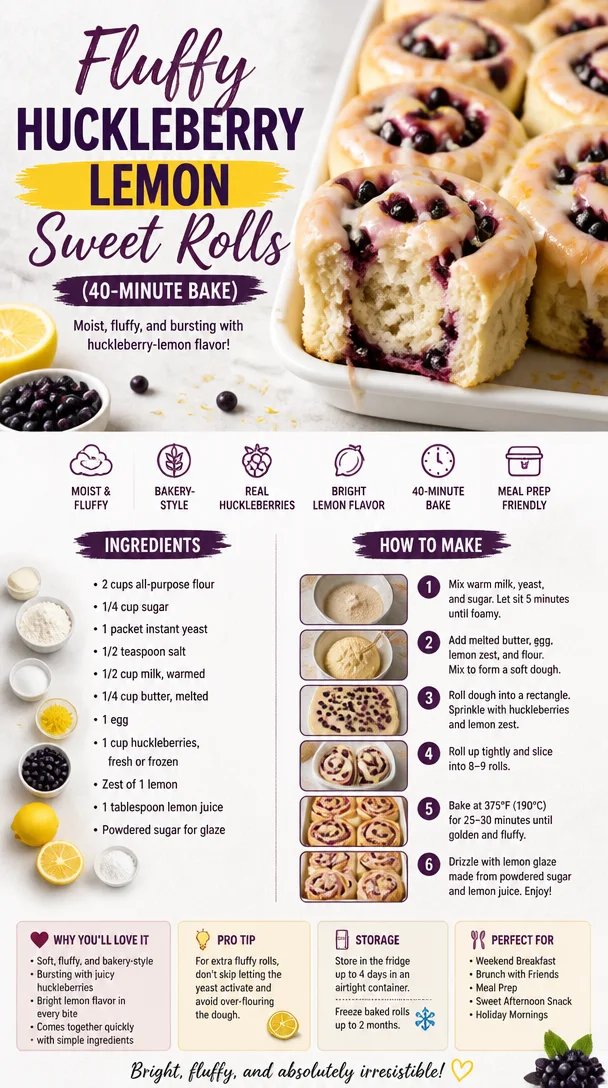
Fluffy Huckleberry Lemon Sweet Rolls (40-Minute Bake)
Huckleberry Lemon Sweet Rolls: A Cozy Kitchen Delight
Welcome to my favorite corner of the kitchen! I’m so excited to share this delightful recipe for Huckleberry Lemon Sweet Rolls with you. These generously swirled, fluffy rolls are the epitome of comfort and joy—perfect for lazy Sunday mornings or as a sweet treat to impress your loved ones. If you’re anything like me, the thought of warm, sweet dough mingling with zesty lemon and tart huckleberries makes your heart skip a beat! So, let’s dive into this comforting, berry-filled adventure that will surely make your kitchen smell like a cozy café.
I first stumbled upon the idea for these rolls during a memorable summer spent in the Pacific Northwest, surrounded by lush landscapes and wild huckleberry bushes. The air was filled with the tantalizing aroma of baked goods, and I couldn’t resist plucking handfuls of sweet, juicy huckleberries while exploring the winding trails. Every bite was a burst of flavor—the sweet berries perfectly complementing and balancing the tangy lemon. The day I turned those huckleberries into sweet rolls, I found myself transported back to that summer, every bite evoking cherished memories and laughter shared around the kitchen table.
Are you ready to think of your own special memories as we create rolling, gooey deliciousness? Let’s gather our ingredients and roll up our sleeves!
Ingredients
-
For the Dough:
- 4 cups all-purpose flour: A pantry staple, this is the backbone of our sweet rolls. If you want a lighter texture, you can substitute half with bread flour.
- 1/4 cup granulated sugar: This adds sweetness to the dough. If you’re watching your sugar intake, feel free to go for coconut sugar instead.
- 1 packet (2 1/4 teaspoons) instant yeast: The tiny magic workers that help our rolls rise! If you only have active dry yeast, use the same amount but activate it in warm water with a pinch of sugar before adding it to your mixture.
- 1 teaspoon salt: Enhancing flavor, it’s essential for balancing sweetness.
- 1 cup whole milk: For tenderness and moisture. You can swap it with almond or oat milk for a dairy-free version.
- 1/4 cup unsalted butter, melted: This adds richness. You can try using coconut oil if you prefer a vegan option.
- 2 large eggs: They help bind our dough and give it structure. For a vegan alternative, you can use flax eggs (1 tablespoon flaxseed meal + 2.5 tablespoons water per egg).
-
For the Filling:
- 1 cup huckleberries (fresh or frozen): Bursting with flavor and antioxidants, they are an absolute treat. Blueberries can be substituted if huckleberries are hard to find!
- 1/2 cup brown sugar: This will create a wonderfully gooey filling. If you want a lighter option, you could use a blend of maple sugar and a bit of cinnamon for depth.
- 2 tablespoons lemon zest: The zest adds that bright tang we love! Try it with grated orange zest for a different twist.
- 1 tablespoon lemon juice: A splash of acidity to elevate our filling. You can use lime juice as an alternative for a unique flavor!
-
For the Glaze:
- 1 cup powdered sugar: The sweetness and smooth texture that make our glaze enticing.
- 2 tablespoons lemon juice: This will give our glaze a zesty kick. Feel free to add milk for a creamier consistency.
- Lemon zest (for garnish): A little extra zest never hurt!
Step-by-Step Instructions
Now that we have everything gathered, let’s roll up our sleeves and get baking!
-
Making the Dough:
In a large bowl, whisk together the flour, sugar, salt, and instant yeast until well combined. In a saucepan, warm the milk over low heat until it’s just barely warm to the touch (not hot!). Remove it from heat and add in the melted butter. Then, whisk the eggs into the milk-butter mixture. Slowly pour the liquid into the dry ingredients, mixing just until a shaggy dough forms.Chef Tip: Don’t over-mix! A shaggy dough means you’ll have soft, chewy rolls.
-
Kneading:
On a lightly floured surface, knead the dough for about 5-7 minutes until it’s smooth and elastic. Keep your surface floured to prevent sticking!Chef Insight: Perfectly kneaded dough will bounce back when you poke it. If it’s too sticky, add a bit more flour, but resist the urge to add too much.
-
First Rise:
Place the kneaded dough in a greased bowl, cover with a kitchen towel or plastic wrap, and let it rise in a warm place until doubled in size—about 1 hour.Nostalgic Note: While the dough is rising, go ahead and take a quick break. This is a great time to put on some music and dream about how these rolls will smell!
-
Preparing the Filling:
While the dough rises, combine the huckleberries, brown sugar, lemon zest, and lemon juice in a medium bowl. Set aside, allowing the flavors to meld beautifully.Chef Insight: If using frozen huckleberries, let them thaw and drain excess liquid to avoid soggy rolls!
-
Rolling Out the Dough:
After the dough has risen, punch it down gently to release the air. Roll it out on a floured surface into a large rectangle, about 16×12 inches.Pro Tip: Aim for even thickness; this helps the rolls bake uniformly!
-
Filling and Rolling:
Spread the berry filling evenly over the dough, leaving a small border around the edges. Starting from one long side, carefully roll the dough into a tight log.Chef Hack: Use a bench scraper to help lift the dough as you roll to keep the shape intact!
-
Cutting the Rolls:
Using a sharp knife or dental floss (yes, seriously!), slice the log into 12 equal pieces. Place them in a greased baking dish, cut side up.Note: If you want to allow the rolls to rise more, you can cover them and let them sit for another 30 minutes. More fluffiness!
-
Second Rise:
Cover the rolls again with a towel and let them rise until puffed and touching each other, about 30-45 minutes.Chef Tip: Preheat your oven to 350°F (180°C) while they’re rising!
-
Baking:
Bake for 25-30 minutes or until golden brown and the center rolls are cooked through. The kitchen will smell heavenly, trust me!Final Pro Tip: Keep an eye on the rolls to prevent overbaking—nobody wants dry rolls!
-
Making the Glaze:
While the rolls cool slightly, whisk together the powdered sugar and lemon juice until smooth. Drizzle over the warm rolls and let it melt into every crevice.
Nostalgic Note: This glaze is like a lemon hug for your rolls!
Serving Suggestions
Once your Huckleberry Lemon Sweet Rolls are out of the oven and drizzled with glaze, they are ready to be served! For an eye-popping presentation, arrange them on a rustic wooden platter, sprinkle extra lemon zest on top, and garnish with fresh huckleberries or mint leaves.
Served warm, these rolls are perfect with a cup of coffee or tea, making them an inviting centerpiece for brunch or a cozy afternoon snack. Just watching your friends and family gather around, excited to dig in, will warm your heart!
Recipe Variations
- Add Spices: Mix in a teaspoon of cinnamon or nutmeg to the filling for added warmth and spice.
- Explore Flavors: Swap out huckleberries for blueberries, raspberries, or even diced strawberries for a fruity twist!
- Vegan Version: Use plant-based milk, coconut oil for butter, and flax eggs to create a completely vegan sweet roll.
- Stuff It Up: Try adding cream cheese to the filling for extra creaminess or white chocolate chips for a decadent touch!
Chef’s Notes
I can hardly believe how long I’ve been making these delightful rolls—it’s one of those recipes that feels like home. Each batch carries a piece of my heart and countless memories. I remember one particular summer, when a thunderstorm rolled in as I was in the middle of making these. With rain pouring down outside, the smell of lemon and huckleberries wafted through the house, turning a dreary afternoon into a cozy gathering with friends. We huddled around the table, stealing rolls while they were still warm, giggling as sugar dusted our noses.
This recipe is a reminder that food is not just about sustenance; it’s an experience, a memory in the making. Let these rolls inspire you to create your own kitchen stories!
FAQs and Troubleshooting
1. Why did my rolls not rise?
If your rolls didn’t rise, it may be due to expired or inactive yeast. Always check the expiration date, and ensure to proof the yeast in warm water with a pinch of sugar beforehand if using active dry yeast.
2. Can I prepare these rolls the night before?
Absolutely! After assembling the rolls, cover them and place them in the fridge overnight. In the morning, take them out and let them rise at room temperature before baking.
3. My dough is too sticky! What do I do?
If your dough is looking excessively sticky, sprinkle in a bit more flour, one tablespoon at a time, until it’s manageable for kneading.
4. Can I freeze these sweet rolls?
Yes, indeed! You can freeze unbaked rolls after cutting them. Just arrange them on a baking sheet, freeze individually, then transfer to a freezer bag. When ready to bake, place them in the fridge overnight to thaw and rise before baking.
Nutritional Info
While enjoying these sweet rolls, remember to do so in moderation! Each roll may contain approximately:
- Calories: 320
- Total Fat: 8g
- Saturated Fat: 4g
- Cholesterol: 40mg
- Sodium: 150mg
- Total Carbohydrates: 54g
- Dietary Fiber: 2g
- Sugars: 14g
- Protein: 6g
Enjoy these delightful Huckleberry Lemon Sweet Rolls and let them spark joy in your kitchen and your heart. Happy baking, friends!
Print
Huckleberry Lemon Sweet Rolls
- Total Time: 45 minutes
- Yield: 12 servings 1x
- Diet: Vegetarian
Description
Delightful Huckleberry Lemon Sweet Rolls, perfect for lazy mornings and comforting family gatherings.
Ingredients
- 4 cups all-purpose flour
- 1/4 cup granulated sugar
- 1 packet (2 1/4 teaspoons) instant yeast
- 1 teaspoon salt
- 1 cup whole milk
- 1/4 cup unsalted butter, melted
- 2 large eggs
- 1 cup huckleberries (fresh or frozen)
- 1/2 cup brown sugar
- 2 tablespoons lemon zest
- 1 tablespoon lemon juice
- 1 cup powdered sugar
- 2 tablespoons lemon juice (for glaze)
- Lemon zest (for garnish)
Instructions
- Whisk the flour, sugar, salt, and yeast in a large bowl until combined.
- Warm the milk over low heat until just warm to touch. Remove from heat and add melted butter.
- Whisk the eggs into the milk-butter mixture.
- Pour the liquid into the dry ingredients, mixing until a shaggy dough forms.
- Knead the dough on a floured surface for 5-7 minutes until smooth and elastic.
- Place the kneaded dough in a greased bowl, cover, and let it rise until doubled in size (about 1 hour).
- Combine huckleberries, brown sugar, lemon zest, and lemon juice for the filling.
- Roll out the dough into a 16×12 inch rectangle.
- Spread the berry filling evenly over the dough.
- Roll the dough into a tight log and cut into 12 equal pieces.
- Place them in a greased baking dish, cut side up, and let rise for another 30-45 minutes.
- Preheat the oven to 350°F (180°C).
- Bake for 25-30 minutes or until golden brown.
- Whisk powdered sugar and lemon juice together for the glaze and drizzle over warm rolls.
Notes
Try substituting huckleberries with blueberries for a different flavor. Perfect with coffee or tea!
- Prep Time: 15 minutes
- Cook Time: 30 minutes
- Category: Breakfast
- Method: Baking
- Cuisine: American
Nutrition
- Serving Size: 1 roll
- Calories: 320
- Sugar: 14g
- Sodium: 150mg
- Fat: 8g
- Saturated Fat: 4g
- Unsaturated Fat: 0g
- Trans Fat: 0g
- Carbohydrates: 54g
- Fiber: 2g
- Protein: 6g
- Cholesterol: 40mg
Keywords: huckleberry, lemon, sweet rolls, baking, brunch
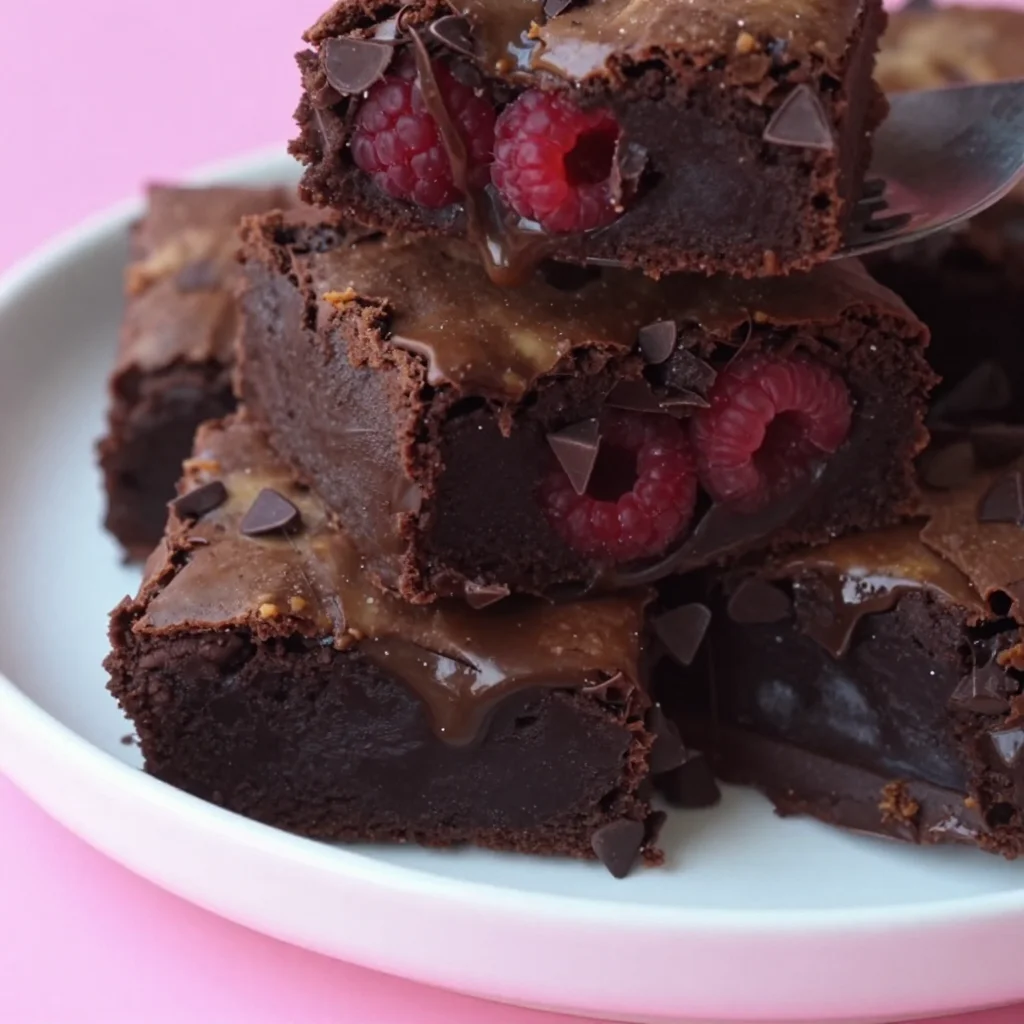
Raspberry Chocolate Brownies: Gooey, 30-Minute Bowl Recipe
Raspberry Chocolate Brownies: A Match Made in Heaven
Welcome, fellow foodies! Today, we’re diving into the delicious world of desserts with a recipe that is truly special—Raspberry Chocolate Brownies! Picture this: a rich, fudgy brownie infused with dark chocolate and swirled with tart, juicy raspberries. It’s a flavor explosion that’s not just a feast for the taste buds but also for the eyes! Honestly, these brownies are the perfect dessert for any occasion, whether you’re celebrating a birthday, indulging after dinner, or just treating yourself on a cozy weekend.
Raspberry and chocolate have always been a perfect pairing in my kitchen. There’s something magical about the sweetness of chocolate blending so beautifully with the tanginess of fresh raspberries. They create a symphony of flavors that takes your palate on a delightful journey. If you can relate to the joy of biting into a warm brownie and discovering the sweet burst of raspberry flavor, you’re going to love this recipe.
You’ll find that this brownie recipe invites creativity and personal touch. Whether you’re a baking newbie or a seasoned pro, whipping up these brownies doesn’t require fancy skills—just some basic ingredients, a bit of love, and a pinch of excitement! So grab your apron, and let’s bring some joy to your kitchen with these luscious Raspberry Chocolate Brownies!
A Sweet Trip Down Memory Lane
I can still remember the first time I made brownies on my own. I was about 12 years old and eager to impress my family with my newfound culinary skills. The kitchen smelled like heaven that day, with chocolate melting in the microwave and the warmth of cookies on the countertop. My mom had just come home with a container of fresh raspberries, and I thought, "Why not?"
I chopped those little gems up and folded them into the brownie batter, thinking that it would be a delightful twist to the classic recipe. I remember the joy on my family’s faces when they tried my creation. Those brownies were a hit! We shared them with neighbors, friends, and even took a batch to a potluck. Every crumb vanished, leaving behind glowing compliments that fueled my passion for baking.
Fast forward to today, and I still find that same magic whenever I make Raspberry Chocolate Brownies. This recipe embodies nostalgia and joy, and I can’t wait for you to create your unique memories in the kitchen!
Ingredients You’ll Need
-
Dark Chocolate (60-70% cocoa): The heart of our brownies! Dark chocolate brings a deep, rich flavor. If you prefer a sweeter taste, feel free to use semi-sweet chocolate or even milk chocolate.
-
Unsalted Butter: Adds moisture and richness. You can substitute with coconut oil or vegetable oil for a dairy-free option.
-
Granulated Sugar: Sweetens the brownies! Brown sugar can be used for a hint of caramel flavor, or coconut sugar for a healthier twist.
-
Large Eggs: Essential for binding the ingredients together. If you need a vegan option, use flaxseed or chia eggs (1 tablespoon ground flaxseed or chia mixed with 3 tablespoons of water per egg).
-
All-Purpose Flour: This gives the brownies structure. Gluten-free flour blends work well, too, for those avoiding gluten.
-
Fresh Raspberries: The star of the show! Use frozen raspberries if fresh ones aren’t available, just be sure to adjust your baking time as they may introduce extra moisture.
-
Vanilla Extract: A hint of vanilla enhances the chocolate flavor. You can substitute with almond extract for a different twist.
-
Salt: Just a pinch enhances all the flavors and balances the sweetness.
Step-by-Step Instructions
Step 1: Melt the Chocolate and Butter
Begin by preheating your oven to 350°F (175°C). Grab a medium saucepan and add the chopped dark chocolate and unsalted butter. Place it over low heat, stirring gently until melted and smooth. This can also be done using a microwave—just heat in short bursts of 20 seconds, stirring in between.
Chef Tip: Don’t overheat the chocolate; it’ll become grainy. Aim for a glossy consistency!
Step 2: Mix the Sugar and Eggs
In a large mixing bowl, whisk together the granulated sugar and eggs. You want to incorporate air into the mixture for a lighter texture. Keep whisking until it’s pale and fluffy (about 2-3 minutes).
Step 3: Combine Chocolate and Sugar Mix
Once your chocolate and butter mix is smooth, pour it into the bowl with your sugar and egg mixture. Stir gently until combined, but be careful not to over-mix!
Step 4: Add Dry Ingredients
In a separate bowl, combine all-purpose flour and salt. Gradually add this dry mix into your wet ingredients. Fold gently until you see no more flour streaks. Over-mixing can lead to tough brownies, and we want them to be ultra-fudgy and soft!
Step 5: Fold in the Raspberries
Now for the fun part! Gently fold in the fresh raspberries. If you’re using frozen raspberries, add them in straight from the freezer. This will help prevent them from breaking down too much in the batter.
Chef Hack: Reserve a few raspberries to place on top for that gorgeous, bakery-style look!
Step 6: Pour into the Baking Pan
Line an 8×8 inch baking pan with parchment paper for easy removal, and pour the brownie batter into the pan. Level it out with a spatula and sprinkle those reserved raspberries on top.
Step 7: Bake to Perfection
Pop the brownies into the preheated oven and bake for about 25-30 minutes. They should look set on the edges but still slightly gooey in the middle. You can check for doneness by inserting a toothpick—it should come out with a few moist crumbs.
Step 8: Cool and Serve
Once they’re done, remove the brownies from the oven and let them cool in the pan for about 15 minutes. Then, lift them out by the parchment paper and cool completely on a wire rack.
Serving Suggestion: Cut into squares and dust with powdered sugar for an elegant presentation. Serve them warm with a scoop of vanilla ice cream or a dollop of whipped cream for a truly decadent treat!
Recipe Variations
- Nutty Surprise: Add a half-cup of chopped walnuts or almonds for a delightful crunch.
- Minty Fresh: Incorporate a few drops of peppermint extract to give an exciting twist when serving during the holidays!
- Spicy Kick: Add a pinch of cayenne pepper or chili powder to the batter for a surprising heat that pairs beautifully with chocolate.
- Cream Cheese Swirl: For a tangy twist, prepare a simple cream cheese mixture and swirl it into the batter before baking.
- Double Berry Delight: Toss in some chopped strawberries along with the raspberries for a vibrant berry mix!
Chef’s Notes
These Raspberry Chocolate Brownies have come a long way since my early baking days. Every time I make them, I’m reminded of my family’s smiles and that sense of accomplishment that comes from feeding loved ones. I’ve experimented over the years with different ingredients, such as switching out the dark chocolate for blondie bases or exploring seasonal fruit varieties.
Whenever I have extra brownie batter, I pour it into muffin tins, creating brownie bites that bake up perfectly! They’re a wonderful solution for when you can’t decide between brownies or cake.
FAQs and Troubleshooting
Q1: Why are my brownies too cakey?
To achieve that fudgy texture, make sure not to overmix the batter, and avoid baking them for too long. They should be slightly under-baked in the center!
Q2: Can I use frozen raspberries?
Absolutely! Just be aware that they may release more moisture, so you might need to adjust the baking time slightly.
Q3: The brownies are crumbling—what went wrong?
This could be due to overbaking or not enough fat added to the recipe. Make sure you’re following the measurements precisely and keep an eye on them while baking.
Q4: How do I store leftover brownies?
Store them in an airtight container at room temperature for up to 4 days or in the fridge for a week. You can also freeze them for up to three months—just make sure they’re wrapped tightly!
Nutritional Info
(Per Brownie – approx. 1/16 of the batch)
- Calories: 180
- Protein: 3g
- Carbohydrates: 25g
- Fat: 8g
- Fiber: 2g
- Sugar: 12g
And there you have it—your guide to making delectable Raspberry Chocolate Brownies! May your baking adventures bring you joy and delicious moments shared with loved ones. Enjoy every bite, and remember, the kitchen is where love and flavors come together! Happy baking!
Print
Raspberry Chocolate Brownies
- Total Time: 45 minutes
- Yield: 16 servings 1x
- Diet: Vegetarian
Description
Rich, fudgy brownies infused with dark chocolate and swirled with tart raspberries, perfect for any occasion.
Ingredients
- 8 oz Dark Chocolate (60-70% cocoa)
- 1/2 cup Unsalted Butter
- 1 cup Granulated Sugar
- 3 Large Eggs
- 1 cup All-Purpose Flour
- 1 cup Fresh Raspberries
- 1 tsp Vanilla Extract
- 1/4 tsp Salt
Instructions
- Preheat your oven to 350°F (175°C). In a medium saucepan, add the chopped dark chocolate and unsalted butter over low heat. Stir until melted and smooth.
- Whisk together the granulated sugar and eggs in a large mixing bowl until pale and fluffy.
- Add the melted chocolate and butter mixture to the sugar and egg mixture. Stir until combined.
- Combine all-purpose flour and salt in a separate bowl, then gradually add it to the wet ingredients while folding gently.
- Fold in the fresh raspberries gently.
- Pour the brownie batter into a lined 8×8 inch baking pan and level it out.
- Bake for about 25-30 minutes, or until set on the edges but still slightly gooey in the center.
- Cool for about 15 minutes, then lift out and cool completely on a wire rack.
Notes
For a nutty surprise, add chopped walnuts or almonds. You can also experiment with flavors like mint or a cream cheese swirl.
- Prep Time: 15 minutes
- Cook Time: 30 minutes
- Category: Dessert
- Method: Baking
- Cuisine: American
Nutrition
- Serving Size: 1 brownie
- Calories: 180
- Sugar: 12g
- Sodium: 100mg
- Fat: 8g
- Saturated Fat: 5g
- Unsaturated Fat: 2g
- Trans Fat: 0g
- Carbohydrates: 25g
- Fiber: 2g
- Protein: 3g
- Cholesterol: 70mg
Keywords: brownies, dessert, chocolate, raspberries, baking




