
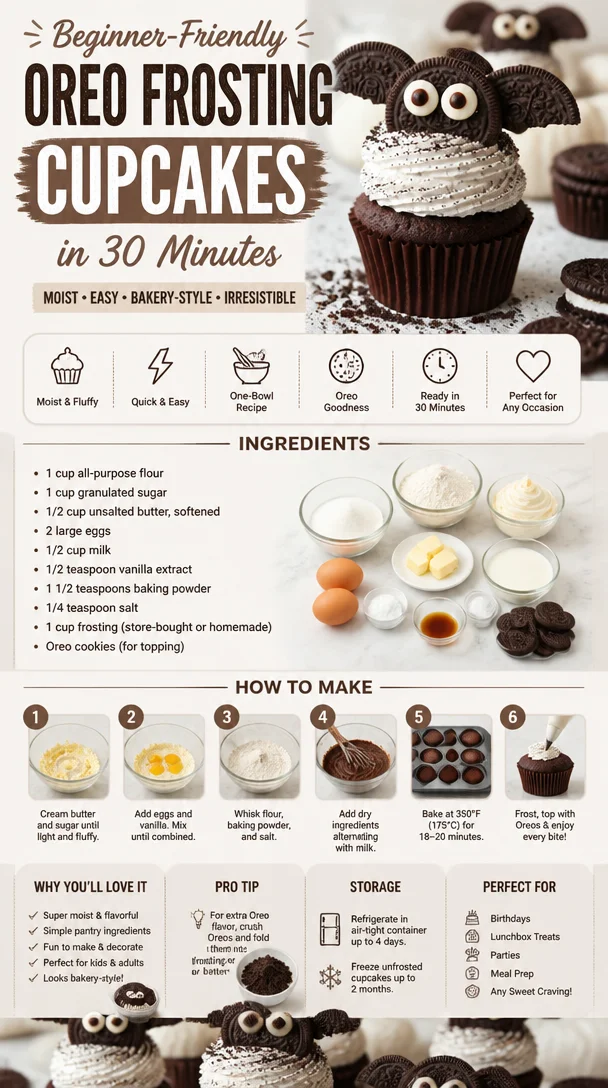
Beginner-Friendly Oreo Frosting Cupcakes in 30 Minutes
Delightfully Decadent Cupcakes with Oreo Frosting
Welcome to my kitchen! Today, we’re diving into a delightful world of sweetness with a recipe that’s as nostalgic as it is indulgent: Cupcakes with Oreo Frosting. If you’ve ever experienced that moment of pure joy when biting into a soft, fluffy cupcake topped with creamy, dreamy frosting, you know just how special this treat can be. Whether you’re celebrating a birthday, an anniversary, or just a Tuesday, these cupcakes are bound to bring smiles and happy dance moves all around!
A Sweet Memory
I still remember the first time I made cupcakes with Oreo frosting. It was a rainy Saturday afternoon, and my younger brother had invited a few of his friends over for a movie marathon. In preparation for their laughter and excitement, I decided to whip up a batch of cupcakes to make the day even sweeter. The kitchen filled with the sweet scent of vanilla and chocolate as I scooped the batter into the cupcake liners, and soon enough, the delightful aroma of freshly baked cupcakes wafted through our home.
Once they were out of the oven and cooled down, I hastily slathered on the Oreo frosting and topped each one with a crushed cookie. My brother and his friends erupted in cheers when they took their first bites—chocolatey bliss paired with the creamy crunch of Oreos. As I watched them relish each sweet morsel, I knew I had not only created a tasty treat but also a cherished memory. Since that day, these cupcakes have become a staple in my kitchen, a tasty reminder of the happiness that comes from baking.
Ingredients
Here’s what you’ll need to get started on these delightful cupcakes:
-
1 ½ cups all-purpose flour
The backbone of our cupcakes! If you need gluten-free options, you can use a 1:1 gluten-free flour substitute. -
1 cup granulated sugar
Sweetness is key! For a bit of a twist, you can opt for brown sugar to enrich the flavor. -
½ cup unsweetened cocoa powder
Cocoa adds that rich chocolate flavor. You could swap it with carob powder if you’re looking for a caffeine-free option. -
1 teaspoon baking powder
This helps our cupcakes rise to fluffy perfection. If you’re out of baking powder, 1/4 teaspoon of baking soda combined with 1/2 teaspoon of cream of tartar can work! -
½ teaspoon baking soda
This contributes to that lovely lift! -
½ teaspoon salt
A little salt enhances all the flavors. Don’t skip it, or your cupcakes might taste a bit flat. -
2 large eggs
These bind the ingredients together and add moisture. Aquafaba (the liquid from a can of chickpeas) can be used as an egg substitute for a vegan version—3 tablespoons per egg. -
½ cup vegetable oil
This will keep your cupcakes moist! You can substitute with melted coconut oil or applesauce for a healthier spin. -
½ cup buttermilk
Buttermilk adds a wonderful tang and enhances the moistness. If you don’t have any, combine regular milk with a teaspoon of vinegar and let it sit for 5 minutes. -
1 teaspoon pure vanilla extract
The secret weapon for flavor! Substitute with almond extract for a nutty twist. -
1 cup crème fraîche or cream cheese (for frosting)
This will allow for a rich base for our Oreo frosting. You can also use mascarpone for an even creamier texture. -
1 cup powdered sugar
To sweeten the frosting. If you’re looking to reduce sugar, you can use a sugar substitute. -
6-8 Oreo cookies (for frosting and decoration)
The star of the show! For a gluten-free version, use gluten-free Oreos.
Step-by-Step Instructions
Let’s get baking! Follow these steps to whip up a batch of delightful cupcakes:
-
Preheat Your Oven
Start by preheating your oven to 350°F (175°C). This is crucial for ensuring your cupcakes bake evenly. -
Prepare Your Pan
Line a 12-cup cupcake pan with fun and vibrant cupcake liners. I always love to mix it up with different colors—it just makes baking even more fun! -
Mix Dry Ingredients
In a large mixing bowl, whisk together the flour, sugar, cocoa powder, baking powder, baking soda, and salt until well combined. This step is important to ensure even flavor distribution throughout your cupcakes. -
Combine Wet Ingredients
In another bowl, beat the eggs, then add in the oil, buttermilk, and vanilla extract. Whisk everything together until smooth. When you pour this into the dry mix, the magic truly begins! -
Combine the Mixtures
Gradually pour the wet mixture into the dry ingredients, stirring gently until just combined. Make sure not to overmix; a few lumps are perfectly okay! -
Scoop and Bake
Using an ice cream scoop or a ladle, fill each cupcake liner about two-thirds full with batter. This gives them just the right amount of space to rise. Bake in the preheated oven for 18–20 minutes, or until a toothpick inserted in the center comes out clean. -
Cool Completely
Once baked, let the cupcakes cool in the pan for about 5 minutes, then transfer them to a wire rack to cool completamente. This is essential before frosting—no one wants melted frosting! -
Frost it Up!
To prepare the Oreo frosting, beat together the crème fraîche (or cream cheese), powdered sugar, and crushed Oreos until smooth and creamy. Again, the key is not to overbeat—just enough to combine perfectly! -
Decorate Your Cupcakes
Once the cupcakes are completely cool, use a piping bag (or a ziplock bag with a corner snipped off) to pipe the Oreo frosting onto each cupcake. Top them off with additional crushed Oreos for that great crunch!
Serving Suggestions
These cupcakes are perfect for parties, family gatherings, or simply enjoyed with a cozy cup of coffee on a quiet afternoon. Serve them on a cute platter—perhaps with a few extra Oreos on the side. A scoop of vanilla ice cream would also make a delightful companion!
Recipe Variations
- Chocolate Chip Surprise: Add mini chocolate chips into the batter for an extra gooey treat.
- Nutty Twist: Fold in crushed almonds or hazelnuts into the batter before baking.
- Vegan Delight: Substitute eggs with flaxseed meal and use a plant-based milk for a vegan-friendly version.
- Mini Cupcakes: Make these cupcakes in mini sizes for bite-sized goodness—just adjust the baking time accordingly.
- Fruity Fun: Add some raspberry or strawberry jam in the center before baking for a fruity explosion!
Chef’s Notes
The beauty of this recipe is its simplicity, which allows for so much personalization and creativity! I remember my first few batches, where I got a bit too adventurous and tossed in a handful of chocolate chips—great idea turned heavenly outcome! Over the years, I’ve experimented, and I still find pleasure in introducing new flavors. Who knew a humble cupcake could bring so much joy? Oh, and if you find frosting everywhere when you’re finished, don’t worry; it’s just a sign of a happy kitchen!
FAQs and Troubleshooting
-
Why are my cupcakes dense?
Dense cupcakes can often be a result of overmixing the batter. Mix until just combined for a lighter texture. -
How can I avoid overbaking?
Keep an eye on your cupcakes during the last few minutes of baking. When a toothpick comes out with just a few moist crumbs, they’re perfect! -
What can I do if my frosting is too runny?
If your frosting is too runny, try adding in a bit more powdered sugar until you reach the desired consistency. -
Can I make these ahead of time?
Absolutely! Bake the cupcakes ahead of time and store them in an airtight container at room temperature for up to 2 days before frosting them.
Nutritional Info (Optional)
For those curious about the nutrition breakdown, here’s a general overview per cupcake (without frosting):
- Calories: Approximately 200
- Total Fat: 8g
- Saturated Fat: 1.5g
- Carbohydrates: 30g
- Sugars: 15g
- Protein: 2g
And there you have it—a delightful recipe for cupcakes with delectable Oreo frosting! I hope this sparks joy in your kitchen as much as it did in mine. Happy baking, fellow foodies!
Print
Delightfully Decadent Cupcakes with Oreo Frosting
- Total Time: 40 minutes
- Yield: 12 servings 1x
- Diet: Vegetarian
Description
Indulge in soft, fluffy cupcakes topped with creamy Oreo frosting for a delightful treat perfect for any occasion.
Ingredients
- 1 ½ cups all-purpose flour
- 1 cup granulated sugar
- ½ cup unsweetened cocoa powder
- 1 teaspoon baking powder
- ½ teaspoon baking soda
- ½ teaspoon salt
- 2 large eggs
- ½ cup vegetable oil
- ½ cup buttermilk
- 1 teaspoon pure vanilla extract
- 1 cup crème fraîche or cream cheese (for frosting)
- 1 cup powdered sugar
- 6–8 Oreo cookies (for frosting and decoration)
Instructions
- Preheat your oven to 350°F (175°C).
- Prepare a 12-cup cupcake pan with cupcake liners.
- Mix together the flour, sugar, cocoa powder, baking powder, baking soda, and salt in a large mixing bowl.
- Combine the eggs, oil, buttermilk, and vanilla in another bowl and whisk until smooth.
- Pour the wet ingredients into the dry ingredients and stir gently until just combined.
- Scoop the batter into the cupcake liners, filling each about two-thirds full.
- Bake for 18–20 minutes, or until a toothpick inserted comes out clean.
- Cool completely on a wire rack before frosting.
- Frost with a mixture of crème fraîche (or cream cheese), powdered sugar, and crushed Oreos.
- Decorate with additional crushed Oreos on top.
Notes
Feel free to experiment with ingredients and toppings for personalized variations!
- Prep Time: 20 minutes
- Cook Time: 20 minutes
- Category: Dessert
- Method: Baking
- Cuisine: American
Nutrition
- Serving Size: 1 cupcake
- Calories: 200
- Sugar: 15g
- Sodium: 210mg
- Fat: 8g
- Saturated Fat: 1.5g
- Unsaturated Fat: 6g
- Trans Fat: 0g
- Carbohydrates: 30g
- Fiber: 1g
- Protein: 2g
- Cholesterol: 30mg
Keywords: cupcakes, Oreo, frosting, dessert, baking
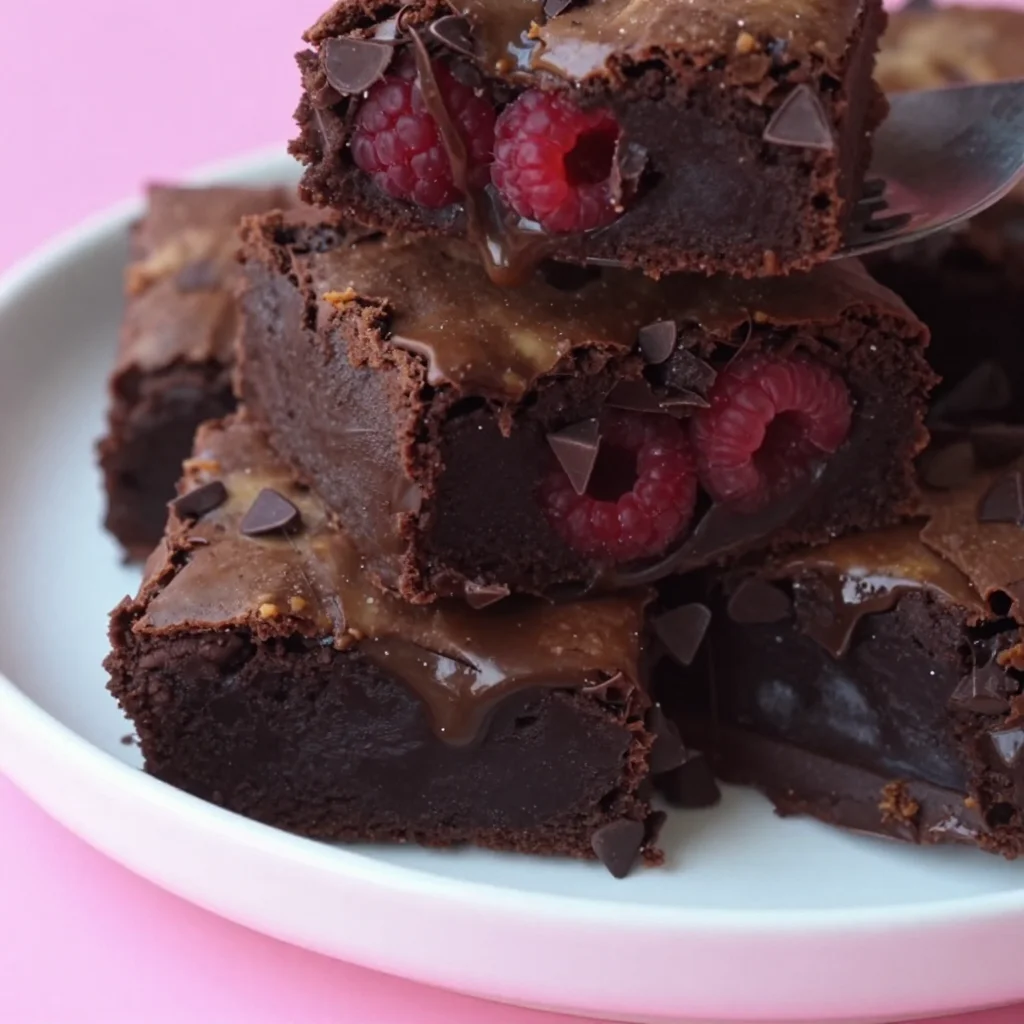
Raspberry Chocolate Brownies: Gooey, 30-Minute Bowl Recipe
Raspberry Chocolate Brownies: A Match Made in Heaven
Welcome, fellow foodies! Today, we’re diving into the delicious world of desserts with a recipe that is truly special—Raspberry Chocolate Brownies! Picture this: a rich, fudgy brownie infused with dark chocolate and swirled with tart, juicy raspberries. It’s a flavor explosion that’s not just a feast for the taste buds but also for the eyes! Honestly, these brownies are the perfect dessert for any occasion, whether you’re celebrating a birthday, indulging after dinner, or just treating yourself on a cozy weekend.
Raspberry and chocolate have always been a perfect pairing in my kitchen. There’s something magical about the sweetness of chocolate blending so beautifully with the tanginess of fresh raspberries. They create a symphony of flavors that takes your palate on a delightful journey. If you can relate to the joy of biting into a warm brownie and discovering the sweet burst of raspberry flavor, you’re going to love this recipe.
You’ll find that this brownie recipe invites creativity and personal touch. Whether you’re a baking newbie or a seasoned pro, whipping up these brownies doesn’t require fancy skills—just some basic ingredients, a bit of love, and a pinch of excitement! So grab your apron, and let’s bring some joy to your kitchen with these luscious Raspberry Chocolate Brownies!
A Sweet Trip Down Memory Lane
I can still remember the first time I made brownies on my own. I was about 12 years old and eager to impress my family with my newfound culinary skills. The kitchen smelled like heaven that day, with chocolate melting in the microwave and the warmth of cookies on the countertop. My mom had just come home with a container of fresh raspberries, and I thought, "Why not?"
I chopped those little gems up and folded them into the brownie batter, thinking that it would be a delightful twist to the classic recipe. I remember the joy on my family’s faces when they tried my creation. Those brownies were a hit! We shared them with neighbors, friends, and even took a batch to a potluck. Every crumb vanished, leaving behind glowing compliments that fueled my passion for baking.
Fast forward to today, and I still find that same magic whenever I make Raspberry Chocolate Brownies. This recipe embodies nostalgia and joy, and I can’t wait for you to create your unique memories in the kitchen!
Ingredients You’ll Need
-
Dark Chocolate (60-70% cocoa): The heart of our brownies! Dark chocolate brings a deep, rich flavor. If you prefer a sweeter taste, feel free to use semi-sweet chocolate or even milk chocolate.
-
Unsalted Butter: Adds moisture and richness. You can substitute with coconut oil or vegetable oil for a dairy-free option.
-
Granulated Sugar: Sweetens the brownies! Brown sugar can be used for a hint of caramel flavor, or coconut sugar for a healthier twist.
-
Large Eggs: Essential for binding the ingredients together. If you need a vegan option, use flaxseed or chia eggs (1 tablespoon ground flaxseed or chia mixed with 3 tablespoons of water per egg).
-
All-Purpose Flour: This gives the brownies structure. Gluten-free flour blends work well, too, for those avoiding gluten.
-
Fresh Raspberries: The star of the show! Use frozen raspberries if fresh ones aren’t available, just be sure to adjust your baking time as they may introduce extra moisture.
-
Vanilla Extract: A hint of vanilla enhances the chocolate flavor. You can substitute with almond extract for a different twist.
-
Salt: Just a pinch enhances all the flavors and balances the sweetness.
Step-by-Step Instructions
Step 1: Melt the Chocolate and Butter
Begin by preheating your oven to 350°F (175°C). Grab a medium saucepan and add the chopped dark chocolate and unsalted butter. Place it over low heat, stirring gently until melted and smooth. This can also be done using a microwave—just heat in short bursts of 20 seconds, stirring in between.
Chef Tip: Don’t overheat the chocolate; it’ll become grainy. Aim for a glossy consistency!
Step 2: Mix the Sugar and Eggs
In a large mixing bowl, whisk together the granulated sugar and eggs. You want to incorporate air into the mixture for a lighter texture. Keep whisking until it’s pale and fluffy (about 2-3 minutes).
Step 3: Combine Chocolate and Sugar Mix
Once your chocolate and butter mix is smooth, pour it into the bowl with your sugar and egg mixture. Stir gently until combined, but be careful not to over-mix!
Step 4: Add Dry Ingredients
In a separate bowl, combine all-purpose flour and salt. Gradually add this dry mix into your wet ingredients. Fold gently until you see no more flour streaks. Over-mixing can lead to tough brownies, and we want them to be ultra-fudgy and soft!
Step 5: Fold in the Raspberries
Now for the fun part! Gently fold in the fresh raspberries. If you’re using frozen raspberries, add them in straight from the freezer. This will help prevent them from breaking down too much in the batter.
Chef Hack: Reserve a few raspberries to place on top for that gorgeous, bakery-style look!
Step 6: Pour into the Baking Pan
Line an 8×8 inch baking pan with parchment paper for easy removal, and pour the brownie batter into the pan. Level it out with a spatula and sprinkle those reserved raspberries on top.
Step 7: Bake to Perfection
Pop the brownies into the preheated oven and bake for about 25-30 minutes. They should look set on the edges but still slightly gooey in the middle. You can check for doneness by inserting a toothpick—it should come out with a few moist crumbs.
Step 8: Cool and Serve
Once they’re done, remove the brownies from the oven and let them cool in the pan for about 15 minutes. Then, lift them out by the parchment paper and cool completely on a wire rack.
Serving Suggestion: Cut into squares and dust with powdered sugar for an elegant presentation. Serve them warm with a scoop of vanilla ice cream or a dollop of whipped cream for a truly decadent treat!
Recipe Variations
- Nutty Surprise: Add a half-cup of chopped walnuts or almonds for a delightful crunch.
- Minty Fresh: Incorporate a few drops of peppermint extract to give an exciting twist when serving during the holidays!
- Spicy Kick: Add a pinch of cayenne pepper or chili powder to the batter for a surprising heat that pairs beautifully with chocolate.
- Cream Cheese Swirl: For a tangy twist, prepare a simple cream cheese mixture and swirl it into the batter before baking.
- Double Berry Delight: Toss in some chopped strawberries along with the raspberries for a vibrant berry mix!
Chef’s Notes
These Raspberry Chocolate Brownies have come a long way since my early baking days. Every time I make them, I’m reminded of my family’s smiles and that sense of accomplishment that comes from feeding loved ones. I’ve experimented over the years with different ingredients, such as switching out the dark chocolate for blondie bases or exploring seasonal fruit varieties.
Whenever I have extra brownie batter, I pour it into muffin tins, creating brownie bites that bake up perfectly! They’re a wonderful solution for when you can’t decide between brownies or cake.
FAQs and Troubleshooting
Q1: Why are my brownies too cakey?
To achieve that fudgy texture, make sure not to overmix the batter, and avoid baking them for too long. They should be slightly under-baked in the center!
Q2: Can I use frozen raspberries?
Absolutely! Just be aware that they may release more moisture, so you might need to adjust the baking time slightly.
Q3: The brownies are crumbling—what went wrong?
This could be due to overbaking or not enough fat added to the recipe. Make sure you’re following the measurements precisely and keep an eye on them while baking.
Q4: How do I store leftover brownies?
Store them in an airtight container at room temperature for up to 4 days or in the fridge for a week. You can also freeze them for up to three months—just make sure they’re wrapped tightly!
Nutritional Info
(Per Brownie – approx. 1/16 of the batch)
- Calories: 180
- Protein: 3g
- Carbohydrates: 25g
- Fat: 8g
- Fiber: 2g
- Sugar: 12g
And there you have it—your guide to making delectable Raspberry Chocolate Brownies! May your baking adventures bring you joy and delicious moments shared with loved ones. Enjoy every bite, and remember, the kitchen is where love and flavors come together! Happy baking!
Print
Raspberry Chocolate Brownies
- Total Time: 45 minutes
- Yield: 16 servings 1x
- Diet: Vegetarian
Description
Rich, fudgy brownies infused with dark chocolate and swirled with tart raspberries, perfect for any occasion.
Ingredients
- 8 oz Dark Chocolate (60-70% cocoa)
- 1/2 cup Unsalted Butter
- 1 cup Granulated Sugar
- 3 Large Eggs
- 1 cup All-Purpose Flour
- 1 cup Fresh Raspberries
- 1 tsp Vanilla Extract
- 1/4 tsp Salt
Instructions
- Preheat your oven to 350°F (175°C). In a medium saucepan, add the chopped dark chocolate and unsalted butter over low heat. Stir until melted and smooth.
- Whisk together the granulated sugar and eggs in a large mixing bowl until pale and fluffy.
- Add the melted chocolate and butter mixture to the sugar and egg mixture. Stir until combined.
- Combine all-purpose flour and salt in a separate bowl, then gradually add it to the wet ingredients while folding gently.
- Fold in the fresh raspberries gently.
- Pour the brownie batter into a lined 8×8 inch baking pan and level it out.
- Bake for about 25-30 minutes, or until set on the edges but still slightly gooey in the center.
- Cool for about 15 minutes, then lift out and cool completely on a wire rack.
Notes
For a nutty surprise, add chopped walnuts or almonds. You can also experiment with flavors like mint or a cream cheese swirl.
- Prep Time: 15 minutes
- Cook Time: 30 minutes
- Category: Dessert
- Method: Baking
- Cuisine: American
Nutrition
- Serving Size: 1 brownie
- Calories: 180
- Sugar: 12g
- Sodium: 100mg
- Fat: 8g
- Saturated Fat: 5g
- Unsaturated Fat: 2g
- Trans Fat: 0g
- Carbohydrates: 25g
- Fiber: 2g
- Protein: 3g
- Cholesterol: 70mg
Keywords: brownies, dessert, chocolate, raspberries, baking




