
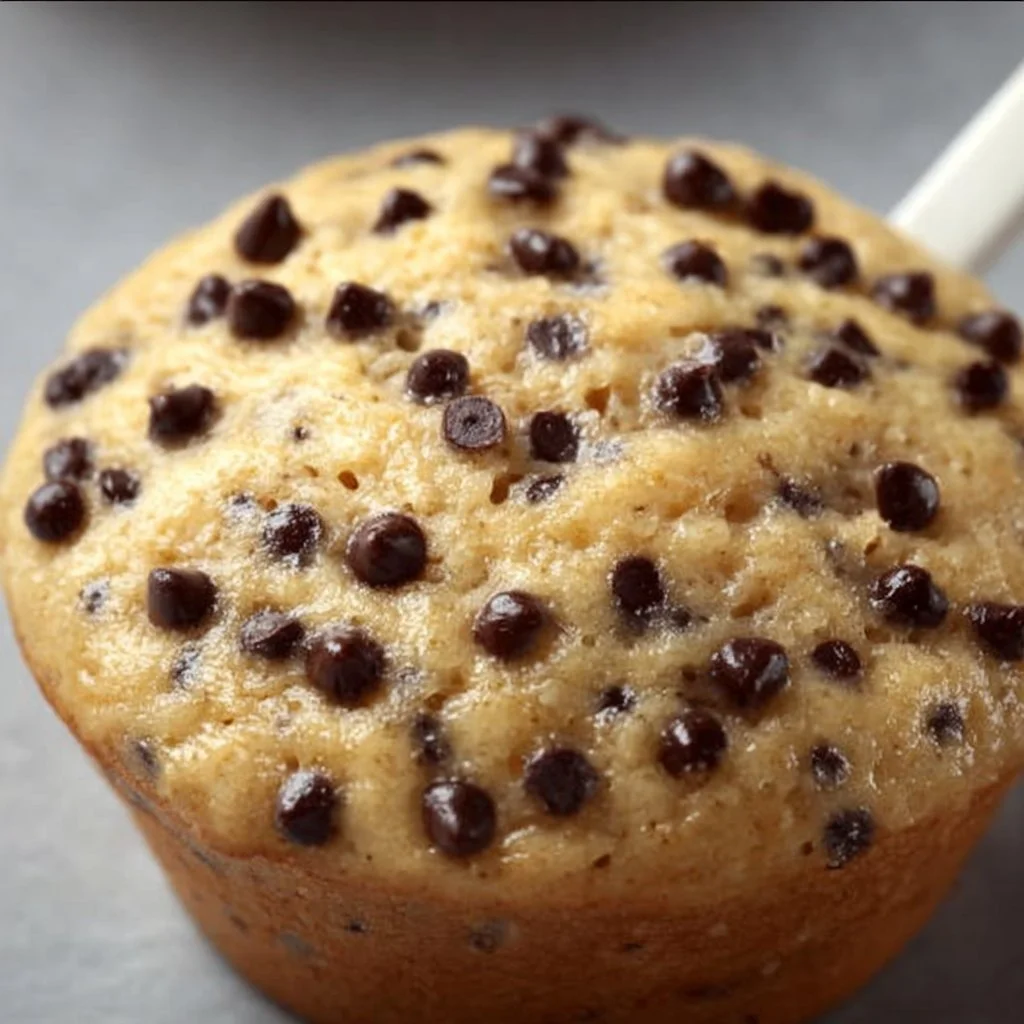
Banana Chocolate Chip Muffins
Banana Chocolate Chip Muffins: The Ultimate Cozy Treat
Welcome to my kitchen, fellow foodies! Today, we’re diving into the delightful world of Banana Chocolate Chip Muffins—an all-time favorite that fills my home with sweet aromas and warm memories. Seriously, nothing beats the smell of these muffins baking in the oven; it’s like a hug in the air. Whether you’re preparing them for a weekend brunch, a snack on the go, or just because you want something comforting, these muffins are here to make your day just a smidge brighter.
A Sweetly Nostalgic Journey
Let me take you on a little trip down memory lane. It was a rainy Saturday morning, and the pitter-patter of raindrops against our kitchen window set the perfect backdrop for some quality baking time. There I was, just a kid with flour-dusted cheeks, ready to dive into one of my favorite activities—cooking with my mom!
We’d woken up to a nursery of sleepy sounds, but she always managed to bring excitement into mundane days. She pulled out the overripe bananas from the counter, insisting they were perfect for baking. I remember thinking, “Eww, brown bananas?!” But mom knew better. With a few simple ingredients and a robust dose of love, those bananas transformed into the fluffiest, most chocolate-studded muffins I’d ever tasted. As we filled our small kitchen with laughter and the scent of baked goodness, I learned that creativity and joy can flourish even on the cloudiest of days.
Now, every time I whip up a batch of Banana Chocolate Chip Muffins, I’m reminded of those sweet moments with my mom—how we discovered flavors, textures, and a sense of togetherness through simple ingredients. And today, I want to pass that joy onto you. Let’s start baking!
Ingredients
To whip up these mouthwatering Banana Chocolate Chip Muffins, here’s what you’ll need:
-
3 ripe bananas
The key to moist muffins! Look for bananas with lots of brown spots; they bring the natural sweetness and flavor. -
1/3 cup melted butter
For richness! If you’re feeling a bit healthier, coconut oil or unsweetened applesauce can work as a substitute. -
3/4 cup sugar
You can use white sugar or brown sugar for a deeper flavor. Feel free to reduce the sugar if you prefer less sweetness. -
1 large egg
Eggs help bind the muffins together. If you’re avoiding eggs, use a flaxseed egg (1 tablespoon ground flaxseed mixed with 2.5 tablespoons water). -
1 teaspoon vanilla extract
Adds a lovely aroma and flavor. For a twist, try almond extract for a different depth of flavor. -
1 teaspoon baking soda
This is your rising agent! Ensure it’s fresh for a perfect rise. If you can’t find baking soda, you can use baking powder, but adjust the quantities. -
Pinch of salt
Balances the sweetness. Don’t skip this—salt enhances all the flavors nicely! -
1 1/2 cups all-purpose flour
The backbone of your muffins. You can use whole wheat flour for a healthier option, but the texture may vary slightly. -
1 cup chocolate chips
They melt beautifully and add sweetness. Semi-sweet or dark chocolate work best; feel free to swap with nuts for a different texture. -
Optional: 1 teaspoon cinnamon
Love a hint of spice? Cinnamon adds warmth. Try nutmeg for a different twist if you want something unique!
Step-by-Step Instructions
Okay, now that we have all our ingredients lined up, it’s time to get down to business and create some magic!
-
Preheat Your Oven
Preheat your oven to 375°F (190°C). This will be the cozy warmth your muffins need to rise perfectly! -
Prepare Your Muffin Tin
Grease a muffin tin or line it with paper liners. This prevents a sticky situation and makes cleanup a breeze. I often use non-stick spray for added assurance! -
Mash Those Bananas
In a large mixing bowl, mash the ripe bananas with a fork until smooth. Don’t be afraid of it being a bit lumpy—that’s the desired texture. -
Mix in the Wet Ingredients
Stir in the melted butter. Once it’s mixed, add in the sugar, egg, and vanilla extract. Mix until well combined. Don’t fret if it looks a bit grainy; it will all come together! -
Combine Dry Ingredients
In a separate bowl, combine the flour, baking soda, salt, and cinnamon (if using). Mix them gently! Just like with your relationships, you don’t want to overmix and create an awkward gluggy texture. -
Combine Wet and Dry
Gradually stir the dry mixture into the wet mixture. Use a spatula and fold it gently until just combined. It’s okay if a few flour streaks remain—over-mixing can lead to tough muffins! -
Add Chocolate Chips
Now, fold in those glorious chocolate chips. Feel free to reserve a few to sprinkle on top before baking for that extra touch of bliss! -
Fill the Muffin Tin
Spoon the muffin batter into your prepared tin, filling each cup about 3/4 way full. Trust me; they’ll rise beautifully. -
Bake
Pop your muffin tin in the oven and bake for 18-20 minutes, or until golden and a toothpick inserted in the center comes out clean. You’ll know they’re done when your kitchen smells like a cozy café! -
Cool Down
Once out of the oven, let the muffins sit in the pan for about 5 minutes before transferring them to a wire rack. This helps them finish cooking while preventing a soggy bottom.
Serving Suggestions
When it comes to serving your Banana Chocolate Chip Muffins, the possibilities are endless! You can enjoy them warm right out of the oven, or let them cool completely and serve them with a slather of butter or a drizzle of honey. They also make fantastic breakfast treats served alongside your favorite coffee or tea or even a dollop of yogurt for a wholesome twist.
Top this off with a sprinkle of powdered sugar for that professional bakery look, and you’ve just transformed your home into a cozy café!
Recipe Variations
Want to mix it up? Here are a few variations you can try:
-
Nutty Banana Muffins: Toss in a cup of chopped walnuts or pecans for that delightful crunch.
-
Tropical Twist: Add 1/2 cup of shredded coconut and a handful of dried pineapple for a fun tropical vibe.
-
Double Chocolate: Swap 1/2 cup flour for cocoa powder to get chocolaty goodness inside and out!
-
Gluten-Free Option: Use a 1:1 gluten-free baking mix for a flawless substitute.
-
Vegan Delight: Use almond or oat milk in place of the egg, and substitute regular butter with vegan butter or coconut oil.
Chef’s Notes
Over the years, my Banana Chocolate Chip Muffins have gone through quite a few iterations. Initially, I followed my mom’s classic recipe to the letter, but I’ve dabbled with flavors and textures. Adding spices, using different types of chocolate, and even experimenting with health-conscious swaps have all been part of my culinary journey. You know what they say—kitchens are meant for creativity and experimentation.
Oh, and I have to share a funny story! One time, I completely forgot to add sugar while making my muffins—it was a baking disaster until I added a bit of sweet syrup post-baking, which turned out to be a surprisingly enjoyable, albeit accidental, innovation. That’s the beauty of cooking: sometimes, mistakes lead to delicious surprises!
FAQs and Troubleshooting
-
My muffins came out dense. What happened?
This usually happens when the batter is overmixed. Ensure you mix just until combined, and don’t worry about leaving a few lumps! -
How can I tell when they’re done?
When a toothpick inserted in the center comes out with a few moist crumbs (not wet batter), they’re ready! -
Can I freeze these muffins?
Absolutely! Once cooled, wrap them tightly in plastic wrap and store in an airtight container. They’ll keep in the freezer for up to three months—perfect for a quick snack on busy days! -
Mine turned out too sweet. What should I do?
You can try reducing sugar in the recipe next time. Additionally, pairing them with something salty or tangy (like cream cheese) can help balance the sweetness.
Nutritional Info (Optional)
If you’re tracking your nutrition, here’s a rough estimate per muffin (without added toppings):
- Calories: 180
- Protein: 3g
- Total Fat: 7g
- Saturated Fat: 4g
- Carbohydrates: 26g
- Sugar: 10g
- Fiber: 1g
And there you have it, my friends! Your very own batch of Banana Chocolate Chip Muffins—filled with memories, creativity, and, most importantly, deliciousness! I can’t wait for you to enjoy these tasty treats. Happy baking! 🍌💖
Print
Banana Chocolate Chip Muffins
- Total Time: 35 minutes
- Yield: 12 servings 1x
- Diet: Vegetarian
Description
Delicious, fluffy muffins filled with ripe bananas and chocolate chips, perfect for any occasion.
Ingredients
- 3 ripe bananas
- 1/3 cup melted butter
- 3/4 cup sugar
- 1 large egg
- 1 teaspoon vanilla extract
- 1 teaspoon baking soda
- Pinch of salt
- 1 1/2 cups all-purpose flour
- 1 cup chocolate chips
- Optional: 1 teaspoon cinnamon
Instructions
- Preheat your oven to 375°F (190°C).
- Prepare your muffin tin by greasing or lining it with paper liners.
- Mash the ripe bananas with a fork until smooth.
- Mix in the melted butter, then add sugar, egg, and vanilla extract.
- Combine the flour, baking soda, salt, and cinnamon in a separate bowl.
- Gradually stir the dry mixture into the wet mixture until just combined.
- Add the chocolate chips and fold gently.
- Fill each muffin cup about 3/4 full with batter.
- Bake for 18-20 minutes, or until a toothpick inserted comes out clean.
- Cool the muffins in the pan for 5 minutes before transferring them to a wire rack.
Notes
Enjoy the muffins warm or let them cool completely. Pair them with butter or honey for a treat!
- Prep Time: 15 minutes
- Cook Time: 20 minutes
- Category: Dessert
- Method: Baking
- Cuisine: American
Nutrition
- Serving Size: 1 muffin
- Calories: 180
- Sugar: 10g
- Sodium: 150mg
- Fat: 7g
- Saturated Fat: 4g
- Unsaturated Fat: 2g
- Trans Fat: 0g
- Carbohydrates: 26g
- Fiber: 1g
- Protein: 3g
- Cholesterol: 30mg
Keywords: banana muffins, chocolate chip, baking recipe
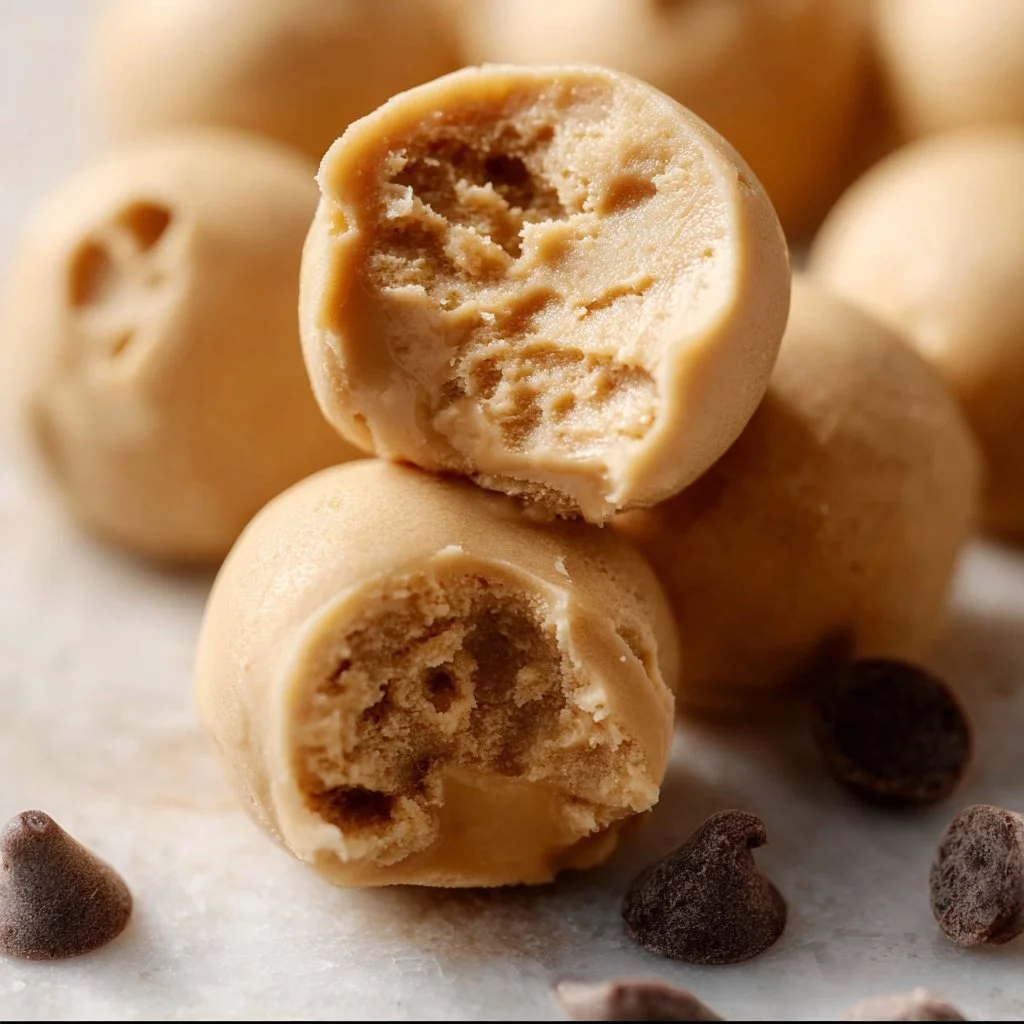
Frozen Greek Yogurt Peanut Butter Bites
Frozen Greek Yogurt Peanut Butter Bites: A Sweet and Simple Treat!
Welcome back to my cozy kitchen, food enthusiasts! Today, I’m bringing you a delightful treat that marries the creamy goodness of Greek yogurt with the rich, nutty flavor of peanut butter. Frozen Greek Yogurt Peanut Butter Bites are your new best friend when you’re craving something sweet but also want a healthier option. These little bites are not only easy to whip up, but they also satisfy that sweet tooth while providing a boost of protein and calcium. Who knew healthy could taste this good?
Let me tell you, there’s something magical about the combination of Greek yogurt and peanut butter. It’s like a hug in food form! The creamy yogurt balances perfectly with the smooth, nutty peanut butter—creating a luxurious, indulgent flavor without the guilt. And let’s be honest, who doesn’t love a snack that you can pop in your mouth whenever you want? These bites are ideal for busy afternoons, a sweet snack for kids, or even a late-night dessert when you’re feeling a little naughty but not too naughty.
Now, not to get too sentimental, but these bites bring me back to simpler times—snack times with friends, making memories in the kitchen with family, and the joy of sharing something delicious that’s also good for you. By the end of this post, you’ll not only have a recipe in hand but also a cozy story to go along with it! So, let’s roll up our sleeves and dive in!
Personal Story
There’s a vivid memory I hold close to my heart that involves a summer spent in my grandmother’s kitchen. She was a master at turning ordinary ingredients into pure magic. One particularly hot afternoon, as we were looking for something cool and tasty, she introduced me to the world of frozen treats made from yogurt. We didn’t have fancy gadgets back then—just a simple mixing bowl, a spatula, and lots of love!
She would whip up yogurt mixtures infused with peanut butter, vanilla, and whatever fruits we had on hand. I remember impatiently waiting for those little bites to freeze, sneaking tastes of the mixture before it made its way to the freezer. It became our little ritual: making scrumptious frozen bites while sharing stories and giggles. Every summer since, I’ve felt the urge to recreate those lovely afternoons, and my Frozen Greek Yogurt Peanut Butter Bites are my homage to her legacy. Now, let’s bring a taste of that nostalgia into your kitchen!
Ingredients
Here’s what you’ll need to create your own frozen delights. Each ingredient plays a crucial role in building that yummy flavor we’re after!
-
Greek Yogurt (Plain or Vanilla): This creamy base is packed with protein and probiotics. Plain yogurt gives you more control over the sweetness, while vanilla adds a lovely flavor boost. If you’re not a fan of Greek yogurt, regular yogurt will work too, but it may give a slightly different texture.
-
Peanut Butter (Creamy or Crunchy): Smooth peanut butter will create a velvety finish, while crunchy offers a delightful texture. If you’re allergic to peanuts or want a twist, try almond butter or sun butter.
-
Honey or Maple Syrup: This natural sweetener balances out the tanginess of the yogurt. For a lower-sugar option, you can use stevia or monk fruit; just adjust to your taste!
-
Mini Chocolate Chips (Optional): Because who doesn’t appreciate a bit of chocolate? Feel free to skip these, or replace them with dried fruit or nuts for a different crunch.
-
Vanilla Extract: A splash of this will elevate your bites to a whole new level of deliciousness, adding warmth and depth. If you’re out of vanilla, a hint of almond extract can do the trick!
-
Pinch of Salt: A tiny bit of salt enhances all the other flavors, making everything pop! Don’t skip it; it’s like the secret handshake between flavors!
Step-by-Step Instructions
Now that we’ve got our ingredients prepped, it’s time to get cooking… or, should I say, mixing! Here’s how to put it all together:
-
Gather Your Equipment: Grab a mixing bowl, a spatula, a measuring cup, and a mini muffin tin or silicone mold (the season’s hottest molds—because they make everything more fun!).
-
Mix the Yogurt and Peanut Butter: In the mixing bowl, add 1 cup of Greek yogurt and ½ cup of peanut butter. Use your spatula and mix until the two ingredients are fully combined. You want it creamy and smooth without any streaks (think of this as a workout for your arms!).
-
Sweeten the Deal: Next, drizzle in about 2 tablespoons of honey or maple syrup (or to taste). Mix again until beautifully blended. Remember, you can always start with less and add more, depending on your sweet tooth!
-
Add the Vanilla and Salt: Pour in ½ teaspoon of vanilla extract and add a pinch of salt. This step is crucial for enhancing the overall flavor profile! Stir everything together until smooth and well incorporated.
-
Fold in Chocolate Chips: If you’re using mini chocolate chips, gently fold them in at this step. This part is so satisfying—imagine each chip being a pocket of joy waiting to burst in your mouth!
-
Scoop and Freeze: Using a spoon or an ice cream scoop, fill your muffin tin or silicone mold with the mixture. Press it down gently for even pops. Leave a little room at the top as they might expand slightly while freezing.
-
Freeze Blissfully: Pop your filled molds into the freezer and let them chill for at least 2 hours, or until solid. This is the hardest part (waiting!), but trust me, the end result is worth it.
-
Enjoy Your Treats: Once they’re frozen solid, pop them out of the molds. You can store them in an airtight container in the freezer for up to a month—if they last that long!
Serving Suggestions
When it comes to serving, the world is your oyster! These bites are fabulous as-is, but you could also do a little extra magic by drizzling some melted chocolate on top or dusting them with a sprinkle of crushed nuts. Serve them in colorful cupcake liners for a festive touch at gatherings, or present them on a pretty platter at your next movie night. They’re perfect alongside fresh fruit or nutty granola, making for a fun DIY yogurt parfait!
Recipe Variations
Y’all know I love a twist! Here are a few fun ideas to switch up your Frozen Greek Yogurt Peanut Butter Bites:
-
Nutty Banana Bliss: Add a mashed ripe banana to the yogurt mixture for a fruity twist. It pairs beautifully with peanut butter!
-
Berry Delicious: Fold in fresh or frozen berries alongside or instead of the chocolate chips for an antioxidant-packed treat.
-
Coconut Craze: Mix in unsweetened shredded coconut for that tropical flair! Pair it with macadamia nut butter for an extra layer of flavor.
-
Spicy Kick: For those who love a little heat, consider adding a small pinch of cayenne or cinnamon. It adds an unexpected zing that’s delightful!
-
Dairy-Free Delight: Substitute the Greek yogurt with a dairy-free yogurt alternative (almond, coconut, or cashew) and use a plant-based peanut butter for a vegan-friendly treat!
Chef’s Notes
Every recipe tells a story, and this one has evolved over the years! I first started making these bites as a healthy after-school snack for my kids. As we began experimenting, the flavors developed, and soon they became a staple in our home. I have even found myself making versions that are more indulgent for parties and gatherings. One of my funniest kitchen mishaps involved misreading the quantities—a bit too much peanut butter led to some delicious peanut butter ice cream instead of bites! Ah, the chaos of creativity!
FAQs and Troubleshooting
-
Why are my bites not freezing properly?
If your bites aren’t freezing well, it may be due to too much peanut butter or yogurt. Try adjusting the ratios slightly. Adding more yogurt can create a firmer texture! -
Can I reuse the molds after making these?
Absolutely! Just give them a good wash to remove any residue, and you’re good to go for your next batch. -
How do I store my Frozen Greek Yogurt Peanut Butter Bites?
Store them in an airtight container in the freezer. You can separate layers with parchment paper to ensure they don’t stick together! -
What if I don’t have mini muffin tins?
No worries! You can use ice cube trays or even silicone molds in fun shapes! The bites will still taste fantastic!
Nutritional Info
While I’m not one to count every calorie, here’s a quick overview of what you can expect per serving (this is an estimate and can vary based on specific brands):
- Calories: Approximately 100
- Protein: 5g
- Fat: 6g
- Carbohydrates: 8g
- Fiber: 1g
- Sugar: 4g (depends on the sweetness of yogurt and added sweetener)
And there you have it, my lovely foodies! Your very own Frozen Greek Yogurt Peanut Butter Bites recipe is ready to delight! Whether you whip these up for a snack, dessert, or a cozy gathering, I hope they bring you just as much joy as they have brought to my kitchen. Remember, cooking is about sharing love and joy, so go ahead, make a batch, and feel that good vibe! Happy cooking!
Print
Frozen Greek Yogurt Peanut Butter Bites
- Total Time: 135 minutes
- Yield: 12 servings 1x
- Diet: Vegetarian
Description
A sweet and simple treat that combines Greek yogurt and peanut butter for a healthy, protein-packed snack.
Ingredients
- 1 cup Greek Yogurt (Plain or Vanilla)
- ½ cup Peanut Butter (Creamy or Crunchy)
- 2 tablespoons Honey or Maple Syrup
- ½ teaspoon Vanilla Extract
- Pinch of Salt
- Mini Chocolate Chips (Optional)
Instructions
- Gather your equipment: Grab a mixing bowl, a spatula, a measuring cup, and a mini muffin tin or silicone mold.
- Mix the yogurt and peanut butter in the mixing bowl until creamy and smooth.
- Sweeten the deal by drizzling in honey or maple syrup and mixing again.
- Add the vanilla extract and salt, stirring until smooth.
- Fold in the chocolate chips if using.
- Scoop the mixture into the muffin tin or mold, pressing down gently.
- Freeze for at least 2 hours until solid.
- Enjoy your treats and store in an airtight container in the freezer.
Notes
For variations, consider adding fruits, coconut, or spices to customize your bites.
- Prep Time: 15 minutes
- Cook Time: 120 minutes
- Category: Dessert
- Method: Freezing
- Cuisine: American
Nutrition
- Serving Size: 1 bite
- Calories: 100
- Sugar: 4g
- Sodium: 80mg
- Fat: 6g
- Saturated Fat: 1g
- Unsaturated Fat: 3g
- Trans Fat: 0g
- Carbohydrates: 8g
- Fiber: 1g
- Protein: 5g
- Cholesterol: 0mg
Keywords: frozen yogurt, peanut butter bites, healthy treat, snack, dessert
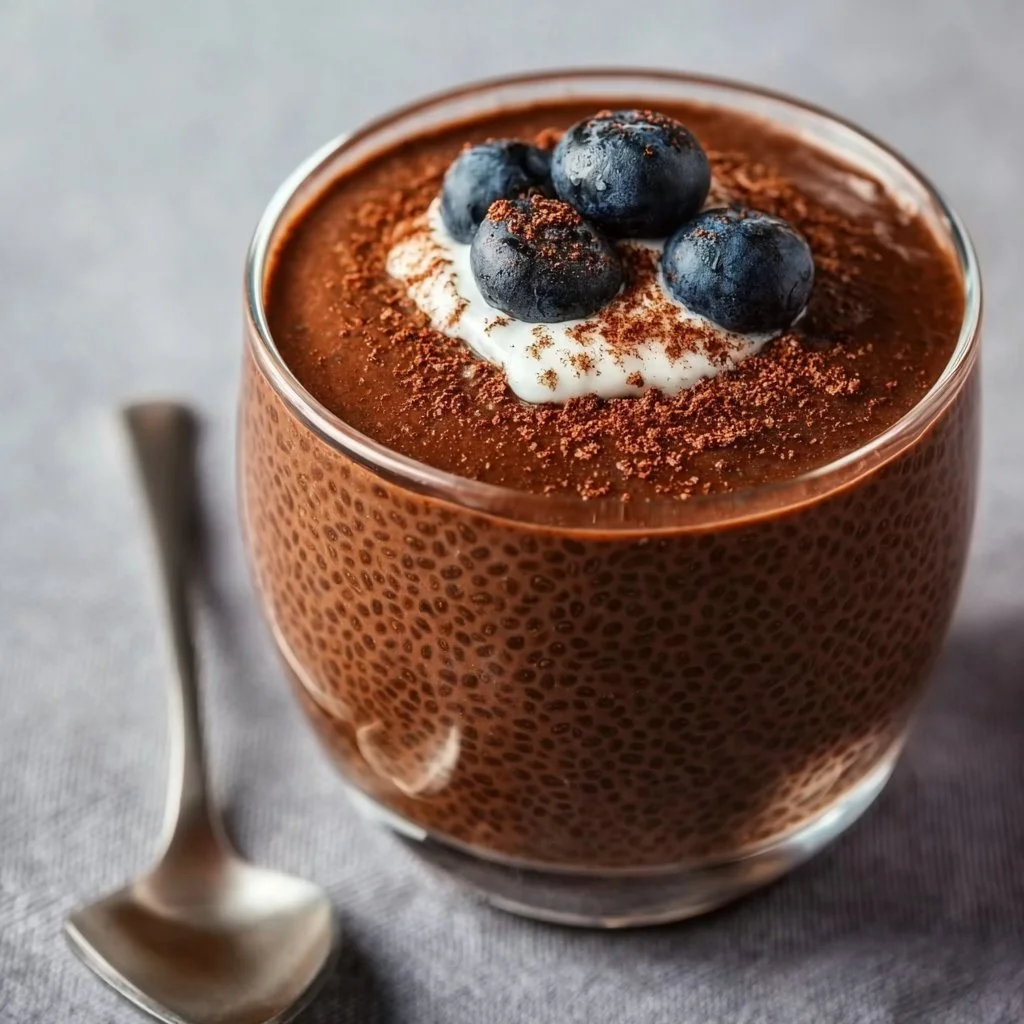
High Protein Chocolate Chia Seed Pudding
# High Protein Chocolate Chia Seed Pudding: Your New Favorite Snack

Hey there, food lovers! I’m Beau Collier, and today we’re diving into a recipe that’s not only nourishing but also satisfying and downright delicious. If you’re on the lookout for a pick-me-up that feels indulgent but keeps you on track with your health goals, I've got just the treat for you: high-protein chocolate chia seed pudding! This delightful dish is packed with all the goodness you need to fuel your day without sacrificing flavor.

## Introduction

Picture this: It’s a sunny afternoon, and you’ve just come back from a long walk—perhaps enjoying a bit of nature, feeling the sun on your face. Like many of us, you might be craving something sweet-yet-nourishing, something that feels luxurious but fits right into your healthy eating routine. That's where my chocolate chia seed pudding comes in!

This isn’t just any pudding; it’s a bowl of magic that you can whip up in no time. Packed with protein, fiber, and Omega-3 fatty acids, chia seeds are nutrition powerhouses. When we mix these tiny seeds with rich almond milk and a touch of chocolate, we create a velvety dessert that balances indulgence and health. And the best part? It’s as easy as pie!

Oh, have I mentioned that it’s also vegan? Yep! So whether you’re looking for a post-workout snack, a sweet breakfast, or a midnight treat, this pudding fits all occasions like your favorite cozy sweater. So, let's mix it up and embark on a delightful journey of flavors, creativity, and a sprinkle of nostalgia!

## Personal Story

I’ll never forget the first time I stumbled upon chia seeds. It was during a cozy brunch with my sister at a trendy café. Puddings were all the rage, and of course, I had to try the chocolate chia pudding. As soon as I took that first spoonful, it was love at first bite! The rich chocolate flavor combined with the delightful texture of the chia seeds was a gamechanger for me.

Years later, I decided to make my version at home. With a few tweaks and a whole lot of love, I crafted this high-protein chocolate chia pudding. It instantly became a staple in my kitchen—my go-to when I wanted something sweet that also filled me up. Every spoonful still reminds me of that brunch—the laughter, the warmth, and the joyful vibes. I hope this recipe does the same for you!

## Ingredients

Let’s gather the stars of our show! Here’s what you’ll need to make this high-protein chocolate chia seed pudding:

- **1/4 cup chia seeds**
  These tiny seeds are loaded with fiber, protein, and Omega-3 fatty acids. You can swap them for flaxseeds if you’re in a pinch—just ensure they’re ground for a similar texture.

- **2 cups almond milk (or any plant-based milk)**
  Almond milk gives this pudding a nutty flavor, but feel free to use coconut milk for creaminess or oat milk for a sweeter twist.

- **2 tablespoons chocolate protein powder**
  This not only amps up the chocolate flavor but also boosts the protein content. If you’re looking for a dairy-free option, make sure your protein powder is vegan!

- **2 tablespoons maple syrup (or to taste)**
  A natural sweetener that enhances the flavors beautifully! You can substitute with agave syrup or even a few drops of stevia if you’re watching your sugar intake.

- **1 teaspoon vanilla extract**
  Vanilla elevates the taste by adding depth and warmth. A splash of almond extract can also impart a lovely flavor if you want to get creative!

- **Pinch of salt**
  A little salt balances the sweetness and intensifies the chocolate flavor. Trust me on this—a tiny pinch goes a long way!

### Totaling it Up
Now that we’ve got our ingredients, you’re well on your way to creating a comforting, satisfying pudding that’ll make your tastebuds dance with joy!

## Step-by-Step Instructions

Ready to get cooking? Let’s roll up our sleeves and make this delectable chocolate chia seed pudding together!

### Step 1: Combine the Ingredients
In a medium mixing bowl, combine the chia seeds and almond milk. Whisk it together until well blended. Make sure there aren't any clumps of seeds!

**Chef’s Tip:** If you're using cocoa powder instead of chocolate protein powder, mix it with a bit of almond milk first to prevent clumps before adding it to the rest.

### Step 2: Sweeten It Up
Stir in the chocolate protein powder, maple syrup, vanilla extract, and that delightful pinch of salt. Get whisking until everything is smooth and coated.

**Hacks:** Taste it—don’t be shy! Depending on your sweet tooth, you might want to add more maple syrup or even a touch of cocoa for extra richness.

### Step 3: Let It Chill
Cover the bowl with plastic wrap or a lid and pop it in the fridge for at least 2 hours, or even better, overnight. This step is crucial; it allows the chia seeds to soak up the liquid and thicken into a divine pudding.

**Chef’s Note:** I prefer making this pudding at night. It gives me a delicious breakfast or snack option ready to go in the morning!

### Step 4: Serve It Up!
Once your pudding has set, give it a good stir! You’ll notice that it has transformed into a thick, luscious concoction.

**Pro Tip:** If you find it too thick, you can add a splash of almond milk to loosen it up!

### Step 5: Enjoy!
Now it’s time to dig in! Serve the pudding in your favorite bowls or jars, and feel free to top it with your favorite goodies.

## Serving Suggestions

Presentation makes everything just a bit more exciting, don’t you think? Here are some fun ways to serve your chocolate chia seed pudding:

- **Top with Fresh Berries**: Strawberries, raspberries, or blueberries add a delightful burst of freshness and a pop of color.

- **A Sprinkle of Nuts**: Add some chopped nuts for a crunch—almonds or walnuts work brilliantly here!

- **Coconut Flakes**: Unsweetened coconut flakes will add a tropical touch to your dessert, enhancing the sweetness beautifully.

- **Drizzle of Nut Butter**: Almond or peanut butter can be an exquisite finishing touch, bringing creaminess and healthy fats to the party.

### Creativity Hour
If you're feeling creative, you can layer your pudding with crunchy granola or even other fruits for a parfait vibe. The options are endless!

## Recipe Variations

Who doesn’t love some variety in the kitchen? Here are a few fun twists you can try with this recipe:

1. **Mint Chocolate**: Add a few drops of peppermint extract for a refreshing mint chocolate experience!

2. **Spicy Chocolate**: Give it a little kick! A dash of cayenne pepper can elevate the chocolate flavors and create an exciting sweet heat.

3. **Matcha Infusion**: Combine chocolate protein powder with a touch of matcha for a unique flavor combo and an antioxidant boost!

4. **Fruit-Infused**: Blend in some banana or avocado before adding to the chia, adding creaminess and sweetness naturally!

5. **Coffee Boost**: Swap some almond milk with cold brew coffee for a mocha-flavored pudding that’s perfect for your morning fix!

## Chef’s Notes

In my kitchen, recipes evolve over time. This chocolate chia seed pudding is a prime example! It was once just simple and basic, but through experimentation and tastes (often late-night cravings), I turned it into a high-protein delight that satisfies my chocolate cravings. I often find myself brown-bagging this pudding for road trips or having it as a late-night treat.

And hey, don’t worry if things don’t turn out perfect on your first try! A little practice makes for a better pudding every time—plus, it’s hard to mess this up!

## FAQs and Troubleshooting

- **Q: Why did my pudding not thicken?**
  A: If your pudding didn’t thicken, it might need more chia seeds next time! Or sometimes, it just needs longer to sit in the fridge.

- **Q: Can I store leftovers?**
  A: Absolutely! Just store them in an airtight container in the fridge for 3-4 days. The flavors develop beautifully as it sits!

- **Q: Can I use different sweeteners?**
  A: Yes! Feel free to use honey, agave, or a sugar substitute based on your preference.

- **Q: My pudding is too thick; what can I do?**
  A: No problem! Just stir in a little almond milk until it reaches your desired consistency.

## Nutritional Info

This high-protein chocolate chia seed pudding isn’t just delicious; it’s also packed with nutrients! Here’s a rough breakdown (per serving):

- **Calories**: Approximately 250
- **Protein**: 15g (varies with protein powder)
- **Fats**: 9g (mostly healthy fats from chia seeds)
- **Carbohydrates**: 29g
- **Fiber**: 10g
- **Sugar**: 7g (varies with sweetener)

This pudding makes a great option for breakfast, a snack, or dessert, keeping you full and satisfied while giving you that sweet fix!

## Final Thoughts

There you have it, food friends! A beautifully simple, high-protein chocolate chia seed pudding that ticks all the boxes of delicious, healthy, and oh-so-easy to make. This recipe is all about creating joy in the kitchen, and I hope it brings you as much happiness as it brings me!

Feeling inspired? Grab those ingredients and start whisking away! Share your versions with me, and let’s celebrate our love for cooking and community through this sumptuous pudding experience. Remember to keep it simple, stay soulful, and always make room for dessert!

Until next time, happy cooking! 🍽️
High Protein Chocolate Chia Seed Pudding
- Total Time: 120 minutes
- Yield: 4 servings 1x
- Diet: Vegan, Vegetarian
Description
A delicious and nutritious high-protein chocolate chia seed pudding that’s perfect for post-workout snacks, breakfasts, or midnight treats.
Ingredients
- 1/4 cup chia seeds
- 2 cups almond milk (or any plant-based milk)
- 2 tablespoons chocolate protein powder
- 2 tablespoons maple syrup (or to taste)
- 1 teaspoon vanilla extract
- Pinch of salt
Instructions
- Combine the chia seeds and almond milk in a medium mixing bowl, whisk until well blended.
- Stir in the chocolate protein powder, maple syrup, vanilla extract, and salt until smooth.
- Cover the bowl and refrigerate for at least 2 hours or overnight.
- Stir the pudding once it has set to ensure a smooth texture.
- Serve the pudding in bowls or jars and top with your favorite toppings.
Notes
For added flavor, consider topping with fresh berries, nuts, or a drizzle of nut butter. Experiment with different sweeteners to suit your taste.
- Prep Time: 10 minutes
- Cook Time: 0 minutes
- Category: Dessert
- Method: Refrigeration
- Cuisine: Vegan
Nutrition
- Serving Size: 1 serving
- Calories: 250
- Sugar: 7g
- Sodium: 200mg
- Fat: 9g
- Saturated Fat: 1g
- Unsaturated Fat: 8g
- Trans Fat: 0g
- Carbohydrates: 29g
- Fiber: 10g
- Protein: 15g
- Cholesterol: 0mg
Keywords: chocolate pudding, vegan dessert, high protein snack, chia seeds, healthy dessert
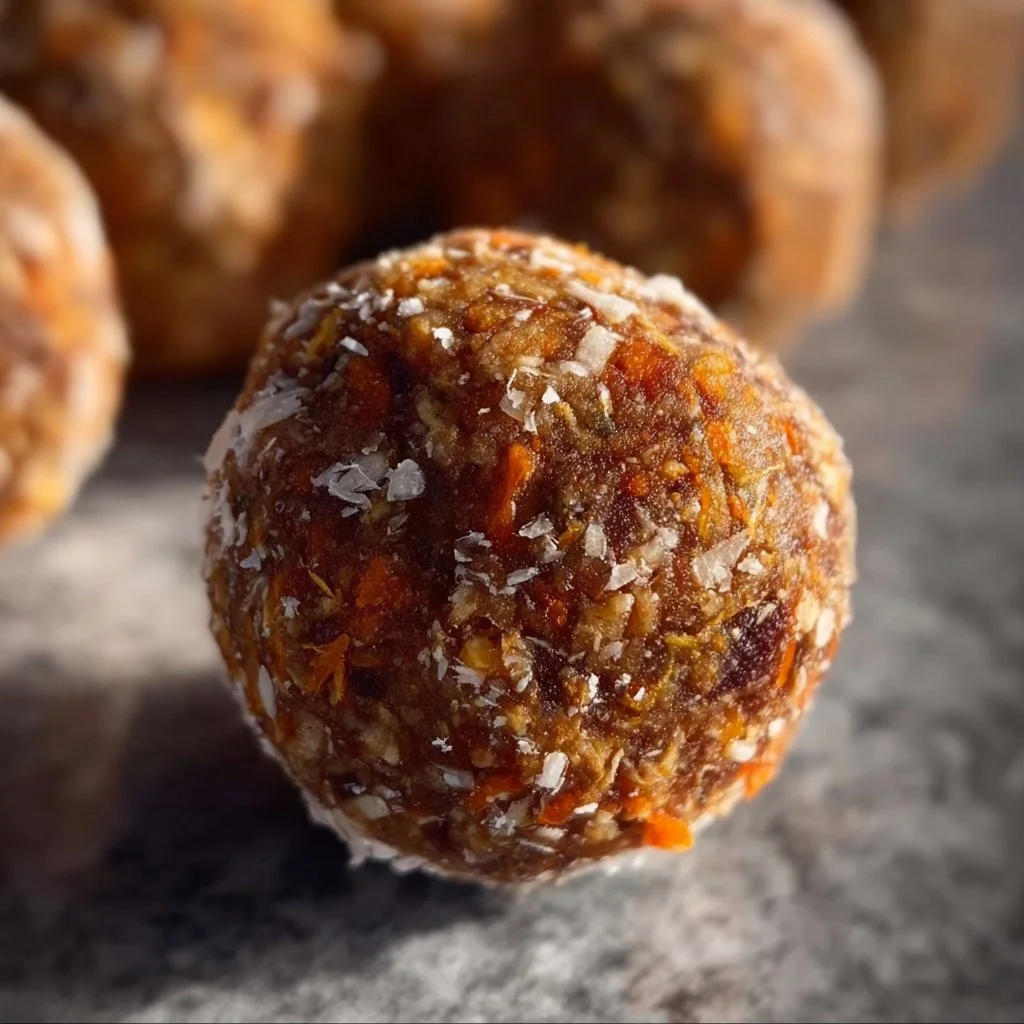
Carrot Cake Energy Balls
Carrot Cake Energy Balls: A Fun and Nourishing Snack
Hey there, fellow foodies! It’s Beau Collier here, and today I have a treat that’s not just scrumptious but also packed with wholesome goodness—Carrot Cake Energy Balls! If you’re like me and have a sweet tooth that sometimes feels like a runaway train, you’ll want to keep a stash of these little gems on hand. They’re perfect for an afternoon snack, a pre-workout boost, or just when you need a little pick-me-up.
These no-bake delights capture all the comforting flavors of classic carrot cake—think cinnamon, nutmeg, and the earthy sweetness of carrots—while keeping things healthy and easy to whip up. Trust me, these energy balls are not only delicious but also fuel your body with nutritious ingredients. Plus, they’re a fun way to sneak in some vegetables without even trying!
Now, I should mention that the best part about these energy balls isn’t just how they taste; it’s the stories behind them. When I was a kid, my grandmother would whip up carrot cake for every family gathering. The scent of warm spices filled the air, and we’d gather around the table, eagerly waiting for our slices topped with cream cheese frosting. I’ve taken that nostalgia and distilled it into these energy balls—a healthy twist on a beloved classic that connects us all.
So, grab your bowl, throw on your favorite playlist, and let’s get ready to create something mouthwatering together!
Personal Story
My love for carrot cake goes way back to my childhood. I vividly remember the anticipation that built up in my stomach every time Grandma announced she’d be baking her famous carrot cake. We kids would race around the kitchen, dodging steamy pots and slightly too-delicious smells wafting from the oven.
One Sunday afternoon, she decided to involve us in the baking process, and I can still picture the bright orange shreds of carrots mixing with eggs, sugar, and warm spices. My brother, attempting to be the “taste-tester,” sneaked in spoonfuls of the cake batter when Grandma turned her back. We ended up with a floury mess, laughter filling the kitchen—not to mention a few too many carrot-flavored finger smudges on our shirts!
Now, while I love a traditional carrot cake, as a busy adult (and as a food lover), I wanted a simpler, healthier version that I could enjoy every day. That’s how I came up with these Carrot Cake Energy Balls, bringing that same flavor while skipping the oven. Every time I make them, I am reminded of those joyful moments spent in the kitchen with family. So let’s keep that spirit alive and create some magic!
Ingredients
Here’s what you’ll need to make these delightful Carrot Cake Energy Balls:
-
1 cup Medjool dates (pits removed)
These sweet, chewy dates are the base of our energy balls and serve as a natural sweetener. If you don’t have Medjool dates, feel free to substitute with other dates, like Deglet Noor, though you may want to soak them in warm water for a few minutes to soften them up! -
1/3 cup shredded carrots
Freshly shredded carrots bring that classic carrot cake flavor and sweetness. You can use pre-packaged shredded carrots for convenience, or you can also swap with finely grated zucchini if you want to mix things up! -
1 cup walnuts
Chopped walnuts deliver a nice crunch and healthy fats. You can use any nuts you love, such as pecans, almonds, or even sunflower seeds for a nut-free option. -
1 tbsp chia seeds
These tiny seeds are packed with nutrition, adding fiber and a slight crunch. You can replace them with flax seeds if you prefer. Just make sure to grind them to get the most benefits! -
1/3 cup shredded unsweetened coconut
Coconut adds a lovely texture and a hint of tropical flavor. If you’re not a coconut fan, feel free to remove it, but they won’t have quite that same “cake” essence without this ingredient! -
1/2 tsp cinnamon
A warm, comforting spice essential to any carrot cake recipe. You could also try pumpkin pie spice for a different flavor profile. -
1/4 tsp nutmeg
This spice complements cinnamon beautifully for that signature carrot cake flavor. If nutmeg isn’t your thing, you can sneak in a little extra cinnamon instead. -
Pinch of salt
Just a touch of salt balances the sweetness and enhances all the other flavors. -
1 tsp vanilla extract
This adds depth and warmth to the energy balls. You can use almond extract instead for a unique twist! -
Extra 1/2 cup shredded coconut for rolling
This is a fun and tasty way to coat your energy balls. If you want something different, consider rolling them in crushed nuts or even cocoa powder for a chocolate kick!
Step-by-Step Instructions
Ready to create some magic in the kitchen? Let’s get rolling with these Carrot Cake Energy Balls!
-
Gather Your Ingredients
Make sure all your ingredients are ready to go. Put on some lively music; it makes the process way more fun! -
Blend the Dates
In a food processor, throw in your Medjool dates. Pulse them a few times until they break down into a sticky paste. This will be the glue that holds our energy balls together! Chef tip: If your dates are too firm, soak them in warm water for about 10 minutes to soften them up. -
Add in the Carrots and Walnuts
Toss in the shredded carrots and walnuts. Blend again, stopping occasionally to scrape down the sides to ensure even mixing. You want a nice, chunky texture, so don’t overdo it. Pro tip: Reserve a few walnut pieces to sprinkle on top of the rolled balls later for added crunch! -
Incorporate the Dry Ingredients
Now, add in chia seeds, shredded coconut, cinnamon, nutmeg, salt, and vanilla extract. Pulse until everything is well combined and it starts to form a batter-like consistency. Important: Take a moment here to taste the mixture! Add a little more cinnamon or vanilla if you’re feeling adventurous! -
Form the Energy Balls
Using your hands or a small scoop, grab a tablespoon-sized amount of the mixture and roll it into a ball. Repeat until you’ve formed all the mixture into balls.Chef’s hint: Wet your hands slightly to avoid stickiness while rolling! -
Coat the Balls
Place the extra shredded coconut in a shallow bowl. Roll each energy ball in the coconut until fully coated. This will not only add an amazing look but also a pop of flavor! You can also use crushed nuts or even cocoa powder for a twist! -
Chill
Place your finished energy balls on a parchment-lined tray. Once they’re all rolled, pop them in the fridge for about 30 minutes to firm them up. Chef’s note: I often double the batch since they disappear fast!
Serving Suggestions
When it comes to serving these Carrot Cake Energy Balls, there are plenty of fun options! You can arrange them on a beautiful platter for an energizing snack table or pop them in small mason jars for a cute gift idea. If you’re feeling fancy, pair them with a warm cup of herbal tea or whipped coconut cream for an extra treat.
Feeling extra festive? Use colorful muffin liners to serve them at your next gathering or just for yourself at home. Either way, these energy balls are perfect bite-sized snacks that bring a smile to every face!
Recipe Variations
Feeling creative? Here are some variations you can try to spice up your Carrot Cake Energy Balls:
-
Spiced Coconut-Lemon
Add a tablespoon of fresh lemon zest to the mix for a citrusy twist, brightening those warm spices in a fresh way! -
Nut Butter Boost
Just a tablespoon of almond or peanut butter can intensify the flavor and creaminess while making the energy balls even more filling! -
Chocolate Carrot Bliss
Mix in a couple of tablespoons of cocoa powder to create a chocolate version of these energy balls. Now you’re really talking! -
Dried Fruit Add-ins
Toss in some raisins or cranberries for an extra burst of sweetness and chewiness! Just chop them up a bit to keep the texture nice. -
Chia Pudding Version
If you love desserts, add an extra coconut milk splash to make chia pudding and let it thicken overnight. Then, form small balls and roll in coconut!
Chef’s Notes
I have to say, the evolution of this recipe has been a blast! What started as a nostalgic craving for Grandma’s carrot cake has transformed into this energizing little snack. I often find myself modifying the ingredients based on what I have available. If I’m low on walnuts, pecans work just as well! If I want a little more sweetness, I’ll add a drizzle of honey or maple syrup. Remember, this is a forgiving recipe, so experiment and make it your own!
And let’s not forget, every time I bite into one of these energy balls, I’m right back in my grandma’s kitchen, creating memories full of love and laughter over a delicious slice of carrot cake!
FAQs and Troubleshooting
Q: Can I make these energy balls vegan?
A: Absolutely! Medjool dates are naturally sweet and sticky, making them a perfect binder for vegan recipes. Just keep those ingredients plant-based!
Q: How long do these energy balls last?
A: Store them in an airtight container in the fridge for up to a week. If you want to keep them longer, pop them in the freezer for up to a month and enjoy them on the go!
Q: What if my mixture is too crumbly?
A: If your mixture feels dry, you can add a splash of water or a tiny bit of nut butter until it reaches a rollable consistency. No one likes a crumbling energy ball!
Q: Can I use different nuts or seeds?
A: Yes, feel free to swap out the walnuts for your favorites—almonds, pecans, or even sunflower seeds! Each will give a slightly different flavor but will still be delicious!
Nutritional Info
You may be wondering just how nutritious these Carrot Cake Energy Balls really are. Here’s a quick breakdown of the goodness packed inside each ball (approximation based on 12 servings):
- Calories: About 100 calories per ball
- Protein: 2-3 grams
- Fiber: 3-4 grams
- Natural Sugars: 5-6 grams from dates
- Healthy Fats: 5-6 grams mainly from walnuts and coconut
They’re a guilt-free treat that fuels your body and satisfies those sweet cravings!
Final Thoughts
And there you have it, my dear foodie friends! These Carrot Cake Energy Balls will keep you energized and smiling, reminiscent of joyful kitchen memories filled with warm spices and sweet treats. I hope you enjoy making these as much as I do because every bite is packed with love and nostalgia.
Remember, cooking doesn’t have to be complicated. It’s all about bringing people together over delicious food and creating lasting memories. So don’t forget to share your finished energy balls on social media and tag us. Let’s spread the joy of cooking far and wide!
Get ready to dig in and indulge—your taste buds will thank you! Happy cooking, friends! 🍽️✨
Print
Carrot Cake Energy Balls
- Total Time: 45 minutes
- Yield: 12 servings 1x
- Diet: Vegan
Description
A fun and nourishing snack that captures the flavors of classic carrot cake in a healthy, no-bake form.
Ingredients
- 1 cup Medjool dates (pits removed)
- 1/3 cup shredded carrots
- 1 cup walnuts, chopped
- 1 tbsp chia seeds
- 1/3 cup shredded unsweetened coconut
- 1/2 tsp cinnamon
- 1/4 tsp nutmeg
- Pinch of salt
- 1 tsp vanilla extract
- 1/2 cup shredded coconut for rolling
Instructions
- Gather your ingredients.
- Blend the dates in a food processor until a sticky paste forms.
- Add the carrots and walnuts, blending until a chunky texture is achieved.
- Incorporate the chia seeds, shredded coconut, cinnamon, nutmeg, salt, and vanilla, pulsing until well combined.
- Form the mixture into tablespoon-sized balls.
- Coat the balls in shredded coconut.
- Chill the balls in the fridge for about 30 minutes to firm them up.
Notes
Feel free to experiment with different nuts or add-ins! Make them your own by incorporating ingredients like nut butters or dried fruits.
- Prep Time: 15 minutes
- Cook Time: 0 minutes
- Category: Snack
- Method: No-Bake
- Cuisine: American
Nutrition
- Serving Size: 1 serving
- Calories: 100
- Sugar: 5g
- Sodium: 5mg
- Fat: 5g
- Saturated Fat: 2g
- Unsaturated Fat: 3g
- Trans Fat: 0g
- Carbohydrates: 15g
- Fiber: 3g
- Protein: 3g
- Cholesterol: 0mg
Keywords: carrot cake, energy balls, healthy snacks, vegan recipe, no-bake dessert




