
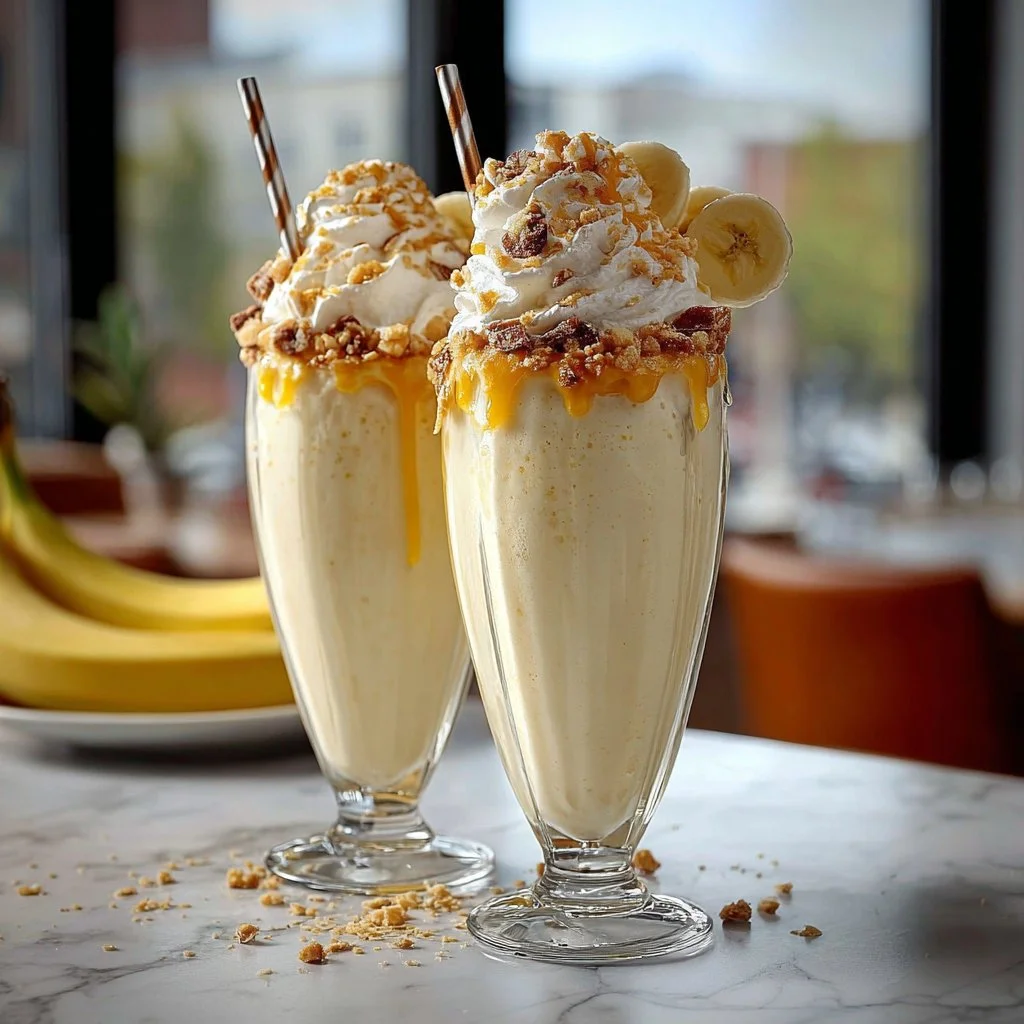
Banana Pudding Milkshakes: The Best Creamy Dessert You’ll Ever Sip
Banana Pudding Milkshakes: The Best Creamy Dessert You’ll Ever Sip
Welcome back to my cozy kitchen, my dear food enthusiasts! Today, we’re going to dive into one of my all-time favorite desserts that’s perfect for any occasion—Banana Pudding Milkshakes! Imagine this: a creamy, luscious shake that combines the comforting essence of banana pudding with the fun of a milkshake. It’s the kind of treat that makes every day feel like a celebration, or better yet, like a flashback to those carefree childhood summers. You know, when the sun was shining, the days felt endless, and every scoop of sweetness brought a smile to your face.
Now, let’s take a moment to appreciate how well this delightful dessert can bring people together. Whether you’re serving it at a casual get-together, a fun-filled BBQ, or simply treating yourself on a cozy evening at home, Banana Pudding Milkshakes are sure to steal the show. They are rich and creamy, with all the nostalgic flavors you adore, while being easy enough for even the busiest of chefs to whip up on a whim.
But wait! Before we jump into the recipe, I want to share a little background about what inspired this delicious creation. After all, every great recipe has a story behind it, right? So sit tight, mix your favorite ingredients, gather your loved ones, and let’s shuffle into a memory lane that will sweeten your day!
Personal Story
Growing up, my family had this tradition of gathering around the table every Sunday for a potluck-style meal. Each week, one family member would take the lead in preparing the main course while everyone else brought their favorite sides. My aunt Clara was famous for her homemade banana pudding, which never failed to steal the spotlight. I still remember the way the warm kitchen would fill with the aroma of vanilla and sweet bananas, drawing everyone in like a moth to a flame. There was always a race to see who could snag the first serving.
One summer, I decided to sneak a taste when no one was looking. Well, let’s just say I never regretted that bold move! I ended up devouring an entire cup of that velvety pudding before even making it to the table. The pure joy of that moment, feeling the balance of soft, creaminess and bites of crunchy Nilla wafers, inspired me to create this Banana Pudding Milkshake. It’s a way for me to honor those cherished memories while also making something whimsical and fun for everyone to enjoy. So gather ’round, my friends! Let’s channel those sunny childhood days with this delightful shake that’s sure to enchant your taste buds and warm your heart.
Ingredients
Here’s what you’ll need to make the ultimate Banana Pudding Milkshake:
-
Bananas
- Ripe, medium bananas work best for sweetness and flavor. If you’re short on ripe bananas, you can opt for frozen pieces for a super creamy consistency.
-
Vanilla Ice Cream
- The base of our shake! You can substitute with a dairy-free alternative or yogurt for a lighter option. Aim for quality ice cream; it truly makes a difference.
-
Milk
- Whole milk adds richness, but feel free to use almond, oat, or any other milk of your choice! Just remember, the consistency you aim for might vary.
-
Instant Vanilla Pudding Mix
- This is the secret ingredient for that classic banana pudding flavor. If you prefer, you could try making your own pudding from scratch.
-
Whipped Cream
- To top it off! Homemade whipped cream is easy to whip up, or go for store-bought for a quicker option.
-
Nilla Wafers
- The signature cookie! If you’re looking for a gluten-free option, check for gluten-free vanilla wafers or even crush up some graham crackers.
-
Salt
- A pinch of salt helps balance the sweetness and enhance all the flavors!
With these ingredients on hand, you’re already halfway to creamy, dreamy bliss!
Step-by-Step Instructions
Now that we have our ingredients ready, it’s time to bring the magic to life. Let’s get shaking!
-
Prep Your Bananas
Start by peeling the bananas and slicing them into smaller chunks. The riper the bananas, the sweeter your shake! If you’re using frozen bananas, skip this step and toss them directly into the blender. -
Blending the Base
Add the sliced bananas into your blender, followed by a generous scoop of vanilla ice cream. You can start with about 2 cups for a thick shake. Now it’s time for the instant vanilla pudding mix—about ½ cup will do. It’s the key to that luscious pudding flavor! -
Adding Milk
Pour in about 1 cup of milk. Depending on how thick or thin you like your shakes, feel free to adjust this amount. Blend the mixture on high until it’s primarily smooth, and please do not forget the taste test at this stage. You might need to add a bit more banana or ice cream—no judgment here! -
Add Texture with Nilla Wafers
Toss in a handful of Nilla Wafers (think about 6-8) and pulse the blender just a couple of times. This will break up the cookies while still leaving some chunks for that classic banana pudding experience. -
Taste and Adjust!
Give it a taste. Do you need a little more sweetness? Maybe a touch of whipped cream or another cookie for pzazz? Adjust according to your like, and blend again briefly if needed. -
Serve It Up!
Grab your favorite tall glasses and pour in the milkshake. Opt for a fun straw or fancy spoon for instant happiness. If you want to, you can even drizzle a little extra whipped cream on top before adding a few crushed Nilla Wafers for decoration—after all, we eat with our eyes first!
Serving Suggestions
These Banana Pudding Milkshakes are phenomenal on their own, but why not serve them with a little flair? You can pair them with homemade cookies, mini banana muffins, or even a scoop of fresh fruit for a refreshing contrast. If you’re hosting a party, consider setting up a shake bar where guests can add their own toppings, like chopped nuts or chocolate shavings, to make it even more personal and fun!
Recipe Variations
-
Chocolate Lover’s Twist
Add 2 tablespoons of chocolate syrup to transform this into a chocolate banana pudding shake. You could even use chocolate ice cream for a rich and indulgent treat! -
Nutty Delight
Introducing a handful of crushed peanuts or almond butter can add a delightful nutty flavor that complements the bananas perfectly. -
Berry Banana Bliss
Toss in a handful of fresh strawberries or blueberries for a vibrant twist full of extra fruity goodness. -
Vegan Version
Swap your regular ice cream for coconut or almond milk ice cream and use a dairy-free milk option. Replace the instant pudding mix with a vegan version or homemade. -
Frozen Banana Surprise
Replace fresh bananas with frozen ones, which will create a wonderfully thick and creamy shake that’s perfect for hot summer days.
Chef’s Notes
Every time I whip up these milkshakes, I’m reminded of those family potluck Sundays. This recipe has evolved over time, inspired by my cravings for nostalgia and comfort. I can’t help but chuckle at how many times I’ve found myself standing by the blender, doing the “just one more scoop” dance! Plus, the joy of sharing a glass with friends is unmatched. Remember, making desserts doesn’t need to be serious—get your kiddos involved, make a mess, and most importantly, have fun!
FAQs and Troubleshooting
1. Why is my milkshake too thick?
If your shake ends up too thick, simply add a bit more milk, blending again until it reaches your desired consistency. It’s always easier to thicken than thin, so add gradually!
2. Can I make this ahead of time?
While I recommend consuming it fresh for the best flavor, you can prepare individual cups and store them in the freezer for short bursts of sweetness. Just be aware that they may take on a slushy texture!
3. What if I don’t have vanilla pudding mix?
You can create your own with cornstarch, sugar, and a dash of vanilla extract or even skip it entirely for a more straight banana flavor! The nostalgia might slightly shift, but it will still be delicious.
4. How long will these last in the fridge?
I generally advise consuming your milkshake right away, but if any leftovers remain, seal them in an airtight container and refrigerate them for a couple of hours. Just give them a quick blend before serving again.
Nutritional Info
- Calories: Approximately 450 (varies based on toppings and substitutions)
- Fat: 18g
- Carbohydrates: 65g
- Protein: 6g
And there you have it! Untangle your mixing bowls and embrace all the creamy goodness that is a Banana Pudding Milkshake. I can’t wait for you to enjoy this batch of nostalgia in a glass, creating sweet memories of your own along the way. Happy shaking!
Print
Banana Pudding Milkshakes
- Total Time: 10 minutes
- Yield: 2 servings 1x
- Diet: Vegetarian
Description
A creamy and nostalgic milkshake that combines the flavors of banana pudding with the fun of a refreshing shake.
Ingredients
- 2 ripe medium bananas
- 2 cups vanilla ice cream
- 1 cup whole milk (or dairy-free alternative)
- ½ cup instant vanilla pudding mix
- Whipped cream for topping
- 6–8 Nilla Wafers
- A pinch of salt
Instructions
- Prep your bananas by peeling and slicing them into smaller chunks.
- Add the bananas into your blender along with 2 cups of vanilla ice cream.
- Pour in ½ cup of instant vanilla pudding mix.
- Pour in 1 cup of milk and blend on high until smooth.
- Toss in a handful of Nilla Wafers and pulse a couple of times to add texture.
- Give it a taste and adjust sweetness as needed.
- Grab glasses and pour in the milkshake, topping with whipped cream and crushed Nilla Wafers.
Notes
For a variation, try adding chocolate syrup or fresh berries for an exciting twist!
- Prep Time: 10 minutes
- Cook Time: 0 minutes
- Category: Dessert
- Method: Blending
- Cuisine: American
Nutrition
- Serving Size: 1 glass
- Calories: 450
- Sugar: 35g
- Sodium: 150mg
- Fat: 18g
- Saturated Fat: 11g
- Unsaturated Fat: 7g
- Trans Fat: 0g
- Carbohydrates: 65g
- Fiber: 3g
- Protein: 6g
- Cholesterol: 60mg
Keywords: banana pudding, milkshake, dessert, creamy, nostalgic
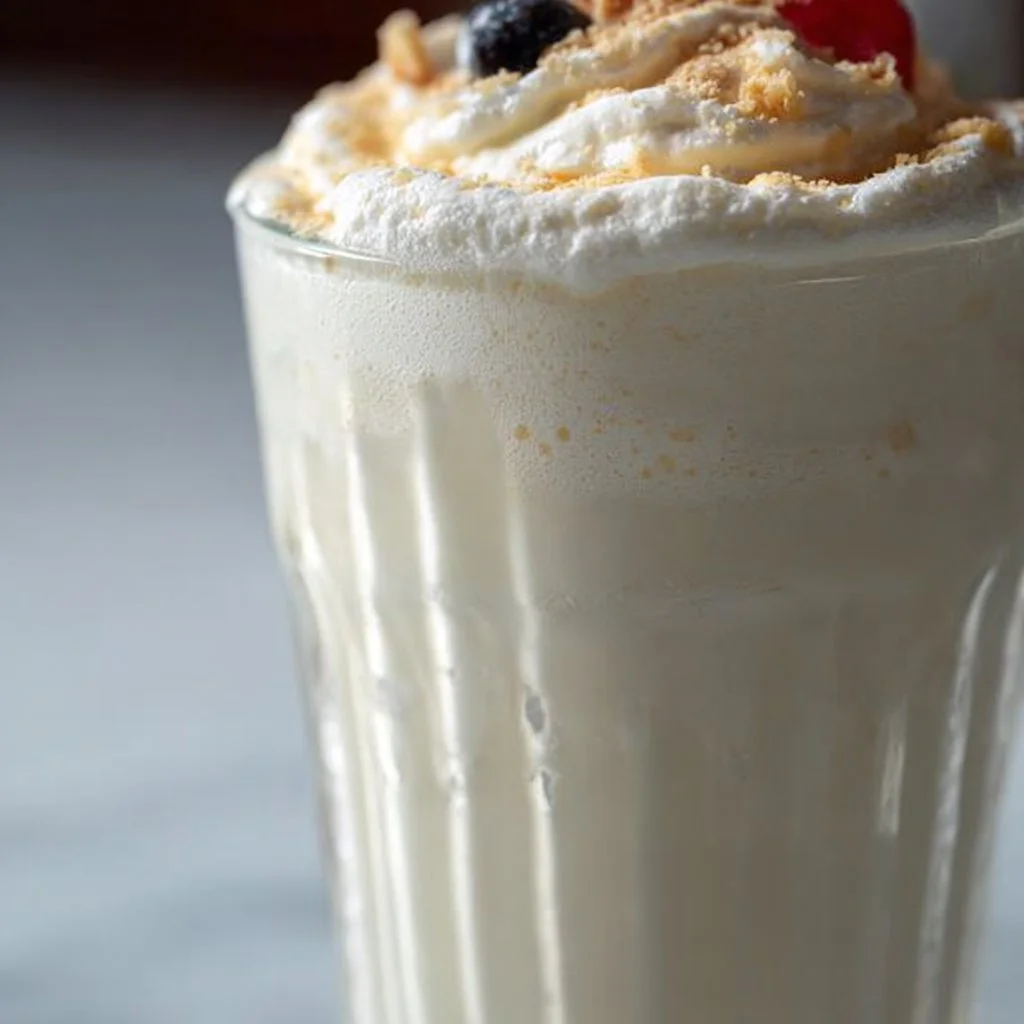
Vanilla Milkshake Recipe (Vanilla Shake)
The Creamy, Dreamy Vanilla Milkshake: A Slice of Nostalgia
Welcome back to my cozy corner of the kitchen! Today, we’re diving into a treat that’s as classic as they come: the vanilla milkshake. With its smooth, creamy texture and the sweet aroma of fresh vanilla, there’s something so comforting and nostalgic about sipping on one of these delightful drinks. Whether it’s a hot summer day or a chilly evening, who can resist a milkshake?
I have fond memories of making vanilla milkshakes in my childhood kitchen alongside my family. It wasn’t just about the milkshake itself; it was the mini celebration we had every time we blended those ingredients together. My siblings and I would take turns walking on our tiptoes to peek into the blender, eagerly anticipating the moment when smooth, frothy goodness would emerge. We would race to claim our favorite glass, often ending up with sticky hands and big smiles, sharing stories about our day while we sipped on our creamy creations.
Today, I’m excited to share that same joy with you! This recipe is simple, fun, and uses ingredients you probably already have at home. Plus, it comes with some twists to make it your own. Ready? Let’s get blending!
Ingredients
Here’s what you’ll need for your luscious vanilla milkshake:
-
Ice Cream (Vanilla)
- The star of the show! Use high-quality vanilla ice cream for the best flavor. If you’re looking for lighter options, try frozen yogurt or even a non-dairy ice cream.
-
Milk
- You can use whole milk for a rich shake or opt for almond milk or oat milk for a lighter alternative. Adjust the quantity based on how thick or thin you like your milkshake!
-
Vanilla Extract
- This adds a depth of flavor that elevates your milkshake. Think about substituting with almond extract for a unique twist, but start with half the amount as it can be quite strong.
-
Whipped Cream (optional)
- Perfect for that finishing touch! Want to make it extra special? Consider adding a drizzle of chocolate or caramel sauce on top for a mouth-watering presentation.
-
Maraschino Cherries (optional)
- These sweet little cherries are the cherry on top of your classic vanilla shake! If you don’t have them, you can always skip this or garnish with fresh berries instead.
Quick Chef Insight:
The key to the perfect milkshake is the ice cream-to-milk ratio, which will determine its thickness. If you want it really thick, use less milk; for a thinner milkshake, add more!
Step-by-Step Instructions
Now that you have everything ready, let’s get to the fun part—making the milkshake!
-
Scoop the Ice Cream
- Start by scooping about 2 cups of vanilla ice cream into your blender. This is where the magic begins! Use an ice cream scooper if you have one—trust me, it makes the task much easier.
-
Pour in the Milk
- Add ½ to 1 cup of milk, depending on how thick you want your shake. Feel free to start with less; you can always add more after blending if you want it thinner. If you’re using a high-speed blender, it might blend up faster than you think!
-
Add Vanilla Extract
- Pour in about a teaspoon of pure vanilla extract. This is my secret to a shake that sings with flavor! It enhances the creamy taste and makes the whole thing smell heavenly.
-
Blend it Up
- Seal the lid tightly and blend on medium speed for about 30 seconds. If there’s ice cream stuck to the sides, pause and scrape it down with a spatula before blending again. Welcome the wonderful whir of the blender—it’s like music to my kitchen-loving heart! Blend until it’s smooth and mixed thoroughly.
-
Taste Test
- Don’t forget this step! Grab a spoon and taste your concoction. If you want it sweeter, you can add a bit more vanilla extract or even a spoon of sugar until it hits the right note for your taste buds.
-
Serve in Style
- Now for the fun part! Pour your milkshake into tall glasses—this is where you can get creative. Add whipped cream on top if you’d like, and don’t hold back on garnishing with a cherry right on top.
Serving Suggestions
For an Instagram-worthy presentation, consider interesting glassware. Mason jars add a cute farmhouse vibe, while classic milkshake glasses bring back that retro diner feel. And let’s be real—what’s a milkshake without a couple of straws? Opt for fun, colorful ones to add to that bright, cheerful vibe you’re creating!
Recipe Variations
Feeling like adding a personal touch? Here are some delightful variations you can try:
-
Chocolate Vanilla Milkshake
- Add chocolate syrup or cocoa powder for a chocolatey twist. Mix things up by drizzling chocolate sauce inside the glass before pouring!
-
Biscoff Cookie Shake
- Blend in crushed Biscoff cookies for a cookie-cinnamon flavor that’ll have your taste buds dancing!
-
Fruit-Infused Shake
- Toss in some fresh fruit while blending, like strawberries or bananas, for an added health kick.
-
Malted Vanilla Milkshake
- For a nostalgic creamy taste reminiscent of childhood ice cream parlors, mix in some malt powder along with the other ingredients.
-
Nutty Vanilla Shake
- Add a spoonful of peanut butter or almond butter for that nutty flavor that pairs perfectly with vanilla!
Chef’s Notes
I truly cherish the memories connected with making milkshakes. Over the years, my recipe has evolved from simply ice cream and milk into this more intricate (but still straightforward) version. Sometimes I experiment by adding a sprinkle of sea salt to bring out the sweetness, and instead of always opting for vanilla, I look at whatever we have in our pantry. You can even throw in a dollop of Nutella when I’m feeling cheeky! A perfect blend of salty and sweet can be just what you need to elevate your homemade treats.
One of my fondest moments in the kitchen was when my niece, who was about six at the time, decided she wanted to help me make milkshakes. She reached for the ice cream tub—but instead of grabbing the scoop, she took a cheeky spoonful and promptly declared she could totally help! Watching her giggle and giggle with every bite was a reminder that cooking is as much about the memories we create as the delicious food we make.
FAQs and Troubleshooting
1. My milkshake is too thick! What now?
- No worries! Just add a little more milk a tablespoon at a time until it reaches your desired consistency.
2. How can I make a vegan version?
- Simple! Choose a dairy-free ice cream and use plant-based milk. Almond milk or oat milk works wonders.
3. Can I use flavorings other than vanilla?
- Absolutely! Feel free to get creative with flavors like chocolate, strawberry, or even mint. Just remember, the base principle remains the same—ice cream, milk, and your chosen flavoring.
4. How do I store leftover milkshake?
- While it’s best enjoyed fresh, you can store any leftovers in an airtight container in the freezer. Just give it a little stir or blend again before serving!
Nutritional Info (Optional)
When you combine all these ingredients, you’ll likely yield two servings of milkshake, each containing:
- Calories: 450-550 (depending on ingredients)
- Protein: 8-10g
- Fat: 20-25g
- Carbohydrates: 50-70g
- Sugars: 35-50g
(Note that these values can vary based on specific brands and substitutions made.)
Well, friends, there you have it—your simple, homey, and absolutely delightful vanilla milkshake recipe! I hope you walk away inspired to whip up something sweet in your kitchen today. Gather some loved ones, raise those glasses, and let the buttery, vanilla-nutty flavors take you back to simpler times. Until next time, happy cooking!
Remember, it’s all about having fun and enjoying the process—get those aprons on and let’s shake it up!
Print
Creamy, Dreamy Vanilla Milkshake
- Total Time: 5 minutes
- Yield: 2 servings 1x
- Diet: Vegetarian
Description
A classic vanilla milkshake that’s smooth, creamy, and nostalgic, perfect for any occasion.
Ingredients
- 2 cups Vanilla Ice Cream
- ½ to 1 cup Milk (whole, almond, or oat)
- 1 teaspoon Vanilla Extract
- Whipped Cream (optional)
- Maraschino Cherries (optional)
Instructions
- Scoop the ice cream into your blender.
- Pour in the milk, adjusting for thickness.
- Add the vanilla extract.
- Blend on medium speed until smooth.
- Taste and adjust sweetness if needed.
- Serve in tall glasses with optional garnishes.
Notes
For a thicker shake, use less milk. You can also experiment with different flavorings or add-ins for a unique twist!
- Prep Time: 5 minutes
- Cook Time: 0 minutes
- Category: Dessert
- Method: Blending
- Cuisine: American
Nutrition
- Serving Size: 1 serving
- Calories: 500
- Sugar: 40g
- Sodium: 150mg
- Fat: 25g
- Saturated Fat: 15g
- Unsaturated Fat: 5g
- Trans Fat: 0g
- Carbohydrates: 60g
- Fiber: 0g
- Protein: 10g
- Cholesterol: 70mg
Keywords: milkshake, vanilla, dessert, classic, easy recipe




