
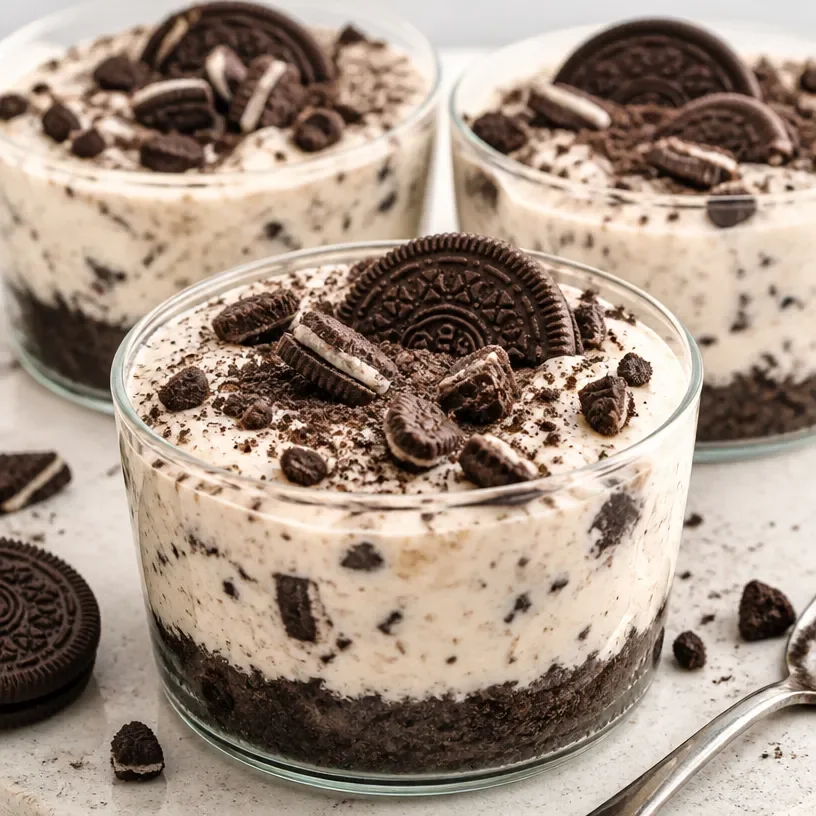
No-Bake Protein Cottage Cheese Oreo Cheesecake Cups
Decadent Protein Cottage Cheese Oreo Cheesecake Cups
Welcome to my cozy corner of the kitchen! Today, I’m thrilled to share with you a recipe that unites two of my greatest loves: cottage cheese and Oreos. Yes, you heard that right! These Protein Cottage Cheese Oreo Cheesecake Cups are going to change your snacking game forever. And trust me, they’re not just for the health enthusiast in your life—they’re delightful enough to charm the most ardent dessert lover.
Imagine this: a creamy, velvety cheesecake filling made with protein-packed cottage cheese, layered elegantly in a cup, and topped with crushed Oreos. These little wonders are not only quick to make but are also an impressive treat for gatherings, lazy afternoons, or even just a late-night snack when the sweet tooth hits!
So let’s roll up our sleeves, pour ourselves a tall glass of milk (or a dairy-free alternative), and dive into making these delightful treats. Trust me; the aroma wafting through your kitchen will draw everyone in like a moth to a flame!
A Special Childhood Memory
Before we dive into the ingredients, let me share a little story. Growing up, dessert time was always an adventure in my home. My mom would whip up cheesecakes for special occasions, but my absolute favorite was the no-bake Oreo cheesecake. I remember standing on a chair to reach the countertop, eagerly waiting to help smash the Oreos, and my mom would let me sneak a few crumbs.
As she folded the filling together, we’d chat about our day, sharing stories and laughing as I haphazardly crushed the cookies, sometimes missing the bowl entirely! Fast forward a few years, and that nostalgic experience of a no-bake cheesecake became my inspiration for these Protein Cottage Cheese Oreo Cheesecake Cups. They make me feel like a kid again, blending the past with a healthier twist. And who wouldn’t want a little trip down memory lane with each delicious bite?
Ingredients
Here’s what you’ll need for these delightful cheesecake cups:
-
1 cup of cottage cheese
A fantastic protein source that adds creaminess without the extra fat of traditional cream cheese. For a smoother texture, use ricotta cheese as a substitute. -
1/2 cup Greek yogurt
Adds a tangy kick while contributing to the creamy texture. You can swap it with sour cream if you prefer a richer flavor. -
1/3 cup honey or maple syrup
For sweetness! Adjust based on your taste. Agave syrup or coconut sugar can also work but might alter the flavor slightly. -
1 teaspoon vanilla extract
This elevates the sweet notes in your filling. Feel free to experiment with almond extract for a different twist. -
10 Oreo cookies
The classic choice for that crunchy texture and rich flavor. Use gluten-free Oreos if you need a gluten-free option! -
1 tablespoon cocoa powder
Enhances the chocolate flavor profile. You can leave this out if you want a classic cheesecake taste. -
1 scoop protein powder (optional)
Adds extra protein, especially if you’re using these as a recovery snack after a workout. Choose your favorite flavor, but vanilla works best.
Step-by-Step Instructions
Now, let’s get cooking! Here’s how to whip up these delightful bites:
-
Crush the Oreo Cookies
Place the Oreo cookies in a ziplock bag and crush them with a rolling pin or your hands. Don’t stress about making them a perfect powder; a mix of fine crumbs and larger chunks adds great texture! -
Prepare the Filling
In a mixing bowl, combine the cottage cheese, Greek yogurt, honey (or maple syrup), vanilla extract, cocoa powder, and protein powder if using. Use a hand mixer or a regular whisk to blend until everything is smooth and creamy. This is where the magic happens! Taste and adjust the sweetness if needed. -
Layer the Cups
Grab your favorite serving cups or mason jars. Start by adding a layer of crushed Oreos at the bottom—about a tablespoon works great. Then, add a generous scoop of the cheesecake filling on top. Repeat the layers until the cups are filled, finishing with a dollop of the cheesecake filling. -
Chill
Cover the cups with plastic wrap and pop them in the fridge for at least an hour. This will allow the flavors to meld beautifully, and the texture will firm up, making them easy to eat. Plus, the waiting makes for even more anticipation! -
Top It Off
Just before serving, sprinkle some extra crushed Oreos on top and maybe a drizzle of melted chocolate for an added flair. If you’re feeling extra fancy, a fresh mint leaf can add a lovely pop of color!
Serving Suggestions
These Protein Cottage Cheese Oreo Cheesecake Cups are perfect for any occasion—breakfast, dessert, or even an afternoon snack. Present them in a clear cup to showcase those stunning layers, and serve them with a side of fresh berries for a pop of sweetness and color. They also pair beautifully with a cup of coffee or a glass of cold milk. And who doesn’t love a little dessert that’s as pleasing to the eyes as it is to the palate?
Recipe Variations
Here are a few fun twists to make this recipe your own:
-
Chocolate Chip Cookie Dough Cups: Swap Oreos for chocolate chip cookies and add mini chocolate chips into the filling for a sweet surprise.
-
Peanut Butter Lovers: Stir in a couple of tablespoons of creamy peanut butter to the filling for a nutty richness.
-
Fruit-Infused Cups: Fold in diced strawberries or blueberries into the cheesecake filling for a burst of freshness.
-
Pumpkin Spice Delight: In the fall, switch the cocoa powder for pumpkin puree and add pumpkin spice for a seasonal twist!
-
Dairy-Free Version: Use dairy-free cream cheese and coconut yogurt to cater to lactose sensitivities.
Chef’s Notes
As I’ve experimented with this recipe over the years, I love knowing how versatile it is. Initially, I shared it with friends as a healthier alternative to traditional cheesecake, and the response was overwhelmingly positive! I even hosted a little dessert party where everyone created their unique versions. Some folks added a swirl of fruit preserves, while others reinvented the flavor profile completely, and it became a fun culinary experiment I often revisit.
And speaking of experiments, I once forgot to add the sugar and didn’t notice until I saw my friend’s face while tasting it. Let’s just say, that’s a memory I won’t forget! The lesson? Always taste as you go!
FAQs and Troubleshooting
1. Can I use regular cream cheese instead of cottage cheese?
Absolutely! But keep in mind that traditional cream cheese will increase the fat content. If you prefer a low-calorie option, stick with the cottage cheese.
2. My cheesecake filling is too runny. What can I do?
If your mixture is too runny, try adding a little extra cottage cheese or a tablespoon of cornstarch to thicken it up. Letting it chill longer can also help!
3. Can I freeze these cheesecake cups?
Yes, you can! Just make sure to cover them tightly with plastic wrap or foil. Thaw them in the fridge when you’re ready to devour.
4. What can I do if I over-sweetened my mixture?
If your filling is too sweet, add a touch more cottage cheese or yogurt to balance out the flavors. A pinch of salt can also help cut through the sweetness!
Nutritional Info
Serving Size: 1 cup
Calories: Approximately 160
Protein: 14g
Fat: 5g
Carbohydrates: 18g
Sugar: 10g
And there you have it! A scrumptiously simple recipe that’s just as fun to make as it is to eat. I hope you enjoy crafting these Protein Cottage Cheese Oreo Cheesecake Cups as much as I do. Happy cooking, and don’t forget to share your creations—I’d love to hear how they turn out!
Print
Protein Cottage Cheese Oreo Cheesecake Cups
- Total Time: 60 minutes
- Yield: 4 servings 1x
- Diet: High Protein
Description
A creamy and protein-packed cheesecake made with cottage cheese and topped with crushed Oreos, perfect for any occasion.
Ingredients
- 1 cup cottage cheese
- 1/2 cup Greek yogurt
- 1/3 cup honey or maple syrup
- 1 teaspoon vanilla extract
- 10 Oreo cookies
- 1 tablespoon cocoa powder
- 1 scoop protein powder (optional)
Instructions
- Crush the Oreo Cookies by placing them in a ziplock bag and crushing them with a rolling pin or hands.
- Prepare the Filling by combining cottage cheese, Greek yogurt, honey, vanilla extract, cocoa powder, and protein powder in a mixing bowl and blending until smooth.
- Layer the Cups with crushed Oreos at the bottom, followed by cheesecake filling, repeating the layers until filled.
- Chill the cups in the fridge for at least an hour.
- Top it off with extra crushed Oreos, a drizzle of melted chocolate, and a mint leaf if desired.
Notes
These cheesecake cups are versatile—experiment with flavors such as peanut butter or fruit for a personal touch.
- Prep Time: 15 minutes
- Cook Time: 0 minutes
- Category: Dessert
- Method: No-Bake
- Cuisine: American
Nutrition
- Serving Size: 1 cup
- Calories: 160
- Sugar: 10g
- Sodium: 200mg
- Fat: 5g
- Saturated Fat: 2g
- Unsaturated Fat: 2g
- Trans Fat: 0g
- Carbohydrates: 18g
- Fiber: 1g
- Protein: 14g
- Cholesterol: 10mg
Keywords: cheesecake, protein, dessert, no-bake, cottage cheese, Oreo
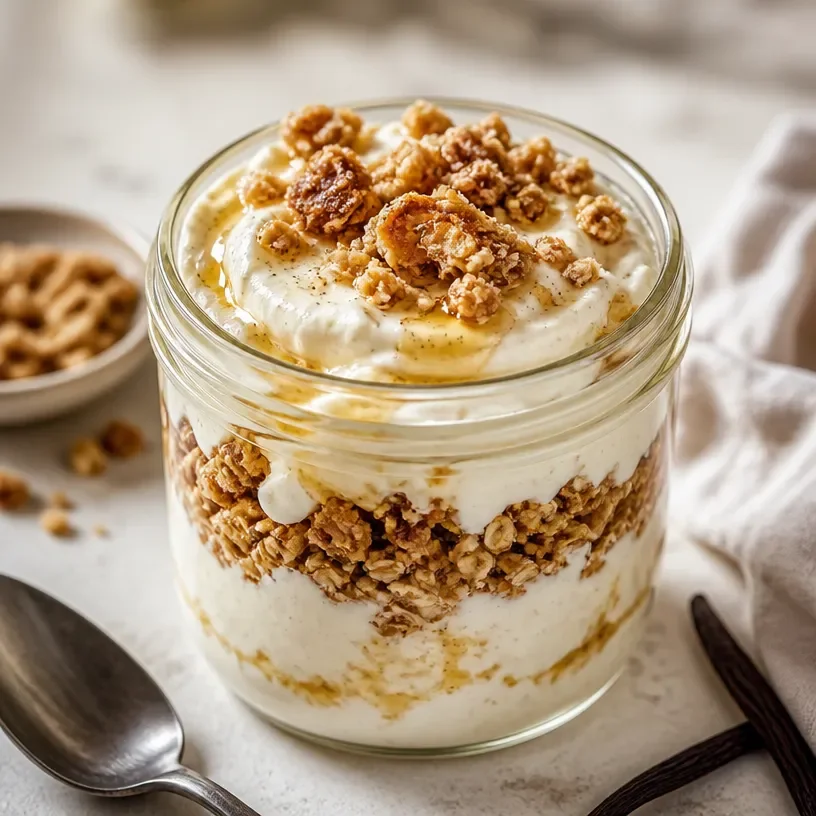
Protein Vanilla Bean Cheesecake Jar
Protein Vanilla Bean Cheesecake Jar: A Cozy, Delicious Delight
Welcome back to my cozy corner of the kitchen, friends! Today, I have a treat that combines creamy indulgence with protein-packed goodness—Protein Vanilla Bean Cheesecake Jars! If you adore the smooth, velvety texture of cheesecake but also crave a healthy twist, you’ve stumbled upon the perfect recipe. Picture this: a delightful blend of cream cheese, Greek yogurt, vanilla bean, and a touch of sweetness, all layered beautifully in a jar for an elegant presentation. Whether you’re treating yourself after a long day or impressing guests at a gathering, these little jars of joy are sure to be a hit!
Personal Story: A Cheesecake Dream
Let me take you back to a special family gathering a few years ago, where I first realized the power of cheesecake to bring people together. My grandmother, who was a wizard in the kitchen, had always made traditional cheesecakes for our family celebrations. I still remember the way the rich aroma of vanilla and baked cream cheese would fill the air, wrapping us in warmth as we gathered around the table.
That day, she decided it was time to shake things up. Instead of her classic recipe, she introduced us to a no-bake version, but with a twist. She added Greek yogurt to the mix and came up with a delightful, lighter cheesecake treat. The first bite was heavenly, and from then on, it became a family favorite. Years later, I find myself recreating that memory in my own kitchen and giving it my special touch with protein powder. So, let’s dive into this recipe together, and I’ll share the magic!
Ingredients
To whip up these delightful Protein Vanilla Bean Cheesecake Jars, you’ll need the following ingredients:
-
Cream Cheese: Use full-fat for a rich, creamy base, or low-fat for a lighter option. Make sure it’s softened to room temperature for easy mixing!
-
Greek Yogurt: This ingredient adds creaminess and a boost of protein! You can substitute it with sour cream or coconut yogurt if you’re looking for a dairy-free option.
-
Protein Powder: A vanilla-flavored protein powder works best to maintain the cheesecake essence. Try plant-based or whey protein, depending on your dietary needs.
-
Vanilla Bean Paste or Extract: Using the real thing brings enchanting notes of vanilla to this recipe. If you can’t find vanilla bean paste, pure vanilla extract will do just fine!
-
Sweetener: Honey, maple syrup, or your favorite sugar substitute will sweeten the deal. Adjust the amount according to your taste preferences.
-
Graham Cracker Crumbs: For the base, use crushed graham crackers, or swap in oat flour for a gluten-free option.
-
Butter: Unsalted butter binds the crust together. Coconut oil is a wonderful vegan substitute.
-
Fresh Berries (optional): These are gorgeous on top and add a pop of color, plus a bit of tartness to balance the sweetness.
Step-by-Step Instructions
Now that we have our ingredients, let’s get to work on these delightful jars! Follow these steps, and watch the magic happen in your kitchen.
-
Prepare the Crust:
- In a medium bowl, combine 1 cup of graham cracker crumbs with 4 tablespoons of melted butter. Mix until the crumbs resemble wet sand.
- Chef’s Tip: If you like a crunchier crust, toast the crumbs in a pan for a few minutes to enhance the flavor before mixing in the butter.
-
Set the Base:
- Scoop about 2 tablespoons of the crumb mixture into the bottom of each jar. Press down firmly to create a solid base.
- Pro Tip: Use the bottom of a shot glass or a small measuring cup to pack it tightly. This step is key for a sturdy structure!
-
Mix the Filling:
- In a large bowl, beat together 8 ounces of softened cream cheese and 1 cup of Greek yogurt until smooth and fluffy. A hand mixer comes in handy here!
- Add 1 scoop of protein powder, 1 tablespoon of vanilla bean paste, and sweetener to taste. Mix until fully combined.
- Chefs Hack: For a smoother texture, sift the protein powder before mixing it in to avoid clumps.
-
Layer It Up:
- Spoon the cheesecake filling over the crust layer in each jar, filling them about ¾ of the way full. Smooth the top with a spatula.
- Tip: Don’t worry if it’s not perfect—these are homemade treats, and a little rustic charm makes them even more endearing!
-
Chill Out:
- Place the jars in the refrigerator and let them chill for at least 2 hours before serving. This helps the flavors meld beautifully.
- Bonus Chef Insight: If you want to make them ahead of time, they can chill up to 24 hours in advance!
-
Serve with Flair:
- Just before serving, top your cheesecake jars with fresh berries or a drizzle of honey for a little extra sweetness and visual appeal.
- Plating Tip: A sprig of mint on top adds a refreshing essence and a pop of color!
Serving Suggestions
These Protein Vanilla Bean Cheesecake Jars are not just delicious; they also look stunning when served! Layered in clear jars, they make for a beautiful dessert presentation. If you’re hosting, consider serving them on a wooden board alongside some fresh fruit, or arrange them on a dessert table with candles for a cozy evening vibe. They also work wonderfully as portioned snacks for meal prep—just grab one from the fridge whenever you need a protein-packed treat on the go!
Recipe Variations
Feeling adventurous? Here are some fun variations to switch things up:
-
Chocolate Swirl: Fold in some cocoa powder or melted dark chocolate into the cheesecake filling for a rich, chocolatey experience.
-
Citrus Zest: Add some lemon or orange zest to the filling for a refreshing twist that complements the vanilla beautifully.
-
Nutty Delight: Swirl in almond or hazelnut butter for a nutty flavor that packs an extra protein punch.
-
Spiced Up: Add a pinch of cinnamon or nutmeg to give it a warm, cozy flavor that’s perfect for fall.
-
Fruit-Infused: Puree berries or mango and layer it between the crust and cheesecake filling for a fruity surprise!
Chef’s Notes
It’s funny how one recipe can evolve over the years. I started making cheesecake jars as a simple way to enjoy my grandma’s classic dessert without the hassle of baking. Over the years, I’ve added my own spin with protein powder and a Greek yogurt twist. I love how versatile this recipe is—it’s deep-rooted in family tradition yet customized to fit modern healthy lifestyles. And let me tell you, getting creative with toppings is always a fun kitchen adventure!
FAQs and Troubleshooting
-
Can I use a different sweetener?
- Absolutely! Feel free to swap in your favorite sweetener, like agave or a sugar alternative like Stevia or erythritol. Just adjust to taste!
-
Why is my cheesecake filling lumpy?
- This usually happens if the cream cheese wasn’t softened enough. Make sure it’s at room temperature before mixing! If this occurs, you can blend it longer to smooth it out.
-
How long do these last in the fridge?
- These jars can last up to 5 days in the fridge, so they’re great for meal prep! Just keep the lids on tight to maintain freshness.
-
Can I freeze these jars?
- Yes, you can freeze the filling (without the crust) in airtight containers for up to a month. When you’re ready to enjoy, thaw in the fridge overnight and then layer with freshly made crust.
With this Protein Vanilla Bean Cheesecake Jar recipe, you’ll enjoy a delicious and healthy treat that speaks of cozy memories and warm gatherings. I can’t wait to hear how you put your own spin on it, so be sure to tag me in your creations or share your kitchen stories! Happy cooking!
Print
Protein Vanilla Bean Cheesecake Jar
- Total Time: 120 minutes
- Yield: 4 servings 1x
- Diet: Healthy
Description
A delightful and healthy twist on classic cheesecake, layered beautifully in jars with creamy indulgence and protein-packed goodness.
Ingredients
- 1 cup graham cracker crumbs
- 4 tablespoons unsalted butter, melted
- 8 ounces cream cheese, softened
- 1 cup Greek yogurt
- 1 scoop vanilla-flavored protein powder
- 1 tablespoon vanilla bean paste or extract
- Sweetener to taste (honey, maple syrup, or sugar substitute)
- Fresh berries (optional)
Instructions
- Combine graham cracker crumbs and melted butter in a medium bowl until they resemble wet sand.
- Scoop about 2 tablespoons of the mixture into the bottom of each jar, pressing down firmly.
- Beat together cream cheese and Greek yogurt in a large bowl until smooth.
- Add protein powder, vanilla bean paste, and sweetener, mixing until fully combined.
- Spoon the cheesecake filling over the crust in each jar, filling about ¾ full.
- Chill in the refrigerator for at least 2 hours before serving.
- Top with fresh berries or a drizzle of honey just before serving.
Notes
These jars can last up to 5 days in the fridge and can be frozen (without crust) for up to a month.
- Prep Time: 15 minutes
- Cook Time: 0 minutes
- Category: Dessert
- Method: No-Bake
- Cuisine: American
Nutrition
- Serving Size: 1 jar
- Calories: 280
- Sugar: 10g
- Sodium: 200mg
- Fat: 14g
- Saturated Fat: 8g
- Unsaturated Fat: 6g
- Trans Fat: 0g
- Carbohydrates: 30g
- Fiber: 1g
- Protein: 12g
- Cholesterol: 30mg
Keywords: cheesecake, dessert, protein, healthy, no-bake




