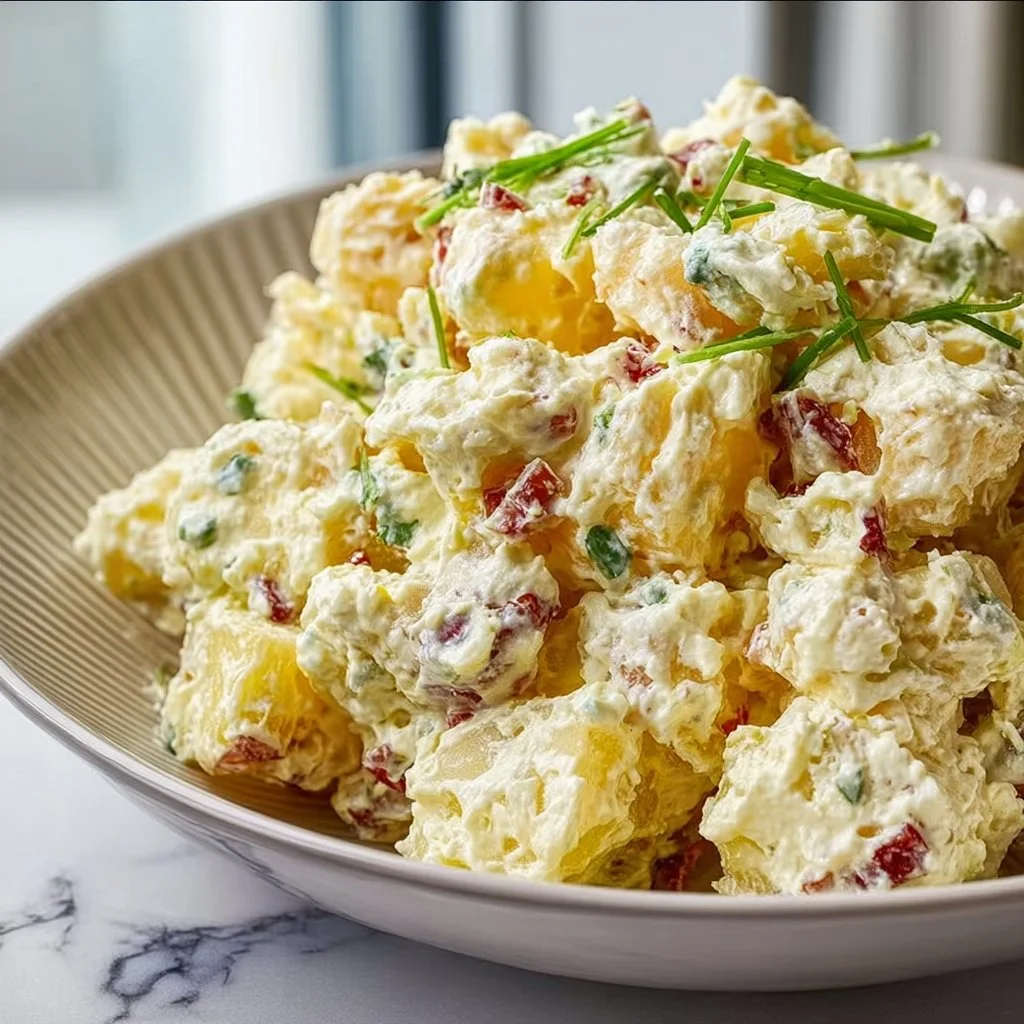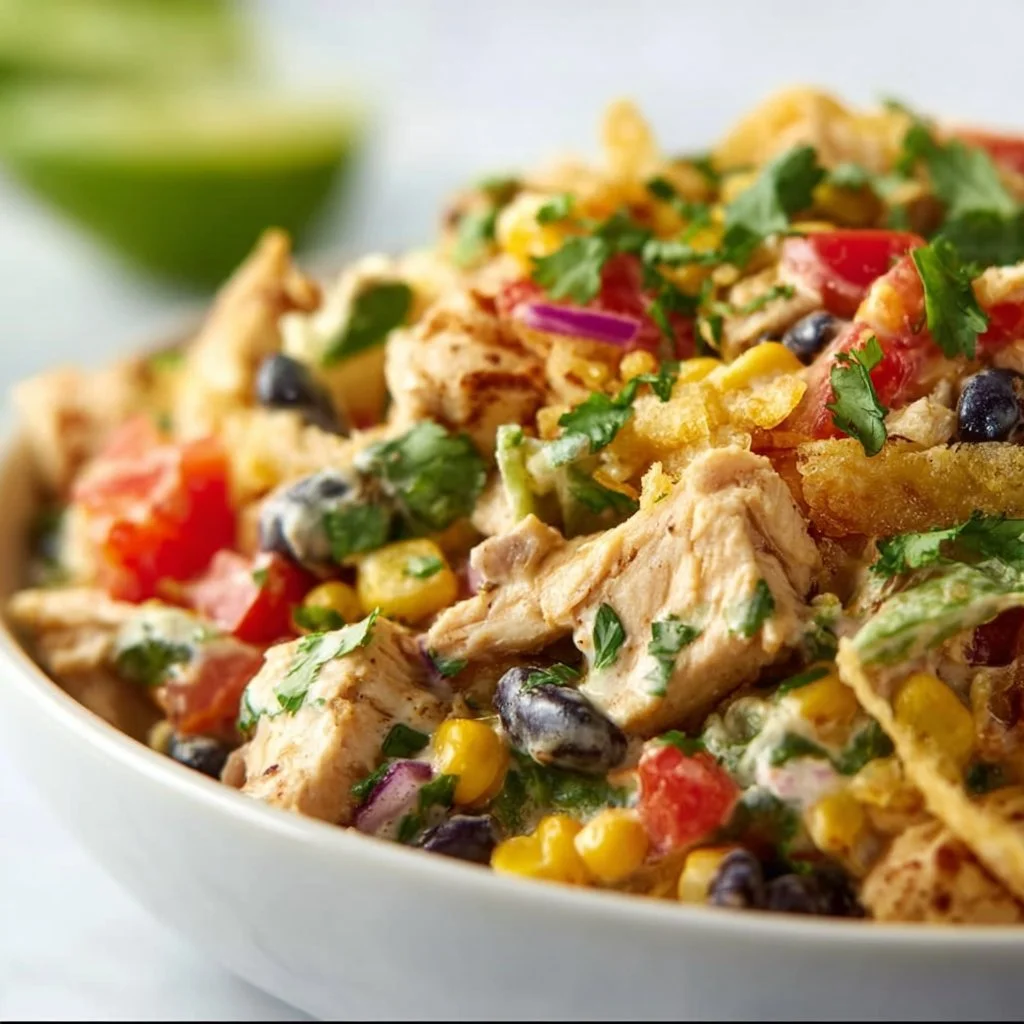
Southwest Chicken Salad
# Southwest Chicken Salad: A Flavorful Fiesta in a Bowl!

## Introduction

Hey there, wonderful foodies! Welcome back to my cozy corner of the culinary world. Today, we’re diving into a vibrant dish that’s not only bursting with color but also loaded with flavor — the Southwest Chicken Salad! This salad is the ultimate culmination of refreshing ingredients and zesty spices, making it perfect for a sunny lunch, a backyard barbecue, or even a light dinner during busy weeknights. It’s a bowl full of joy!

Now, you might be thinking: “What’s so special about a salad?” But this isn’t just any salad, my friends. Think succulent grilled chicken, crunchy bell peppers, creamy avocado, and a spicy salsa dressing that will make your taste buds do a happy dance. Yes, it’s that good! Plus, the best part? It comes together in a snap—meaning you can have a delicious, healthy meal ready in no time. So grab your apron and prepare for a cooking adventure that promises to tantalize your palate and brighten your day!

Imagine this: It’s a warm summer evening, and you’ve gathered friends and family around for dinner. The laughter is flowing, and the aroma of grilled chicken fills the air. The best stories are shared over meals, and this Southwest Chicken Salad is sure to spark conversation and create memories. Everything from the juicy chicken to the crisp vegetables and creamy dressing comes together to not just create a meal, but an experience.

Can you already feel the excitement bubbling? I thought so! Let’s get started on this flavorful journey. I’ll walk you through the steps, share some tips from my kitchen as we chop and mix, and by the end, you’ll not only have a delightful salad but also a smile on your face and a spark of creativity for your next cooking endeavor. Ready? Let’s do this!

## Personal Story

I’ll never forget the first time I made a Southwest Chicken Salad. It was during a particularly scorching summer, and I had friends visiting from out of town. We were all so excited to catch up, but I quickly realized that cooking something hearty would be too much given the heat! I rummaged through my fridge and pantry, finding remnants of chicken from a previous dinner, some veggies that needed to be used, and an avocado that was just begging to be incorporated.

That day, as I tossed everything together in a big bowl, I felt an overwhelming sense of satisfaction. The vibrant colors of red, yellow, and green literally jumped out at me, and as I drizzled my newly concocted spicy dressing over the top, I knew I had stumbled onto something magical. The laughter of my guests echoed in the background as we all dug in—what was meant to be a quick meal turned into a feast of flavors and a long-lasting memory. Ever since, this Southwest Chicken Salad has been a staple in my kitchen, reminding me of the power of simple ingredients and the joy of sharing good food with even better company.

## Ingredients

Let’s break down the components that make this Southwest Chicken Salad a home run!

- **Chicken Breast**: The star of the show! I recommend using boneless, skinless chicken breast for a leaner option. Substitute with grilled tofu or black beans for a vegetarian twist.

- **Olive Oil**: This liquid gold not only coats our chicken for grilling but also enhances the overall flavor. Feel free to use avocado oil or sunflower oil for a neutral option.

- **Bell Peppers** (Red and Yellow): These add a sweet crunch and bright color. If you prefer, swap them with cherry tomatoes or cucumbers for a different texture.

- **Red Onion**: A subtle crunch and a zing! For a milder flavor, soak the onion slices in cold water for 10 minutes before adding them to your salad.

- **Avocado**: Creamy and delicious! Look for ripe avocados that yield slightly to pressure. If you don’t have any, a handful of nuts or seeds can add a delightful crunch.

- **Corn**: Sweet and crunchy, corn adds depth. Canned or frozen (thawed) corn works just as well. If you're avoiding corn, try adding quinoa for added texture.

- **Black Beans**: They bring protein and fiber to the dish. Canned black beans work perfectly, but be sure to rinse and drain them first!

- **Fresh Cilantro**: This herb adds a fresh note. Don’t love cilantro? Parsley or green onions make excellent substitutes.

- **Lime**: Freshly squeezed lime juice brings brightness! If you're out of limes, lemon juice makes a great alternative.

- **Spices (Cumin & Chili Powder)**: These spices give our salad a Southwest flair. If you want to kick the heat up, add a dash of cayenne pepper.

- **Greek Yogurt or Sour Cream**: This is for our dressing! Greek yogurt gives a creamy texture with added protein. You can omit it for a lighter dressing or use dairy-free yogurt options.

- **Salsa**: The secret sauce! Use your favorite store-bought salsa or whip up your own with diced tomatoes, jalapeños, and more!

## Step-by-Step Instructions

Now that you have all your ingredients lined up, let’s dive into cooking! Don’t worry; this is going to be super straightforward and fun.

1. **Prep the Chicken**: Start by seasoning your chicken breast with olive oil, cumin, chili powder, salt, and pepper. Use your hands for this part—it’s much easier to get the spices evenly distributed. After seasoning, let the chicken rest for about 10 minutes. If you have time, marinating it for a few hours or overnight can enhance the flavor even more!

2. **Grill the Chicken**: Preheat your grill or grill pan over medium-high heat. Once hot, add the chicken and grill for about 6-7 minutes on each side, or until the internal temperature reaches 165°F (75°C). You want that gorgeous grill mark! No grill? No problem! A skillet works just as well.

3. **Slice the Chicken**: Once cooked, transfer your chicken to a cutting board to rest for a few minutes. This allows the juices to redistribute, keeping it juicy and tender. After resting, slice it thinly against the grain.

4. **Chop and Dice**: While the chicken is resting, it’s time to chop! Dice the bell peppers, slice the red onion, cube the avocado, and rinse your beans. Don’t forget to add that fresh cilantro—chop it coarsely to keep its vibrant flavor!

5. **Make the Dressing**: In a small bowl, mix Greek yogurt (or sour cream) with salsa to create a creamy dressing! You can adjust the ratio based on how creamy you want it. Add a splash of lime juice for that extra zing!

6. **Combine Everything**: In a large mixing bowl, combine the grilled chicken, bell peppers, red onion, avocado, corn, and black beans. Toss gently to combine. Drizzle with your dressing and give it another gentle toss—just enough so that everything is coated and mixed without squishing the avocados!

7. **Taste and Adjust**: Now for the fun part! Grab a fork and taste your creation. Need more lime juice or spice? Adjust it here. The beauty of cooking is making the dish your own!

## Serving Suggestions

Now that your Southwest Chicken Salad is ready and looking vibrant, it’s time to serve it up! Topping it with extra avocado slices, a sprinkle of feta cheese, or a handful of tortilla strips can add a lovely finishing touch. Serve in a beautiful bowl or platter to showcase those colors. This salad can also be served in individual bowls or even wrapped in a tortilla for a satisfying wrap!

## Recipe Variations

Looking to switch things up a bit? Here are some fun variations to keep things exciting:

- **Quinoa Southwest Chicken Salad**: Add cooked quinoa to the mix for an extra protein boost and a nutty flavor.

- **Spicy Chicken Twist**: Add jalapeños or switch to a spicy salsa to turn up the heat!

- **Shrimp or Fish Option**: For seafood lovers, grilled shrimp or white fish can replace the chicken for a lighter, yet equally flavorful salad.

- **Vegan Delight**: Replace the chicken with grilled portobello mushrooms and use a vegan yogurt for the dressing.

- **Cheesy Spin**: Add shredded cheese (like pepper jack or cheddar) for a creamy flavor.

## Chef’s Notes

It’s always fascinating how recipes evolve in the kitchen, isn’t it? Over the years, I’ve played with this recipe so much. I remember a time when I threw in leftover roasted sweet potatoes, and it added such a delightful sweetness that it became a regular in my summer rotation. One mishap, however, was when I grabbed the chili powder instead of cinnamon (oops!). The resulting salad was unexpectedly spicy, but we laughed about it and edited the recipe! It's those little moments that keep cooking joyous and lighthearted.

## FAQs and Troubleshooting

- **Q: My chicken turned out dry. What went wrong?**
  A: Dry chicken often means it was overcooked. Always use a meat thermometer; 165°F is your sweet spot. Letting the chicken rest is equally important to keep it juicy.

- **Q: Can I make this salad ahead of time?**
  A: Absolutely! You can prep all ingredients and store them separately. Keep the dressing aside until you’re ready to serve to avoid sogginess.

- **Q: What if I don’t like black beans?**
  A: No worries! You can substitute them with chickpeas or just skip them altogether. You’ll still have a fantastic salad.

- **Q: How do I store leftovers?**
  Store in an airtight container in the fridge for up to two days. The flavors will meld beautifully, just make sure to add fresh avocado just before serving.

## Nutritional Info

This salad isn’t just delicious but also nutritious! Packed with protein from the chicken and black beans, healthy fats from the avocado and olive oil, and a multitude of vitamins from the veggies, it’s a balanced meal. Each serving offers a great mix of nutrients without overwhelming calories, making it perfect for anyone looking for a wholesome option!

---

And there you have it—a scrumptious Southwest Chicken Salad that’s equal parts easy and exciting! I hope this recipe brings as much joy to your kitchen as it has brought to mine. Happy cooking, and remember—every meal is a chance to create and connect!

Southwest Chicken Salad
- Total Time: 30 minutes
- Yield: 4 servings 1x
- Diet: Gluten-Free
Description
A flavorful salad loaded with grilled chicken, fresh vegetables, and a zesty dressing, perfect for a warm day or a light dinner.
Ingredients
- 1 lb Boneless, skinless chicken breast
- 2 tbsp Olive oil
- 1 Red bell pepper, diced
- 1 Yellow bell pepper, diced
- 1/2 Red onion, thinly sliced
- 1 Avocado, diced
- 1 cup Corn, canned or frozen
- 1 can Black beans, rinsed and drained
- 1/4 cup Fresh cilantro, chopped
- Juice of 1 Lime
- 1 tsp Cumin
- 1 tsp Chili powder
- 1/2 cup Greek yogurt or sour cream
- 1 cup Salsa
Instructions
- Prep the chicken by seasoning with olive oil, cumin, chili powder, salt, and pepper; let it rest for 10 minutes.
- Grill the chicken on a preheated grill for 6-7 minutes on each side until fully cooked.
- Slice the chicken after resting to retain juices.
- Chop the bell peppers, red onion, avocado, and rinse the black beans.
- Make the dressing by mixing Greek yogurt with salsa and lime juice.
- Combine all chopped ingredients and chicken in a large bowl, then gently toss with the dressing.
- Taste and adjust seasoning as needed.
Notes
You can serve the salad in a bowl, on a plate, or rolled in a tortilla for a wrap. For a vegan option, substitute chicken with grilled tofu.
- Prep Time: 15 minutes
- Cook Time: 15 minutes
- Category: Salad
- Method: Grilling
- Cuisine: Mexican
Nutrition
- Serving Size: 1 serving
- Calories: 350
- Sugar: 4g
- Sodium: 300mg
- Fat: 18g
- Saturated Fat: 3g
- Unsaturated Fat: 11g
- Trans Fat: 0g
- Carbohydrates: 27g
- Fiber: 8g
- Protein: 24g
- Cholesterol: 70mg
Keywords: southwest chicken salad, healthy salad, grilled chicken salad, summer salad, meal prep

Chimichurri Chicken Thighs
Chimichurri Chicken Thighs: A Flavorful Journey
Hey there, fellow food lovers! Welcome back to my cozy corner of the culinary world where the oven is always warm, and the aroma of delicious flavors fills the air. Today, I’m super excited to share a recipe that’s not just a winner in my home but one that’s sure to spice up your meals — Chimichurri Chicken Thighs! You might be wondering what makes this dish stand out. Well, let me tell you; it’s a vibrant dance between juicy chicken, zesty herbs, and a splash of unforgettable Argentinian flair.
Chimichurri, a sauce born from the sun-soaked landscapes of Argentina, is the real star here! It’s packed with fresh parsley, garlic, and just the right amount of tangy goodness. When paired with succulent, tender chicken thighs, it creates a perfect balance that’s fragrant and downright irresistible. Whether you’re feeding a crew of hungry friends or enjoying a quiet night in, this dish is an absolute showstopper.
Beyond its bold flavors, what I love most about making Chimichurri Chicken Thighs is how quick and easy it is to whip up. Trust me, no fancy-schmancy skills are required here! A little chopping, a little marinating, and before you know it, you’re basking in the sweet glory of a delightful homemade meal that impresses without the stress.
So, grab your apron and let’s dive into the world of Chimichurri Chicken Thighs! This recipe is not just about cooking; it’s about creating joyful memories around the table. Ready? Let’s go!
Personal Story
Whenever I think of Chimichurri Chicken Thighs, my mind drifts back to one summer evening spent with my family in my grandmother’s backyard. The sun was setting, painting the sky with shades of pink and orange, and the air was filled with laughter, the smell of grilled meats, and chimichurri sauce that had been generously drizzled over everything. Grandma had a magic touch with her cooking, and her chimichurri was unmatched.
That evening, we were all gathered around a rustic wooden table, swapping stories while devouring dish after dish, each bite transporting us to the heart of Argentina. Everyone had their own opinion on the best way to enjoy chimichurri: some preferred it drizzle over grilled vegetables, others liked it thick on their steak, while I was loyal to my love for chicken thighs. With each mouthful, I felt the warmth of family and passion for cooking come alive. It was more than just a meal; it was a gathering of hearts and flavors, a feast that sparked joy and connection.
Fast forward to today, and I find myself recreating that magical evening. Every time I make Chimichurri Chicken Thighs, I can almost hear my grandmother’s laughter and feel that summer warmth all over again. So, let’s bring that nostalgia back to life, shall we?
Ingredients
Now that we’ve set the mood, let’s gather our ingredients! Below is a list of what you’ll need to whip up these scrumptious Chimichurri Chicken Thighs, along with some handy insights to make your cooking experience even smoother:
-
Bone-in, skin-on chicken thighs (4 pieces)
These are juicy and flavorful, making for a perfect canvas for our chimichurri marinade. If you prefer a healthier option, boneless, skinless thighs work well too! Just adjust the cooking time slightly. -
Fresh parsley (1 cup, chopped)
This is the heart and soul of the chimichurri! Use flat-leaf parsley for its vibrant flavor. If you’re feeling adventurous, mix in some cilantro for a fresh twist. -
Garlic cloves (4 cloves, minced)
Garlic adds that irresistible punch! Feel free to reduce this amount if you’re not a fan of strong garlic flavors, or even try roasted garlic for a sweeter, milder taste. -
Red wine vinegar (1/3 cup)
This tangy vinegar balances the richness of the chicken beautifully, adding a fragrant zing. If you don’t have red wine vinegar on hand, apple cider vinegar is a great substitute. -
Olive oil (1/3 cup)
A good quality olive oil takes the sauce to another level. You can also use avocado oil for a different flavor profile. Just make sure to keep that bottle in the pantry ready for your next recipe! -
Red pepper flakes (¼ teaspoon, or to taste)
This offers a delightful kick! Adjust the amount based on your spice tolerance — you can always start with less and add more as you taste. -
Kosher salt and freshly ground pepper (to taste)
Don’t skip this! Seasoning enhances every flavor. I suggest using kosher salt for a balanced salinity! -
Lemon juice (from half a lemon)
Add a pop of freshness with this! If you’re in a pinch, bottled lemon juice also works — but fresh is always best!
Step-by-Step Instructions
Alright, time to get down to business! Here’s how to make these magical Chimichurri Chicken Thighs step by step — don’t worry, I’ll guide you through every moment so you can feel like a rockstar in your kitchen!
Step 1: Prepare the Chimichurri Sauce
-
Chop the parsley and garlic:
Start by finely chopping the fresh parsley and mincing the garlic cloves. You want those fresh aromas to come together beautifully! I often use a chef’s knife because it makes the chopping more efficient and fun. Plus, it’s a great way to channel your inner culinary ninja! -
Mix the ingredients:
In a small bowl or a food processor, combine the chopped parsley, minced garlic, red wine vinegar, olive oil, red pepper flakes, and a good pinch of salt and pepper. If you’re using a food processor, pulse until the mixture is well-combined but still slightly chunky. If doing it by hand, just stir well until everything is combined. The colors should be vibrant — just like your cooking spirit! -
Taste and adjust:
Here’s where you add your chef’s magic touch! Give it a taste and adjust for salt, acidity, and spice. If it tastes a little flat, a squeeze of lemon juice can brighten it right up!
Step 2: Marinate the Chicken
-
Prepare the chicken:
Rinse and pat the chicken thighs dry with paper towels. This helps to achieve that perfect crispness when cooking. Then, place the chicken thighs in a large bowl or a resealable bag. -
Add the chimichurri sauce:
Pour half of the chimichurri sauce over the chicken thighs, making sure they’re well-coated. Save the other half for serving — trust me, you’ll want it on the side! Marinate the chicken for at least 30 minutes if you’re in a hurry, or up to overnight in the fridge for maximum flavor.
Step 3: Cook the Chicken
-
Preheat the grill or oven:
If you’re grilling, preheat it to medium-high heat (around 425°F). If you’re baking, preheat your oven to 375°F. Both methods work great, so choose what suits your vibe today! -
Grill or bake the chicken:
On a grill, place the marinated chicken thighs skin-side down. Grill for about 6-8 minutes per side, or until the internal temperature reaches 165°F. If baking, place them in a greased baking dish and bake for about 35-40 minutes. -
Crisp the skin:
If you’re grilling, check back often to avoid flare-ups from the fat! If you’re baking, to create the crispy skin, turn the oven broiler on for the last 5 minutes of cooking — just keep an eye on it to prevent burning!
Step 4: Serve and Enjoy
-
Let it rest:
Once cooked, remove the chicken from the heat and let it rest for about 5-10 minutes. This allows those juices to redistribute and keeps your chicken juicy! -
Plate it up:
Serve those glorious chicken thighs with a generous drizzle of the reserved chimichurri sauce over the top. Adding some roasted veggies or a fresh salad on the side makes for a beautiful presentation!
Serving Suggestions
For a cozy family meal, arrange your Chimichurri Chicken Thighs on a large platter, drizzling the chimichurri sauce all over and garnishing with lemon slices and sprigs of fresh parsley. Serve alongside your favorite sides like roasted garlic potatoes or a vibrant quinoa salad to complement the dish. Don’t forget a glass of red wine or sparkling water to round off the experience. Cheers to good food and great company!
Recipe Variations
-
Grilled Chimichurri Shrimp: Swap out the chicken thighs for succulent shrimp. Marinate for about 15-20 minutes and grill just until pink, for a quick seafood twist!
-
Chimichurri Tofu: For a vegetarian version, use firm tofu. Marinate, grill, and serve with chimichurri — it’s just as tasty!
-
Pasta with Chimichurri Chicken: After preparing the chicken, chop it up and toss it with al dente pasta, a drizzle of olive oil, and a sprinkle of Parmesan for a delectable, hearty meal.
-
Chimichurri Meatballs: Create flavorful meatballs using beef or turkey and bake them, topped with chimichurri sauce for a fun twist on the classic.
Chef’s Notes
As I’ve experimented with this recipe over the years, I’ve discovered the beauty of cooking is its adaptability. The original chimichurri serves beautifully as a marinade, but you can enjoy it in so many ways! I’ll never forget the time I tried to impress a group of friends and accidentally over-marinated the chicken. It was on the saltier side but surprisingly delicious! That’s when I learned the importance of balance in flavors.
Food is meant to be fun and exciting! Don’t hesitate to mix things up according to your cravings. Throw in some nuts or even a hint of honey to the chimichurri for a sweeter touch, and I promise, the results will surprise you.
FAQs and Troubleshooting
1. My chicken turned out dry. What happened?
This could be due to overcooking. Always use a meat thermometer to check the internal temperature (165°F is ideal!). If you’re unsure, err on the side of caution and take it off early; it can always cook a tad more while resting.
2. Can I make the chimichurri sauce in advance?
Absolutely! You can prep the sauce a day ahead and store it in the fridge. Just let it sit at room temperature for a bit before serving, as olive oil can solidify when cold!
3. Is it okay if I don’t have fresh herbs?
While fresh herbs deliver maximum flavor, you can use dried herbs in a pinch! Just remember that dried herbs are more concentrated — a teaspoon per tablespoon of fresh.
4. How long can I store leftover chicken and chimichurri?
If you have leftovers (which might be unlikely, but great if you do!), store them in an airtight container in the fridge for 3-4 days. The chimichurri sauce can last up to a week.
Nutritional Info
Chimichurri Chicken Thighs (per serving, without sides):
- Calories: ~350
- Protein: ~25g
- Fat: ~25g
- Carbohydrates: ~4g
- Fiber: ~1g
So there you have it! A flavorful journey through Chimichurri Chicken Thighs that’s guaranteed to warm your heart and fill your tummy. I hope you enjoy every savory bite as much as I do and make memories that linger long after the last plate is cleared. Happy cooking, and remember to always cook with love!
Print
Chimichurri Chicken Thighs
- Total Time: 55 minutes
- Yield: 4 servings 1x
- Diet: Paleo
Description
Juicy chicken thighs marinated in vibrant chimichurri sauce, embodying the flavors of Argentina.
Ingredients
- 4 bone-in, skin-on chicken thighs
- 1 cup fresh parsley, chopped
- 4 garlic cloves, minced
- 1/3 cup red wine vinegar
- 1/3 cup olive oil
- ¼ teaspoon red pepper flakes (or to taste)
- Kosher salt and freshly ground pepper (to taste)
- Juice from half a lemon
Instructions
- Prepare the Chimichurri Sauce: Chop the parsley and garlic. Mix in a bowl with parsley, minced garlic, red wine vinegar, olive oil, red pepper flakes, and a pinch of salt and pepper. Taste and adjust flavors.
- Marinate the Chicken: Rinse and pat chicken thighs dry. Place in a bowl, pour half of the chimichurri sauce over and marinate, refrigerating for at least 30 minutes or overnight.
- Cook the Chicken: Preheat grill to medium-high (425°F) or oven to 375°F. Grill chicken skin-side down for 6-8 minutes per side until reaching 165°F, or bake for 35-40 minutes. Broil for crisp skin if desired.
- Serve and Enjoy: Let the chicken rest for 5-10 minutes, then drizzle with reserved chimichurri sauce before serving.
Notes
Add roasted vegetables or a fresh salad to your meal for a complete experience. Adjust the chimichurri spice level per your taste.
- Prep Time: 15 minutes
- Cook Time: 40 minutes
- Category: Main Course
- Method: Grilling, Baking
- Cuisine: Argentinian
Nutrition
- Serving Size: 1 chicken thigh
- Calories: 350
- Sugar: 1g
- Sodium: 500mg
- Fat: 25g
- Saturated Fat: 6g
- Unsaturated Fat: 15g
- Trans Fat: 0g
- Carbohydrates: 4g
- Fiber: 1g
- Protein: 25g
- Cholesterol: 100mg
Keywords: chimichurri, chicken thighs, Argentinian, grilling, main course
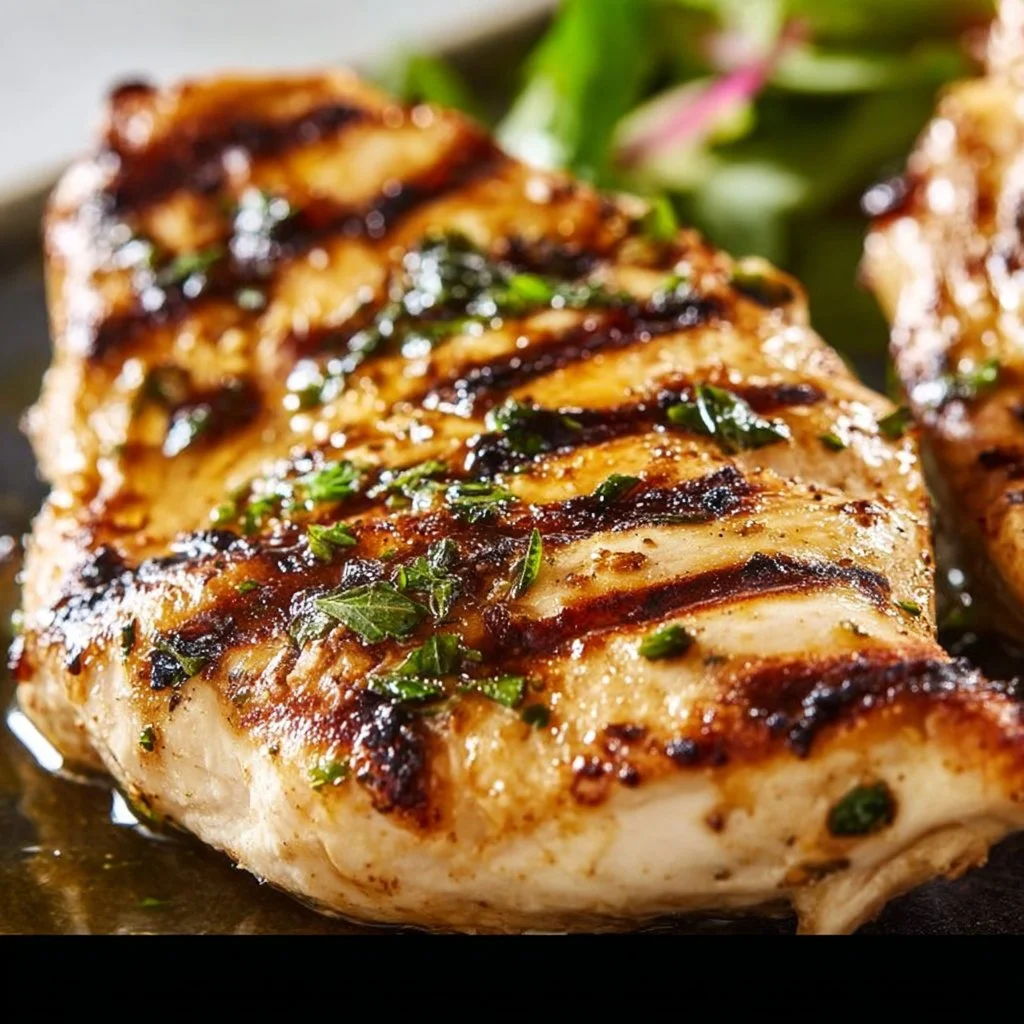
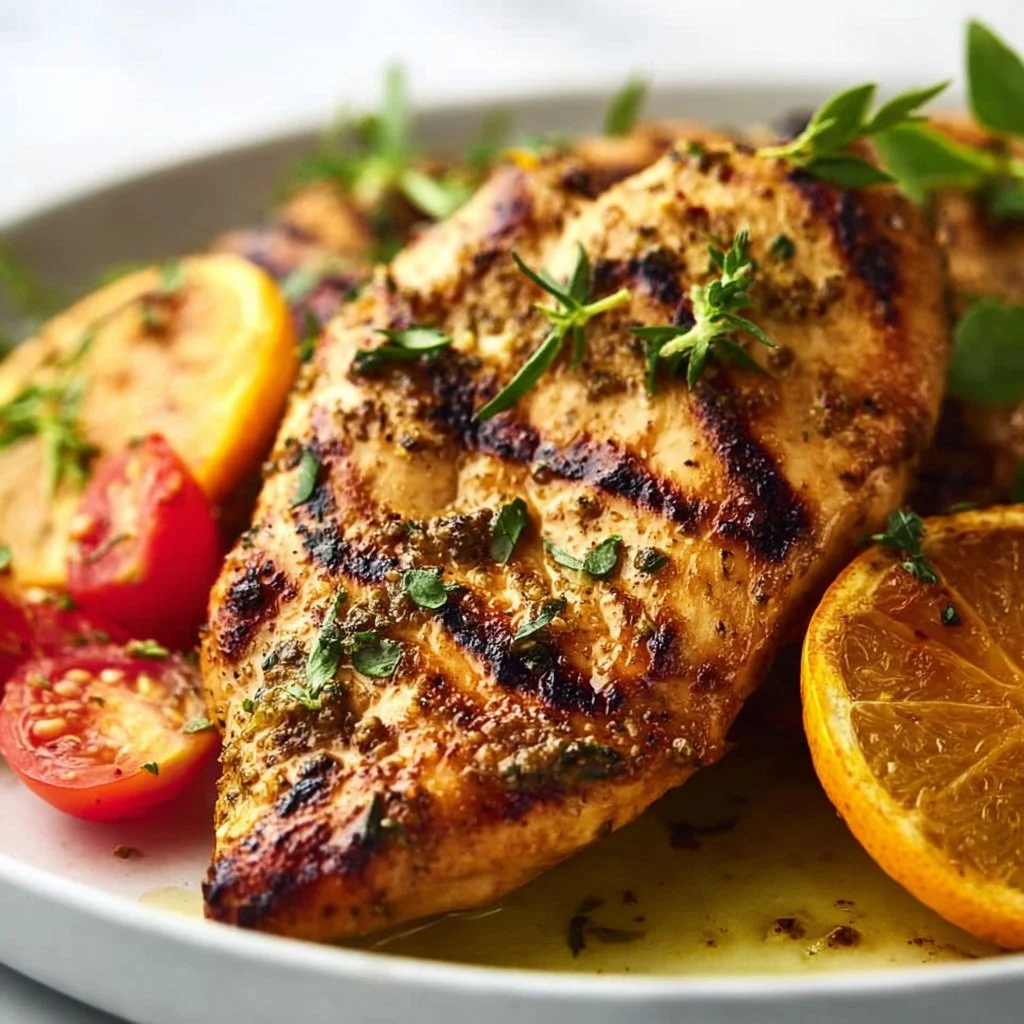
Grilled Chicken Breast
# Grilled Chicken Breast: A Simple Delight to Brighten Your Table

## Introduction

Welcome back to my cozy kitchen, friends! I’m so enthusiastic to share one of my all-time favorite meals with you today: *grilled chicken breast*. There's something utterly satisfying about a perfectly grilled chicken—a juicy interior with a lightly charred, flavorful exterior. Whether it’s sizzling on the grill during a summer barbecue or pan-seared for a weeknight dinner, grilled chicken is like a chameleon; it adapts to any cuisine and flavor profile, ever the avid traveler on your dinner plate!

What I love most about this dish is how customizable it can be. You aren’t just limited to salt and pepper; oh no, my culinary companions! With just a handful of spices, marinades, and techniques, you have the power to transport your taste buds to distant lands—be it Mediterranean, Asian, or good ol’ Southern BBQ.

And let's talk about those magical sharing moments that happen around the grilled chicken. Picture this: warm evenings with laughter ringing out, friends gathered around the grill, plates piled high with vibrant sides, and the tantalizing aroma wafting through the air. I mean, can you smell it? That’s what cooking is all about—uniting people and creating memories that last long after the last bite.

So grab your aprons and let's dive into this delicious adventure! Ready to transform humble chicken breasts into something extraordinary? Let’s do this!

## Personal Story

I remember my very first grilling adventure like it was yesterday. I was in high school, a bit of a culinary novice, when my dad decided it was time for me to step up to the grill while he handled the big boys! We had a beautifully sunny day, the kind that beckons you outside. He showed me the trusty old charcoal grill we had, which smelled faintly of the countless cookouts that preceded my initiation.

With my dad guiding me, we marinated the chicken in olive oil, lemon juice, and a few secret spices. I can still hear his gentle laughter as I fumbled with those tongs for the first time. But the moment those beautiful breast pieces hit the grill, oh boy! The sizzle was music to my ears! The taste—a masterpiece born from the fire—made me realize that I could indeed create joy in the kitchen.

From then on, it became our ritual every summer; we experimented with flavors, swapped recipes, and learned together. Those sunny days at the grill weren’t just about the chicken; they were about connection, laughter, and love being served right alongside our meal.

## Ingredients

To create the best grilled chicken breast, let’s gather our stars of the show! Here’s what you’ll need:

- **Chicken Breasts** (boneless and skinless)
  - Choose organic, free-range if possible for the best flavor and texture. If you prefer, thighs can work in place of breasts for a juicier, richer taste.

- **Olive Oil**
  - A must for marinating and ensuring those grill marks stick! If you don’t have olive oil, melted coconut oil or avocado oil can be great substitutes.

- **Garlic Powder**
  - This adds a lovely depth to your chicken. If you want a fresher note, you could use freshly minced garlic instead—just be cautious, as it can burn faster on the grill.

- **Paprika**
  - This is your secret weapon for color and a hint of smokiness. Smoked paprika packs an extra punch if you’re going for that BBQ vibe!

- **Salt and Pepper**
  - Essential! Sea salt enhances flavors beautifully, while freshly cracked pepper gives a kick. If you’re watching your sodium intake, consider using a lower-sodium sea salt.

- **Herbs (optional)**
  - Fresh or dried thyme, rosemary, or Italian seasoning can elevate your chicken. Feel free to mix and match based on what you have on hand!

- **Lemon Juice**
  - Freshly squeezed lemon juice brings brightness to your marinade. You can substitute it with lime juice for a fun twist.

## Step-by-Step Instructions

Now that we have our ingredients, it’s time for the fun part: cooking! Here’s how to turn those breasts into a grilled masterpiece.

1. **Prep the Chicken:**
   - Begin by trimming any excess fat from your chicken breasts for a cleaner bite. Pat them dry with a paper towel; this ensures better browning when they hit the grill!

2. **Marinate:**
   - In a large bowl, combine ¼ cup olive oil, 1 teaspoon garlic powder, 1 teaspoon paprika, and the juice of one lemon. Whisk those beauties together, then season generously with salt and pepper.
   - Add the chicken breasts, ensuring they're well-coated in the marinade. Cover and let them soak up those flavors for at least 30 minutes in the fridge—ideally, an hour or more if you have time.

3. **Heat the Grill:**
   - Preheat your grill to medium-high heat. This usually takes about 10-15 minutes. If using a charcoal grill, you want to make sure the coals are glowing and covered with ash for perfect temperature to grill.

4. **Grill the Chicken:**
   - Once your grill is hot, lightly oil the grates to prevent sticking. Place the chicken on, spaced apart to allow airflow. Grill for about 6-7 minutes without moving them—this is where those gorgeous grill marks develop.

5. **Flip and Finish:**
   - Using tongs, flip the chicken breasts and grill for another 6-7 minutes on the other side. You’re looking for an internal temperature of 165°F (75°C) for fully cooked chicken, measured with a meat thermometer.

6. **Rest:**
   - Once your chicken is beautifully charred and cooked through, let it rest for about 5 minutes. This little break allows the juices to redistribute so that every bite is succulent and evenly moist.

## Serving Suggestions

Now comes the fun part—serving! Slice your grilled chicken breasts into thick pieces and arrange them on a colorful platter. Pair them with a vibrant, seasonal salad like a cherry tomato and basil caprese or some roasted veggies to compliment that grilled goodness.

Drizzle with a balsamic reduction or serve alongside a zesty yogurt sauce for an added flavor boost. And don’t forget to sprinkle some fresh herbs on top—your chicken deserves the spotlight!

## Recipe Variations

Get ready to mix things up! Here are some creative ways to enjoy your grilled chicken:

- **Mediterranean Twist:** Add oregano and lemon zest to the marinade, and serve with tzatziki sauce for a delightful Greek vibe.

- **Tropical Vibes:** Mix in some pineapple juice and soy sauce for a Hawaiian twist, and add grilled pineapple slices on top before serving.

- **Spicy Kick:** Add chili powder or cayenne pepper to the marinade for heat. You could even glaze the chicken with some sriracha for that extra zing!

- **Honey Mustard Delight:** Swap out the olive oil for equal parts honey and dijon mustard in your marinade for a sweet-and-tangy flavor profile.

- **Herb Medley:** Use a mixture of your favorite fresh herbs; think cilantro, basil, or dill, for a fresher take. These can be thrown directly onto the grill in a foil packet for added smoky flavor.

## Chef's Notes

This grilled chicken recipe has been one of my go-to staples for years, and I continue to adapt it based on the seasons and what’s in my pantry. I remember a time I was experimenting with a new marinade and accidentally added too much salt; a sprinkling of brown sugar helped balance the whole dish. Kitchen blunders can sometimes lead to the most delicious discoveries!

Another thing I love is how versatile this chicken is. It can easily become the star in a salad, wrap, or even atop a comforting grain bowl. If you’re feeling adventurous, try marinating a batch overnight and see how those flavors deepen overnight. You might surprise yourself!

## FAQs and Troubleshooting

**1. My chicken turned out dry. What went wrong?**
   - This is often due to cooking at too high a heat or cooking for too long. Use a meat thermometer, and remember to let it rest before slicing!

**2. How do I know when the chicken is done?**
   - The best way is using a meat thermometer. Once it reaches 165°F (75°C) in the thickest part, it’s good to go!

**3. Can I grill frozen chicken?**
   - It's best to thaw chicken before grilling; frozen chicken cooks unevenly and takes much longer. Always plan ahead!

**4. How can I store leftovers?**
   - Store cooked and cooled chicken in an airtight container in the fridge for up to four days. It also freezes beautifully! Be sure to slice or cube it before freezing for easier use in future meals.

## Nutritional Info (Optional)

**Per serving (4 oz grilled chicken breast):**
- Calories: 165
- Protein: 31g
- Total Fat: 3.5g
- Saturated Fat: 1g
- Carb: 0g
- Fiber: 0g
- Sugar: 0g

Grilled chicken breast is an excellent source of high-quality protein with low fat, making it an ideal choice for a healthy and balanced diet.

---

And there you have it, my friends! A delicious and adaptable grilled chicken breast recipe that’s bound to become a staple in your cooking repertoire. Enjoy bringing family and friends together with the beauty of home-cooked meals. Happy grilling!

Grilled Chicken Breast: A Simple Delight to Brighten Your Table
- Total Time: 30 minutes
- Yield: 4 servings 1x
- Diet: Paleo
Description
A flavorful grilled chicken breast recipe, perfect for summer barbecues or weeknight dinners.
Ingredients
- 4 boneless, skinless chicken breasts
- ¼ cup olive oil (or melted coconut/avocado oil)
- 1 teaspoon garlic powder
- 1 teaspoon paprika (smoked if desired)
- Salt and pepper to taste
- Fresh or dried herbs (optional)
- Juice of 1 lemon (or lime for twist)
Instructions
- Prep the chicken by trimming excess fat and patting dry.
- Marinate by combining olive oil, garlic powder, paprika, lemon juice, salt, and pepper in a bowl.
- Heat the grill to medium-high, about 10-15 minutes.
- Grill the chicken for 6-7 minutes without moving for grill marks.
- Flip the chicken and grill for another 6-7 minutes until it reaches 165°F (75°C).
- Rest for 5 minutes before slicing and serving.
Notes
Marinate for at least 30 minutes, up to overnight for best flavor. Use a meat thermometer for precise cooking.
- Prep Time: 15 minutes
- Cook Time: 15 minutes
- Category: Main Course
- Method: Grilling
- Cuisine: American
Nutrition
- Serving Size: 1 breast
- Calories: 165
- Sugar: 0g
- Sodium: 200mg
- Fat: 3.5g
- Saturated Fat: 1g
- Unsaturated Fat: 2g
- Trans Fat: 0g
- Carbohydrates: 0g
- Fiber: 0g
- Protein: 31g
- Cholesterol: 85mg
Keywords: grilled chicken, chicken breast, easy chicken recipes, summer grilling, healthy meals
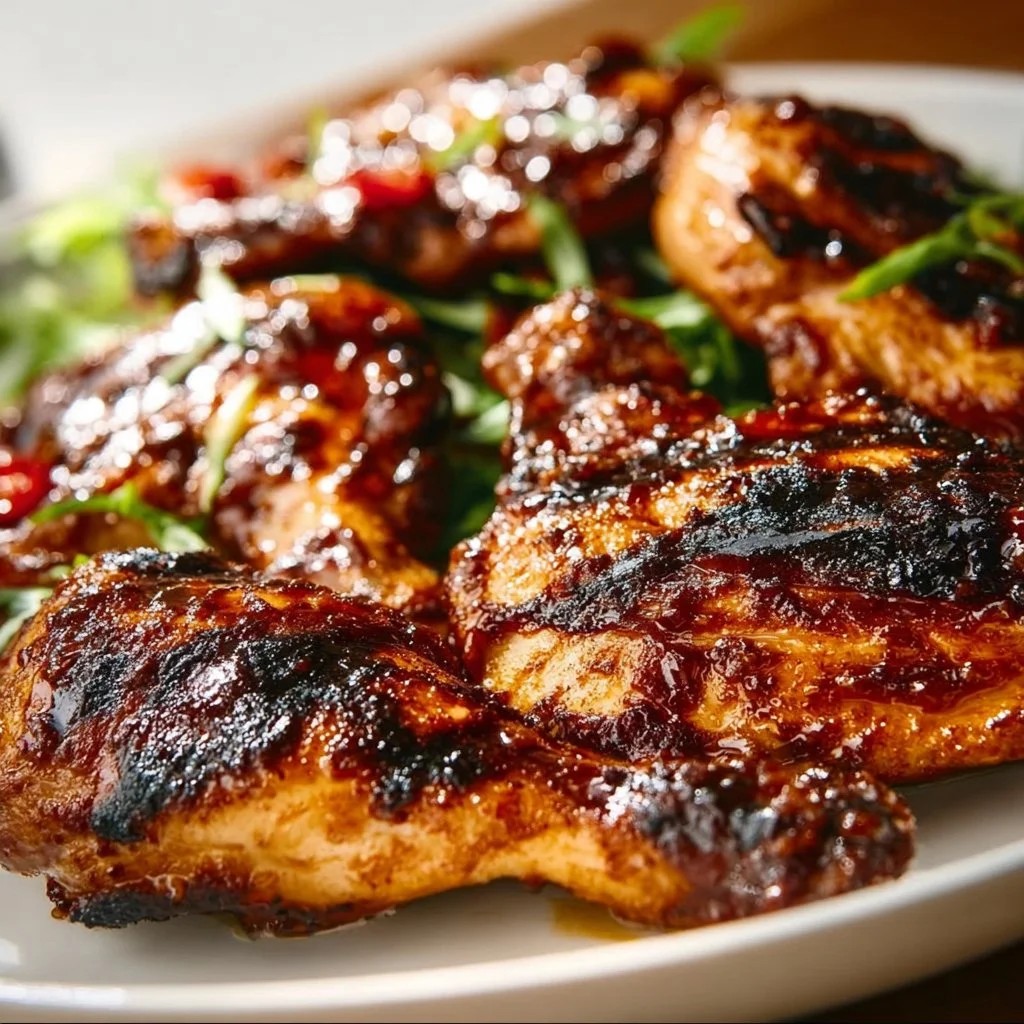
BBQ Chicken
Savory BBQ Chicken: A Recipe That Brings the Heat and the Heart
Hello, fellow food enthusiasts! Welcome back to my cozy kitchen, where the air is always scented with love, warmth, and the irresistible aroma of something delicious simmering away. Today, we’re diving into one of my all-time favorite dishes that perfectly encapsulates summer vibes, backyard gatherings, and heartwarming family dinners: BBQ Chicken! There’s something incredibly satisfying about sizzling chicken slathered in rich, smoky, sweet barbecue sauce, isn’t there?
I can still remember the first time I tasted BBQ chicken as a kid. My family hosted a summer barbecue, and the excitement was palpable. My dad manned the grill, while my mom prepared sides from scratch. The sun was beginning to set, casting a golden hue over everything, and the moment that chicken hit the grill, all of our mouths watered in anticipation. When that first bite hit my taste buds, I was mesmerized. The combination of smoky flavors and juicy chicken was pure magic, sparking my love for cooking and sharing great food with the people I cherish.
In this blog post, I’ll guide you through making BBQ chicken that will leave your guests begging for seconds, or in my family’s case, thirds! We’ll dive into the ingredients, step-by-step instructions, and creative variations that make this dish a family favorite, no matter the season. Grab your apron, and let’s get cooking!
Personal Story
One of my most treasured memories revolves around a family camping trip where BBQ chicken took center stage. Picture this: a lush campsite surrounded by towering pine trees, the tantalizing scent of smoky grilled chicken wafting through the air, and laughter echoing as my family gathered around a long picnic table. My uncle set up the grill as we played tag, and the moment those juicy pieces of chicken came off the fire, we fought over the first bite.
What made that meal so unforgettable wasn’t just the sticky, sweet sauce—it was the laughter, the stories we shared, and the feeling of togetherness as we dug in. My uncle had a secret spice mix that he swore by, and, of course, we still debate whose BBQ chicken reigns supreme to this day! It’s moments like these that remind me of why I love to cook—bringing people together and creating savory memories that last a lifetime.
Ingredients
Here’s what you’ll need to create BBQ chicken that captures all those summer flavors right in your home kitchen:
-
Chicken (bone-in, skin-on): I recommend using chicken thighs or drumsticks for maximum juiciness and flavor. If you prefer a leaner option, boneless chicken breasts will work, but keep an eye on cooking time to avoid dryness.
-
BBQ Sauce: Your favorite store-bought sauce works well, but homemade is always a treat! Look for a sauce that combines sweet, tangy, and smoky elements. And remember, it’s all about personal preference—don’t hesitate to experiment!
-
Olive Oil: A drizzle not only adds flavor but also helps the skin crisp up beautifully while roasting. You could use vegetable oil or melted butter as alternatives.
-
Garlic Powder: This adds depth to your seasoning without any fuss. Fresh garlic would work too, but be cautious not to burn it during grilling!
-
Onion Powder: A must-have for that savory base flavor! If you want to hit it up a notch, consider using shallots for a gentle twist.
-
Paprika: Smoked paprika gives a lovely color and rich flavor. You can swap it out for regular paprika if you prefer less smokiness or even chili powder for a spicier kick.
-
Salt and Pepper: Don’t skimp on seasoning! It can make or break your dish.
Substitution Tips:
Feel free to mix and match ingredients based on your dietary needs or what’s in your pantry! You can even go for a spicy BBQ sauce or add a few pinches of cayenne pepper for heat.
Step-by-Step Instructions
Now that we’ve gathered our ingredients, let’s dive into the step-by-step magic of creating savory BBQ chicken!
Step 1: Prepare the Chicken
Start by preheating your grill (or oven) to medium-high heat (about 375°F to 400°F). While it heats up, pat your chicken pieces dry with paper towels. This ensures a crisp skin! Don’t forget to take a moment to season your chicken generously with salt, pepper, garlic powder, onion powder, and paprika. Rub it all over, getting into those nooks and crannies!
Step 2: Oil Up
Once seasoned, drizzle a bit of olive oil over the chicken to help it crisp up and prevent sticking. You can even brush the oil directly onto the grill grates for added protection.
Step 3: Grill Time
Place your chicken skin-side down on the grill. The sizzle is music to your ears! Grill for about 5-7 minutes until those beautiful grill marks appear. Chef tip: Avoid flipping the chicken too soon; let it develop a good sear!
Step 4: Flip and Sauce
Once you’ve achieved that perfect golden-brown crust, flip the chicken pieces over. Now, it’s time to brush on your BBQ sauce! Use a generous amount and allow it to caramelize for another 5-7 minutes. This creates that delectable glaze we all love.
Step 5: Check for Doneness
To make sure your chicken is cooked through, you can check with a meat thermometer—the internal temperature should hit 165°F. If you don’t have a thermometer handy, simply pierce the thickest part of the chicken; the juices should run clear.
Step 6: Final Coat of Sauce
Before serving, brush on a final layer of BBQ sauce for that extra sticky goodness! If you’re feeling adventurous, toss on a sprinkle of crushed red pepper or fresh herbs for a pop of color.
Step 7: Rest and Serve
Let your chicken rest for about 5-10 minutes before serving. This step allows the juices to redistribute, ensuring each bite is super tender and moist.
Serving Suggestions
To serve, plate the BBQ chicken on a large platter, giving it a beautiful display. You can garnish with fresh parsley or cilantro for some color. Pair it with sides like coleslaw, cornbread, or grilled veggies for a complete meal that screams summer!
Recipe Variations
Feeling adventurous? Here are a few variations to shake things up:
-
Spicy BBQ Chicken: Add cayenne pepper or use a spicy BBQ sauce for a fiery kick.
-
Honey Mustard BBQ Chicken: Mix equal parts honey and yellow mustard with your sauce for a sweet and tangy twist.
-
Herb-Infused BBQ Chicken: Incorporate fresh herbs like rosemary or thyme into your BBQ sauce for added earthy flavors.
-
Tropical BBQ Chicken: Stir in some diced pineapple or mango into your BBQ sauce for a fruity glaze that’s perfect for summer.
-
Smoky Chipotle BBQ Chicken: Add chopped chipotle peppers in adobo sauce to your BBQ sauce for a smoky, spicy flavor profile.
Chef’s Notes
Over the years, this BBQ chicken recipe has become a staple in my kitchen. It started as a simple way to share meals with family, but it has evolved into an easy weeknight dinner or a go-to for gatherings! I love experimenting with regional barbecue styles; sometimes, I’ll infuse Asian flavors with soy sauce and sesame oil or give it a Caribbean flair with jerk seasonings! The possibilities are endless, and that’s what keeps cooking fun.
This dish has also led to some funny kitchen moments. One time, I tried to impress my friends with a BBQ chicken cook-off, and I accidentally left the chicken on the grill too long—smoke filled the air, and what was supposed to be a delicious dinner turned into a comic scene of panicking and waving fans to clear the smoke. Lesson learned: Always set a timer!
FAQs and Troubleshooting
How do I know when my chicken is done?
Use a meat thermometer! An internal temperature of 165°F is key for juicy chicken. If you don’t have one, poke into the thickest part of the chicken—if the juices run clear, you’re golden!
Can I make this BBQ chicken in the oven?
Absolutely! Preheat your oven to 400°F. Place the seasoned chicken on a baking sheet and bake for about 30-35 minutes, basting with BBQ sauce halfway through.
What should I do if my BBQ sauce burns on the grill?
Don’t panic! If you notice burning while cooking, lower the heat. If it gets too charred, you can always scrape off the burnt layer and apply a fresh coat of sauce for another flavor lift!
Can I marinate the chicken beforehand?
Yes! Marinating for a few hours or overnight adds intense flavor. Combine grill seasonings with olive oil and your BBQ sauce, then let the chicken soak up those delicious flavors in the fridge!
Nutritional Info (if applicable)
- Calories: Approx. 250-300 per serving (based on skin-on chicken thighs and BBQ sauce)
- Protein: 25g
- Carbs: 12g
- Fat: 14g
Remember that these values can vary based on the specific ingredients and portion sizes you’re using.
And there you have it, my friends! A heartfelt BBQ chicken recipe that’s sure to become a family favorite. Whether it’s a sunny backyard barbecue or a cozy dinner at home, this dish promises to bring joy and flavor. Don’t hesitate to share your experience in the comments below. I can’t wait to hear your kitchen stories and any tweaks you made to the recipe. Happy cooking! 🍗❤️
Print
Savory BBQ Chicken
- Total Time: 45 minutes
- Yield: 4 servings
- Diet: Paleo
Description
A delightful BBQ chicken recipe that captures the essence of summer gatherings and heartwarming family dinners.
Ingredients
- Chicken (bone-in, skin-on thighs or drumsticks)
- BBQ Sauce (store-bought or homemade)
- Olive Oil
- Garlic Powder
- Onion Powder
- Paprika
- Salt
- Pepper
Instructions
- Prepare the chicken by preheating your grill to medium-high heat and patting the chicken pieces dry.
- Drizzle olive oil over the chicken after seasoning it with salt, pepper, garlic powder, onion powder, and paprika.
- Place your chicken skin-side down on the grill and cook for about 5-7 minutes.
- Flip the pieces over and brush on your BBQ sauce, allowing it to caramelize for another 5-7 minutes.
- Check for doneness using a meat thermometer or by piercing the chicken to see if juices run clear.
- Brush on a final layer of BBQ sauce before serving.
- Let the chicken rest for about 5-10 minutes before plating.
Notes
Feel free to substitute ingredients based on dietary needs and preferences. Experiment with different BBQ sauce flavors for a unique twist.
- Prep Time: 15 minutes
- Cook Time: 30 minutes
- Category: Main Course
- Method: Grilling
- Cuisine: American
Nutrition
- Serving Size: 1 serving
- Calories: 300
- Sugar: 10g
- Sodium: 600mg
- Fat: 14g
- Saturated Fat: 3g
- Unsaturated Fat: 9g
- Trans Fat: 0g
- Carbohydrates: 12g
- Fiber: 0g
- Protein: 25g
- Cholesterol: 90mg
Keywords: BBQ chicken, summer recipe, grilling, family dinner, comfort food
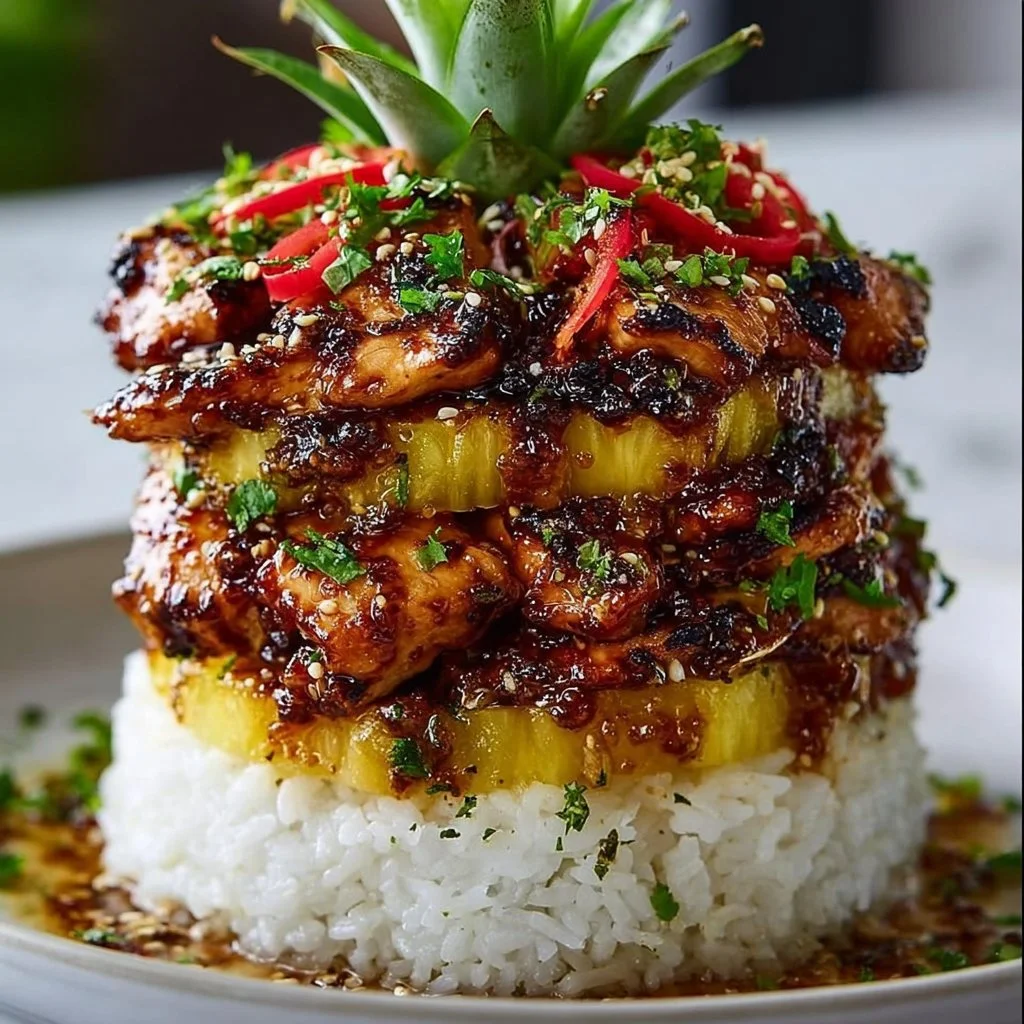
Hawaiian Huli Huli Chicken Stack
Hawaiian Huli Huli Chicken Stack: A Slice of Aloha in Your Kitchen
Introduction
Aloha and welcome to my kitchen! Today, we’re taking a deliciously tropical journey to the sunny islands of Hawaii with a dish that’s bursting with flavor and good vibes: the Hawaiian Huli Huli Chicken Stack. If the mere mention of grilled chicken marinated in a sweet and tangy sauce makes your taste buds dance, you’re definitely in for a treat! This colorful dish not only tantalizes the palate, but it also brings a splash of island sunshine right into your home.
Growing up, family gatherings often included a BBQ in the backyard, where the smell of marinated chicken sizzling on the grill would fill the air, making my heart race with anticipation. The recipe for Huli Huli chicken has become a staple in my home, seamlessly merging the unpretentious comfort of home cooking with the joy of hosting friends and family. It’s a dish that sparks laughter, stories, and, of course, hearty appetites.
Now, let’s get down to it! The beauty of Huli Huli chicken lies in its carefree, laid-back vibe. This isn’t just about filling your belly; it’s about creating memories! So roll up your sleeves and grab your apron. Together, we’re going to create a feast that’s as inviting as the islands themselves, and trust me—you don’t need to be a culinary expert to whip this up!
Personal Story
Ah, the memories! One of my most cherished moments connected to Huli Huli chicken dates back to a summer family reunion in my uncle’s backyard. We gathered around the grill, the intoxicating aroma of marinated chicken wafting through the air, bringing everyone together. I could see my cousins racing around while my aunts prepared sides of fluffy coconut rice, grilled vegetables, and fresh pineapple slices.
As my uncle flipped the chicken on the grill, he would regale us with stories of his Hawaiian adventures, showcasing his love for the islands and their incredible food culture. We all laughed, ate, and shared tales, creating a bond over perfectly charred chicken that was sticky sweet with every bite. It was in that moment, surrounded by laughter, love, and delectable flavors, that I fell in love with cooking—especially dishes that bring people together. Huli Huli chicken became more than just a recipe for me; it became a symbol of connection.
Fast forward to today, and I’ve adapted this dish into my own kitchen. But every time I fire up the grill, I am reminded of those treasured summer days with family—a reminder that food is best moments shared.
Ingredients
Here’s what you’ll need to get started on your Hawaiian Huli Huli Chicken Stack! Each ingredient plays a vital role in bringing this dish to life:
-
Chicken Thighs (Boneless, Skinless)
- Tender and juicy, chicken thighs are perfect for grilling. They stay moist and absorb flavors beautifully. If you’re not a thigh fan, chicken breasts work too, though they might need a bit more attention to avoid drying out!
-
Soy Sauce
- The backbone of the marinade, soy sauce adds umami and depth. For a gluten-free option, you can substitute with tamari or coconut aminos which still deliver robust flavor.
-
Brown Sugar
- This ingredient contributes that delicious sweet contrast to the savory elements. If you want a less sugary version, you can use honey or maple syrup, but keep in mind that it might alter the flavor slightly.
-
Pineapple Juice
- Fresh is best! Pineapple juice tenderizes the chicken while adding a refreshing note. Don’t have fresh juice? Canned is fine; just make sure it’s 100% juice without additives.
-
Garlic (Minced)
- Fresh garlic gives that aromatic kick that complements the sweetness. If you’re in a pinch, garlic powder works, though I recommend fresh whenever possible.
-
Ginger (Grated)
- Ginger elevates the flavor with its warmth and slight spiciness. You can swap it out for ground ginger, but fresh will always provide a more vibrant flavor.
-
Sesame Oil
- Adding a nutty flavor, sesame oil ties all these wonderful tastes together. It’s rich, so just a little goes a long way. In a bind, canola or vegetable oil can substitute, but the taste won’t be quite the same!
-
Green Onions
- A sprinkle of green onions adds a fresh crunch to the stack. If you’re out, chives or shallots can work as alternatives for garnish.
-
Sesame Seeds
- Toasted sesame seeds not only bring crunch but also a beautiful presentation. You can choose to skip these if you want a lighter option.
Step-by-Step Instructions
Ready to bring the sunshine into your kitchen with Huli Huli chicken? Let’s roll up those sleeves and dive into the deliciousness!
-
Prepare the Marinade: In a medium bowl, combine soy sauce, brown sugar, pineapple juice, minced garlic, grated ginger, and sesame oil. Whisk the ingredients together until the sugar has dissolved. By blending these, we’re creating that tropical sweet tang that defines Huli Huli chicken! Don’t forget to taste—cooking is all about adjustments, and this is the time to find your perfect flavor.
-
Marinate the Chicken: Place your chicken thighs in a large resealable plastic bag or a shallow dish. Pour half of the marinade over the chicken, making sure each piece is well coated. Seal the bag (or cover the dish) and let it marinate for at least 30 minutes in the refrigerator. For optimal flavor, aim for 2–4 hours if time permits! This marinating time is a small investment for maximum flavor payoff.
-
Preheat the Grill: While the chicken is marinating, preheat your grill to medium-high heat. If you’re using a charcoal grill, you want a nice even layer of glowing coals. For gas grills, ensure the grates are clean and get them hot! This step is key to achieving those beautiful grill marks and a smoky flavor.
-
Grill Chicken: Remove the chicken from the marinade and shake off excess liquid (don’t toss the remaining marinade just yet!). Place the chicken on the grill and cook for 6-7 minutes on each side, or until the internal temperature reaches 165°F (74°C). You’ll know it’s done when you see those gorgeous grill marks!
-
Make the Glaze: While the chicken is grilling, take the reserved marinade and bring it to a boil in a small saucepan over medium heat. Let it simmer for about 5-10 minutes until it thickens slightly. This will serve as a glaze that adds an extra layer of flavor when served!
-
Stack It Up: Once grilled, remove the chicken and let it rest for a few minutes. While it’s resting, you can toast some burger or sandwich buns on the grill for that added crunch. Slice the chicken into thick pieces, then layer it on toasted buns with toppings like grilled pineapple, fresh greens, and a drizzle of the reduced marinade glaze. Serve with a sprinkle of toasted sesame seeds and green onions for added texture and presentation!
Serving Suggestions
To serve, pile that succulent Huli Huli chicken high on a toasted bun, accompanied by fresh toppings. A vibrant salad of mixed greens dressed lightly with sesame vinaigrette makes a perfect side. For a bit of crunch, lay some crispy coleslaw next to your stacks—or get adventurous and pair it with coconut rice. You can also serve with grilled pineapple slices to amplify those tropical vibes!
Recipe Variations
If you’re looking to mix things up, here are some delicious variations to try:
-
Spicy Kick: Add sriracha to the marinade for a spicy version of Huli Huli chicken—perfect for those who crave a bit of heat!
-
Teriyaki Twist: Substitute traditional marinade ingredients with teriyaki sauce, pairing sweet and savory flavors together for dynamism.
-
Vegetarian Option: Marinate and grill portobello mushrooms or eggplant slices using the same marinade as a tasty alternative!
-
Tropical Salsa: Top the chicken with a fresh mango salsa made from diced mangoes, red onion, jalapeño, cilantro, and lime juice for an extra burst of tropical flavor.
-
Cauliflower Stacks: Replace chicken with cauliflower steaks for a vegetarian take while still enjoying that beloved tangy, grilled flavor!
Chef’s Notes
This Huli Huli chicken recipe has come a long way! The first time I attempted it, I forgot to let the chicken rest before slicing—I ended up with a juicy mess! Learning from that mistake, I now preach the importance of resting for optimal texture. And whenever I make it, I’m reminded that cooking is not just about the food; it’s about laughter, love, and the thrill of trying new things! Over the years, I’ve also found that adding some fresh herbs—like cilantro or mint—can elevate it with exciting new profiles, so feel free to experiment!
FAQs and Troubleshooting
-
Why is my chicken dry?
- Overcooking is usually the culprit! Use a meat thermometer for accuracy. Chicken should aim for 165°F (74°C) for juicy results.
-
Can I make the marinade ahead of time?
- Absolutely! You can prepare the marinade up to 3 days in advance. Just store it in an airtight container in the refrigerator.
-
What can I use if I don’t have a grill?
- Check out your oven! You can bake the marinated chicken at 400°F (200°C) for about 25-30 minutes, flipping halfway through for even cooking.
-
How long can I store leftovers?
- Store any leftover chicken in an airtight container in the fridge for up to 3-4 days. It makes for an amazing addition to salads or wraps!
Nutritional Info
(For one serving of Huli Huli Chicken)
- Calories: 350
- Protein: 30g
- Carbohydrates: 32g
- Fats: 15g
(Note: Nutrition will vary based on choice of sides and toppings. Adjust as needed for your dietary goals!)
There you have it—your very own Hawaiian Huli Huli Chicken Stack! I hope this recipe fills your kitchen with wonderful aromas and brings smiles to you and your loved ones. Cooking doesn’t have to be fancy; it just has to come from the heart. Enjoy and mahalo! 🌸
Print
Hawaiian Huli Huli Chicken Stack
- Total Time: 45 minutes
- Yield: 4 servings
- Diet: Gluten-Free
Description
A deliciously tropical dish featuring grilled chicken marinated in a sweet and tangy sauce, perfect for gatherings.
Ingredients
- Chicken Thighs (Boneless, Skinless)
- Soy Sauce
- Brown Sugar
- Pineapple Juice
- Garlic (Minced)
- Ginger (Grated)
- Sesame Oil
- Green Onions
- Toasted Sesame Seeds
Instructions
- Prepare the Marinade: In a medium bowl, combine soy sauce, brown sugar, pineapple juice, minced garlic, grated ginger, and sesame oil. Whisk together until the sugar dissolves.
- Marinate the Chicken: Place chicken thighs in a large resealable plastic bag or a shallow dish. Pour half of the marinade over them, coat well, and marinate for at least 30 minutes.
- Preheat the Grill: While the chicken marinates, preheat your grill to medium-high heat.
- Grill Chicken: Remove the chicken from the marinade. Grill for 6-7 minutes on each side until the internal temperature reaches 165°F (74°C).
- Make the Glaze: While grilling, bring the reserved marinade to a boil and then simmer for 5-10 minutes until thickened.
- Stack It Up: After resting the chicken, slice it and layer on toasted buns with toppings like grilled pineapple and greens. Drizzle with glaze, and top with sesame seeds and green onions.
Notes
Let the chicken rest before slicing to maintain juiciness. Using fresh ingredients enhances flavor.
- Prep Time: 30 minutes
- Cook Time: 15 minutes
- Category: Main Course
- Method: Grilling
- Cuisine: Hawaiian
Nutrition
- Serving Size: 1 serving
- Calories: 350
- Sugar: 10g
- Sodium: 800mg
- Fat: 15g
- Saturated Fat: 2g
- Unsaturated Fat: 10g
- Trans Fat: 0g
- Carbohydrates: 32g
- Fiber: 1g
- Protein: 30g
- Cholesterol: 80mg
Keywords: Huli Huli Chicken, Hawaiian recipe, grilled chicken, BBQ chicken, tropical flavors
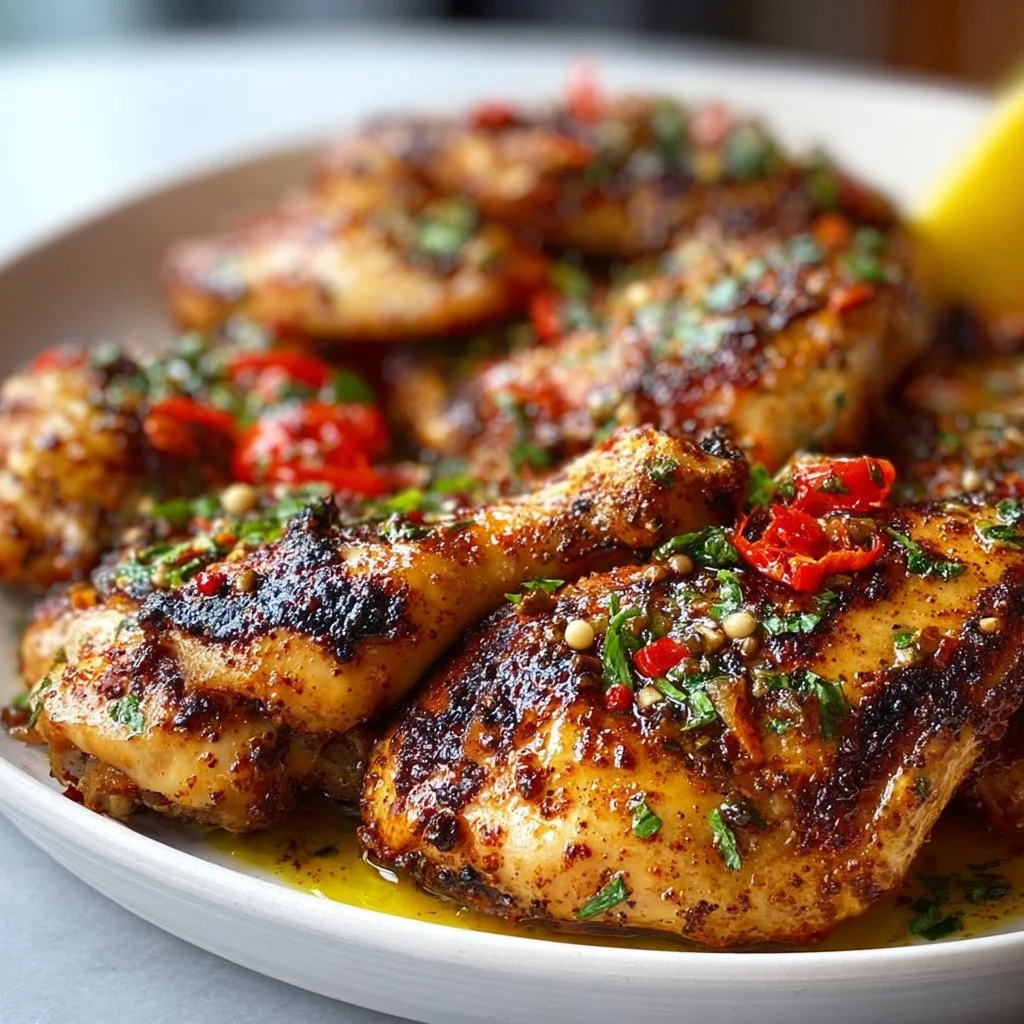
Portuguese Grilled Chicken
Portuguese Grilled Chicken: A Flavorful Journey to the Heart of the Kitchen
Welcome to the vibrant world of my kitchen! Today, we’re diving into a dish that speaks to the soul and brings flavors to the forefront in the most delightful way: Portuguese Grilled Chicken. Imagine the aromatic spices wafting through your kitchen, the sizzling sound of chicken hitting the grill, and the mouth-watering anticipation of sharing a delicious meal with your loved ones. This dish isn’t just a recipe – it’s an experience that invites warmth, conversation, and a sprinkle of joy.
Growing up, my culinary adventures began in my grandmother’s kitchen, where I learned the importance of flavor and love in cooking. Every dish she crafted was like a warm embrace, and her grilled chicken was legendary! Her secret? A tantalizing marinade infused with fragrant spices that danced on the palate. Every family gathering was a celebration, and her grilled chicken always took center stage. Now, I want to share that essence with you!
The beauty of Portuguese Grilled Chicken lies in its simplicity. While it showcases the robust flavors of paprika, garlic, and lemon, it also embodies the spirit of bringing people together. Whether you’re firing up the grill for a summer cookout or making a cozy weeknight dinner, this dish is perfect for any occasion. Don your apron and roll up those sleeves; we’re about to embark on a culinary adventure that will transform your kitchen into a haven of flavor!
Personal Story
I’ll never forget the first time I attempted my grandmother’s grilled chicken recipe. I was a teenager armed with enthusiasm but lacking finesse. One sunny Saturday morning, I decided to surprise my family by recreating her famous dish. As I gathered my ingredients, I felt a sense of nostalgia wash over me. The pungent aroma of garlic, the fiery touch of paprika, and the zing of fresh lemon brought back memories of smoky backyard barbecues and laughter.
With my family gathered around, I nervously placed the marinated chicken on the grill. The moment the flames kissed the meat, I felt a thrill—this was it! As we sat down to eat, I held my breath, waiting for their reaction. The first bite was magic! My family’s eyes lit up, and I knew then that I had successfully infused my love for cooking into that dish. That day marked the beginning of my journey from a novice cook to a passionate flavor enthusiast. Now, I can’t wait to help you create unforgettable memories just like that!
Ingredients
Here’s what you’ll need to create this mouth-watering dish:
-
Whole Chicken (or Chicken Pieces): The star of the show! Choose a whole chicken for a showstopper, or opt for thighs and drumsticks for a quicker cook. Bone-in, skin-on chicken will yield extra juiciness.
-
Paprika: This spice adds a sweet, smoky flavor that’s quintessential to Portuguese cuisine. If you’re in the mood for something mildly spicy, try using smoked paprika for an added depth.
-
Garlic: Fresh garlic is a must! It brings a pungent kick that balances beautifully with the other flavors. If you’re in a pinch, garlic powder can be used, but fresh is best!
-
Olive Oil: Essential for marinating and grilling, olive oil helps keep the chicken moist. Use extra virgin for a rounder flavor, or substitute with avocado oil for a higher smoke point.
-
Lemon Juice: Freshly squeezed lemon juice brightens the dish and helps tenderize the chicken. In a pinch, bottled lemon juice will work, but fresh is always preferred.
-
Chili Powder: For those who love a little heat, chili powder adds a nice kick. Adjust the amount to suit your taste; you can always add more, but you can’t take it away!
-
Salt and Pepper: Essential for enhancing flavors. Use kosher salt for seasoning the chicken before grilling— it clings well and enhances the flavors without overpowering.
-
Fresh Parsley: For a pop of color and freshness, sprinkle chopped parsley on top before serving. You can substitute with cilantro if you prefer a different flavor profile.
Step-by-Step Instructions
Now that we’ve gathered our ingredients, let’s get cooking! Follow these steps to create the most delicious Portuguese Grilled Chicken:
-
Prepare the Marinade: In a mixing bowl, combine 1/4 cup of olive oil, the juice of one lemon, 4 minced garlic cloves, 2 tablespoons of paprika, 1 tablespoon of chili powder, and a generous pinch of salt and pepper. This marinade is the backbone of flavor, so don’t be shy—mix it well until all ingredients are combined!
-
Marinate the Chicken: Place your chicken (whole or cut pieces) into a large resealable bag or a dish. Pour the marinade over the chicken, ensuring every piece is coated. Seal the bag (or cover the dish) and refrigerate for at least 2 hours, or ideally overnight. This allows the flavors to penetrate the chicken deeply. Chef Tip: If you’re short on time, even 30 minutes can make a difference, but overnight is best!
-
Preheat the Grill: About 20-30 minutes before you’re ready to grill, preheat your grill to medium-high heat (about 375°F to 400°F). If using a charcoal grill, let the coals get nice and hot. This will give your chicken those beautiful grill marks and caramelization.
-
Grill the Chicken: Remove the chicken from the marinade, letting any excess drip off (don’t rinse—it washes away the flavor!). Place the chicken on the grill, skin-side down first. Grill for about 6-8 minutes, or until you see lovely grill marks. Flip the pieces and grill for an additional 6-8 minutes on the other side.
-
Check for Doneness: Use a meat thermometer to check the internal temperature of the chicken. It should reach 165°F for it to be cooked through. If you’re grilling a whole chicken, consider closing the lid to help cook evenly and retain moisture.
-
Rest the Chicken: Once the chicken is done, remove it from the grill and let it rest on a cutting board for about 10 minutes. This is crucial! Resting allows the juices to redistribute throughout the meat, ensuring each bite is juicy and flavorful.
-
Serve and Enjoy: Carve the chicken into pieces if needed and drizzle with a little extra lemon juice before serving.
Chef Hack: Squeeze fresh lemon juice over the chicken right before serving for that extra zesty punch! Your taste buds will thank you.
Serving Suggestions
This dish is best served family-style. Arrange the grilled chicken on a platter, garnished with fresh parsley for a pop of color. Pair it with herby couscous, a refreshing cucumber salad, or some crusty bread to soak up those flavorful juices. Want to up the game? A tangy chimichurri sauce drizzled on top takes it to the next level!
Recipe Variations
-
Spicy Piri Piri Chicken: Add red pepper flakes or a splash of hot sauce to the marinade for a traditional Portuguese twist.
-
Herbed Lemon-Dill Chicken: Swap out the paprika and chili powder for fresh dill and oregano for a vibrant, herbal flavor.
-
Coconut-Grilled Chicken: Substitute half the olive oil with coconut milk for a tropical twist. The chicken will be even juicier!
-
BBQ Twist: Brush your favorite barbecue sauce on the chicken during the final moments of grilling for a smoky-sweet glaze.
-
Vegetable Skewers: Add some colorful veggies (bell peppers, zucchini, onion) tossed in olive oil and seasoning onto the grill alongside your chicken for a complete meal.
Chef’s Notes
Over the years, this Portuguese Grilled Chicken has taken on many forms in my kitchen. I remember a particularly fun barbecue night where I attempted to grill it using a cedar plank. The smoky flavor was phenomenal, and it added a unique twist that my friends raved about! My most treasured kitchen stories often revolve around the shared laughter and joy during the cooking process. Savoring the delicious end result with friends and family keeps me inspired to keep evolving this ever-so-delicious recipe!
FAQs and Troubleshooting
-
What if my chicken is not browning?
Make sure your grill is hot enough before you place the chicken on. Preheating is essential for that beautiful sear. -
Can I bake the chicken instead?
Absolutely! Preheat your oven to 375°F and place the chicken in a baking dish for about 30-45 minutes, or until it reaches 165°F internal temperature. -
How can I store leftovers?
Store any leftover chicken in an airtight container in the fridge for up to 3 days. It’s great cold in salads or sandwiches! -
Why is my chicken dry?
Overcooking is often the culprit! Use a meat thermometer to avoid this. Resting the chicken after cooking also helps keep it juicy!
Nutritional Info (Optional)
For those curious about nutrition, here’s a quick overview:
- Serving Size: 4 oz of Grilled Chicken
- Calories: Approximately 210
- Protein: 27g
- Fat: 9g
- Carbohydrates: 0g
- Fiber: 0g
That wraps up our culinary adventure into Portuguese Grilled Chicken! I hope you’re inspired to fire up the grill and create some delicious memories in your kitchen. Share your creations with me—I would love to hear your stories and see your flavorful triumphs. Until next time, happy cooking!
Print
Portuguese Grilled Chicken
- Total Time: 150 minutes
- Yield: 4 servings 1x
- Diet: Paleo
Description
A flavorful and aromatic Portuguese Grilled Chicken, perfect for family gatherings or cozy dinners.
Ingredients
- 1 Whole Chicken (or Chicken Pieces)
- 1/4 cup Paprika
- 4 cloves Garlic, minced
- 1/4 cup Olive Oil
- Juice of 1 Lemon
- 1 tablespoon Chili Powder
- Salt and Pepper to taste
- Fresh Parsley, for garnish
Instructions
- Prepare the Marinade: In a mixing bowl, combine olive oil, lemon juice, garlic, paprika, chili powder, and a pinch of salt and pepper.
- Marinate the Chicken: Place chicken in a resealable bag, pour marinade, seal, and refrigerate for at least 2 hours.
- Preheat the Grill: Heat grill to medium-high (375°F to 400°F) for about 20-30 minutes.
- Grill the Chicken: Remove from marinade, grill skin-side down for 6-8 minutes, flip and grill for another 6-8 minutes.
- Check for Doneness: Ensure chicken reaches an internal temperature of 165°F.
- Rest the Chicken: Let it sit off the grill for about 10 minutes before serving.
- Serve and Enjoy: Carve and drizzle with extra lemon juice before serving.
Notes
For extra flavor, squeeze fresh lemon juice before serving. Pair with herby couscous or a refreshing salad.
- Prep Time: 120 minutes
- Cook Time: 30 minutes
- Category: Main Course
- Method: Grilling
- Cuisine: Portuguese
Nutrition
- Serving Size: 1 serving
- Calories: 350
- Sugar: 0g
- Sodium: 200mg
- Fat: 12g
- Saturated Fat: 2g
- Unsaturated Fat: 8g
- Trans Fat: 0g
- Carbohydrates: 5g
- Fiber: 0g
- Protein: 27g
- Cholesterol: 80mg
Keywords: grilled chicken, Portuguese recipe, barbecue chicken
Citrus Dijon Grilled Chicken
Citrus Dijon Grilled Chicken: A Zingy Delight for Your Next Meal!
Hello, culinary adventurers! I’m Olivia Bennett, and today, I’m thrilled to share a recipe that perfectly embodies the spirit of sunshine and good times — Citrus Dijon Grilled Chicken. This dish is not just a feast for your taste buds; it’s a celebration of flavors that can brighten up even the cloudiest days! If you find joy in the thrill of grilling, the aroma of citrus wafting through your kitchen, and the laughter of loved ones gathering around the table, you’re in for a treat.
Imagine this: it’s a warm summer evening, and the sun is slowly setting, casting a golden hue over your backyard. You’ve got a gentle breeze ruffling the leaves of the trees, and the grill is sizzling, emitting that oh-so-familiar sound that makes your mouth water. This Citrus Dijon Grilled Chicken is the star of the show, marrying the zesty brightness of citrus with the rich, tangy kick of Dijon mustard. As it cooks, the scent fills the air, drawing friends and family to the kitchen like moths to a flame. What’s more? You’ll find that this dish is incredibly simple to prepare, making it perfect for both casual dinners and festive gatherings.
Not only is it delicious, but it also allows for some fun creative touches that cater to all palates. So grab your apron, channel your inner chef, and let’s dive into this vibrant recipe together. Whether you’re a seasoned grill master or a novice in the kitchen, I promise you’ll feel confident as we embark on this flavorful journey. So, let’s dust off the grill and get ready to serve up some mouthwatering plates!
Personal Story
Every time I prepare Citrus Dijon Grilled Chicken, it brings me back to those sun-soaked summer weekends spent in my parents’ backyard. My dad was the grill master, and he had this infectious energy each time we fired it up. I remember gathering around, the chatter of family and friends blending seamlessly with the sizzle of meats and veggies, all seasoned to perfection.
One particular moment stands out to me. My family decided to host a mini barbecue for our neighbors, and Dad decided to experiment with a citrus marinade that involved orange juice, lemon zest, and, of course, mustard. As he slathered it all over the chicken, we all had our doubts — would the flavor be too bold? But boy, were we in for a surprise! The first bite was an explosion of flavor. Suddenly, everyone was raving about this “new” dish, and that day, we all learned the magic of citrus combined with Dijon. It became a family favorite, one that I now cherish and love to recreate. Every time I make it, I can still hear echoes of laughter and clinking glasses from that day. And now, I can’t wait for you to create your own memories with this dish!
Ingredients
Here’s what you’ll need to whip up some Citrus Dijon Grilled Chicken. Each ingredient has its unique flair, so let’s break it down a bit:
-
Chicken Breasts (4 boneless, skinless): The star of the show! Chicken breasts are perfect for grilling as they absorb flavors well. If you’re looking for a leaner option, swap them for chicken thighs. They remain juicy even if cooked a tad longer!
-
Dijon Mustard (1/4 cup): This gives that delightful tangy kick. If you’re not a mustard fan, try using a honey mustard for a sweeter touch or even a grainy mustard for some texture.
-
Fresh Orange Juice (1/2 cup): Adds sweetness and acidity. No fresh oranges? Don’t fret! You can use bottled juice — just go for 100% pure juice, no added sugars!
-
Fresh Lemon Juice (2 tablespoons): Brightens up the whole dish! You could substitute with lime juice for a zippier profile, or add a dash of vinegar for an alternative tartness.
-
Garlic (3 cloves, minced): A must-have! For an easier prep, feel free to use pre-minced garlic available at the store or garlic powder (about 1 teaspoon).
-
Olive Oil (1/4 cup): This helps to keep the chicken moist on the grill. If you’re looking to switch it up, avocado oil or even melted coconut oil can work here too!
-
Salt and Pepper (to taste): For seasoning. Use sea salt for a burst of flavor or opt for pink Himalayan salt if you’re feeling fancy.
-
Fresh Herbs (like parsley or thyme, for garnish): Fresh herbs add a beautiful touch to the presentation; however, feel free to use dried herbs if that’s all you have on hand!
Now that we’ve gathered our ingredients, let’s get down to business and bring this dish to life!
Step-by-Step Instructions
Alright, food lovers, it’s game time! Grab your apron (and maybe a glass of your favorite beverage), and let’s start cooking this vibrant Citrus Dijon Grilled Chicken.
Step 1: Marinate the Chicken
In a mixing bowl, combine the Dijon mustard, fresh orange juice, lemon juice, minced garlic, olive oil, salt, and pepper. Whisk it all together until it’s nice and smooth. Chef Tip: The longer you marinate the chicken, the more flavor it absorbs. Ideally, let it marinate at least 30 minutes, but if you can manage 2-4 hours (or even overnight), you’ll thank yourself later!
Step 2: Preheat Your Grill
This is a crucial step. Preheat your grill to medium-high heat (around 375°F to 400°F). For those of you using a gas grill, just turn it on. If you’re working with charcoal, let the coals burn until they’re ashy. Chef Hack: If your grill grates tend to stick, brush them with oil before you start grilling.
Step 3: Grill the Chicken
Once your grill is preheated, take the marinated chicken breasts out of the bowl, allowing any excess marinade to drip off (but don’t discard it!). Place the chicken on the grill. It’s important to give each piece enough space. Pro Tip: Avoid flipping the chicken too soon. Let it cook about 5-7 minutes on one side before you attempt to flip, as this helps to achieve those beautiful grill marks!
Step 4: Flip and Glaze
After about 7 minutes, it’s time to flip those beauties. Brush a little extra marinade on the grilled side (because why not?!) and let them grill for another 5-7 minutes, until the chicken reaches an internal temperature of 165°F. Chef’s Insight: If you have a meat thermometer, you’ll take the guesswork out of cooking chicken. Trust me, no one wants dry chicken!
Step 5: Rest the Chicken
Once cooked, remove the chicken from the grill and let it rest for a few minutes to allow juices to redistribute. This step is essential for tender chicken! You can cover it lightly with aluminum foil during this time.
Step 6: Serve and Garnish!
Slice the juicy chicken breast and serve it up with a sprinkle of freshly chopped herbs for that finishing touch. Presentation Tip: Pair it with grilled veggies or a fresh side salad to make the colors pop on your plate!
Serving Suggestions
When serving your Citrus Dijon Grilled Chicken, a colorful presentation goes a long way. You can serve it atop a bed of mixed greens, drizzled with a citrus vinaigrette. Alternatively, accompanying it with grilled asparagus or seasonal roasted vegetables makes for a visually stunning and nutritious plate. Don’t forget to keep some of that leftover marinade on hand — it’s great as a dipping sauce!
Recipe Variations
Feeling adventurous? Here are some fun twists you can try with the base recipe:
-
Herb-Infused Marinade: Add fresh dill or rosemary to the marinade for an aromatic twist.
-
Spicy Kick: Mix in a teaspoon of red pepper flakes or sriracha for those who love a little heat.
-
Tropical Vibe: Use pineapple juice instead of orange juice for a tropical finish.
-
Honey-Lime Glaze: Replace the orange juice with honey and lime juice for a sweeter, tangy flavor.
-
Grilled Citrus Slices: Toss some orange and lemon slices on the grill alongside your chicken for an extra burst of flavor that’s also super gorgeous on the plate!
Chef’s Notes
As I mentioned, this recipe has transformed over the years. Initially, it was just a quick dinner idea my dad made when guests popped over. Over time, I’ve added different elements to the marinade based on what was in season and what my friends loved. Once, I even added a splash of whiskey during a playful get-together, and it turned out to be a hit! Cooking for me is not just about following a recipe; it’s about creating moments and traditions that last a lifetime. I encourage you to play around with this dish, too. You just might stumble upon your own secret twist that makes it unforgettable!
FAQs and Troubleshooting
FAQ 1: What if my chicken is dry?
Dry chicken can be a result of overcooking. Always use a meat thermometer for accuracy, and ensure you let the chicken rest after grilling.
FAQ 2: Can I bake this chicken instead?
Absolutely! Preheat the oven to 375°F and bake for about 25-30 minutes or until it reaches an internal temperature of 165°F.
FAQ 3: How long can I marinate the chicken?
You can marinate the chicken for anywhere from 30 minutes to 24 hours. Just remember, the longer you marinate, the more flavorful it becomes!
FAQ 4: What sides pair well with the Citrus Dijon Grilled Chicken?
This dish is versatile and pairs beautifully with grilled veggies, roasted potatoes, a fresh salad, or even over rice!
Nutritional Info
While specific nutritional values can vary based on portion sizes and specific ingredients, a typical serving of Citrus Dijon Grilled Chicken comes in around:
- Calories: 250
- Protein: 28g
- Fat: 10g
- Carbohydrates: 3g
This chicken is not only delicious but also a healthy option packed with protein!
There you have it, my friends! A step-by-step guide to making Citrus Dijon Grilled Chicken that’s bound to impress. I’m excited for you to try this recipe and make it your own. Remember, cooking is about creativity, joy, and making memories. So turn up that upbeat music, grab your loved ones, and let’s create something magical in the kitchen together! Happy cooking!
Print
Citrus Dijon Grilled Chicken
- Total Time: 45 minutes
- Yield: 4 servings 1x
- Diet: Poultry
Description
A zesty and flavorful grilled chicken dish with a tangy citrus marinade, perfect for summer gatherings.
Ingredients
- 4 boneless, skinless chicken breasts
- 1/4 cup Dijon mustard
- 1/2 cup fresh orange juice
- 2 tablespoons fresh lemon juice
- 3 cloves garlic, minced
- 1/4 cup olive oil
- Salt and pepper, to taste
- Fresh herbs (like parsley or thyme, for garnish)
Instructions
- Marinate the chicken: In a mixing bowl, combine the Dijon mustard, orange juice, lemon juice, garlic, olive oil, salt, and pepper. Whisk until smooth. Marinade for at least 30 minutes.
- Preheat your grill to medium-high heat (375°F to 400°F).
- Grill the chicken: Remove marinated chicken from the bowl, allowing excess marinade to drip off. Place chicken on the grill, cooking for 5-7 minutes without flipping.
- Flip and glaze: After 7 minutes, flip the chicken. Brush with additional marinade and grill for another 5-7 minutes until the internal temperature reaches 165°F.
- Rest the chicken for a few minutes before slicing.
- Serve and garnish with fresh herbs.
Notes
For added flavor, let the chicken marinate longer (up to 4 hours or overnight). Serve with grilled veggies or a fresh salad.
- Prep Time: 30 minutes
- Cook Time: 15 minutes
- Category: Main Course
- Method: Grilling
- Cuisine: American
Nutrition
- Serving Size: 1 chicken breast
- Calories: 250
- Sugar: 5g
- Sodium: 300mg
- Fat: 10g
- Saturated Fat: 1.5g
- Unsaturated Fat: 8g
- Trans Fat: 0g
- Carbohydrates: 3g
- Fiber: 0g
- Protein: 28g
- Cholesterol: 70mg
Keywords: grilled chicken, citrus chicken, summer recipes, easy grilling, healthy dinner
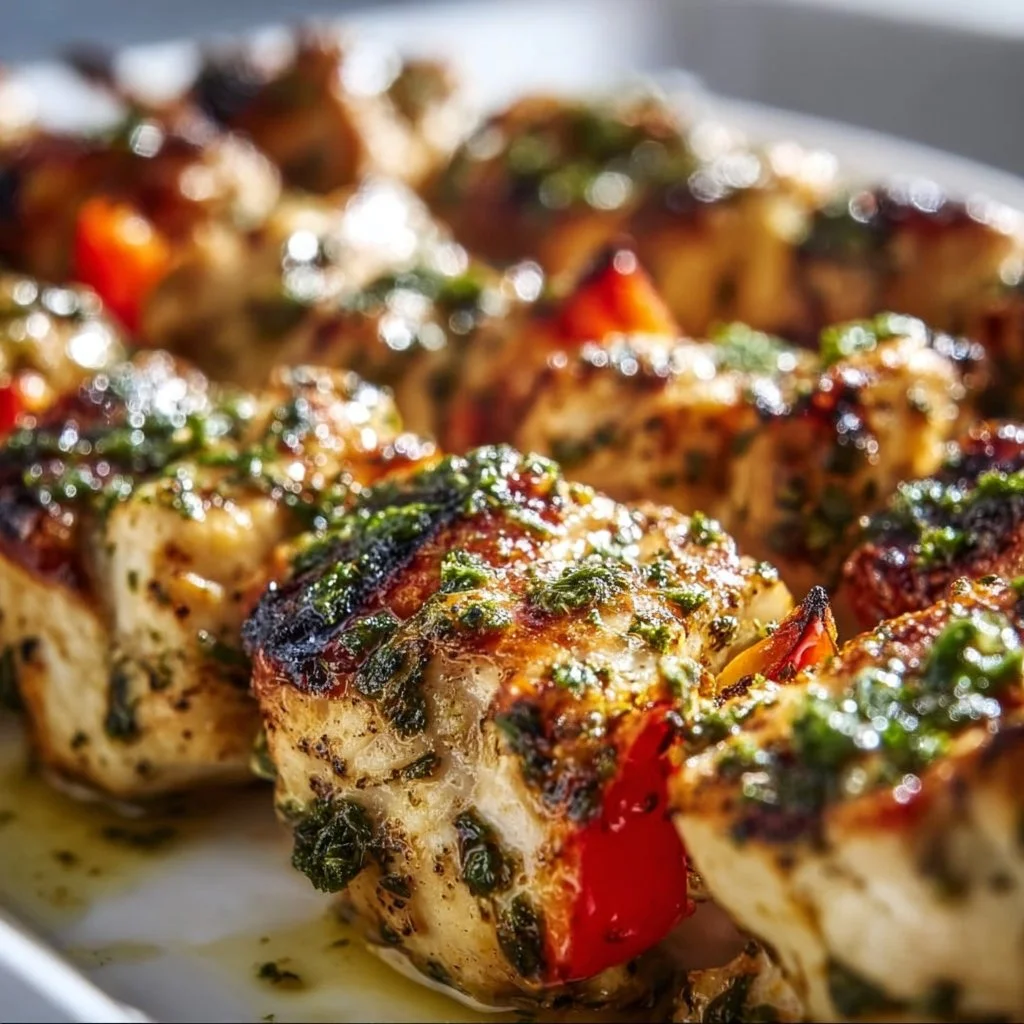
Greek Marinated Chicken Kabobs
# Greek Marinated Chicken Kabobs: A Flavorful Journey

## Introduction

Welcome to another tasty adventure in my kitchen! Today, we’re diving deep into the delightful world of Greek Marinated Chicken Kabobs. If you haven’t yet discovered the joys of marinated meats threaded onto skewers and grilled to perfection, you’re in for a treat! These kabobs embody everything I love about cooking: vibrant flavors, fresh ingredients, and a meal that feels like a party on a plate.

Greek cuisine is celebrated for its bold flavors, freshness, and aromatic herbs. These chicken kabobs bring all of that directly to your kitchen. Picture succulent pieces of chicken marinated in a zesty blend of olive oil, lemon juice, garlic, and an array of herbs, then grilled to create smoky, juicy bites that burst with flavor. It’s a dish that makes you feel like you’ve taken a mini-vacation to a sun-drenched Greek island, complete with the sound of waves crashing in the background – even if you’re just in your backyard!

One of the best things about these kabobs is their versatility. They can be served as a quick weeknight dinner, a fun barbecue treat, or a delightful addition to your next gathering. Pair them with a refreshing tzatziki sauce and a colorful Greek salad, and you have a meal that’s both satisfying and healthy.

So grab your aprons, and let’s get cooking! Together, we’ll navigate the steps to create this beautiful dish, share some tasty tips, and maybe even inspire you to share it with someone you love. Trust me; it’s going to be a delicious journey!

## Personal Story

Growing up, my family had a tradition of hosting summer barbecues that always came with an aroma-filled promise of good food, laughter, and togetherness. One dish that always made an appearance was my dad’s Greek chicken kabobs. The memory of sitting in our garden, the sun casting a warm glow over everyone, while the kabobs sizzled on the grill, is etched in my mind. I can still hear my dad’s hilarious banter as he skewered the marinated chicken, trying to fit as many pieces as he could onto the stick – a true testament to his belief that more is always better!

Whenever I take that first bite of a kabob now, I not only taste the flavors but also feel a sense of nostalgia that wraps around me like a cozy blanket. It reminds me of summer, laughter, and the joy of sharing beautiful meals with family and friends. It's a love that I’ve carried forward, and now it’s my turn to share this with you!

## Ingredients

Here’s what you'll need to create these mouthwatering Greek Marinated Chicken Kabobs:

- **Chicken Breasts (or Thighs):**
  - Use boneless, skinless chicken for easy skewering. Thighs are juicier, while breasts are leaner; either will work well!

- **Olive Oil:**
  - A key ingredient that keeps the chicken moist and helps the spices stick. Extra virgin olive oil adds a wonderful flavor, but any good-quality olive oil will do.

- **Lemon Juice:**
  - Freshly squeezed lemon juice adds bright acidity and helps tenderize the chicken. If you're in a pinch, bottled juice can work, but fresh is best!

- **Garlic:**
  - Minced garlic is essential for depth of flavor. You can substitute with garlic powder if you’re out of fresh.

- **Oregano:**
  - Dried or fresh, this herb is quintessential in Greek cooking. If you’re out, dried basil or thyme can be good alternatives, though they offer a different flavor profile.

- **Salt and Pepper:**
  - Essential for seasoning. Don’t skip these – they enhance the natural flavors.

- **Bell Peppers (optional):**
  - If you’d like to get a bit creative, colorful bell peppers make great additions to the skewers and add a pop of sweetness.

- **Red Onion (optional):**
  - Also an excellent pairing with the chicken, adding a crunchy texture and subtle sweetness when grilled.

## Step-by-Step Instructions

Let’s get cooking! Follow these steps to create irresistible Greek Marinated Chicken Kabobs:

1. **Marinate the Chicken:**
   - In a large bowl, combine ¼ cup of olive oil, ¼ cup of freshly squeezed lemon juice, and four cloves of minced garlic. Add 2 tablespoons of dried oregano, along with 1 teaspoon of salt and pepper. Whisk until well mixed.
   - Cut your chicken into 1- to 1.5-inch pieces, ensuring they are cut uniformly for even cooking. Add the chicken to the marinade, making sure every piece is coated. Cover with plastic wrap and let it marinate in the fridge for at least 30 minutes (or up to 4 hours for super flavorful chicken!)

2. **Prepare Skewers:**
   - If you’re using wooden skewers, soak them in water for about 30 minutes to prevent them from burning on the grill. Metal skewers are great too; make sure they’re clean and ready to go!

3. **Preheat the Grill:**
   - Preheat your grill to medium-high heat (about 375°F to 400°F). A hot grill gives you those irresistible grill marks and keeps the juices inside!

4. **Assemble the Kabobs:**
   - Thread the marinated chicken pieces onto the skewers. If you’re adding veggies, alternate them with the chicken for a colorful presentation. Leave a bit of space between each piece for even cooking.

5. **Grill the Kabobs:**
   - Place the skewers on the grill, cooking for about 10-12 minutes, rotating every couple of minutes until the chicken is nicely browned and cooked through (internal temperature should reach 165°F).

6. **Let Them Rest:**
   - Once done, remove the kabobs from the grill and let them rest for a few minutes before serving. This helps the juices redistribute!

### Tips to Enhance Your Kabobs:
- **Don’t rush the marinade!** The longer you can marinate, the more flavor the chicken will absorb.
- **Experiment with spices!** Try adding cumin or smoked paprika for a twist on traditional flavors.
- **Grill with a friend!** Cooking with someone can make the experience even more enjoyable, turning the kitchen into a fun gathering spot.

## Serving Suggestions

When it comes to serving these Greek Marinated Chicken Kabobs, simplicity is key. Lay the kabobs on a large platter, garnished with fresh parsley or dill. A side of homemade tzatziki sauce (made from Greek yogurt, cucumber, garlic, and dill) is a fabulous complement. You could also serve them atop a bed of fluffy couscous or alongside warm pita bread, maybe with a Greek salad bursting with ripe tomatoes, cucumbers, and feta to round everything out. Don’t forget to squeeze a bit of fresh lemon juice over the top for extra zing!

## Recipe Variations

- **Vegetarian Option:** Substitute chicken with firm tofu or mushrooms marinated in the same Greek marinade for a delightful vegetarian version.
- **Spicy Kick:** Add some crushed red pepper flakes or a bit of harissa to the marinade for a zesty punch!
- **Mediterranean Medley:** Incorporate cherry tomatoes and zucchini on the skewers for a colorful and nutritious addition.
- **Herb swaps:** Play around with herbs – dill and thyme work beautifully in this marinade!
- **Different Proteins:** Swap chicken for shrimp or even beef, just adjust the cooking time as needed.

## Chef’s Notes

One of my favorite things about this recipe is its adaptability. Over the years, I’ve switched up the marinade slightly based on what’s in my pantry or the season. Sometimes I might add a splash of white wine for depth, or even a dollop of yogurt for extra creaminess in the marinade. Every time I make these kabobs, they remind me of those family barbecues, filled with joy and laughter. Plus, they’re fantastic for meal prep; just marinate a batch, grill them, and you’ll have delicious lunches ready for the week!

## FAQs and Troubleshooting

**1. What if my chicken is dry?**
   - If your chicken ends up dry, it likely cooked for too long. Using thighs can help prevent this as they retain more moisture.

**2. Can I use frozen chicken?**
   - Definitely! Just ensure it’s completely thawed before marinating, or it won't absorb the flavors fully.

**3. What’s the best way to know the chicken is done?**
   - Use a meat thermometer to check for an internal temperature of 165°F. Alternatively, cut into the thickest piece to confirm it’s no longer pink inside.

**4. My veggies charred but the chicken is undercooked. What did I do wrong?**
   - Different proteins and vegetables cook at different rates. If you’re adding veggies, cut them larger than the chicken pieces and stagger the cooking times.

## Nutritional Info (optional)

Each kabob contains approximately 200 calories, 25g of protein, and 11g of fat, depending on the size and preparation method. For a healthier twist, consider serving with a salad to increase fiber and nutrients!

---

I hope you’re excited to try these Greek Marinated Chicken Kabobs! They’re a fantastic way to bring flavor, fun, and a touch of Greece into your home. Happy cooking, friends, and remember to share the love (and the kabobs) with those around you!

Greek Marinated Chicken Kabobs
- Total Time: 42 minutes
- Yield: 4 servings 1x
- Diet: Gluten-Free
Description
Succulent pieces of chicken marinated in a zesty blend of olive oil, lemon juice, garlic, and herbs, grilled to perfection.
Ingredients
- 1 lb Chicken Breasts or Thighs, boneless and skinless
- ¼ cup Olive Oil
- ¼ cup Lemon Juice, freshly squeezed
- 4 cloves Garlic, minced
- 2 tablespoons Oregano, dried
- 1 teaspoon Salt
- 1 teaspoon Pepper
- Bell Peppers, optional
- Red Onion, optional
Instructions
- Marinate the Chicken: In a large bowl, combine ¼ cup of olive oil, ¼ cup of freshly squeezed lemon juice, and four cloves of minced garlic. Add 2 tablespoons of dried oregano, along with 1 teaspoon of salt and pepper. Whisk until well mixed. Cut your chicken into 1- to 1.5-inch pieces, ensuring they are cut uniformly for even cooking. Add the chicken to the marinade, making sure every piece is coated. Cover with plastic wrap and let it marinate in the fridge for at least 30 minutes (or up to 4 hours).
- Prepare Skewers: If you’re using wooden skewers, soak them in water for about 30 minutes to prevent them from burning on the grill.
- Preheat the Grill: Preheat your grill to medium-high heat (about 375°F to 400°F).
- Assemble the Kabobs: Thread the marinated chicken pieces onto the skewers, alternating with veggies if desired. Leave a bit of space between each piece for even cooking.
- Grill the Kabobs: Place the skewers on the grill, cooking for about 10-12 minutes, rotating every couple of minutes until the chicken is cooked through.
- Let Them Rest: Once done, remove the kabobs from the grill and let them rest for a few minutes before serving.
Notes
For best results, marinate the chicken longer for more flavor. Experiment with spices or add vegetables to the skewers for added color and taste.
- Prep Time: 30 minutes
- Cook Time: 12 minutes
- Category: Main Course
- Method: Grilling
- Cuisine: Greek
Nutrition
- Serving Size: 1 kabob
- Calories: 200
- Sugar: 1g
- Sodium: 400mg
- Fat: 11g
- Saturated Fat: 2g
- Unsaturated Fat: 5g
- Trans Fat: 0g
- Carbohydrates: 6g
- Fiber: 1g
- Protein: 25g
- Cholesterol: 70mg
Keywords: Greek chicken kabobs, marinated chicken, easy dinner recipes

Thai Grilled Chicken
Thai Grilled Chicken: A Flavorful Journey from My Kitchen to Yours
Welcome back to my cozy corner of the culinary world! Today, I’m thrilled to share one of my all-time favorite recipes: Thai Grilled Chicken. The moment you take a bite of this dish, you’re in for a flavor explosion! Marinated to perfection and kissed by the flames of the grill, this chicken is tender, juicy, and infused with all the wonderful notes of Thai cuisine. Trust me; you’re going to want this recipe in your arsenal for those warm summer nights, casual get-togethers, or even just a simple weeknight dinner.
Now, I know what you might be thinking: “Thai cooking sounds complicated, right?” Well, I’m here to tell you that it can be incredibly easy and fun! And what’s even better? This dish is incredibly adaptable, meaning you can tweak it to your taste or whatever you have on hand. Plus, the marinade is so simple that you can whip it up in no time. Just think vivid herbs and spices blending beautifully with savory, sweet, and tangy flavors – there’s nothing quite like it!
But let’s rewind a bit. This recipe isn’t just about cooking chicken. It’s about creating memories, bringing people together, and savoring life’s little moments. Whether cooking for your family or having friends over, this Thai Grilled Chicken will have everyone gathering around the table, eager for another bite. So grab your apron, turn on that grill, and let’s get cooking!
Personal Story
Let me take you back to a particularly sunny summer afternoon in my childhood. I must have been ten or eleven years old, and my family decided to host a barbecue in our backyard. My dad was the grill master, flipping burgers and hot dogs with flair, but it was my mom’s Thai chicken skewers that stole the show. She would marinate the chicken overnight in a delightful concoction of coconut milk, garlic, and plenty of fresh herbs, and then skewer them for easy grilling.
I remember running around with my siblings, the smell of grilled meat wafting through the air as we played games and chased each other around the garden. The anticipation built as we watched my mom pull the chicken from the grill, its golden-brown skin glistening. When we finally dug in, it was pure bliss – the mingling of sweet, salty, and spicy flavors transported me to another world. That meal was a celebration of family, laughter, and the sheer joy of sharing food.
Fast forward years later, and here I am, still reveling in the magic of that Thai grilled chicken, one that brings all those beautiful memories rushing back. It’s a recipe I’ve tweaked over the years but kept the essence of my mom’s original creation intact. I can’t wait for you to experience it too!
Ingredients
For the Chicken Marinade:
-
Chicken Thighs (bone-in or boneless):
- Chicken thighs are incredibly juicy and tender, making them perfect for grilling. You can use chicken breasts for a leaner option, but thighs bring that rich flavor that’s hard to beat.
-
Coconut Milk (1 cup):
- Creamy and rich, coconut milk lends a delightful sweetness to the marinade. If you’re looking for a dairy-free alternative, this is perfect! For a lighter option, you can substitute with yogurt or buttermilk, although the flavor will differ.
-
Soy Sauce (¼ cup):
- Soy sauce offers umami and depth. If gluten-free, use tamari instead, or opt for coconut aminos – they’ll do the trick!
-
Brown Sugar (2 tablespoons):
- The sweetness of brown sugar balances the savory flavors. For a more caramelly flavor, try using coconut sugar, or if you’re aiming for lower sugar, you can use honey or maple syrup in moderation.
-
Lime Juice (2 tablespoons):
- Fresh lime juice brightens the flavor and adds zing. No limes? Lemon juice works as a substitute, though it has a different profile.
-
Garlic (3 cloves, minced):
- Garlic adds aromatic depth. Fresh cloves are best, but if you’re in a pinch, garlic powder can work too; just use about ¼ teaspoon for each clove.
-
Fresh Ginger (1 tablespoon, grated):
- Ginger provides a warm spiciness and is quintessential in Thai cooking. If you’re out of fresh ginger, ground ginger can be used – about half the amount should suffice.
-
Chili Flakes or Sriracha (to taste):
- Adding a little heat is essential! Adjust based on your spice tolerance. You can also use fresh chilies if you prefer – just chop finely.
For Grilling:
- Vegetable Oil (for grilling):
- A neutral oil like canola or grapeseed is great to prevent sticking. For that added flavor, you can use sesame oil if you’d like, just keep in mind its strong flavor.
Garnish:
- Fresh Cilantro and Lime Wedges:
- Fresh herbs always elevate a dish. If you’re not a cilantro fan, Thai basil or mint can be wonderful alternatives!
Step-by-Step Instructions
Step 1: Whisk Together the Marinade
In a large mixing bowl, combine the coconut milk, soy sauce, brown sugar, lime juice, minced garlic, grated ginger, and chili flakes. Whisk until everything is well combined and the sugar mostly dissolves.
Step 2: Marinate the Chicken
Add the chicken thighs into the marinade, ensuring they’re well-coated. Cover the bowl with plastic wrap and let it marinate in the fridge for at least two hours. If time allows, marinate it overnight—your future self will thank you! Pro tip: The longer the marination, the more intense the flavors will be.
Step 3: Prep Your Grill
When you’re ready to cook, preheat your grill to medium-high heat (about 375-400°F). If you’re using a charcoal grill, let the coals burn until they’re covered in white ash. Before placing the chicken on, brush the grill grates with a little vegetable oil to help prevent sticking.
Step 4: Grill the Chicken
Take the chicken out of the marinade, shaking off any excess liquid (but don’t rinse!). Place them on the grill, ensuring there’s space between each piece so they cook evenly. Grill for about 6-8 minutes per side, or until the internal temperature reaches 165°F.
Step 5: Rest and Serve
Once cooked, remove the chicken from the grill and let it rest for about 5 minutes. Resting helps keep the juices in, resulting in tender chicken. While resting, squeeze some lime juice over the top!
Step 6: Garnish and Enjoy
Serve your Thai grilled chicken garnished with fresh cilantro and lime wedges. You can pair it with jasmine rice, a refreshing cucumber salad, or my personal favorite – grilled vegetables!
Serving Suggestions
Presentation matters! To plate, start by arranging the chicken on a large serving platter. Scatter fresh cilantro over the top and add lime wedges alongside. For an extra touch, you can sprinkle sesame seeds for a nice crunch and flavor. Serve it family-style; nothing brings more joy than breaking bread together!
Recipe Variations
-
Coconut-Ginger Sauce: Create a drizzling sauce by combining leftover marinade (boil to ensure it’s safe) with toasted sesame oil and lime juice, to add a zesty kick!
-
Spicy Peanut Sauce: Serve with a small bowl of spicy peanut sauce for dipping, made with peanut butter, soy sauce, lime juice, and chili paste.
-
Herb-Infused Grilling: Toss some fresh herbs like basil or mint directly onto the grill alongside the chicken for added flavor.
-
Veggie Skewers: Want to make it vegetarian? Toss veggies like bell peppers, zucchini, and mushrooms in the marinade and grill them alongside the chicken.
-
Tropical Twist: Add pineapple chunks to the marinade for a sweet contrast. Grill them alongside the chicken for delicious kebobs!
Chef’s Notes
One of the beautiful things about cooking is how recipes evolve. This Thai Grilled Chicken started as a simple family recipe, but over the years, it’s turned into a creative outlet where I explore new flavors and techniques. I’ve experimented with various herbs, spices, and even different proteins, and it never disappoints. I still remember that first time experimenting with coconut milk—it was a game changer! Funny enough, my kitchen resembled a tropical paradise with coconut everywhere, and my friends dubbed it “Olivia’s Coconut Chicken Adventure!”
Cooking is not just about following recipes; it’s about joy, laughter, and a bit of chaos in the kitchen. Don’t be afraid to make this recipe your own—you might just create a family tradition of your own!
FAQs and Troubleshooting
1. My chicken is burning on the grill. What should I do?
If your grill is too hot, the chicken will burn on the outside before cooking through. Make sure to preheat the grill on medium-high heat, and always keep an eye on it. If you notice flames flaring up due to fat dripping, move the chicken to a cooler part of the grill or lower the heat.
2. Can I use chicken breasts instead of thighs?
Absolutely! Chicken breasts are a great alternative, but keep in mind they can dry out quicker. Consider marinating them for a longer time and grilling them for a shorter period (4-6 minutes per side) to keep them juicy.
3. What can I do if I don’t have a grill?
No problem! You can either use a grill pan on your stove or bake the marinated chicken in the oven at 400°F for about 25-30 minutes. Finish it under the broiler for a few minutes to achieve that beautiful char!
4. Can I make the marinade ahead of time?
Yes! The marinade can be prepared a day or two ahead. Just be sure to keep it in an airtight container in the fridge until you’re ready to cook. It might actually taste even better after sitting!
Nutritional Info (optional)
- Serving Size: 1 thigh
- Calories: 290
- Protein: 20g
- Carbohydrates: 9g
- Fat: 21g
- Sugar: 3g
- Fiber: 0g
There you have it, my friends! A recipe that’s bound to make your taste buds dance and fill your home with amazing aromas. I hope this Thai Grilled Chicken inspires you to cook and share great food with your loved ones. Happy cooking, and don’t forget to pull up a chair and enjoy the journey!
Print
Thai Grilled Chicken
- Total Time: 150 minutes
- Yield: 4 servings
- Diet: Gluten-Free
Description
A flavorful journey with Thai Grilled Chicken, marinated to perfection and grilled for a tender, juicy finish, perfect for summer nights.
Ingredients
- Chicken Thighs (bone-in or boneless)
- Coconut Milk (1 cup)
- Soy Sauce (¼ cup)
- Brown Sugar (2 tablespoons)
- Lime Juice (2 tablespoons)
- Garlic (3 cloves, minced)
- Fresh Ginger (1 tablespoon, grated)
- Chili Flakes or Sriracha (to taste)
- Vegetable Oil (for grilling)
- Fresh Cilantro and Lime Wedges (for garnish)
Instructions
- Whisk together the coconut milk, soy sauce, brown sugar, lime juice, minced garlic, grated ginger, and chili flakes until well combined.
- Marinate the chicken thighs in the marinade, cover, and let it marinate in the fridge for at least 120 minutes or overnight.
- Prep your grill to medium-high heat (375-400°F) and brush the grill grates with vegetable oil.
- Grill the chicken for about 6-8 minutes per side, or until the internal temperature reaches 165°F.
- Rest the chicken for about 5 minutes before serving.
- Garnish with fresh cilantro and lime wedges before serving.
Notes
You can substitute chicken breasts for thighs for a leaner option, but be cautious as they can dry out quicker. Pair with jasmine rice or a refreshing cucumber salad.
- Prep Time: 10 minutes
- Cook Time: 20 minutes
- Category: Main Course
- Method: Grilling
- Cuisine: Thai
Nutrition
- Serving Size: 1 thigh
- Calories: 290
- Sugar: 3g
- Sodium: 800mg
- Fat: 21g
- Saturated Fat: 12g
- Unsaturated Fat: 9g
- Trans Fat: 0g
- Carbohydrates: 9g
- Fiber: 0g
- Protein: 20g
- Cholesterol: 90mg
Keywords: grilled chicken, Thai chicken, summer recipes, easy dinner
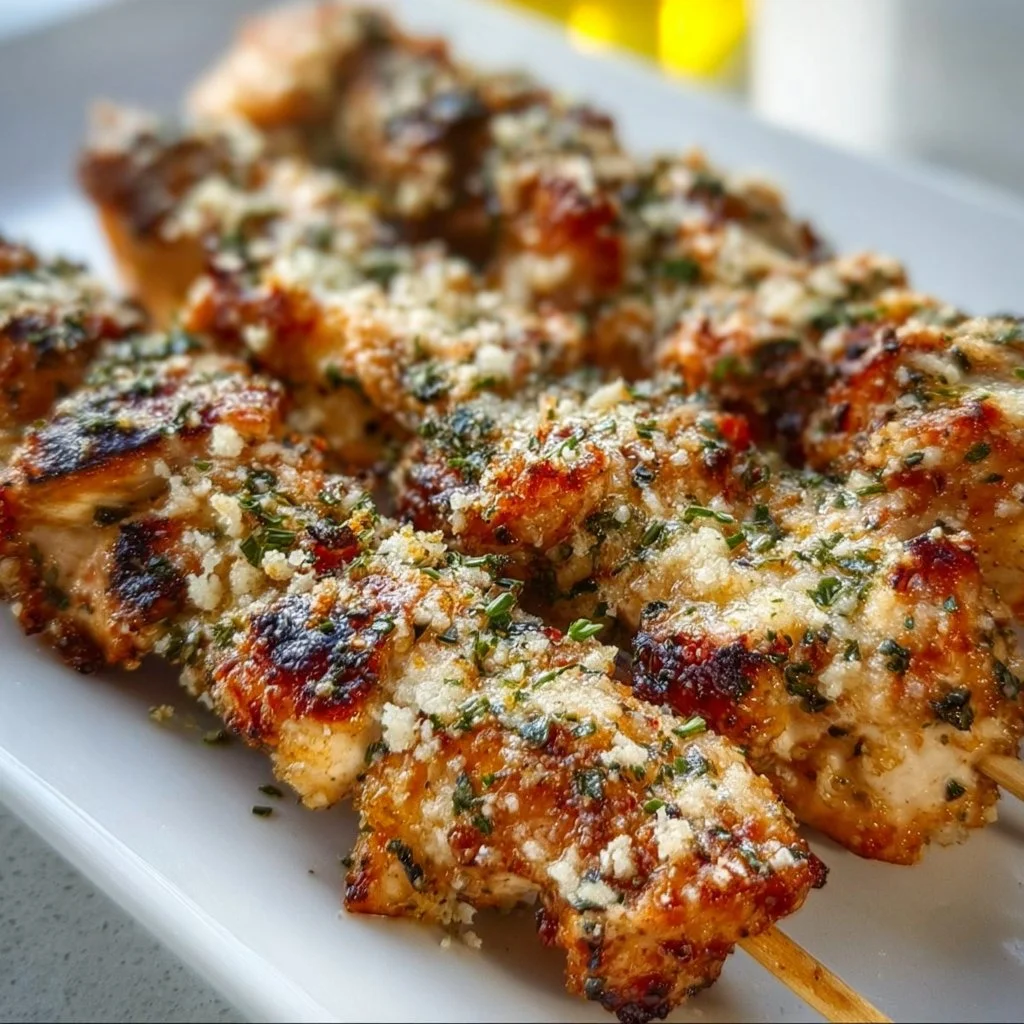
Ranch Garlic Parmesan Chicken Skewers
Delicious Ranch Garlic Parmesan Chicken Skewers: A Cozy Kitchen Adventure
Welcome back to my kitchen, fellow foodies! Today, we’re diving into a dish that’s sure to make your taste buds dance: Ranch Garlic Parmesan Chicken Skewers. These little gems are the perfect combination of juicy chicken, savory garlic, and the creamy delight of parmesan, all brought together with a touch of ranch seasoning. Whether you’re whipping these up for a casual weeknight dinner or impressing friends at your next gathering, these skewers are here to steal the show.
If you’ve ever felt overwhelmed in the kitchen, let me assure you that this dish is as approachable as it is delicious. With simple ingredients and a straightforward process, you’ll feel like a pro in no time. Plus, there’s something incredibly satisfying about grilling (or baking) skewers! The anticipation of that first bite, the sound of everything sizzling away, and the delightful aromas wafting through the kitchen — it’s enough to make anyone’s heart skip a beat!
Before the first skewers hit the grill, let me share a little story about why these Ranch Garlic Parmesan Chicken Skewers are close to my heart. This dish reminds me not only of good flavors but also of kitchen antics with family and friends. So, buckle up as we embark on this flavorful journey together. The best part? You’ll always find easy tips and hacks along the way. Ready to turn your kitchen into a haven of deliciousness? Let’s get cooking!
Personal Story
I’ll never forget the first time I made chicken skewers. It was a sunny afternoon, and my dad decided to host a family BBQ in our backyard. With a wooden picnic table dressed in a cheerful checkered tablecloth, we gathered to celebrate the warm weather and each other’s company. But here’s the twist: my dad wasn’t the one behind the grill that day; I was!
Feeling both excited and a little nervous, I concocted my own marinade (with a little inspiration from my mom’s favorite ranch dip). A mix of garlic, luscious parmesan cheese, and a few other herbs created what I believed to be the ultimate chicken skewer recipe. As I threaded the marinated chunks of chicken onto skewers, I could almost taste the success before they hit the grill!
Fast forward to dinner time, my family gathered around, eager to taste what I had created. With the first bite, I was overwhelmed with pride – not only did my experiment bring smiles, but it also sparked laughter and stories that night, memories that have stuck with us for years! Today, I share this Ranch Garlic Parmesan Chicken Skewers recipe, hoping it brings as much joy to your kitchen as it has to mine.
Ingredients
Before we start cooking, let’s gather our ingredients. Here they are, along with some handy tips and substitutions:
-
Chicken Breast (1 pound)
Use boneless, skinless chicken breast for easy skewering. You can substitute with chicken thighs for a juicier option. -
Ranch Seasoning Mix (2 tablespoons)
Store-bought is great, but if you have time, make your own with dried herbs like dill, parsley, garlic powder, and buttermilk powder. This can elevate the flavor immensely! -
Garlic (3 cloves, minced)
Fresh garlic delivers that robust flavor. In a pinch, garlic powder can work, but fresh is always better! -
Parmesan Cheese (1/2 cup, grated)
Freshly grated is the way to go for a more pronounced flavor. If you’re dairy-free, try nutritional yeast for a cheesy boost! -
Olive Oil (2 tablespoons)
Essential for marinating and ensuring that those flavors stick. Substitute with avocado oil for a higher smoke point. -
Skewers (wooden or metal)
If you opt for wooden skewers, remember to soak them in water for at least 30 minutes prior to grilling to prevent burning. -
Salt and Pepper to taste
Brightens the flavors! Feel free to add any other spices, like paprika or cayenne for a kick!
Step-by-Step Instructions
Now that we have our ingredients ready, let’s get down to the juicy details of cooking these Ranch Garlic Parmesan Chicken Skewers!
-
Marinate the Chicken
In a large bowl, combine the olive oil, ranch seasoning mix, minced garlic, and grated parmesan cheese. Add the cut chicken breast pieces (around 1-inch cubes). Toss everything together until the chicken is well-coated. Feel free to get in there with your hands; we want each piece to soak up all those fabulous flavors! Let it marinate for at least 30 minutes — if you have the luxury of time, let it sit in the fridge for a few hours or even overnight. -
Prepare the Skewers
While our chicken is soaking up that tangy, garlicky goodness, let’s prepare the skewers. If using wooden skewers, remember to soak them first! This step helps prevent them from catching fire. If you’re using metal skewers, you can skip this part — you’re all set and ready to skewer! -
Skewer the Chicken
This is the fun part. Take your marinated chicken and thread it onto your skewers, leaving a little space between each piece for even cooking. Do this with all the chicken pieces, and if you’re feeling adventurous, you can add some veggies like bell peppers or zucchini for color and crunch! -
Preheat the Grill
Get your grill (or oven) ready! If you’re using an outdoor grill, bring it to medium-high heat. If you’re opting for the oven, preheat it to 400°F (200°C). A hot grill leads to those perfect grill marks and that lovely char. -
Cook the Skewers
Place the skewers on the grill. If grilling, cook for about 10-12 minutes, turning occasionally to ensure even cooking. If using the oven, lay the skewers on a baking sheet lined with parchment and bake for about 15-20 minutes, flipping halfway through. This difference in methods brings out different textures, and both are equally tasty! -
Check for Doneness
Chicken is best served cooked to an internal temperature of 165°F (75°C). Use a meat thermometer to check, particularly if you’re new to grilling. -
Let Them Rest
Once cooked, remove the skewers from the grill or oven and let them rest for about 5 minutes. This little break allows the juices to redistribute, keeping your chicken lovely and tender. -
Dig in!
Serve warm and get ready for a delicious chicken experience! These skewers are best enjoyed fresh off the grill (or out of the oven) while still juicy and flavorful.
Serving Suggestions
For an eye-catching presentation, serve these Ranch Garlic Parmesan Chicken Skewers on a vibrant platter with a drizzle of ranch dressing on top and a sprinkle of fresh parsley. Pair with a refreshing side salad or some homemade coleslaw for an extra crunch. Don’t forget to provide a little bowl of extra ranch dressing for dipping — because who doesn’t love that creamy goodness?
Recipe Variations
Feeling inspired? Here are some creative twists to switch things up:
- Vegetable Skewers: Add colorful cherry tomatoes, bell peppers, and zucchini for a fresh veggie twist.
- Spicy Kick: Toss some crushed red pepper flakes into the marinade for an extra heat.
- Herb-Focused: Swap ranch seasoning for fresh herbs like thyme or rosemary for a garden-fresh taste.
- BBQ Flavor: Brush with your favorite BBQ sauce in the last few minutes of cooking for a smoky-sweet twist.
- Carb Option: Pair with naan or pita bread for a fun handheld dinner!
Chef’s Notes
Throughout my cooking journey, I’ve had my fair share of kitchen mishaps (don’t we all?). I remember one time, I accidentally swapped out salt for sugar while prepping the marinade, leading to some confused expressions at the dinner table! It’s these silly moments that add a sprinkle of fun to cooking, and maybe a dash of humility. This Ranch Garlic Parmesan Chicken Skewers recipe has seen a few iterations over the years, but I always circle back to the classic flavors that remind me of sunny family barbecues.
FAQs and Troubleshooting
**1. **What can I use instead of ranch seasoning?
If you’re out of ranch seasoning, a blend of garlic powder, dill, parsley, and a splash of buttermilk can mimic the flavor quite nicely!
**2. **Can I use frozen chicken?
Frozen chicken can work, but be sure to thaw it completely before marinating for even flavor absorption and proper cooking.
**3. **What if my chicken is still pink inside?
Always check with a meat thermometer! If your chicken isn’t cooked through, pop it back on the grill or in the oven until it reaches 165°F (75°C).
**4. **Can I make these skewers ahead of time?
Absolutely! You can marinate the chicken the night before and stored skewers in the fridge until you’re ready to grill.
Nutritional Info (Optional)
If you’re curious about nutritional stats, these juicy skewers are a great source of protein while keeping calories in check and packing in healthy fats from the olive oil. Additionally, with the parmesan and chicken on board, you’re also getting a nice boost of calcium!
Now that you have your guide to crafting these scrumptious Ranch Garlic Parmesan Chicken Skewers, I can’t wait for you to try this recipe! Happy cooking, and remember: the kitchen is your playground. Embrace the mess, savor the flavors, and most importantly, share the joy with those you love!
Print
Ranch Garlic Parmesan Chicken Skewers
- Total Time: 50 minutes
- Yield: 4 servings 1x
- Diet: Gluten-Free
Description
Juicy chicken skewers marinated in garlic, parmesan, and ranch seasoning that are perfect for any gathering.
Ingredients
- 1 pound Chicken Breast, boneless and skinless
- 2 tablespoons Ranch Seasoning Mix
- 3 cloves Garlic, minced
- 1/2 cup Parmesan Cheese, grated
- 2 tablespoons Olive Oil
- Skewers (wooden or metal)
- Salt and Pepper to taste
Instructions
- Marinate the chicken: In a large bowl, combine the olive oil, ranch seasoning mix, minced garlic, and grated parmesan cheese. Add the cut chicken breast pieces (around 1-inch cubes). Toss everything until the chicken is well-coated.
- Prepare the skewers: If using wooden skewers, soak them in water for 30 minutes. For metal skewers, skip this step.
- Skewer the chicken: Thread marinated chicken onto skewers, leaving space for even cooking. Optionally, add veggies.
- Preheat the grill: Get your grill to medium-high heat or preheat the oven to 400°F (200°C).
- Cook the skewers: Grill for 10-12 minutes, turning occasionally, or bake for 15-20 minutes, flipping halfway.
- Check for doneness: Ensure chicken reaches an internal temperature of 165°F (75°C).
- Let them rest: Allow skewers to rest for 5 minutes before serving.
- Dig in!: Serve warm with a drizzle of ranch dressing and fresh parsley.
Notes
These skewers can be marinated the night before for enhanced flavor.
- Prep Time: 30 minutes
- Cook Time: 20 minutes
- Category: Main Course
- Method: Grilling
- Cuisine: American
Nutrition
- Serving Size: 1 skewer
- Calories: 300
- Sugar: 1g
- Sodium: 500mg
- Fat: 15g
- Saturated Fat: 5g
- Unsaturated Fat: 8g
- Trans Fat: 0g
- Carbohydrates: 2g
- Fiber: 0g
- Protein: 35g
- Cholesterol: 80mg
Keywords: chicken skewers, ranch dressing, garlic parmesan