

High Protein Jalapeno Popper Chicken Salad Recipe – Low Carb Chicken Salad with Bacon, Cheese & Jalapeños
High Protein Jalapeno Popper Chicken Salad: A Low Carb Delight!
Welcome back to my cozy kitchen, friends! Today, I have something really exciting in store for you—my High Protein Jalapeno Popper Chicken Salad! If you love the spicy zing of jalapeno poppers but want a healthier, low-carb version that’s perfect for any occasion, you’re in for a treat. This salad is not only bursting with flavor but also packed with protein, making it a satisfying meal that won’t derail your healthy eating goals.
Imagine this: it’s a sunny afternoon, and you’re gathering with friends for a casual lunch. The grill is fired up, and while you’re busy flipping burgers and searing veggies, you want something incredibly easy to whip up that everyone will rave about. Enter this chicken salad! It’s a delightful blend of tender chicken, zesty jalapeños, smoky bacon, creamy cheese, and just the right amount of crunch. Your guests will be singing your praises, asking for the recipe even before they finish their first bite!
But more than just a delicious dish, this salad is packed with memories for me. I grew up in a family where gatherings were centered around great food. My mother would often bring her spin on jalapeno poppers to parties—crisp bacon, creamy cheese, and spicy jalapeños lovingly stuffed inside a tender pepper. It was a hit every time! Inspired by those memories, I created this salad as a tribute to those lively family get-togethers. So, let’s get cooking, and I’ll share all the details you need to recreate this fabulous dish in your own kitchen!
Personal Story
One of my fondest kitchen memories revolves around my late grandmother, who was the queen of comfort food in our family. Whenever the family got together, you could almost always find her whipping up her famous jalapeño poppers. I still remember the laughter and stories shared around the table while those poppers baked in the oven, filling the air with an irresistible smoky aroma. Naturally, they would disappear almost as soon as they were served!
But one time, she decided to experiment and turned her beloved poppers into a salad. I’ll never forget the look on everyone’s faces when she presented it—half surprised, half intrigued! Taking the risk to change tradition for something new was such a bold move, and believe it or not, that salad became a hit! Fast forward to today, I’ve put my own spin on that nostalgic recipe, turning it into a high-protein, low-carb delight that brings comfort and joy, just like Grandma used to.
Ingredients
Here’s what you’ll need to make this delectable High Protein Jalapeno Popper Chicken Salad:
-
2 cups cooked chicken, shredded
You can use rotisserie chicken for convenience or cook your own. Shredded grilled chicken breast also works well! -
1/2 cup cream cheese, softened
This is the creamy element that brings the salad together! If you want a lighter option, you can substitute with Greek yogurt, which adds protein and tanginess. -
1/2 cup mayonnaise
For that luscious, creamy texture. Opt for avocado oil mayo for a healthier choice—it’s just as tasty! -
1/2 cup bacon, cooked and crumbled
Bacon adds a delightful crunch and smoky flavor. Use turkey bacon for a lower-fat option, or skip it entirely for a vegetarian version (just add extra seasoning!). -
1/2 cup jalapeños, diced (fresh or pickled)
This is where the spice comes in! Fresh jalapeños give a kick, while pickled ones add a tangy flavor. Use banana peppers as a milder substitute if you prefer less heat. -
1 cup cheddar cheese, shredded
I like sharp cheddar for its robust flavor, but feel free to mix it up with pepper jack for an extra spicy touch or mozzarella for a milder flavor. -
1/4 cup green onion, sliced
These add a fresh, mild onion flavor. Fresh chives work beautifully in a pinch! -
Salt and pepper to taste
Season appropriately! Smoked paprika is also a lovely addition for a depth of flavor.
Ingredient Insight
Choosing quality ingredients can elevate your dish. For chicken, go for organic or free-range when possible for better flavor! And remember, the beauty of cooking is that you can adapt ingredients based on what you have on hand or what you prefer.
Step-by-Step Instructions
-
Prep Your Chicken: Start by shredding your cooked chicken into bite-sized pieces. The simplicity of this step is that you can easily do it with two forks or your hands for a more personal touch! If you don’t have pre-cooked chicken available, poaching some chicken breasts in salted water works beautifully too. Just remember to let them cool before shredding!
-
Cook Your Bacon: In a skillet over medium heat, cook your bacon until crispy. Once done, transfer it to a paper towel-lined plate to absorb excess grease and cool before crumbling into pieces. Here’s a little hack: if you want perfectly crispy bacon without much fuss, try baking it in the oven. Spread it out on a foil-lined baking sheet and cook at 400°F for about 20 minutes—you’ll thank me later!
-
Make the Dressing: In a large mixing bowl, combine the softened cream cheese and mayonnaise. Use a hand mixer or a whisk to blend them until you reach a smooth consistency. This creamy base is what makes the salad luscious!
-
Add the Mix-Ins: Fold in shredded chicken, crumbled bacon, diced jalapeños, shredded cheddar cheese, and sliced green onion. As you mix these ingredients together, don’t hesitate to taste as you go. Adjust the seasonings (salt, pepper, and a touch of smoked paprika) to your liking. The key here is to get everything evenly coated with that creamy dressing!
-
Chill and Serve: Once everything is thoroughly mixed, cover your bowl with plastic wrap or a lid and let the salad chill in the fridge for at least 30 minutes. This allows the flavors to meld beautifully. Trust me, waiting is the hardest part, but it’s so worth it!
-
Plating Tips: When you’re ready to serve, scoop generous portions onto crunchy lettuce leaves or in a wrap for a fun meal. Garnish with extra bacon bits or a sprinkle of cheese on top for that aesthetic touch.
Pro Tip:
If you’re in a rush, you can skip the chilling step, but just know that allowing the flavors to meld together will take your salad to the next level!
Serving Suggestions
This High Protein Jalapeno Popper Chicken Salad is so versatile! Serve it nestled in halved bell peppers or wrapped in large lettuce leaves for a fresh crunch. You could even scoop it onto whole-grain crackers for a fantastic appetizer! And let’s not forget about serving it on top of a bed of mixed greens—perfect for brightening up your plate and adding some extra fiber.
Recipe Variations
Feeling creative? Here are a few adaptations you can try:
-
Crispy Mexican Twist: Add black beans and corn for a burrito-style fun twist.
-
Creamy Avocado Upgrade: Fold in diced avocado for a creamy texture and healthy fat.
-
Keto-friendly Option: Skip the bacon and use unsweetened coconut flakes for a tropical vibe without compromising on flavor!
-
Herbes de Provence: Incorporate herbs like thyme or rosemary for an aromatic touch and an added layer of flavor.
-
Mediterranean Flair: Swap out the jalapeños for olives and sundried tomatoes for a Mediterranean-themed salad—hello, sundried tomato and basil flavor profile!
Chef’s Notes
As with any recipe, feel free to adjust based on what your taste buds are craving! This salad is super forgiving, and one of my favorite things is that it has evolved over time thanks to feedback from my family and friends who have tried it. Each time, someone would suggest something new, leading me to discover fabulous twists that just gel perfectly together.
Also, I remember a time when I mistakenly added garlic powder instead of onion powder. It turned out to be a happy accident, and surprisingly, it resonated with everyone tasting it. So don’t be afraid to improvise—you might just surprise yourself!
FAQs and Troubleshooting
-
Can I use canned chicken instead of cooking my own?
Yes, canned chicken works just fine! Just make sure to drain and rinse it well before shredding. -
What if my salad is too salty?
If your salad turns out too salty, add more cream cheese and mayonnaise to balance it out. You can also increase the volume by adding in some chopped lettuce or vegetables. -
How can I store leftovers?
Store any leftovers in an airtight container in the fridge. It should stay fresh for about 3-4 days. Just give it a good stir before serving again! -
Can I freeze this salad?
I don’t recommend freezing this salad as the creaminess may change in texture. It’s best enjoyed fresh!
Nutritional Info
While not mandatory, here’s a rough breakdown to keep you informed (per serving, based on 4 servings total):
- Calories: Approximately 350
- Protein: 30g
- Carbohydrates: 6g
- Fat: 24g
- Fiber: 1g
And there you have it! Your High Protein Jalapeno Popper Chicken Salad awaits—a delicious tribute to the flavors we love and the comfort of shared meals. Enjoy making it as much as I enjoy sharing it with you! Happy cooking!
Print
High Protein Jalapeno Popper Chicken Salad
- Total Time: 30 minutes
- Yield: 4 servings 1x
- Diet: Low Carb
Description
A low-carb, protein-packed chicken salad that brings the flavors of jalapeno poppers into a healthy dish.
Ingredients
- 2 cups cooked chicken, shredded
- 1/2 cup cream cheese, softened
- 1/2 cup mayonnaise
- 1/2 cup bacon, cooked and crumbled
- 1/2 cup jalapeños, diced (fresh or pickled)
- 1 cup cheddar cheese, shredded
- 1/4 cup green onion, sliced
- Salt and pepper to taste
Instructions
- Prep your chicken: Start by shredding your cooked chicken into bite-sized pieces.
- Cook your bacon: In a skillet over medium heat, cook your bacon until crispy.
- Make the dressing: In a large mixing bowl, combine the softened cream cheese and mayonnaise.
- Add the mix-ins: Fold in shredded chicken, crumbled bacon, diced jalapeños, shredded cheddar cheese, and sliced green onion.
- Chill and serve: Cover your bowl with plastic wrap and let the salad chill in the fridge for at least 30 minutes.
- Plate and serve: Scoop servings onto crunchy lettuce leaves or in a wrap for a fun meal.
Notes
If you’re in a rush, you can skip the chilling step, but allowing the flavors to meld together will enhance the dish.
- Prep Time: 15 minutes
- Cook Time: 15 minutes
- Category: Salad
- Method: Mixing
- Cuisine: American
Nutrition
- Serving Size: 1 serving
- Calories: 350
- Sugar: 2g
- Sodium: 600mg
- Fat: 24g
- Saturated Fat: 10g
- Unsaturated Fat: 5g
- Trans Fat: 0g
- Carbohydrates: 6g
- Fiber: 1g
- Protein: 30g
- Cholesterol: 85mg
Keywords: chicken salad, jalapeno popper, protein salad, low carb recipe
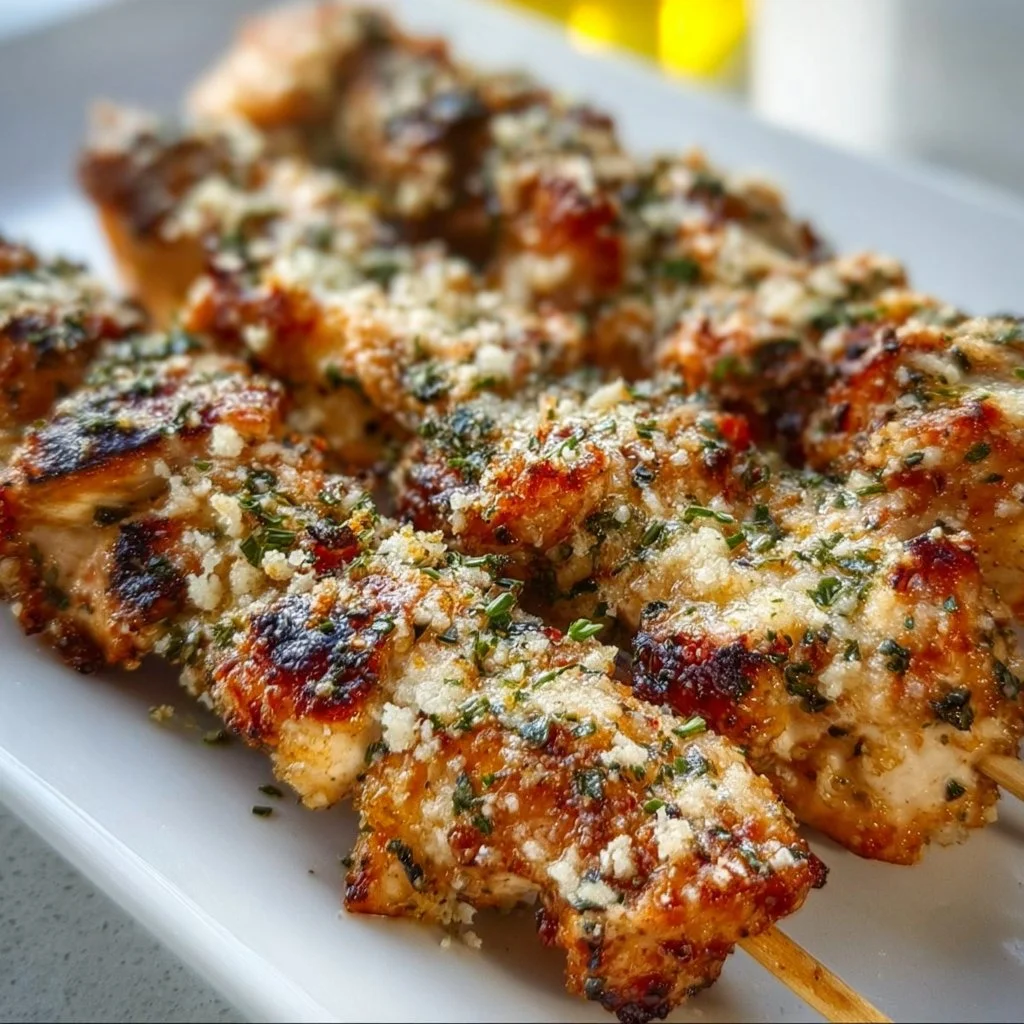
Ranch Garlic Parmesan Chicken Skewers
Delicious Ranch Garlic Parmesan Chicken Skewers: A Cozy Kitchen Adventure
Welcome back to my kitchen, fellow foodies! Today, we’re diving into a dish that’s sure to make your taste buds dance: Ranch Garlic Parmesan Chicken Skewers. These little gems are the perfect combination of juicy chicken, savory garlic, and the creamy delight of parmesan, all brought together with a touch of ranch seasoning. Whether you’re whipping these up for a casual weeknight dinner or impressing friends at your next gathering, these skewers are here to steal the show.
If you’ve ever felt overwhelmed in the kitchen, let me assure you that this dish is as approachable as it is delicious. With simple ingredients and a straightforward process, you’ll feel like a pro in no time. Plus, there’s something incredibly satisfying about grilling (or baking) skewers! The anticipation of that first bite, the sound of everything sizzling away, and the delightful aromas wafting through the kitchen — it’s enough to make anyone’s heart skip a beat!
Before the first skewers hit the grill, let me share a little story about why these Ranch Garlic Parmesan Chicken Skewers are close to my heart. This dish reminds me not only of good flavors but also of kitchen antics with family and friends. So, buckle up as we embark on this flavorful journey together. The best part? You’ll always find easy tips and hacks along the way. Ready to turn your kitchen into a haven of deliciousness? Let’s get cooking!
Personal Story
I’ll never forget the first time I made chicken skewers. It was a sunny afternoon, and my dad decided to host a family BBQ in our backyard. With a wooden picnic table dressed in a cheerful checkered tablecloth, we gathered to celebrate the warm weather and each other’s company. But here’s the twist: my dad wasn’t the one behind the grill that day; I was!
Feeling both excited and a little nervous, I concocted my own marinade (with a little inspiration from my mom’s favorite ranch dip). A mix of garlic, luscious parmesan cheese, and a few other herbs created what I believed to be the ultimate chicken skewer recipe. As I threaded the marinated chunks of chicken onto skewers, I could almost taste the success before they hit the grill!
Fast forward to dinner time, my family gathered around, eager to taste what I had created. With the first bite, I was overwhelmed with pride – not only did my experiment bring smiles, but it also sparked laughter and stories that night, memories that have stuck with us for years! Today, I share this Ranch Garlic Parmesan Chicken Skewers recipe, hoping it brings as much joy to your kitchen as it has to mine.
Ingredients
Before we start cooking, let’s gather our ingredients. Here they are, along with some handy tips and substitutions:
-
Chicken Breast (1 pound)
Use boneless, skinless chicken breast for easy skewering. You can substitute with chicken thighs for a juicier option. -
Ranch Seasoning Mix (2 tablespoons)
Store-bought is great, but if you have time, make your own with dried herbs like dill, parsley, garlic powder, and buttermilk powder. This can elevate the flavor immensely! -
Garlic (3 cloves, minced)
Fresh garlic delivers that robust flavor. In a pinch, garlic powder can work, but fresh is always better! -
Parmesan Cheese (1/2 cup, grated)
Freshly grated is the way to go for a more pronounced flavor. If you’re dairy-free, try nutritional yeast for a cheesy boost! -
Olive Oil (2 tablespoons)
Essential for marinating and ensuring that those flavors stick. Substitute with avocado oil for a higher smoke point. -
Skewers (wooden or metal)
If you opt for wooden skewers, remember to soak them in water for at least 30 minutes prior to grilling to prevent burning. -
Salt and Pepper to taste
Brightens the flavors! Feel free to add any other spices, like paprika or cayenne for a kick!
Step-by-Step Instructions
Now that we have our ingredients ready, let’s get down to the juicy details of cooking these Ranch Garlic Parmesan Chicken Skewers!
-
Marinate the Chicken
In a large bowl, combine the olive oil, ranch seasoning mix, minced garlic, and grated parmesan cheese. Add the cut chicken breast pieces (around 1-inch cubes). Toss everything together until the chicken is well-coated. Feel free to get in there with your hands; we want each piece to soak up all those fabulous flavors! Let it marinate for at least 30 minutes — if you have the luxury of time, let it sit in the fridge for a few hours or even overnight. -
Prepare the Skewers
While our chicken is soaking up that tangy, garlicky goodness, let’s prepare the skewers. If using wooden skewers, remember to soak them first! This step helps prevent them from catching fire. If you’re using metal skewers, you can skip this part — you’re all set and ready to skewer! -
Skewer the Chicken
This is the fun part. Take your marinated chicken and thread it onto your skewers, leaving a little space between each piece for even cooking. Do this with all the chicken pieces, and if you’re feeling adventurous, you can add some veggies like bell peppers or zucchini for color and crunch! -
Preheat the Grill
Get your grill (or oven) ready! If you’re using an outdoor grill, bring it to medium-high heat. If you’re opting for the oven, preheat it to 400°F (200°C). A hot grill leads to those perfect grill marks and that lovely char. -
Cook the Skewers
Place the skewers on the grill. If grilling, cook for about 10-12 minutes, turning occasionally to ensure even cooking. If using the oven, lay the skewers on a baking sheet lined with parchment and bake for about 15-20 minutes, flipping halfway through. This difference in methods brings out different textures, and both are equally tasty! -
Check for Doneness
Chicken is best served cooked to an internal temperature of 165°F (75°C). Use a meat thermometer to check, particularly if you’re new to grilling. -
Let Them Rest
Once cooked, remove the skewers from the grill or oven and let them rest for about 5 minutes. This little break allows the juices to redistribute, keeping your chicken lovely and tender. -
Dig in!
Serve warm and get ready for a delicious chicken experience! These skewers are best enjoyed fresh off the grill (or out of the oven) while still juicy and flavorful.
Serving Suggestions
For an eye-catching presentation, serve these Ranch Garlic Parmesan Chicken Skewers on a vibrant platter with a drizzle of ranch dressing on top and a sprinkle of fresh parsley. Pair with a refreshing side salad or some homemade coleslaw for an extra crunch. Don’t forget to provide a little bowl of extra ranch dressing for dipping — because who doesn’t love that creamy goodness?
Recipe Variations
Feeling inspired? Here are some creative twists to switch things up:
- Vegetable Skewers: Add colorful cherry tomatoes, bell peppers, and zucchini for a fresh veggie twist.
- Spicy Kick: Toss some crushed red pepper flakes into the marinade for an extra heat.
- Herb-Focused: Swap ranch seasoning for fresh herbs like thyme or rosemary for a garden-fresh taste.
- BBQ Flavor: Brush with your favorite BBQ sauce in the last few minutes of cooking for a smoky-sweet twist.
- Carb Option: Pair with naan or pita bread for a fun handheld dinner!
Chef’s Notes
Throughout my cooking journey, I’ve had my fair share of kitchen mishaps (don’t we all?). I remember one time, I accidentally swapped out salt for sugar while prepping the marinade, leading to some confused expressions at the dinner table! It’s these silly moments that add a sprinkle of fun to cooking, and maybe a dash of humility. This Ranch Garlic Parmesan Chicken Skewers recipe has seen a few iterations over the years, but I always circle back to the classic flavors that remind me of sunny family barbecues.
FAQs and Troubleshooting
**1. **What can I use instead of ranch seasoning?
If you’re out of ranch seasoning, a blend of garlic powder, dill, parsley, and a splash of buttermilk can mimic the flavor quite nicely!
**2. **Can I use frozen chicken?
Frozen chicken can work, but be sure to thaw it completely before marinating for even flavor absorption and proper cooking.
**3. **What if my chicken is still pink inside?
Always check with a meat thermometer! If your chicken isn’t cooked through, pop it back on the grill or in the oven until it reaches 165°F (75°C).
**4. **Can I make these skewers ahead of time?
Absolutely! You can marinate the chicken the night before and stored skewers in the fridge until you’re ready to grill.
Nutritional Info (Optional)
If you’re curious about nutritional stats, these juicy skewers are a great source of protein while keeping calories in check and packing in healthy fats from the olive oil. Additionally, with the parmesan and chicken on board, you’re also getting a nice boost of calcium!
Now that you have your guide to crafting these scrumptious Ranch Garlic Parmesan Chicken Skewers, I can’t wait for you to try this recipe! Happy cooking, and remember: the kitchen is your playground. Embrace the mess, savor the flavors, and most importantly, share the joy with those you love!
Print
Ranch Garlic Parmesan Chicken Skewers
- Total Time: 50 minutes
- Yield: 4 servings 1x
- Diet: Gluten-Free
Description
Juicy chicken skewers marinated in garlic, parmesan, and ranch seasoning that are perfect for any gathering.
Ingredients
- 1 pound Chicken Breast, boneless and skinless
- 2 tablespoons Ranch Seasoning Mix
- 3 cloves Garlic, minced
- 1/2 cup Parmesan Cheese, grated
- 2 tablespoons Olive Oil
- Skewers (wooden or metal)
- Salt and Pepper to taste
Instructions
- Marinate the chicken: In a large bowl, combine the olive oil, ranch seasoning mix, minced garlic, and grated parmesan cheese. Add the cut chicken breast pieces (around 1-inch cubes). Toss everything until the chicken is well-coated.
- Prepare the skewers: If using wooden skewers, soak them in water for 30 minutes. For metal skewers, skip this step.
- Skewer the chicken: Thread marinated chicken onto skewers, leaving space for even cooking. Optionally, add veggies.
- Preheat the grill: Get your grill to medium-high heat or preheat the oven to 400°F (200°C).
- Cook the skewers: Grill for 10-12 minutes, turning occasionally, or bake for 15-20 minutes, flipping halfway.
- Check for doneness: Ensure chicken reaches an internal temperature of 165°F (75°C).
- Let them rest: Allow skewers to rest for 5 minutes before serving.
- Dig in!: Serve warm with a drizzle of ranch dressing and fresh parsley.
Notes
These skewers can be marinated the night before for enhanced flavor.
- Prep Time: 30 minutes
- Cook Time: 20 minutes
- Category: Main Course
- Method: Grilling
- Cuisine: American
Nutrition
- Serving Size: 1 skewer
- Calories: 300
- Sugar: 1g
- Sodium: 500mg
- Fat: 15g
- Saturated Fat: 5g
- Unsaturated Fat: 8g
- Trans Fat: 0g
- Carbohydrates: 2g
- Fiber: 0g
- Protein: 35g
- Cholesterol: 80mg
Keywords: chicken skewers, ranch dressing, garlic parmesan
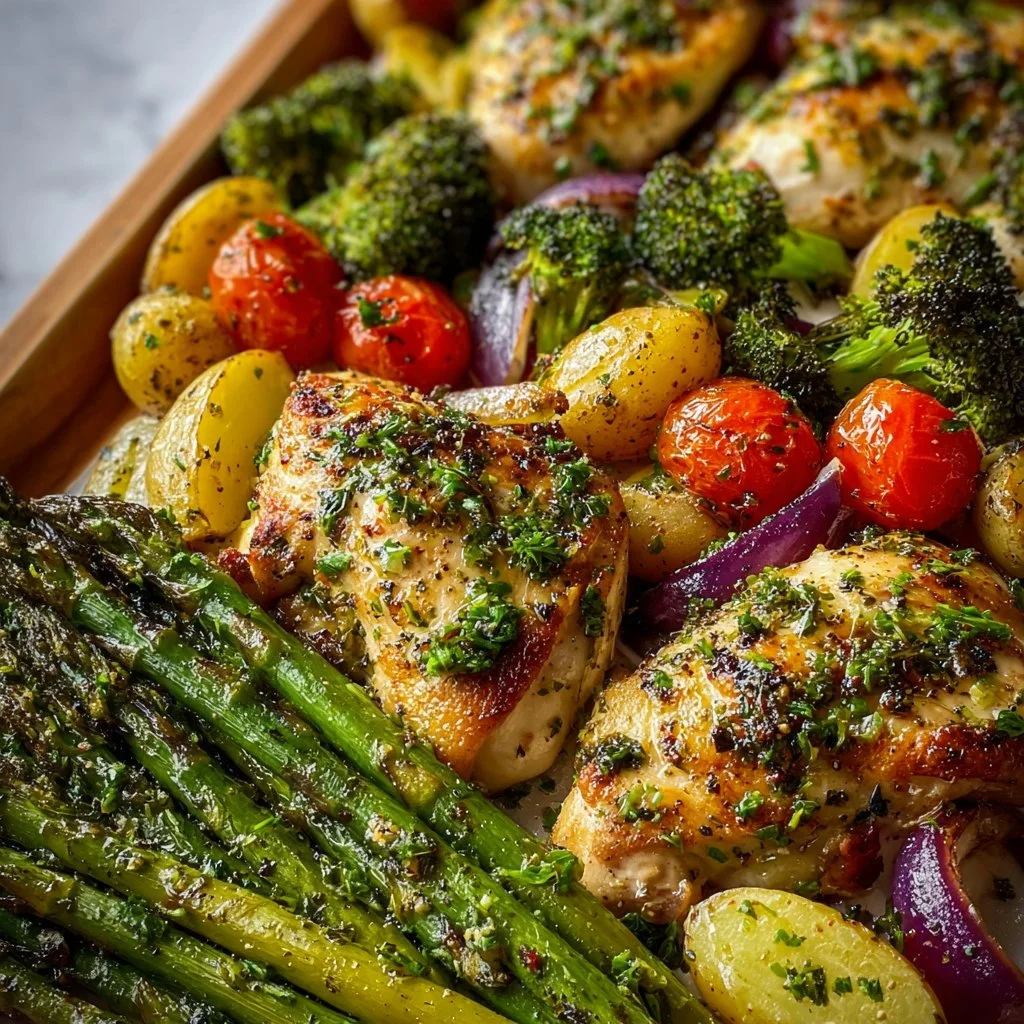
Sheet Pan Garlic Butter Chicken and Veggies
Sheet Pan Garlic Butter Chicken and Veggies: A Simple, Delicious Meal that Brings Joy to Your Table
Welcome back to my cozy kitchen! Today, I’m thrilled to share one of my all-time favorite recipes: Sheet Pan Garlic Butter Chicken and Veggies. If you’re anything like me, you love a meal that’s not only mouthwatering but also simple to prepare and clean up. And let me tell you, this dish checks all those boxes!
What’s not to love about succulent chicken thighs bathed in a rich garlic butter sauce, paired with vibrant seasonal veggies? This meal is perfect for those busy weeknights when you want something delicious without spending hours slaving over the stove. Plus, with everything cooked on a single sheet pan, you’ll have fewer dishes to wash—seriously, a win-win!
Around my kitchen table, food is not just sustenance; it’s love, laughter, and togetherness. I believe that cooking should be fun and approachable! This recipe encapsulates that spirit. You can customize it based on your family’s preferences or whatever you have on hand, making it as versatile as your imagination. So grab your apron and let’s dive into the delightful world of garlic butter chicken!
Personal Story
I still remember the first time I made this dish. It was a chilly autumn evening a few years ago, and I had invited a few friends over for dinner. I wanted to impress them without going too far out of my comfort zone. After scouring my kitchen and rummaging through my pantry, I stumbled upon chicken thighs, a couple of bags of colorful veggies, and a forgotten stick of butter in the fridge.
In that moment, I decided to whip up this Sheet Pan Garlic Butter Chicken. The intoxicating aroma of garlic wafting through my kitchen set the stage for a cozy night filled with warmth and laughter. I’ll never forget the smiles on my friends’ faces as they dug into their plates and savored the first bite. It wasn’t just a meal; it was a shared experience that brought us closer together. Ever since that night, this recipe has become a staple in my household, reminding me that the best memories are often created around the dinner table—no matter how simple the meal.
Ingredients
Here’s what you’ll need to whip up this flavorful dish:
For the Chicken:
- Chicken Thighs: Juicy and flavorful, chicken thighs are ideal for roasting because they stay moist and tender. You can substitute with chicken breasts or drumsticks if preferred, but keep in mind that cooking times may vary.
- Butter: A rich base that provides depth of flavor. For a healthier option, you can use olive oil or ghee for a dairy-free version.
For the Garlic Butter:
- Garlic: Fresh garlic is a must! It gives that delicious, aromatic flavor. If you’re in a pinch, you can use garlic powder, but the fresh stuff packs so much more punch!
- Parsley: Fresh parsley adds a pop of color and freshness. You could substitute with thyme or rosemary for a different herbal note.
For the Veggies:
- Carrots: Sweet and colorful, they add a nice crunch. You can also swap them for sweet potatoes or parsnips for a twist.
- Bell Peppers: These add vibrant color and a hint of sweetness. Feel free to use any color you prefer (red, green, or yellow!).
- Zucchini: Tender and mild, zucchini cooks quickly and absorbs flavors beautifully. You could replace this with asparagus or broccoli, depending on your preference.
Seasoning:
- Salt and Black Pepper: The essentials! Adjust to your taste.
- Paprika: Adds a warm, smoky flavor. You could also try smoked paprika for an extra kick.
Bonus:
- Lemon Juice (optional): A squeeze of lemon at the end brightens the dish and takes it to the next level.
Step-by-Step Instructions
Now that we’ve gathered all our ingredients, let’s get cooking! Follow these simple steps, and you’ll have a delicious dinner on the table in no time.
-
Preheat Your Oven:
Preheat your oven to 425°F (220°C). A hot oven is key for achieving that beautiful, crispy skin on the chicken and caramelization on the veggies. -
Prepare the Veggies:
Chop your veggies into bite-sized pieces for even cooking. This is also a great chance to involve your kids or friends in the prep! When everyone pitches in, it’s not just cooking; it becomes a fun activity. -
Make the Garlic Butter:
In a small saucepan over low heat, melt the butter. Add the minced garlic and cook for about 1-2 minutes until fragrant, making sure not to burn it. The smell will be heavenly! Once fragrant, remove from heat and mix in the chopped parsley, salt, pepper, and paprika. Set aside. -
Season the Chicken:
Pat the chicken thighs dry with paper towels—this helps achieve that lovely crispy skin. Season both sides generously with salt, pepper, and a sprinkle of paprika for that extra oomph. -
Assemble the Sheet Pan:
Line a large baking sheet with parchment paper for easy cleanup (trust me, you’ll thank me later!). Arrange the chicken thighs in the center of the sheet pan and scatter your prepared veggies around them. Drizzle everything with that melt-in-your-mouth garlic butter sauce. Use a brush or spoon to coat the chicken and veggies evenly. -
Roast:
Pop the sheet pan into the preheated oven and roast for 25-30 minutes, or until the chicken is cooked through and reaches an internal temperature of 165°F (75°C) and the veggies are tender and slightly caramelized. You might want to flip the veggies halfway through for even roasting, but it’s not strictly necessary! -
Finishing Touches:
Once cooked, remove the sheet pan from the oven and give everything a good toss. For a burst of freshness, squeeze a bit of lemon juice over the top before serving. Isn’t it amazing how such a simple touch can elevate a dish?
Serving Suggestions
When it comes to serving, the beauty of this dish lies in its rustic, hearty presentation. You can serve it family-style right from the sheet pan—let everyone dig in! For a more refined plate, you could arrange the chicken and veggies on a platter, garnish with fresh parsley, and maybe even add a lemon wedge for that extra touch of elegance. Pair it with some crusty bread or a simple green salad to round out the meal.
Recipe Variations
Feeling adventurous? Here are a few creative twists to make this dish even more exciting:
- Herb Variations: Swap out the fresh parsley for fresh dill or basil for a fresh twist.
- Add Heat: If you love spice, consider adding red pepper flakes to the garlic butter for some heat.
- Different Proteins: Switch the chicken for shrimp or fish. They will cook faster, so keep an eye on them!
- Veggie Medley: Use whatever veggies you have on hand—broccoli, cauliflower, or Brussels sprouts work wonderfully, too!
- Citrus Kick: Try adding orange zest and juice for a bright, citrusy flavor.
Chef’s Notes
One of the things I love most about this recipe is its adaptability. I’ve made it countless times, and every time it comes out delicious—sometimes by design, and other times, purely by accident! One time, I completely forgot to add the garlic butter. Can you believe it? I was in a frenzy trying to get dinner ready and it slipped my mind. Surprisingly, my friends loved the plain roasted chicken and veggies so much that they suggested I offer it as a “light option” in the future. Cooking, after all, is as much about experimenting and having fun as it is about following a recipe!
FAQs and Troubleshooting
1. My chicken skin didn’t crisp up! What happened?
Make sure your oven is fully preheated before putting in the chicken. Pat the chicken dry to remove excess moisture and ensure that the skin crisps up nicely.
2. Can I use frozen chicken?
While you can use frozen chicken, it’s best to thaw it first to ensure even cooking. Planning ahead will yield the best results!
3. What if my veggies are cooking too quickly?
If your veggies are cooking faster than the chicken, you can remove them from the oven earlier and just let the chicken finish roasting.
4. How do I store leftovers?
Store any leftovers in an airtight container in the refrigerator for up to 3 days. Reheat them in the oven for the best results or in the microwave for a quick meal.
Nutritional Info
(If you would like, I can provide an estimated nutritional breakdown, but it varies based on your specific ingredients and serving sizes!)
And there you have it! A delightful and approachable recipe for Sheet Pan Garlic Butter Chicken and Veggies that will surely bring joy to your table. Remember, cooking is not just about the food—it’s about the moments you create and the love you share. Happy cooking, friends! ✨
Print
Sheet Pan Garlic Butter Chicken and Veggies
- Total Time: 45 minutes
- Yield: 4 servings 1x
- Diet: Gluten-Free
Description
A simple and delicious meal featuring succulent chicken thighs bathed in garlic butter sauce, paired with vibrant seasonal vegetables.
Ingredients
- 1.5 lbs Chicken Thighs
- 1 stick Butter
- 4 cloves Garlic, minced
- 1/4 cup Fresh Parsley, chopped
- 2 Carrots, chopped
- 2 Bell Peppers, chopped
- 1 Zucchini, chopped
- 1 tsp Salt
- 1 tsp Black Pepper
- 1 tsp Paprika
- 1 tbsp Lemon Juice (optional)
Instructions
- Preheat your oven to 425°F (220°C).
- Chop your veggies into bite-sized pieces for even cooking.
- In a small saucepan over low heat, melt the butter. Add the minced garlic and cook for about 1-2 minutes until fragrant.
- Pat the chicken thighs dry with paper towels and season both sides with salt, pepper, and paprika.
- Line a large baking sheet with parchment paper and arrange the chicken thighs in the center, scattering the veggies around them.
- Drizzle everything with the garlic butter sauce and coat evenly.
- Pop the sheet pan into the oven and roast for 25-30 minutes, until the chicken is cooked through and the veggies are tender.
- Once cooked, remove from the oven and toss everything. Squeeze lemon juice over before serving.
Notes
You can customize the recipe with your favorite vegetables or protein. Always ensure to pat the chicken dry for crispier skin.
- Prep Time: 15 minutes
- Cook Time: 30 minutes
- Category: Main Course
- Method: Baking
- Cuisine: American
Nutrition
- Serving Size: 1 serving
- Calories: 450
- Sugar: 6g
- Sodium: 420mg
- Fat: 22g
- Saturated Fat: 10g
- Unsaturated Fat: 10g
- Trans Fat: 0g
- Carbohydrates: 30g
- Fiber: 4g
- Protein: 25g
- Cholesterol: 80mg
Keywords: garlic butter chicken, sheet pan dinner, easy chicken recipe, one pan meal, quick dinner


