
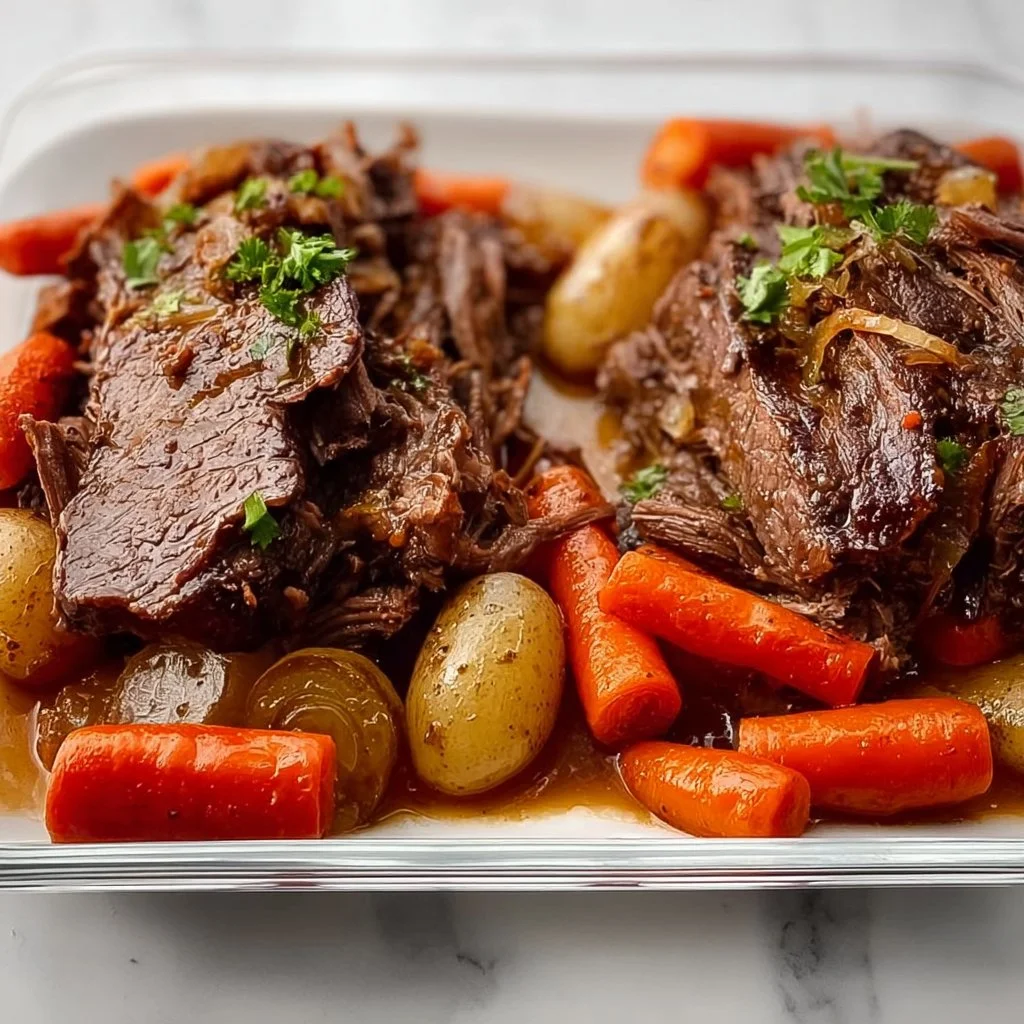
Tender Pot Roast
Tender Pot Roast: A Cozy Hug on a Plate
Hello, my wonderful culinary adventurers! Welcome back to my kitchen, where every recipe tells a story and every meal is an opportunity to create memories. Today, we’re diving into a dish that feels like a warm embrace on a chilly evening: Tender Pot Roast. This isn’t just any pot roast; it’s the kind that makes your home smell divine and makes everyone feel like they’re gathered around the most inviting table.
Picture yourself walking into your kitchen after a long day, and that rich aroma of beef braising with a medley of vegetables hits you like a comforting blanket. There’s something magical about slow-cooked meals, don’t you think? They remind us to slow down, savor every bite, and relish the experience of sharing good food with great company.
The beauty of a pot roast is in its simplicity. With just a few wholesome ingredients and a bit of love, you can transform an ordinary cut of meat into an extraordinary centerpiece that beckons loved ones from all corners of your home. Plus, it’s the perfect dish for those who might feel daunted by more intricate recipes. Trust me; this dish will have you feeling like a master chef in no time!
So, grab your apron, let’s roll up those sleeves, and get cooking! I’ll be sharing not only the tried-and-true recipe but also a little story that makes this dish even more special to me. Don’t worry; we’ll also explore some creative variations, tips, and all the possible FAQs you might have. Let’s make this pot roast legendary!
Personal Story
Whenever I think about pot roast, I whisk back to Sunday dinners at my grandmother’s house. She was the queen of comfort food, and her pot roast was legendary. Every week, she’d take a tough cut of meat and transform it into the most tender, fall-apart goodness you could ever imagine. I can still hear the sizzle of the skillet as she seared the meat, the garlic and herbs flirtatiously mingling in the air.
I remember sitting at her table, surrounded by my cousins, sharing stories while the pot roast simmered away. The anticipation grew as we all secretly hoped she would serve her signature mashed potatoes as a side. After what felt like hours, we could finally dig in, and oh boy, it was worth the wait! Each bite was packed with flavor, and the gravy? Pure magic!
Those meals were more than just food; they were family memories forged over laughter and love. Now, years later, I strive to replicate that very same love in every pot roast I make. Whenever I whip up this recipe, I feel like I’m honoring my grandmother and sharing that cozy, nostalgic spirit with you.
Ingredients
To make this Tender Pot Roast, you’ll need a handful of ingredients that come together beautifully. Here’s what you’ll need:
-
3-4 lbs Chuck Roast
A wonderfully flavorful cut that becomes tender when slow-cooked. If you can’t find chuck, brisket or round roast are great substitutes. -
2 tablespoons Olive Oil
For searing the meat to create that beautiful crust. If you’re looking for a different flavor, try using avocado oil. -
1 large Onion, diced
A staple in savory dishes, it adds sweetness and depth. You could swap this out for shallots if you want a more delicate flavor. -
4 cloves Garlic, minced
A must-have for that aromatic punch! If fresh garlic isn’t available, feel free to use garlic powder in a pinch. -
4 medium Carrots, chopped
They add sweetness and color. Celery can make a fantastic substitute for a different texture. -
4 Yukon Gold Potatoes, quartered
Creamy and buttery, they soak up all the delicious juices. Russets work well, too, but they might become a bit more fluffy than waxy. -
2 cups Beef Broth
This is the liquid gold of your braise. Homemade is best, but store-bought works perfectly. You can also use vegetable broth for a lighter base. -
1 tablespoon Worcestershire Sauce
A little umami magic that enhances the flavor. Liquid aminos are a great alternative for a gluten-free option. -
1 teaspoon Dried Thyme
An aromatic herb that pairs wonderfully with beef. Fresh thyme works well, too; just use three times the amount. -
1 teaspoon Salt
Essential for flavor. You can cut back or opt for sea salt or Himalayan salt for a different flavor profile. -
½ teaspoon Black Pepper
Adds a kick! Feel free to adjust to your personal taste preference. -
1 Bay Leaf
For that subtle earthy flavor. Just remember to remove it before serving!
Step-by-Step Instructions
Now, let’s get into the fun part — making that pot roast! Follow these steps, and you’ll be on your way to creating a dish that will have your family raving.
Step 1: Sear the Meat
Time to get that skillet hot!
Start by heating up your olive oil in a large, heavy-bottomed pot or Dutch oven over medium-high heat. Pat your chuck roast dry with paper towels (this helps it sear nicely). When the oil shimmers, add the roast and let it brown for about 4-5 minutes on each side. Chef Tip: Resist the urge to move the roast around too much; let it caramelize beautifully. This step is crucial for flavor!
Step 2: Sauté the Aromatics
Once your roast is beautifully browned, remove it from the pot and set it aside. In that same pot, add your diced onion and sauté for about 3-4 minutes until it’s translucent. Toss in the minced garlic and sauté for another minute, just until you smell that amazing aroma wafting through your kitchen. Little Hack: Scrape up any browned bits on the bottom of the pan; that’s flavor heaven!
Step 3: Add the Veggies
Next, drop in those chopped carrots and quartered potatoes, giving them a little stir to coat in the onion and garlic goodness. Sauté for about 3-4 minutes, allowing them to become just a tad tender.
Step 4: Put It All Together
Now, it’s time to invite that roast back to the party! Return it to the pot and add your beef broth, Worcestershire sauce, thyme, salt, pepper, and bay leaf. Bring everything to a gentle simmer. Pro Tip: If you want an even richer flavor, consider adding a splash of red wine!
Step 5: Slow Cook
Cover your pot with a tight-fitting lid and transfer it to a preheated oven at 300°F (150°C). Let it cook for 3-4 hours, or until the meat is super tender and shreds easily with a fork. This is the patience-testing part, but trust me, it’s worth every minute!
Step 6: Check for Doneness
After a good chunk of time has passed, peek inside! The meat should be tender, and the vegetables should have soaked up all those tasty flavors. If you have a meat thermometer, the perfect internal temperature for a pot roast is around 195-205°F (90-96°C) for that melt-in-your-mouth goodness.
Step 7: Serve and Enjoy!
Once it’s all beautifully cooked, carefully remove the pot from the oven. Let the roast rest for about 15-20 minutes before slicing or shredding. This helps the juices redistribute, ensuring a luscious bite every time. Serving Tip: Spoon some of that divine gravy over your meat and veggies for the ultimate flavor explosion.
Serving Suggestions
Nothing beats a plate filled with tender slices of roasty goodness! For a cozy presentation, serve your pot roast with the carrots and potatoes piled high. Drizzle that luscious gravy over the top and sprinkle with fresh herbs for a pop of color. If you want to make it extra special, accompany it with homemade bread to soak up all that savory goodness. Trust me, your family will be fighting for the last bite!
Recipe Variations
- Herbaceous Upgrade: Swap out the dried thyme for fresh rosemary or oregano for a different herby twist.
- Spicy Kick: Add a touch of crushed red pepper flakes or a douse of hot sauce to make things spicy!
- Mushroom Lover: Toss in some diced mushrooms during the sauté step for added umami.
- Cranberry Delight: Add a handful of fresh cranberries to the pot during cooking for a sweet-tart flavor pop.
- Vegetarian Version: Use a hearty plant-based protein like jackfruit or seitan, and swap the beef broth for vegetable broths.
Chef’s Notes
As each pot roast tells a story, mine has evolved over the years. I remember when I first started making it; I’d simply follow my grandmother’s recipe. But with time, I’ve experimented with different seasonings and methods. A favorite memory includes the first time I tried adding red wine to the broth, elevating the flavor to another level!
Another fun kitchen story — I once forgot to add the bay leaf before putting it in the oven. I panicked but decided to let it ride. At the end of the day, it was still a hit! It’s true what they say: cooking is all about finding what resonates with you.
FAQs and Troubleshooting
1. Why is my pot roast tough?
Make sure you’re allowing enough cooking time! Tough cuts of meat need that low and slow treatment to break down the collagen and become tender.
2. Can I make pot roast in a slow cooker?
Absolutely! Sear the meat first in a skillet, then transfer everything to your slow cooker. Cook on low for 8 hours or on high for about 4 hours.
3. How do I store leftovers?
Allow any leftovers to cool completely, then store in an airtight container in the fridge for up to 4 days. It tastes even better the next day!
4. What if I don’t have beef broth?
If you find yourself out of beef broth, vegetable broth or even water with a touch of soy sauce can work as a substitute for moisture and flavor.
Nutritional Info
Serving Size: Approximately 1/4 of pot roast
Calories: 400
Total Fat: 20g
Saturated Fat: 7g
Cholesterol: 90mg
Sodium: 600mg
Total Carbohydrates: 30g
Dietary Fiber: 4g
Sugars: 4g
Protein: 30g
Note: Nutritional info may vary based on ingredient brands and quantities used.
And there you have it — a perfect Tender Pot Roast recipe that will warm not only your belly but also your heart. I hope you enjoy making this dish as much as I do. Remember, it’s all about the journey, and every meal is a chance to create lasting memories with those you love. Happy cooking! 🍽️
Print
Tender Pot Roast
- Total Time: 255 minutes
- Yield: 4 servings 1x
- Diet: None
Description
A cozy, tender pot roast recipe that will warm your heart and home, perfect for family gatherings.
Ingredients
- 3–4 lbs Chuck Roast
- 2 tablespoons Olive Oil
- 1 large Onion, diced
- 4 cloves Garlic, minced
- 4 medium Carrots, chopped
- 4 Yukon Gold Potatoes, quartered
- 2 cups Beef Broth
- 1 tablespoon Worcestershire Sauce
- 1 teaspoon Dried Thyme
- 1 teaspoon Salt
- ½ teaspoon Black Pepper
- 1 Bay Leaf
Instructions
- Sear the Meat: Heat olive oil in a large pot over medium-high heat. Pat the chuck roast dry and brown it for about 4-5 minutes on each side.
- Sauté the Aromatics: Remove the roast, add onion and sauté for 3-4 minutes, then add garlic and sauté for another minute.
- Add the Veggies: Stir in carrots and potatoes, sautéing for 3-4 minutes.
- Put It All Together: Return the roast, add the beef broth, Worcestershire sauce, thyme, salt, pepper, and bay leaf. Bring to a simmer.
- Slow Cook: Cover and transfer to a preheated oven at 300°F (150°C). Cook for 3-4 hours until the meat is tender.
- Check for Doneness: Ensure the meat is tender and vegetables have absorbed flavors; aim for an internal temperature of 195-205°F (90-96°C).
- Serve and Enjoy: Allow the roast to rest for 15-20 minutes before slicing. Serve with gravy.
Notes
For enhanced flavor, consider adding a splash of red wine. Remove the bay leaf before serving.
- Prep Time: 15 minutes
- Cook Time: 240 minutes
- Category: Main Course
- Method: Braising
- Cuisine: American
Nutrition
- Serving Size: 1 serving
- Calories: 400
- Sugar: 4g
- Sodium: 600mg
- Fat: 20g
- Saturated Fat: 7g
- Unsaturated Fat: 0g
- Trans Fat: 0g
- Carbohydrates: 30g
- Fiber: 4g
- Protein: 30g
- Cholesterol: 90mg
Keywords: pot roast, slow cooked beef, comfort food, family dinner, hearty meals

Mac & Beef
# Cozy Mac & Beef: A Perfect Marriage of Comfort Food

## Introduction

Hey there, kitchen enthusiasts! Welcome back to my little corner of the internet where the aroma of delicious food fills the air and every recipe is crafted with love. Today, I am thrilled to share a dish that has always held a special place in my heart: Mac & Beef. If you're like me, when you hear the word "comfort food," your mind might drift to that creamy, cheesy goodness we all adore. But, oh, let me tell you — when you add some savory beef into the mix, you’ve got a meal that goes beyond just comfort; it turns dinner into a warm hug for your soul!

Picture this. You’re rushing home from work, the stress of the day clinging to your shoulders like an unwanted jacket. You walk into your kitchen, and what do you find yourself craving? That’s right — mac and cheese. But let's kick it up a notch (or maybe four!). Combine that gooey goodness with seasoned ground beef, and suddenly you’re not just feeding your hunger; you’re igniting a spark of joy. This dish is not only easy to whip up, but it’s also perfect for family dinners, cozy nights in, or even a potluck where you want to impress without the fuss.

In today’s post, we’ll dive into the *how-tos* of creating this delightful Mac & Beef. I promise you, we’ll keep it light and fun! You don’t need to be a culinary wizard to make something extraordinary. We’ll have a sweet cooking journey filled with tips, anecdotes, and possibly a few laughs along the way. So grab your apron, put on some fun music, and let’s get cooking!

## Personal Story

Ah, Mac & Beef. For me, it’s not just a dish; it’s a flood of memories. I still remember the first time my mom made it for my family. I was about ten years old, and after a long day of school — like every classic movie scene...well, maybe a bit more chaotic. We rushed home, backpacks flying, and our noses filled with the scent of melting cheese and seasoned meat wafting through our cozy little kitchen.

I could hardly contain my excitement! Sitting around the dining table, we eagerly dug into our bowls, and with every spoonful, I felt warmth spreading through me. It wasn’t just the food — it was the laughter, the conversations, and the stories that danced around with us. My mom would share how she learned the recipe from Grandma, who made it for her growing up. I felt like part of a delicious legacy, propelling me into my future adventures in the kitchen.

As the years went by, I tried to recreate that magical meal. Each attempt brought more joy and a sprinkle of nostalgia. Now, I carry that recipe close to my heart, ready to share it with you! Let’s make it together and create some of your own beautiful memories!

## Ingredients

To whip up this delightful dish, here’s what you’ll need:

- **Macaroni Pasta (8 ounces)**
  - This is the classic choice! Feel free to swap it with any pasta shape you love, such as shells, bowties, or even gluten-free options.

- **Ground Beef (1 pound)**
  - Lean ground beef works best! If you're looking for alternatives, ground turkey or even plant-based crumbles could be great substitutes for a lighter option.

- **Cheddar Cheese (2 cups, shredded)**
  - A staple in mac and cheese! Look for sharp cheddar for a bold flavor, or mix in mozzarella for extra creaminess.

- **Milk (1 cup)**
  - Whole milk is preferred for richness, but you can also use almond milk or oat milk if you're dairy-free.

- **Butter (2 tablespoons)**
  - Unsalted butter gives you complete control over seasoning. Margarine can easily replace it if you’re looking for a dairy-free option.

- **All-Purpose Flour (2 tablespoons)**
  - This helps create a roux for your cheese sauce. If you need a gluten-free version, almond flour works in a pinch!

- **Garlic Powder (1 teaspoon)**
  - Adds flavor magic! Fresh minced garlic also works beautifully — about 1-2 cloves should do!

- **Onion Powder (1 teaspoon)**
  - A delightful savory touch! You can use finely chopped onions for more texture.

- **Salt & Pepper (to taste)**
  - Always taste as you go! You can also add some smoked paprika or cayenne pepper for a spicy kick.

- **Breadcrumbs (optional, for topping)**
  - Adds a crunchy layer! You can use panko for extra crispiness or crushed crackers.

With these ingredients, you’re well on your way to creating a dish that feels like home in every bite!

## Step-by-Step Instructions

Alright, let’s get down to the good stuff — cooking! Here’s a step-by-step guide to making the fabulous Mac & Beef.

1. **Boil the Pasta:**
   - Start by bringing a pot of salted water to a boil. Once boiling, add your macaroni and cook according to package instructions until al dente. This usually takes about 7-8 minutes. Remember, we want it slightly undercooked since it will continue to cook in the oven later! Drain and set aside.

2. **Cook the Beef:**
   - In a large skillet over medium heat, add your ground beef. Let it sizzle until browned, about 5-7 minutes. Make sure to break it up with a wooden spoon. This step is where you'll infuse a ton of flavors! Season with a little salt and pepper while it’s cooking for extra depth.

3. **Make the Cheese Sauce:**
   - In a separate saucepan, melt the butter over medium heat. Sprinkle in the flour, and whisk it together to form a roux. Cook this for about 1-2 minutes until it’s golden brown and starts to smell nutty. Gradually add the milk, whisking continuously to avoid lumps. Let it simmer until thickened — about 3-5 minutes.

4. **Add the Cheese:**
   - Once your milk mixture is thick, lower the heat and stir in the shredded cheddar until it’s melty and lovely. (Feel free to sneak a taste or two; I won’t tell!) If it’s too thick, just add a splash more milk!

5. **Combine Everything:**
   - Now, toss in your perfectly cooked macaroni and ground beef into the cheese sauce. Give it a good mix until everything is coated in cheesy goodness!

6. **Transfer and Top:**
   - If you’re using a baking dish, transfer the mixture now. For an extra layer of crunch, sprinkle breadcrumbs on top. It adds such a delightful texture contrast!

7. **Bake:**
   - Preheat your oven to 350°F (175°C) and bake your dish for about 20-25 minutes until bubbly and golden on top. Trust me; this is the moment you’ll want to peek through the oven door!

8. **Serve and Enjoy!**
   - Once out of the oven, let it sit for about 5 minutes — this allows the flavors to settle. Serve warm and watch the smiles light up around the table!

## Serving Suggestions

Now that you’ve got your dish made, how can you serve it up like a pro? I love to scoop generous portions into warm, rustic bowls. Grate a bit of fresh cheese on top for that melty finish. You can also sprinkle some chopped parsley or green onion for a pop of color and freshness — it dazzles! For a complete meal, serve alongside a simple salad or some roasted veggies.

## Recipe Variations

Feeling adventurous? Here are some fun variations to give your Mac & Beef a unique twist:

1. **Spicy Southwest Mac & Beef:**
   - Add diced jalapeños and a sprinkle of taco seasoning to give it that zesty kick!

2. **Creamy Mushroom Blend:**
   - Sauté some garlic and mushrooms in the beef mixture for an umami punch.

3. **Veggie-Packed Delight:**
   - Toss in some steamed broccoli or peas to amp up the nutritional value and color!

4. **BBQ Twist:**
   - Mix a few tablespoons of your favorite barbecue sauce into the beef for a smoky flavor.

5. **Plant-Based Version:**
   - Use lentils or quinoa in place of beef for a filling and nutritious alternative.

## Chef’s Notes

Over the years, I’ve tinkered with this recipe to fit my mood, the seasons, and what I have on hand. Sometimes a swap of cheese can change the game entirely, using Gruyère for a luxurious touch or some feta for an unexpected zing. And let’s not forget about the endless possibilities of toppings! A drizzle of sriracha or a sprinkle of chili flakes can add an extra dimension of flavor. Life is all about experimentation in the kitchen, and those little moments of inspiration have led to countless cherished gatherings with friends and family.

## FAQs and Troubleshooting

**Q: Can I make this dish ahead of time?**
- Absolutely! You can prepare everything up to the baking step. Just cover and refrigerate. When you're ready to bake, allow it to come to room temperature and then pop it in the oven!

**Q: How do I avoid overcooked pasta?**
- Always refer to the package instructions! Remember, the pasta will cook a little more in the oven, so make sure it’s al dente when you drain it.

**Q: What if my cheese sauce is too thick?**
- No worries! Just add a splash more milk, stir it in, and it will loosen up beautifully.

**Q: How do I know when my dish is done baking?**
- Look for bubbly edges, a golden top, and that irresistible aroma filling your kitchen.

## Nutritional Info (Optional)

While comfort food isn’t always meant to be a low-calorie option, this Mac & Beef is packed with protein and carbohydrates to fuel your day. One serving (approx. 1 cup) typically contains:

- Calories: 550
- Protein: 30g
- Carbohydrates: 50g
- Fat: 25g

***Remember, these values can vary greatly depending on ingredient choices, so feel free to adjust according to your dietary needs.***

So, there you have it! My cozy Mac & Beef recipe that brings together nostalgia, flavor, and a whole lot of love. I can’t wait for you to try it out and create your own delicious memories. Happy cooking, and don’t forget to share the love around your dinner table!

Cozy Mac & Beef
- Total Time: 45 minutes
- Yield: 4 servings 1x
- Diet: Omnivore
Description
A hearty and comforting dish combining creamy macaroni and seasoned ground beef, perfect for family dinners or potlucks.
Ingredients
- 8 ounces Macaroni Pasta
- 1 pound Ground Beef
- 2 cups Cheddar Cheese, shredded
- 1 cup Milk
- 2 tablespoons Butter
- 2 tablespoons All-Purpose Flour
- 1 teaspoon Garlic Powder
- 1 teaspoon Onion Powder
- Salt & Pepper, to taste
- Breadcrumbs (optional, for topping)
Instructions
- Boil the Pasta: Start by bringing a pot of salted water to a boil. Once boiling, add your macaroni and cook according to package instructions until al dente, about 7-8 minutes. Drain and set aside.
- Cook the Beef: In a large skillet over medium heat, add your ground beef. Let it sizzle until browned, about 5-7 minutes. Season with salt and pepper.
- Make the Cheese Sauce: In a separate saucepan, melt the butter over medium heat. Sprinkle in the flour, whisk to form a roux, and cook for about 1-2 minutes. Gradually whisk in the milk, and let simmer until thick, about 3-5 minutes.
- Add the Cheese: Stir in the shredded cheddar until melted. If too thick, add more milk.
- Combine Everything: Toss in the cooked macaroni and ground beef into the cheese sauce. Mix well.
- Transfer and Top: Transfer the mixture to a baking dish and sprinkle breadcrumbs on top if using.
- Bake: Preheat the oven to 350°F (175°C) and bake for about 20-25 minutes until bubbly and golden.
- Serve and Enjoy!: Let sit for 5 minutes, then serve warm.
Notes
Feel free to customize with your favorite toppings or mix-ins for a unique twist!
- Prep Time: 15 minutes
- Cook Time: 30 minutes
- Category: Main Course
- Method: Baking
- Cuisine: American
Nutrition
- Serving Size: 1 cup
- Calories: 550
- Sugar: 5g
- Sodium: 700mg
- Fat: 25g
- Saturated Fat: 10g
- Unsaturated Fat: 10g
- Trans Fat: 0g
- Carbohydrates: 50g
- Fiber: 2g
- Protein: 30g
- Cholesterol: 80mg
Keywords: comfort food, mac and cheese, beef casserole, family dinner, easy recipe

Pesto Grilled Cheese
The Joy of Pesto Grilled Cheese: A Cozy Kitchen Adventure
Welcome to my kitchen, friends! Today, we’re diving headfirst into a recipe that feels like a warm hug on a rainy day: the Pesto Grilled Cheese. If you’re anything like me, the mere thought of grilled cheese brings back an avalanche of comforting childhood memories—cheesy goodness melting between buttery, golden slices of toasted bread. Now, let’s kick it up a notch with a luscious layer of homemade or store-bought pesto!
So, what’s the big deal about pesto, you might ask? Well, it’s a fabulous mixture of fresh basil, garlic, nuts, olive oil, and cheese, packing a punch of flavor in every bite. When you slather it onto your favorite bread along with that gooey cheese, the result is nothing short of magic. Think about it: the crispy, crunchy exterior giving way to that stretchy, gooey melted cheese, infused with the herbal goodness of pesto. Absolutely heavenly, right?
Grilled cheese is the ultimate comfort food, but my goal is to show you that it can also be an avenue for creativity. You don’t need to be a culinary wizard to impress your loved ones (or yourself!) with this dish. Between the nostalgia of a classic grilled cheese and the freshness of a vibrant pesto, this recipe is all about embracing flavors while keeping it simple and delightful. Whether you’re making a quick lunch for yourself or hosting a cozy gathering with friends, this Pesto Grilled Cheese is sure to become a staple in your culinary repertoire.
Let’s pull up those aprons and get cooking. You’ll soon find out how easy it is to create a masterpiece in your own kitchen!
Personal Story
Growing up, I spent countless afternoons after school in the kitchen with my grandmother. She had this magical touch that transformed everyday ingredients into something extraordinary. One of my favorite memories is when she made her famous grilled cheese sandwiches. But what set hers apart was the secret ingredient: a dollop of her homemade pesto.
I remember standing on a stool, trying to peek over the counter as she mixed the vibrant green paste in the food processor. The smell of fresh basil and garlic wafting through the air was irresistible. She would spread her pesto on the bread before layering in the cheese, telling me stories about how each ingredient held a special place in her heart. As we waited for the cheese to melt, we chatted and sometimes even danced a little to the music playing in the background.
Those grilled cheese sandwiches weren’t just lunch; they were a representation of love served on a plate. Now, as an adult, I find myself recreating those moments in my own kitchen. My version, the Pesto Grilled Cheese, is deeply inspired by those afternoons spent with Grandma. Each bite recalls laughter, warmth, and the smell of baking bread—a gentle reminder that food has the power to bring us together.
Ingredients
Here’s what you’ll need to whip up your Pesto Grilled Cheese:
-
Sourdough Bread (or your favorite bread)
Sourdough provides a wonderful tang and crispness, but feel free to use whole grain, rye, or even gluten-free options. -
Mozzarella Cheese (fresh or shredded)
Melty mozzarella adds a lovely stretchy texture. You can swap for cheddar, gouda, or provolone for different flavors. -
Pesto (store-bought or homemade)
The star of the show! You can buy it in a jar, but if you have fresh basil, try making your own. It’s easier than you think and can be customized with nuts, cheese, or even sun-dried tomatoes. -
Butter (for grilling)
Always use real butter for that rich, golden crunch. Want to make it dairy-free? Use vegan butter or olive oil! -
Garlic Powder (optional)
*Sprinkling a bit of garlic powder on the buttered side elevates the flavor.
Here’s a quick pro tip: You can also mix the pesto with a sprinkle of red pepper flakes for a little kick if you’re feeling adventurous!
Step-by-Step Instructions
Step 1: Prepare Your Ingredients
Before diving in, let’s gather everything. Grab your bread, cheese, pesto, and butter. If you’re making homemade pesto, whip that up first using a food processor: combine fresh basil, garlic, nuts (like pine nuts or walnuts), Parmesan cheese, and olive oil. Blend until you get your desired consistency.
Step 2: Butter Your Bread
Every perfect grilled cheese starts with butter. Generously spread butter on the outside of each slice of bread. Don’t skimp here! This will give us that delightful golden crust. If you want, add a sprinkle of garlic powder to the butter—that’s my secret touch!
Step 3: Assemble the Sandwich
On the unbuttered side of one slice, slather a hearty layer of pesto. Then, add a mound of mozzarella cheese on top. Don’t go too thin on the cheese; we want this sandwich to be decadent! If you’re using another cheese type, layer it on nicely and consider adding more for extra flavor. Place the second slice of bread on top, buttered side facing out.
Step 4: Heat Up That Pan
Preheat a non-stick skillet or griddle over medium heat. Now, gently place your assembled sandwich in the pan. Resist the urge to flip it immediately—let that butter do its magic.
Step 5: Grill to Perfection
Cook for about 3-4 minutes on one side until it’s golden brown and crispy. As the cheese begins to melt, press down gently with a spatula to ensure even cooking and melting. After the time is up, carefully flip the sandwich and cook the other side for another 3-4 minutes.
Don’t forget: if you’re using fresh mozzarella, it can release moisture. If that happens, just turn the heat down a tad and cook a bit longer—it’ll get there!
Step 6: Serve and Enjoy!
Once both sides are golden and melty, remove your Pesto Grilled Cheese from the pan. Let it rest for a minute before cutting it in half—this part is essential to keep all that cheesy goodness from oozing out. Serve it warm, possibly alongside a nice tomato soup or a simple salad for that perfect cozy meal!
Serving Suggestions
For plating, cut the sandwich in half diagonally and serve it open-faced, with the gooey cheese peeking out, or stack the halves neatly on a rustic wooden board. Offer a small bowl of extra pesto for dipping and perhaps a sprinkle of freshly grated Parmesan on top to finish it off. Voilà! Your Pesto Grilled Cheese is ready to wow!
Recipe Variations
-
Caprese Grilled Cheese: Layer in sliced tomatoes and fresh basil along with mozzarella for a refreshing twist, perfect for summer.
-
Spicy Pesto Grilled Cheese: Add a bit of crushed red pepper or sliced jalapeños to the pesto for a spicy kick.
-
Mediterranean Delight: Swap the mozzarella for feta cheese and mix in chopped olives and sun-dried tomatoes for a Mediterranean spin.
-
Savory Mushrooms: Sauté mushrooms with garlic and thyme before adding them to your sandwich for an earthy flavor.
-
Nut-Free Version: Replace pine nuts in your pesto with sunflower seeds or simply leave them out, keeping the other ingredients intact.
Chef’s Notes
As I look back on my culinary journey, this Pesto Grilled Cheese has become a hallmark of cozy gatherings and late-night munchies. What started as a simple childhood favorite evolved into something I look forward to improvising each time. Whether I’m trying a new cheese or experimenting with different types of homemade pesto, there’s an element of joy and curiosity every time I prepare it. And let’s be honest, it’s hard to resist that craving for something warm, cheesy, and delicious!
Many of my friends have told me that this grilled cheese rekindled their love for cooking. It’s a reminder that sometimes, less is more. And remember: every kitchen mishap can lead to a spectacular kitchen story.
FAQs and Troubleshooting
Q: Why isn’t my cheese melting?
A: If you’re using fresh mozzarella, it can be a bit wetter than shredded cheese. Make sure you’re cooking over medium heat, and don’t be afraid to turn down the heat to give it more time to melt!
Q: Can I make this sandwich in the oven?
A: Absolutely! Preheat your oven to 375°F (190°C), assemble the sandwich, and place it on a baking sheet. Bake for about 15 minutes, flipping halfway through, until the cheese is melted and the bread is golden.
Q: What if I don’t have pesto?
A: No worries! Try substituting with hummus, balsamic glaze, or a thick tapenade. It won’t be the same, but it can still result in a delightful sandwich.
Q: How do I store leftovers?
A: If you have any leftover sandwiches (which is rare), store them in an airtight container in the fridge for up to 2 days. To reheat, pop them in a pan or toaster oven for best results!
Nutritional Info
(This is optional, but informative! Feel free to skip or include)
- Calories: Approximately 400 calories per sandwich
- Protein: 18g
- Fat: 24g
- Carbohydrates: 30g
And there you have it—your complete guide to crafting the ultimate Pesto Grilled Cheese! I hope you find joy in making this dish as much as I do. Remember, cooking should be fun and full of laughter, so gather your loved ones and enjoy every bite! Happy cooking! 🥪💚
Print
Pesto Grilled Cheese
- Total Time: 18 minutes
- Yield: 2 servings
- Diet: Vegetarian
Description
A delightful twist on the classic grilled cheese, infused with the vibrant flavors of pesto and melty mozzarella.
Ingredients
- Sourdough Bread (or your favorite bread)
- Mozzarella Cheese (fresh or shredded)
- Pesto (store-bought or homemade)
- Butter (for grilling)
- Garlic Powder (optional)
Instructions
- Prepare Your Ingredients: Gather bread, cheese, pesto, and butter. If making homemade pesto, blend fresh basil, garlic, nuts, Parmesan cheese, and olive oil in a food processor.
- Butter Your Bread: Spread butter on the outside of each slice of bread. Optionally, add garlic powder to the butter.
- Assemble the Sandwich: On the unbuttered side of one slice, spread pesto, then add a mound of mozzarella cheese. Top with the second slice of bread, buttered side out.
- Heat Up That Pan: Preheat a non-stick skillet over medium heat and place the assembled sandwich in the pan.
- Grill to Perfection: Cook for 3-4 minutes on one side until golden brown, then flip and cook for another 3-4 minutes until both sides are crispy and cheese is melted.
- Serve and Enjoy: Let the sandwich rest for a minute before cutting in half. Enjoy with tomato soup or a salad.
Notes
For extra kick, mix the pesto with red pepper flakes. Use different cheeses or add tomatoes for variations.
- Prep Time: 10 minutes
- Cook Time: 8 minutes
- Category: Main Course
- Method: Grilling
- Cuisine: American
Nutrition
- Serving Size: 1 sandwich
- Calories: 400
- Sugar: 2g
- Sodium: 600mg
- Fat: 24g
- Saturated Fat: 12g
- Unsaturated Fat: 8g
- Trans Fat: 0g
- Carbohydrates: 30g
- Fiber: 2g
- Protein: 18g
- Cholesterol: 50mg
Keywords: grilled cheese, pesto, comfort food, vegetarian, quick meal
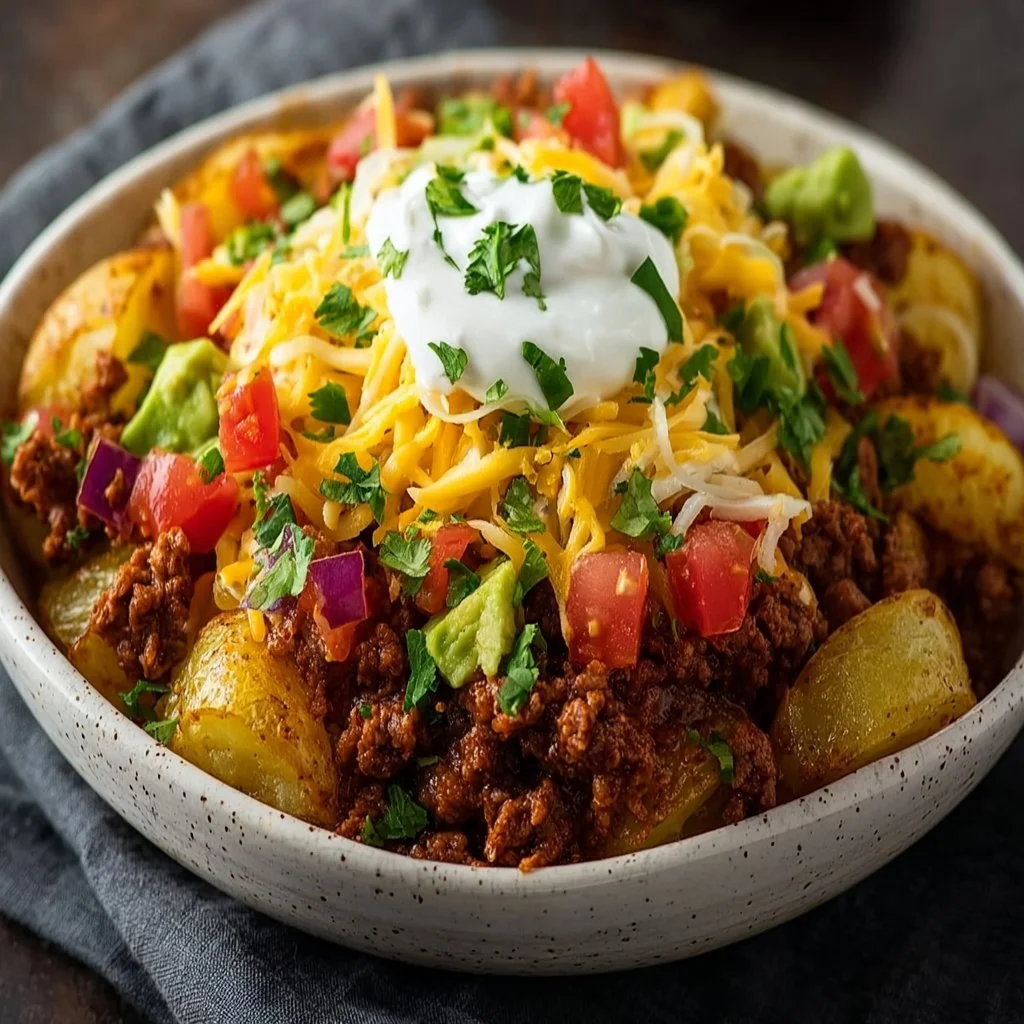
Loaded Potato Taco Bowl
Loaded Potato Taco Bowl: A Cozy Culinary Adventure
Welcome to my kitchen, my foodie friends! Today, we’re diving into a dish that is equal parts comforting and fun: the Loaded Potato Taco Bowl. Picture this: crispy roasted potatoes topped with all your favorite taco fixings, lovingly layered in a bowl that feels like a warm hug! Seriously, who doesn’t love tacos and potatoes? They’re the ultimate comfort food duo, and together they practically sing a cozy tune of flavor.
Now, why do I adore this Loaded Potato Taco Bowl? Well, it goes beyond just deliciousness. It brings people together! Whether it’s a cozy weeknight dinner for two or a vibrant gathering with friends, this dish is all about connection and celebration of flavors. So grab your apron, and let’s whip up something extraordinary that will not only satisfy your taste buds but also spread joy around your table!
My Culinary Journey with Loaded Potato Taco Bowls
Ahh, memories of my younger self in the kitchen always bring a smile to my face! Growing up, taco night was a sacred ritual in my household. The aroma of seasoned meat sizzling on the stove, the vibrant colors of freshly chopped veggies, and the unmistakable sound of laughter and chatter created a warm atmosphere that felt like home. I have a special memory of my dad, a skilled home cook himself, teaching me to make his legendary loaded burritos.
One evening, I had a sudden craving for tacos, but we were out of tortillas! Instead of a boring dinner, we rummaged through our pantry and transformed simple roasted potatoes into the base for our “taco bowl.” Oh, friends, it was a game-changer! The crunchiness of the potatoes combined with the traditional taco flavors was a delightful surprise that I still cherish today. Fast forward to now, and I can’t help but recreate that nostalgic magic—not just in my own kitchen but in yours too!
Ingredients
Let’s chat about the ingredients! Below is what you’ll need to create your Loaded Potato Taco Bowl, complete with some handy tips and suggestions.
-
Potatoes (Yukon Gold or Russet): The star ingredient! Yukon Golds are creamy and buttery, while Russets are fluffy. Choose whichever you prefer or have on hand; both work beautifully for roasting. You could even try sweet potatoes for a slightly healthier twist.
-
Olive Oil: A must for that perfect roasting! It helps achieve a crispy exterior. You can substitute with avocado oil or melted coconut oil to infuse a different flavor.
-
Taco Seasoning: You can buy pre-made mixes or whip up your own with chili powder, cumin, garlic powder, onion powder, and salt. This blend is where the magic begins!
-
Ground Beef or Turkey: A classic choice! If you’re looking for a lighter version, try chicken or even a plant-based alternative like black beans or lentils for a vegetarian option.
-
Black Beans: Packed with protein and fiber! You can swap them for kidney beans or chickpeas if you wish.
-
Corn (frozen or fresh): Adds a nice sweetness! Feel free to skip it or replace it with diced bell peppers for that extra crunch.
-
Shredded Cheese (Cheddar or Mexican Blend): Who can resist melted cheese? Want a healthier option? Opt for a sprinkle of nutritional yeast instead!
-
Sour Cream or Greek Yogurt: A dollop of creamy deliciousness on top! If you prefer dairy-free, try cashew cream or avocado for a creamy texture.
-
Fresh Cilantro: A pop of freshness! If cilantro isn’t your jam, try fresh parsley or even green onions for added flavor.
-
Sliced Jalapeños: For those who love a kick! You can choose pickled jalapeños for a tangy twist or leave them out altogether if spice isn’t your thing.
Step-by-Step Instructions
Alright, my friends, let’s get this cooking show on the road! Here’s how you’ll turn these fresh ingredients into a loaded potato fiesta!
Step 1: Preheat the Oven
Preheat your oven to 425°F (220°C). Let’s get that heat going so our potatoes can crisp up beautifully!
Step 2: Prep the Potatoes
- While the oven warms up, wash and dice your potatoes into bite-sized chunks (about 1 inch). You want them to roast evenly and get nicely crispy.
Pro Tip:
Leave the skin on for added texture and nutrients.
Step 3: Season the Potatoes
- In a large mixing bowl, toss the diced potatoes with olive oil, taco seasoning, and a pinch of salt. Make sure every piece is coated for maximum flavor!
Chef’s Insight:
Feel free to add other spices you love. Smoked paprika is a delicious addition!
Step 4: Roast the Potatoes
- Spread the seasoned potatoes in a single layer on a baking sheet lined with parchment paper. Bake for 25-30 minutes, flipping halfway through, until golden and crispy. You want them to have that irresistible crunch!
Tip:
Keep an eye on them towards the end. Ovens vary, and you don’t want any burnt morsels!
Step 5: Cook Your Protein
- While the potatoes are roasting, it’s time to cook your protein! In a skillet over medium heat, add a splash of olive oil and brown your ground meat. Stir in a bit of taco seasoning to enhance the flavor, cooking until it’s fully cooked.
Quick Hack:
If you’re using canned black beans, remember to rinse them first to remove excess sodium!
Step 6: Warm the Corn and Beans
- If you’re using canned corn and beans, just toss them into the skillet until warmed through. If you’re using fresh corn, you may want to sauté it for a few minutes for that perfectly sweet taste!
Step 7: Assemble the Bowls
- Now comes the fun part! Grab your favorite bowls and start by adding a generous layer of crispy potatoes as your base.
Step 8: Top it Off!
- Like a taco bar, layer on your meat, beans, corn, and a sprinkle of cheese. Add a dollop of sour cream or Greek yogurt and garnish with fresh cilantro and jalapeños.
Serving Suggestions
Serving this dish is as much about presentation as it is about flavor! To plate your Loaded Potato Taco Bowl, layer each component artfully, allowing the colors to shine. Consider a drizzle of homemade salsa or guacamole on top for an extra burst of flavor. Feel free to set up a toppings bar so everyone can customize their bowls just the way they like it!
Recipe Variations
Get creative with your Loaded Potato Taco Bowl! Here are a few tasty twists you can try:
-
Buffalo Chicken Loaded Potato Bowl: Swap the taco seasoning for buffalo sauce, adding shredded chicken and a side of ranch dressing.
-
Veggie-Loaded Bowl: Go vegetarian and pile on roasted veggies like zucchini, bell peppers, and mushrooms instead of meat for a rainbow of flavors.
-
Breakfast Taco Bowl: In place of the regular toppings, use scrambled eggs, avocado, and salsa for a cozy brunch twist!
-
Spicy Shrimp Bowl: Toss shrimp in taco seasoning and sauté them for a spicy seafood twist on this recipe.
-
BBQ Loaded Potato Bowl: Replace taco seasoning with BBQ sauce and top with pulled pork or brisket—perfect for a Southern feast!
Chef’s Notes
This Loaded Potato Taco Bowl is one of those versatile recipes that has evolved since that fateful taco night. I remember trying it out for a casual dinner party, and it was an instant hit! The best part? You can always adjust the toppings based on what’s in your fridge, making it a fantastic "clean out the pantry" dish. Honestly, the laughter and joy it brings around the table are more satisfying than any Michelin star!
FAQs and Troubleshooting
Let’s address some common questions and potential problems you might encounter with this recipe:
-
What if my potatoes aren’t crispy?
If your potatoes are soft and not crispy, it’s likely that they weren’t spread out in a single layer on the baking sheet. Next time, give them enough space to roast efficiently! -
Can I make this vegetarian?
Absolutely! Swap the meat for more beans, lentils, or roasted veggies, and you’ll have a delicious vegetarian option that’s just as satisfying. -
How do I store leftovers?
Store any leftovers in an airtight container in the fridge. Reheat in the oven or toaster oven for the best texture—avoid the microwave if you want those potatoes crispy again! -
What if I don’t have taco seasoning?
No worries! Mix together chili powder, cumin, garlic powder, onion powder, and paprika. It’ll do the trick just fine!
Nutritional Info
While I’m not a nutritionist, the Loaded Potato Taco Bowl is packed with nutrients from the potatoes, beans, and colorful veggies. It’s a balanced meal when you include lean protein, and you can tweak it for your dietary needs—making it a versatile option for everyone!
Now that we’ve come to the end of our cozy culinary adventure, I hope you feel inspired to whip up this Loaded Potato Taco Bowl. It’s not just a meal; it’s a chance to create memories with the people you love. Gather around the table, share your stories, and enjoy this blend of flavors that’s sure to bring a smile. Happy cooking, friends!
Print
Loaded Potato Taco Bowl
- Total Time: 45 minutes
- Yield: 4 servings 1x
- Diet: Optional Vegetarian
Description
A cozy and comforting bowl of crispy roasted potatoes topped with your favorite taco fixings, perfect for any gathering.
Ingredients
- 2 large Potatoes (Yukon Gold or Russet)
- 2 tablespoons Olive Oil
- 2 tablespoons Taco Seasoning
- 1 pound Ground Beef or Turkey (or plant-based alternative)
- 1 can Black Beans
- 1 cup Corn (frozen or fresh)
- 1 cup Shredded Cheese (Cheddar or Mexican Blend)
- 1/2 cup Sour Cream or Greek Yogurt
- 1/4 cup Fresh Cilantro
- 1/4 cup Sliced Jalapeños
Instructions
- Preheat the oven to 425°F (220°C).
- Prep the potatoes by washing and dicing them into bite-sized chunks.
- Season the potatoes with olive oil, taco seasoning, and salt.
- Roast the potatoes on a baking sheet for 25-30 minutes, flipping halfway.
- Cook your protein in a skillet over medium heat with a splash of olive oil.
- Warm the corn and beans in the skillet until heated through.
- Assemble the bowls with a layer of crispy potatoes.
- Top with cooked meat, beans, corn, cheese, sour cream, cilantro, and jalapeños.
Notes
Customize your bowl with additional toppings like homemade salsa or guacamole. Excellent for clean-out-the-pantry meals.
- Prep Time: 15 minutes
- Cook Time: 30 minutes
- Category: Main Course
- Method: Baking
- Cuisine: Mexican
Nutrition
- Serving Size: 1 serving
- Calories: 400
- Sugar: 4g
- Sodium: 300mg
- Fat: 18g
- Saturated Fat: 7g
- Unsaturated Fat: 10g
- Trans Fat: 0g
- Carbohydrates: 45g
- Fiber: 7g
- Protein: 20g
- Cholesterol: 60mg
Keywords: loaded potato, taco bowl, comfort food, easy recipes, weeknight dinner

Healthy Sweet Potato Hash Browns
Healthy Sweet Potato Hash Browns
Welcome back to my cozy kitchen, food lovers! Today, we’re diving into one of the most comforting and satisfying dishes that I can think of: sweet potato hash browns! If you’ve ever found yourself wanting to recreate that crisp, golden perfection you get at your favorite brunch spot, but in a healthier way, you’re in for a real treat. These hash browns are bursting with flavor, easy to whip up, and packed with nutrients. Plus, they’ll make your home smell absolutely divine!
Sweet potatoes are not just great for savory dishes; they are an exceptionally versatile ingredient that can elevate a simple breakfast to a gourmet experience. Here’s why I’m obsessed with them: they’re not only rich in vitamins A and C, but they also have natural sweetness that pairs beautifully with spices and savory toppings. Whether you’re feeding a crowd on a lazy weekend morning, or simply want a quick yet wholesome side for dinner, these hash browns are ready to take center stage!
Now, let me tell you, making sweet potato hash browns is not just about cooking; it’s about creating a delightful experience. You’ll love hearing the sizzle in the pan, and trust me, the crispy edges will have everyone in the house gathering around the kitchen in no time. As we embark on this culinary adventure together, I promise you’ll feel empowered and excited to cook. So grab your apron, and let’s get started on making these healthy sweet potato hash browns!
Personal Story
Ah, sweet potato hash browns hold a special place in my heart. It all started during those cozy Sunday mornings at my grandmother’s house. You see, every weekend, she would treat us to a hearty breakfast spread featuring her famous hash browns. I can still remember the way her kitchen would fill up with laughter and the aroma of sizzling potatoes blending with the scent of freshly brewed coffee.
Those moments were not just about the food; they were about family, warmth, and connection. As a child, I was always captivated by how she transformed simple ingredients into something magical. Once I learned how to make them myself, I made it a point to tweak her classic recipe over the years, swapping out traditional potatoes for sweet potatoes to give it a healthier twist—even adding kale or spinach on occasion for an extra veggie boost! The feel and flavors of those memories are what inspire each batch of these hash browns in my kitchen today.
Growing up, feeding loved ones has always been a way to show care and create lasting memories. Now, every time I prepare these sweet potato hash browns, I’m reminded of my grandmother and those precious mornings. It’s that nostalgia and love that I hope you’ll also feel as you make this dish.
Ingredients
Here’s what you’ll need to whip up your own batch of heavenly sweet potato hash browns:
-
Sweet Potatoes (2 large)
- The star of the show! Sweet potatoes are packed with vitamins, minerals, and fiber. They add a lovely sweetness and a gorgeous color to your dish. Swap for Yukon gold or mashed potatoes if you’re in a pinch, but trust me, the sweet potatoes really shine here!
-
Onion (1 medium)
- Adds a savory depth to the flavor. Use yellow, white, or even red onions for a sweeter taste. If you’re not an onion fan, try a small amount of garlic powder instead.
-
Garlic (2 cloves, minced)
- For that lovely aromatic kick. You can also use garlic powder, but fresh garlic brings an extra pop!
-
Egg (1 large, optional)
- For binding the mixture and adding protein. If you’re looking for a vegan alternative, a flax egg (1 tablespoon flaxseed meal mixed with 2.5 tablespoons water) or even some mashed banana could work to hold everything together!
-
Olive Oil (2-3 tbsp)
- Perfect for frying to create that crispy exterior. You can substitute with avocado oil for a high smoke point or coconut oil for a subtle sweetness.
-
Salt and Pepper (to taste)
- Essential for seasoning! Feel free to add additional spices like paprika, cumin, or cayenne pepper for a kick.
-
Fresh Herbs (like parsley or cilantro, optional)
- These add a fresh note and brighten up the dish. Dried herbs can work too if fresh isn’t available.
Step-by-Step Instructions
Are you ready to get your hands dirty? Let’s create some crispy, golden, and utterly delicious sweet potato hash browns! Follow these simple steps for the best results:
-
Prep the Sweet Potatoes:
- Start by peeling the sweet potatoes and then grating them using a box grater or a food processor. You want them finely grated, almost like you’d prepare for a slaw. Trust me, the finer the grate, the crispier the hash browns will be!
-
Remove Excess Moisture:
- After grating, place the sweet potatoes in a clean kitchen towel or cheesecloth, twist it up, and wring out as much moisture as you can. This is a crucial step! The more moisture you remove, the crispier the hash browns will turn out.
-
Sauté the Onion and Garlic:
- In a large skillet, heat 1 tablespoon of olive oil over medium heat. Add the chopped onion and sauté until translucent (about 5 minutes). Stir in the minced garlic and sauté for another minute, until fragrant—oh, the smells are heavenly!
-
Mix Ingredients:
- After sautéing, transfer the onion and garlic to a mixing bowl. Add the grated sweet potatoes, beaten egg (if using), salt, and pepper. Mix it all together until it’s well combined. This is where you can also add any spices and herbs you wish. Mix, mix, mix!
-
Cook the Hash Browns:
- In the same skillet, add another tablespoon of olive oil and turn the heat up to medium-high. Once the oil is hot, scoop about a quarter cup of the sweet potato mixture into the skillet, flattening it down with a spatula into a patty shape. Repeat this with the remaining mixture, ensuring not to overcrowd the skillet.
-
Let it Sizzle:
- Allow the hash browns to cook undisturbed for about 4-5 minutes on one side until golden brown and crispy. Resist the urge to flip them too soon; the crust needs time to form!
-
Flip and Finish Cooking:
- Gently flip each hash brown using a spatula, adding a little more oil if necessary. Cook for another 4-5 minutes until that beautiful golden color is achieved.
-
Drain on a Paper Towel:
- Once they’re cooked, transfer the hash browns onto a plate lined with paper towels to absorb any excess oil.
-
Repeat:
- Cook the remaining batter, adding more oil to the skillet as needed. This is a great time to touch-up on other breakfast items—maybe scramble some eggs or prepare some avocado!
-
Serve and Enjoy:
- These delicious hash browns are best served immediately! Act fast, as they tend to lose their crispiness over time.
Serving Suggestions
When it comes time to serve, think about adding a pop of color and flavor to your plate! You can serve these sweet potato hash browns with a fresh dollop of sour cream or Greek yogurt on the side, topped with green onions or chopped herbs. For even more color and nutrition, add sliced avocado or a vibrant homemade salsa. If you’re feeling extra indulgent, a drizzle of sriracha or a sprinkle of feta cheese can take these hash browns over the top!
Recipe Variations
Here are some creative twists to keep your sweet potato hash browns exciting:
-
Add Spinach or Kale: Toss in a handful of chopped greens to amp up the nutrition and flavor.
-
Spicy Sweet Potato Hash: Add diced jalapeños or red pepper flakes for a kick!
-
Herb-Infused: Mix in fresh herbs like thyme or rosemary for an aromatic touch.
-
Cheesy Delight: Fold in some shredded cheese like cheddar or feta before cooking for a cheesy hash brown experience!
-
Breakfast Bowls: Use them as a base for a breakfast bowl, topped with an egg any style, sautéed veggies, or your favorite proteins.
Chef’s Notes
As I reflect on this recipe, I love how it has evolved over time in my kitchen. Initially, it started as a simple comfort food option for my family. But as I began experimenting, I found ways to incorporate healthy ingredients and bold flavors, turning it into a wholesome dish. I remember one time hosting a brunch and accidentally running out of sweet potatoes. In a rush, I mixed in some grated zucchini, and folks, it was a game changer! The variation was a hit and drew attention for its unique texture and flavor.
It’s these happy kitchen accidents that keep me excited as a home cook. Remember, cooking is about having fun and making it your own, so don’t be afraid to let your creativity shine through!
FAQs and Troubleshooting
1. Why are my hash browns soggy?
- If they come out soggy, it’s likely due to excess moisture. Be sure to squeeze out as much liquid as possible after grating the sweet potatoes.
2. Can I make these ahead of time?
- Absolutely! You can prep the mixture ahead and store it in the fridge for up to a day. Just remember to cook them before serving!
3. Are they freezer-friendly?
- Yes! You can freeze the uncooked hash brown patties between layers of parchment paper, then store them in a freezer-safe bag. Just cook them from frozen—add a few extra minutes to the cooking time.
4. What should I do if they fall apart while cooking?
- If your hash browns crumble, try adding an extra egg for binding or lightly pressing them with a spatula while cooking to help them hold together.
Nutritional Info
Note: Nutritional values may vary based on specific ingredients and portion sizes.
- Calories: 200
- Protein: 3g
- Fat: 7g
- Carbohydrates: 34g
- Fiber: 4g
- Sugars: 6g
And there you have it, my dear foodies! This recipe for healthy sweet potato hash browns is sure to brighten up your breakfast table—or any meal for that matter! I hope you feel inspired to get cooking and create amazing memories in your kitchen, just as I did in my grandmother’s. Remember, food is love, and every bite tells a story. Happy cooking!
Print
Healthy Sweet Potato Hash Browns
- Total Time: 35 minutes
- Yield: 4 servings 1x
- Diet: Vegetarian
Description
Delicious and nutritious sweet potato hash browns that are crispy on the outside and soft on the inside. Perfect for breakfast or as a side dish.
Ingredients
- 2 large Sweet Potatoes
- 1 medium Onion
- 2 cloves Garlic, minced
- 1 large Egg (optional)
- 2–3 tbsp Olive Oil
- Salt and Pepper, to taste
- Fresh Herbs (optional)
Instructions
- Prep the sweet potatoes by peeling and grating them.
- Remove excess moisture by wringing them in a towel.
- Sauté the onion in olive oil until translucent, then add garlic.
- Mix the sautéed onion and garlic with grated sweet potatoes, egg, salt, and pepper.
- Cook mixture in the skillet, forming patties and frying until golden brown.
- Flip the patties and cook until the other side is crispy.
- Drain on paper towels before serving.
- Serve immediately with your choice of toppings.
Notes
These hash browns are best served fresh. Consider adding toppings like sour cream, salsa, or avocado for extra flavor.
- Prep Time: 15 minutes
- Cook Time: 20 minutes
- Category: Breakfast
- Method: Frying
- Cuisine: American
Nutrition
- Serving Size: 1 serving
- Calories: 200
- Sugar: 6g
- Sodium: 400mg
- Fat: 7g
- Saturated Fat: 1g
- Unsaturated Fat: 5g
- Trans Fat: 0g
- Carbohydrates: 34g
- Fiber: 4g
- Protein: 3g
- Cholesterol: 70mg
Keywords: sweet potato, hash browns, breakfast, vegetarian, healthy recipes


