
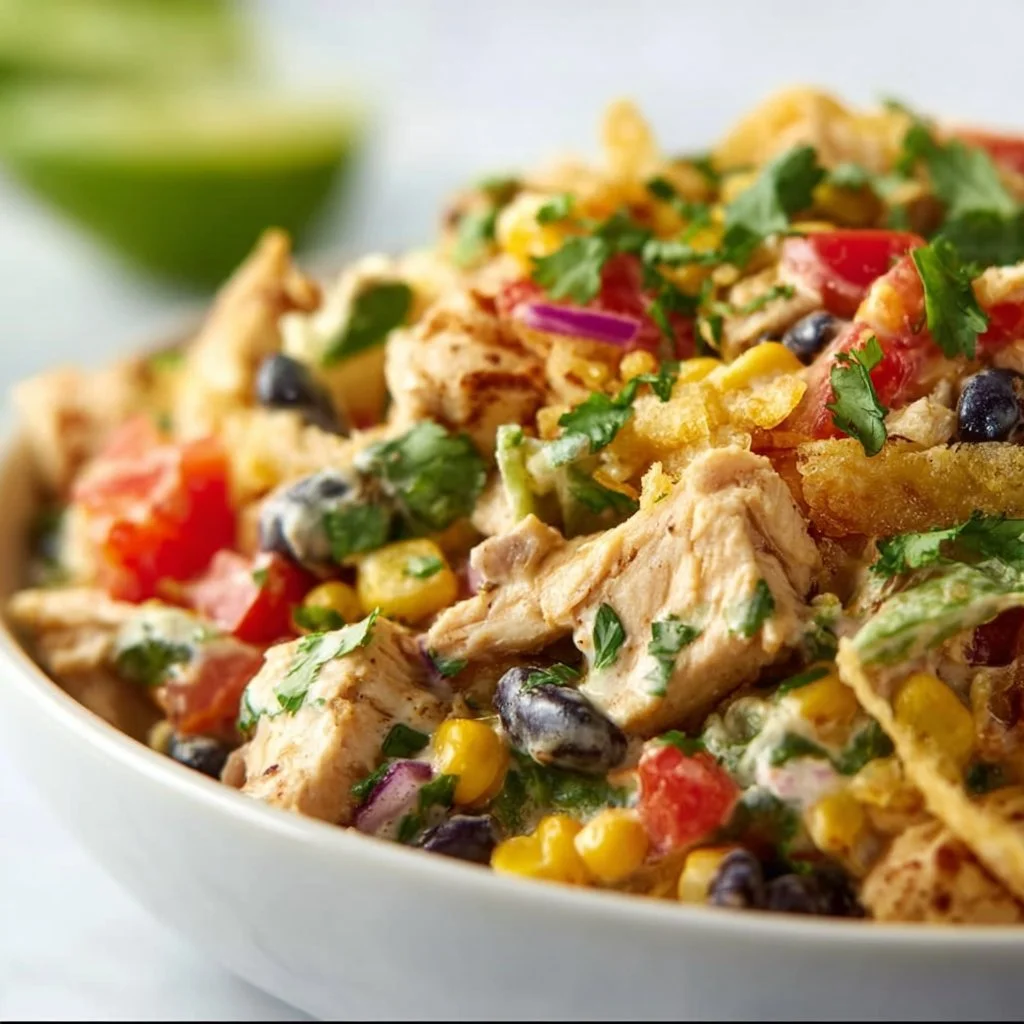
Southwest Chicken Salad
# Southwest Chicken Salad: A Flavorful Fiesta in a Bowl!

## Introduction

Hey there, wonderful foodies! Welcome back to my cozy corner of the culinary world. Today, we’re diving into a vibrant dish that’s not only bursting with color but also loaded with flavor — the Southwest Chicken Salad! This salad is the ultimate culmination of refreshing ingredients and zesty spices, making it perfect for a sunny lunch, a backyard barbecue, or even a light dinner during busy weeknights. It’s a bowl full of joy!

Now, you might be thinking: “What’s so special about a salad?” But this isn’t just any salad, my friends. Think succulent grilled chicken, crunchy bell peppers, creamy avocado, and a spicy salsa dressing that will make your taste buds do a happy dance. Yes, it’s that good! Plus, the best part? It comes together in a snap—meaning you can have a delicious, healthy meal ready in no time. So grab your apron and prepare for a cooking adventure that promises to tantalize your palate and brighten your day!

Imagine this: It’s a warm summer evening, and you’ve gathered friends and family around for dinner. The laughter is flowing, and the aroma of grilled chicken fills the air. The best stories are shared over meals, and this Southwest Chicken Salad is sure to spark conversation and create memories. Everything from the juicy chicken to the crisp vegetables and creamy dressing comes together to not just create a meal, but an experience.

Can you already feel the excitement bubbling? I thought so! Let’s get started on this flavorful journey. I’ll walk you through the steps, share some tips from my kitchen as we chop and mix, and by the end, you’ll not only have a delightful salad but also a smile on your face and a spark of creativity for your next cooking endeavor. Ready? Let’s do this!

## Personal Story

I’ll never forget the first time I made a Southwest Chicken Salad. It was during a particularly scorching summer, and I had friends visiting from out of town. We were all so excited to catch up, but I quickly realized that cooking something hearty would be too much given the heat! I rummaged through my fridge and pantry, finding remnants of chicken from a previous dinner, some veggies that needed to be used, and an avocado that was just begging to be incorporated.

That day, as I tossed everything together in a big bowl, I felt an overwhelming sense of satisfaction. The vibrant colors of red, yellow, and green literally jumped out at me, and as I drizzled my newly concocted spicy dressing over the top, I knew I had stumbled onto something magical. The laughter of my guests echoed in the background as we all dug in—what was meant to be a quick meal turned into a feast of flavors and a long-lasting memory. Ever since, this Southwest Chicken Salad has been a staple in my kitchen, reminding me of the power of simple ingredients and the joy of sharing good food with even better company.

## Ingredients

Let’s break down the components that make this Southwest Chicken Salad a home run!

- **Chicken Breast**: The star of the show! I recommend using boneless, skinless chicken breast for a leaner option. Substitute with grilled tofu or black beans for a vegetarian twist.

- **Olive Oil**: This liquid gold not only coats our chicken for grilling but also enhances the overall flavor. Feel free to use avocado oil or sunflower oil for a neutral option.

- **Bell Peppers** (Red and Yellow): These add a sweet crunch and bright color. If you prefer, swap them with cherry tomatoes or cucumbers for a different texture.

- **Red Onion**: A subtle crunch and a zing! For a milder flavor, soak the onion slices in cold water for 10 minutes before adding them to your salad.

- **Avocado**: Creamy and delicious! Look for ripe avocados that yield slightly to pressure. If you don’t have any, a handful of nuts or seeds can add a delightful crunch.

- **Corn**: Sweet and crunchy, corn adds depth. Canned or frozen (thawed) corn works just as well. If you're avoiding corn, try adding quinoa for added texture.

- **Black Beans**: They bring protein and fiber to the dish. Canned black beans work perfectly, but be sure to rinse and drain them first!

- **Fresh Cilantro**: This herb adds a fresh note. Don’t love cilantro? Parsley or green onions make excellent substitutes.

- **Lime**: Freshly squeezed lime juice brings brightness! If you're out of limes, lemon juice makes a great alternative.

- **Spices (Cumin & Chili Powder)**: These spices give our salad a Southwest flair. If you want to kick the heat up, add a dash of cayenne pepper.

- **Greek Yogurt or Sour Cream**: This is for our dressing! Greek yogurt gives a creamy texture with added protein. You can omit it for a lighter dressing or use dairy-free yogurt options.

- **Salsa**: The secret sauce! Use your favorite store-bought salsa or whip up your own with diced tomatoes, jalapeños, and more!

## Step-by-Step Instructions

Now that you have all your ingredients lined up, let’s dive into cooking! Don’t worry; this is going to be super straightforward and fun.

1. **Prep the Chicken**: Start by seasoning your chicken breast with olive oil, cumin, chili powder, salt, and pepper. Use your hands for this part—it’s much easier to get the spices evenly distributed. After seasoning, let the chicken rest for about 10 minutes. If you have time, marinating it for a few hours or overnight can enhance the flavor even more!

2. **Grill the Chicken**: Preheat your grill or grill pan over medium-high heat. Once hot, add the chicken and grill for about 6-7 minutes on each side, or until the internal temperature reaches 165°F (75°C). You want that gorgeous grill mark! No grill? No problem! A skillet works just as well.

3. **Slice the Chicken**: Once cooked, transfer your chicken to a cutting board to rest for a few minutes. This allows the juices to redistribute, keeping it juicy and tender. After resting, slice it thinly against the grain.

4. **Chop and Dice**: While the chicken is resting, it’s time to chop! Dice the bell peppers, slice the red onion, cube the avocado, and rinse your beans. Don’t forget to add that fresh cilantro—chop it coarsely to keep its vibrant flavor!

5. **Make the Dressing**: In a small bowl, mix Greek yogurt (or sour cream) with salsa to create a creamy dressing! You can adjust the ratio based on how creamy you want it. Add a splash of lime juice for that extra zing!

6. **Combine Everything**: In a large mixing bowl, combine the grilled chicken, bell peppers, red onion, avocado, corn, and black beans. Toss gently to combine. Drizzle with your dressing and give it another gentle toss—just enough so that everything is coated and mixed without squishing the avocados!

7. **Taste and Adjust**: Now for the fun part! Grab a fork and taste your creation. Need more lime juice or spice? Adjust it here. The beauty of cooking is making the dish your own!

## Serving Suggestions

Now that your Southwest Chicken Salad is ready and looking vibrant, it’s time to serve it up! Topping it with extra avocado slices, a sprinkle of feta cheese, or a handful of tortilla strips can add a lovely finishing touch. Serve in a beautiful bowl or platter to showcase those colors. This salad can also be served in individual bowls or even wrapped in a tortilla for a satisfying wrap!

## Recipe Variations

Looking to switch things up a bit? Here are some fun variations to keep things exciting:

- **Quinoa Southwest Chicken Salad**: Add cooked quinoa to the mix for an extra protein boost and a nutty flavor.

- **Spicy Chicken Twist**: Add jalapeños or switch to a spicy salsa to turn up the heat!

- **Shrimp or Fish Option**: For seafood lovers, grilled shrimp or white fish can replace the chicken for a lighter, yet equally flavorful salad.

- **Vegan Delight**: Replace the chicken with grilled portobello mushrooms and use a vegan yogurt for the dressing.

- **Cheesy Spin**: Add shredded cheese (like pepper jack or cheddar) for a creamy flavor.

## Chef’s Notes

It’s always fascinating how recipes evolve in the kitchen, isn’t it? Over the years, I’ve played with this recipe so much. I remember a time when I threw in leftover roasted sweet potatoes, and it added such a delightful sweetness that it became a regular in my summer rotation. One mishap, however, was when I grabbed the chili powder instead of cinnamon (oops!). The resulting salad was unexpectedly spicy, but we laughed about it and edited the recipe! It's those little moments that keep cooking joyous and lighthearted.

## FAQs and Troubleshooting

- **Q: My chicken turned out dry. What went wrong?**
  A: Dry chicken often means it was overcooked. Always use a meat thermometer; 165°F is your sweet spot. Letting the chicken rest is equally important to keep it juicy.

- **Q: Can I make this salad ahead of time?**
  A: Absolutely! You can prep all ingredients and store them separately. Keep the dressing aside until you’re ready to serve to avoid sogginess.

- **Q: What if I don’t like black beans?**
  A: No worries! You can substitute them with chickpeas or just skip them altogether. You’ll still have a fantastic salad.

- **Q: How do I store leftovers?**
  Store in an airtight container in the fridge for up to two days. The flavors will meld beautifully, just make sure to add fresh avocado just before serving.

## Nutritional Info

This salad isn’t just delicious but also nutritious! Packed with protein from the chicken and black beans, healthy fats from the avocado and olive oil, and a multitude of vitamins from the veggies, it’s a balanced meal. Each serving offers a great mix of nutrients without overwhelming calories, making it perfect for anyone looking for a wholesome option!

---

And there you have it—a scrumptious Southwest Chicken Salad that’s equal parts easy and exciting! I hope this recipe brings as much joy to your kitchen as it has brought to mine. Happy cooking, and remember—every meal is a chance to create and connect!

Southwest Chicken Salad
- Total Time: 30 minutes
- Yield: 4 servings 1x
- Diet: Gluten-Free
Description
A flavorful salad loaded with grilled chicken, fresh vegetables, and a zesty dressing, perfect for a warm day or a light dinner.
Ingredients
- 1 lb Boneless, skinless chicken breast
- 2 tbsp Olive oil
- 1 Red bell pepper, diced
- 1 Yellow bell pepper, diced
- 1/2 Red onion, thinly sliced
- 1 Avocado, diced
- 1 cup Corn, canned or frozen
- 1 can Black beans, rinsed and drained
- 1/4 cup Fresh cilantro, chopped
- Juice of 1 Lime
- 1 tsp Cumin
- 1 tsp Chili powder
- 1/2 cup Greek yogurt or sour cream
- 1 cup Salsa
Instructions
- Prep the chicken by seasoning with olive oil, cumin, chili powder, salt, and pepper; let it rest for 10 minutes.
- Grill the chicken on a preheated grill for 6-7 minutes on each side until fully cooked.
- Slice the chicken after resting to retain juices.
- Chop the bell peppers, red onion, avocado, and rinse the black beans.
- Make the dressing by mixing Greek yogurt with salsa and lime juice.
- Combine all chopped ingredients and chicken in a large bowl, then gently toss with the dressing.
- Taste and adjust seasoning as needed.
Notes
You can serve the salad in a bowl, on a plate, or rolled in a tortilla for a wrap. For a vegan option, substitute chicken with grilled tofu.
- Prep Time: 15 minutes
- Cook Time: 15 minutes
- Category: Salad
- Method: Grilling
- Cuisine: Mexican
Nutrition
- Serving Size: 1 serving
- Calories: 350
- Sugar: 4g
- Sodium: 300mg
- Fat: 18g
- Saturated Fat: 3g
- Unsaturated Fat: 11g
- Trans Fat: 0g
- Carbohydrates: 27g
- Fiber: 8g
- Protein: 24g
- Cholesterol: 70mg
Keywords: southwest chicken salad, healthy salad, grilled chicken salad, summer salad, meal prep

Potato Salad Recipe
The Ultimate Potato Salad Recipe That Brings Everyone Together
Introduction
Hello, food friends! Welcome back to my cozy kitchen. I’m so excited to share one of my absolute favorite recipes with you today: the Ultimate Potato Salad! This isn’t your everyday potato salad; we’re talking about a dish that’s been elevated to a party centerpiece, a summer BBQ staple, and even a comforting side for that cozy family gathering. You know the one—that dish that brings everyone to the table and sparks laughter and stories? Yep, that’s this potato salad.
I remember my first experience with potato salad. It was a hot summer day, the sun was shining, and we had a big family barbecue in the backyard. Grandma was at the helm, armed with her trusty mixing bowl and a smile that could warm your soul. As she whipped up her infamous potato salad, it was like watching a culinary magician. The aroma of fresh herbs, crisp veggies, and vibrant mustard filled the air, and I was hooked. Each bite was creamy, tangy, and had just the right amount of crunch. Fast forward to today, and I’ve put my own twist on it, creating a recipe that combines nostalgia with modern flavors.
This potato salad is simple enough for a weeknight dinner yet fancy enough for your holiday table. We’ll be using fresh ingredients and a few unexpected surprises that will make your taste buds sing. So, whether you’re a kitchen novice or a seasoned pro, let’s roll up our sleeves and dive into this delicious, heart-warming adventure together!
Personal Story
You know, I often think about the stories behind the meals that mean the most to us, and for me, potato salad is wrapped up in family bonding moments. One summer, we had an epic potluck with all the relatives—shouting cousins and giggling aunts everywhere. Grandma insisted on bringing her potato salad, and she was determined to win the "Best Dish" contest. The pressure was on!
As we gathered around the table, I watched everyone’s eyes light up when they saw Grandma’s creation. It was this beautiful blend of Yukon gold potatoes, fresh herbs, and a touch of her whimsical ingredient—a secret dash of dill pickles! As people savored her dish, laughter erupted, and stories started flying around the table like confetti. I’ll never forget how that potato salad broke the ice and brought everyone closer, reminding us all that food is truly a bridge that connects hearts. Every family has a version of this dish, and now, I can’t wait for you to create lasting memories with your loved ones using my take on Grandma’s delightful recipe!
Ingredients
Here’s what you’ll need for the Ultimate Potato Salad:
-
Yukon Gold Potatoes: These creamy spuds are my go-to for potato salad. Their buttery flavor and smooth texture make this dish irresistible. Plus, they hold up well, ensuring no mushy mess! Substitute with red potatoes for a slightly firmer bite.
-
Mayonnaise: The creamy star of the show! Use a good quality mayo for the best flavor. If you’re looking for a lighter option, Greek yogurt or a vegan mayo can make a delicious substitute.
-
Dijon Mustard: This adds a nice tang and depth of flavor. It’s a game-changer! If you’re sensitive to mustard, yellow mustard works well too, or – for something different – try a tablespoon of vinegar.
-
Lemon Juice: Freshly squeezed is best and adds a bright, zesty kick that cuts through the creaminess perfectly. If you don’t have fresh lemons, a splash of vinegar can work in a pinch.
-
Celery: For that crisp crunch! It adds a refreshing bite and a pop of color. If you’re not a fan of celery, chopped bell peppers or carrots can offer similar crunch with their own flavor twist.
-
Red Onion: This gives the potato salad its kick! Apple cider vinegar-soaked onions can substitute if you’re looking for a milder flavor.
-
Fresh Dill: It’s a must for that classic potato salad flavor! If you can’t find fresh, dried dill works, but you’ll need much less—about a teaspoon.
-
Salt and Pepper: Essential for seasoning! A little salt boosts all the flavors, and freshly cracked black pepper adds a nice peppery kick.
These simple ingredients come together to create a potato salad that’s creamy, tangy, and will surely steal the show at your next gathering!
Step-by-Step Instructions
Let’s get cooking! Follow these simple steps and keep an eye out for my chef hacks along the way:
-
Prep the Potatoes: Start by washing your Yukon gold potatoes. You can peel them or leave the skins on for extra texture and nutrients—personal choice here! Cut them into equal-sized chunks, about 1–2 inches, for even cooking.
Chef Hack: Do you want to save time? You can boil the potatoes whole and chop them afterward! Just ensure they’re fork-tender.
-
Boil the Potatoes: Place the potatoes in a large pot, cover them with cold water, and add a generous pinch of salt. Bring to a boil and let ’em cook for 12–15 minutes until tender but not mushy—nobody likes mushy potato salad! Test by poking with a fork; it should go in easily but have a little resistance.
-
Cool the Potatoes: Once cooked, drain the potatoes and let them cool on the counter. This step is crucial—if they’re too hot when you mix in the mayo, it can turn into a gloppy mess!
Chef Hack: For even faster cooling, spread them out on a baking sheet.
-
Make the Dressing: In a large mixing bowl, combine mayo, Dijon mustard, lemon juice, salt, and pepper. Give it a good mix until it’s creamy and smooth.
-
Chop the Veggies: While the potatoes are cooling, finely chop your celery, red onion, and fresh dill. You want everything to be bite-sized and evenly distributed throughout the salad.
-
Combine: Once the potatoes are cool, gently fold them into the dressing along with the chopped veggies. Be careful not to mash them; we want those lovely chunks of potato to shine!
-
Taste Test: This is my favorite part! Give your potato salad a taste, and adjust the seasoning as needed. Need more zing? Add more lemon juice or salt; craving even more creaminess? Fold in a bit more mayo.
-
Chill: Cover the potato salad and let it chill in the fridge for at least 1 hour before serving. This rest time allows the flavors to meld beautifully.
Chef Hack: If you can, make this the day before! It gets better overnight!
-
Serve: When ready to serve, give it a gentle toss and top with a sprinkle of fresh dill for a pop of color.
Serving Suggestions
Serve the Ultimate Potato Salad chilled, either in a large bowl or for a more elegant presentation, scoop it into individual serving dishes. Garnish with a pinch of paprika or more dill on top to add flair. Pair it with grilled meats, sandwiches, or enjoy it by itself as a satisfying bite!
Recipe Variations
- Bacon & Chive: Add crispy cooked bacon and chopped chives for extra flavor and crunch!
- Mediterranean Twist: Toss in some olives, cherry tomatoes, and feta cheese for a fresh, tangy bite.
- Vegan Delight: Swap mayo for avocado or vegan mayo, and use chickpeas instead of potatoes for a protein-rich alternative.
- Spicy Kick: Add diced jalapeños or a dash of hot sauce for those who like it a little hot!
- Herb Blend: Experiment with different herbs like parsley, tarragon, or basil for a unique flavor profile.
Chef’s Notes
Potato salad is one of those fantastic recipes that can evolve with your tastes and the seasons. Over the years, I’ve added and tweaked many versions, but the heart of it always remains the same: comfort food. One funny memory I have is attempting to impress a friend by infusing my potato salad with an array of spices—only to find that they were not a fan of "spicy" salad. Let’s stick to flavors that make people feel warm and satisfied!
As you create your own versions, don’t forget to make this recipe your own. It’s all about the love you put into it (and maybe a bit of trial and error)!
FAQs and Troubleshooting
1. My potato salad is too mushy. What went wrong?
- It sounds like the potatoes may have been overcooked. For the best texture, test them with a fork and remove them from heat before they turn into mush.
2. Can I make this dish ahead of time?
- Absolutely! In fact, it tastes better after a night in the fridge as the flavors meld together. Just be sure to give it a good stir before serving!
3. What can I use if I don’t have fresh dill?
- No worries! Dried dill works well; just use about 1/3 of the amount for the best balance. Fresh herbs like parsley or chives can also be great alternatives.
4. Can I add other veggies?
- Definitely! Chopped bell peppers, corn, or even peas can add a pop of color and flavor. Get creative!
Nutritional Info (Optional)
This potato salad can serve as a hearty side dish, providing essential nutrients from the potatoes and veggies. Here’s a rough breakdown per serving:
- Calories: 200
- Protein: 3g
- Carbohydrates: 30g
- Fats: 10g
- Fiber: 2g
Feel free to adjust portions for a lighter version by reducing mayo or potatoes!
And there you have it: the Ultimate Potato Salad to help you create memories in your kitchen! I can’t wait for you to try this recipe and see the joy it brings to your gatherings. Happy cooking, my friends! 🍽️
Print
The Ultimate Potato Salad
- Total Time: 30 minutes
- Yield: 8 servings 1x
- Diet: Vegetarian
Description
A creamy, tangy potato salad that brings everyone together, perfect for summer BBQs and family gatherings.
Ingredients
- 3 lbs Yukon Gold Potatoes, cubed
- 1 cup mayonnaise
- 1/4 cup Dijon Mustard
- 2 tbsp Lemon Juice
- 1 cup Celery, chopped
- 1/2 cup Red Onion, finely chopped
- 1/4 cup Fresh Dill, chopped
- Salt and Pepper, to taste
Instructions
- Prep the Potatoes: Wash and cut potatoes into equal-sized chunks, about 1–2 inches.
- Boil the Potatoes: Place potatoes in a pot, cover with cold water, add salt, and bring to a boil. Cook for 12–15 minutes until tender.
- Cool the Potatoes: Drain and let cool on a counter.
- Make the Dressing: In a bowl, mix mayo, Dijon mustard, lemon juice, salt, and pepper.
- Chop the Veggies: Finely chop celery, red onion, and dill.
- Combine: Fold cooled potatoes into the dressing with chopped veggies.
- Taste Test: Adjust seasoning as needed.
- Chill: Cover and chill for at least 1 hour.
- Serve: Toss before serving, garnish with fresh dill.
Notes
This dish tastes better if made a day in advance.
- Prep Time: 15 minutes
- Cook Time: 15 minutes
- Category: Side Dish
- Method: Boiling
- Cuisine: American
Nutrition
- Serving Size: 1 cup
- Calories: 200
- Sugar: 1g
- Sodium: 300mg
- Fat: 10g
- Saturated Fat: 1g
- Unsaturated Fat: 9g
- Trans Fat: 0g
- Carbohydrates: 30g
- Fiber: 3g
- Protein: 3g
- Cholesterol: 10mg
Keywords: potato salad, summer recipes, BBQ side dish, creamy potato salad, family recipes

Deviled Egg Potato Salad
Deviled Egg Potato Salad: A Creamy Twist on a Classic Dish
Hello, fellow food lovers! Welcome back to my cozy kitchen! Today, I’m thrilled to share a delightful twist on a classic that’s guaranteed to spark joy at your next gathering or even just a laid-back dinner at home. We’re diving into my Deviled Egg Potato Salad — a creamy, tangy dish that brings all the nostalgic vibes with a fancy, flavorful kick! Trust me; this is not your ordinary potato salad.
Growing up, summer picnics were not complete without my grandmother’s renowned potato salad. It was creamy, packed with flavors, and always had that garnish of paprika on top that just made it look extra special. Fast forward to my culinary adventures, and I found myself craving the flavors of deviled eggs, which were another family favorite. It struck me—what if I combined the best of both worlds? And, just like that, Deviled Egg Potato Salad was born!
This dish gives you the comfort of classic potato salad while introducing the rich creaminess and zesty kick of deviled eggs. It’s perfect for potlucks, barbecues, or just a side dish that feels gourmet without breaking a sweat. Prepare for some delightful kitchen antics and cooking tips, all while creating a dish that’s as beautiful as it is delectable.
So, roll up those sleeves, grab your apron (get ready for a little mess!), and let’s dive into this scrumptious recipe that’s sure to become a staple in your kitchen!
Personal Story
The memories I cherish most often revolve around food. I remember bustling around my grandmother’s kitchen, the air thick with the aroma of garlic and herbs, while she would deftly chop vegetables and guide me through her age-old family recipes. One of my favorites was her potato salad, with its smooth texture and vibrant flavors. It was the highlight of every family barbecue, always served alongside juicy burgers and grilled corn.
I was the self-proclaimed potato salad expert among my cousins, and my only job was to sprinkle the paprika on top—oh, the pride! As I grew older and started experimenting in the kitchen, I couldn’t resist adding my little twist to the classic flavors I loved so much. When I eventually made this Deviled Egg Potato Salad, I couldn’t help but smile, not just from the deliciousness that unfolded but from the memories that flooded back.
Now, as I share this recipe with you, I believe food has a special way of connecting us, evoking memories, and creating new ones. I can’t wait for you to create your version, with laughter and joy woven into every bite!
Ingredients
Here are the ingredients you’ll need to make this scrumptious Deviled Egg Potato Salad:
-
Potatoes (about 2 pounds)
- I love using Yukon Golds for their buttery flavor, but Russets work well too! Just remember to peel and cube them before boiling for even cooking.
-
Eggs (4 large)
- Hard-boiled eggs are key! They not only enhance the creaminess but also provide protein. For easier peeling, try using older eggs or steaming them before boiling.
-
Mayonnaise (1/2 cup)
- The creamy base of our salad! Feel free to use Greek yogurt for a lighter option or an avocado-based mayo for a healthier twist.
-
Dijon Mustard (1 tablespoon)
- A little tang goes a long way. If you’re a mustard fan, you can double this for that zesty kick!
-
Apple Cider Vinegar (1 tablespoon)
- Brightens the flavors. White vinegar works too, or lemon juice if you want a fresh twist!
-
Celery (2 stalks, chopped)
- Adds crunch! If you prefer a sweeter flavor, try using chopped pickles or relish instead.
-
Red Onion (1/4 cup, finely chopped)
- A punch of flavor! If red onion feels too strong, go for green onions or shallots.
-
Salt and Pepper (to taste)
- Essential for balancing flavors! Always taste as you go—you want that perfect savory touch!
-
Paprika (for garnish)
- The crowning glory! Smoked paprika adds an amazing depth, but sweet paprika works just as well.
Step-by-Step Instructions
Let’s get cooking! Follow these detailed steps to create a creamy and indulgent Deviled Egg Potato Salad.
Step 1: Boil the Potatoes
-
Prepare the potatoes: Start by washing and peeling the potatoes. Cut them into uniform cubes, about 1-inch in size. This will ensure even cooking.
-
Boil them up: Fill a large pot with water, add a generous pinch of salt, and bring it to a rolling boil. Carefully add the cubed potatoes, letting them cook for 10-15 minutes until fork-tender (but not mushy!). You want them to hold their shape.
-
Drain and cool: Once cooked, drain the potatoes and let them cool slightly in the sink, giving them a little shake to release some steam. You want them warm but not steaming hot when you mix them in.
Step 2: Hard-Boil the Eggs
-
Boil the eggs: In a separate pot, gently place the eggs and cover them with cold water. Bring it to a boil, then cover and remove from heat. Let them sit for about 12-14 minutes.
-
Cool and peel: Once done, transfer the eggs to an ice bath to stop the cooking process. After they cool for about 5-10 minutes, peel them under running water for easier shell removal.
Step 3: Mix the Creamy Base
- Prepare the dressing: In a large bowl, combine the mayonnaise, Dijon mustard, apple cider vinegar, salt, and pepper. Mix well until it’s creamy and smooth. This will be the glorious dressing that brings everything together!
Step 4: Assemble the Salad
-
Chop the eggs and veggies: Dice the hard-boiled eggs. You can either chop them finely for a more blended texture or leave them in bigger pieces for a chunkier bite—totally your call!
-
Combine ingredients: Add the cooled potatoes, chopped celery, and red onion to the bowl with the dressing. Gently fold in the chopped eggs, being careful not to mash the potatoes or eggs.
-
Taste and adjust: This is your moment! Taste your salad and adjust the seasoning as needed. If you prefer more tanginess, add a little more vinegar or mustard.
Step 5: Chill and Garnish
-
Chill out: Once everything is beautifully mixed, cover the bowl and let the salad chill in the refrigerator for at least an hour. This allows all the flavors to meld beautifully.
-
Serve with flair: Before serving, sprinkle a generous dusting of paprika on top for that pop of color and flavor.
Serving Suggestions
When it’s time to serve your Deviled Egg Potato Salad, consider presenting it in a lovely bowl garnished with fresh herbs like parsley or chives. Pair it alongside classic barbecue dishes, grilled meats, or serve it on a picnic platter. It’s equally fantastic as a hearty side or as the centerpiece of a lunch spread!
Recipe Variations
-
Herbed Delight: Add fresh dill or parsley for an herbal touch that brightens up the flavors.
-
Spicy Kick: Mix in a dash of sriracha or hot sauce for a spicy twist on the classic taste.
-
Bacon Love: Crumble crispy bacon on top for a smoky flavor that contrasts beautifully with the creaminess.
-
Veggie Lovers: Toss in some sweet peas or diced bell peppers for extra color and sweetness.
-
Dietary Swaps: Use plant-based mayo for a vegan option, or swap potatoes for diced cauliflower for a low-carb alternative.
Chef’s Notes
I like to think of this recipe as a canvas. The foundations of potatoes and eggs create a perfect base, while your creativity can shine through in the seasonings and toppings. Over the years, I’ve played around with various herbs and spices, and each iteration tells a story of its own. One fateful summer, I even tossed in some pickled jalapeños, and it became a favorite among friends—we dubbed it the “spicy deviled egg potato salad”!
In the kitchen, the possibilities are endless, and that’s what makes cooking such a joy. So, don’t hesitate to make it your own and let your personality shine!
FAQs and Troubleshooting
Q: My potatoes are mushy. What went wrong?
A: If they’re mushy, it usually means they were over-boiled. Aim for that fork-tender state!
Q: How can I make my eggs easier to peel?
A: Use older eggs or steam them instead of boiling; it works like a charm to loosen the shell.
Q: Can I prep this ahead of time?
A: Absolutely! It’s best made a day in advance; just ensure you store it in an airtight container in the fridge.
Q: How long does it last in the refrigerator?
A: Your Deviled Egg Potato Salad will last about 3-4 days in the fridge. Just give it a stir before serving again!
Nutritional Info
While this dish is rich and creamy, it’s also packed with protein and vitamins! Each serving provides a satisfying blend of healthy fats and nutrients, perfect as a side at your next meal.
I hope you loved this journey into the world of Deviled Egg Potato Salad! Remember, the best meals are the ones that stir our hearts and fill our bellies. So, gather your loved ones and feast on this deliciousness. Cheers to cozy cooking and happy memories in the kitchen!
Print
Deviled Egg Potato Salad
- Total Time: 45 minutes
- Yield: 6 servings 1x
- Diet: Vegetarian
Description
A creamy twist on classic potato salad combined with the flavors of deviled eggs.
Ingredients
- 2 pounds Potatoes (peeled and cubed)
- 4 large Eggs (hard-boiled)
- 1/2 cup Mayonnaise
- 1 tablespoon Dijon Mustard
- 1 tablespoon Apple Cider Vinegar
- 2 stalks Celery (chopped)
- 1/4 cup Red Onion (finely chopped)
- Salt and Pepper (to taste)
- Paprika (for garnish)
Instructions
- Prepare the potatoes: Start by washing and peeling the potatoes. Cut them into uniform cubes, about 1-inch in size.
- Boil them up: Fill a large pot with water, add a pinch of salt, and bring it to a rolling boil. Carefully add the cubed potatoes, cooking for 10-15 minutes until fork-tender.
- Drain and cool: Once cooked, drain the potatoes and let them cool slightly.
- Boil the eggs: In a separate pot, place the eggs and cover with cold water. Bring to a boil, cover, and let sit for 12-14 minutes.
- Cool and peel: Transfer the eggs to an ice bath and cool for 5-10 minutes before peeling.
- Prepare the dressing: In a large bowl, combine the mayonnaise, Dijon mustard, apple cider vinegar, salt, and pepper. Mix well until creamy.
- Chop the eggs and veggies: Dice the hard-boiled eggs, and add the cooled potatoes, chopped celery, and red onion to the bowl with the dressing.
- Combine ingredients: Carefully fold in the chopped eggs without mashing.
- Taste and adjust: Taste the salad and adjust seasoning as necessary.
- Chill out: Cover the salad and chill in the refrigerator for at least an hour.
- Serve with flair: Sprinkle paprika on top before serving.
Notes
Feel free to add herbs or spices to tailor to your taste. Best if made a day ahead!
- Prep Time: 15 minutes
- Cook Time: 30 minutes
- Category: Side Dish
- Method: Boiling, Chilling
- Cuisine: American
Nutrition
- Serving Size: 1 serving
- Calories: 350
- Sugar: 2g
- Sodium: 400mg
- Fat: 22g
- Saturated Fat: 5g
- Unsaturated Fat: 15g
- Trans Fat: 0g
- Carbohydrates: 35g
- Fiber: 4g
- Protein: 8g
- Cholesterol: 190mg
Keywords: deviled eggs, potato salad, creamy salad, side dish, summer picnic
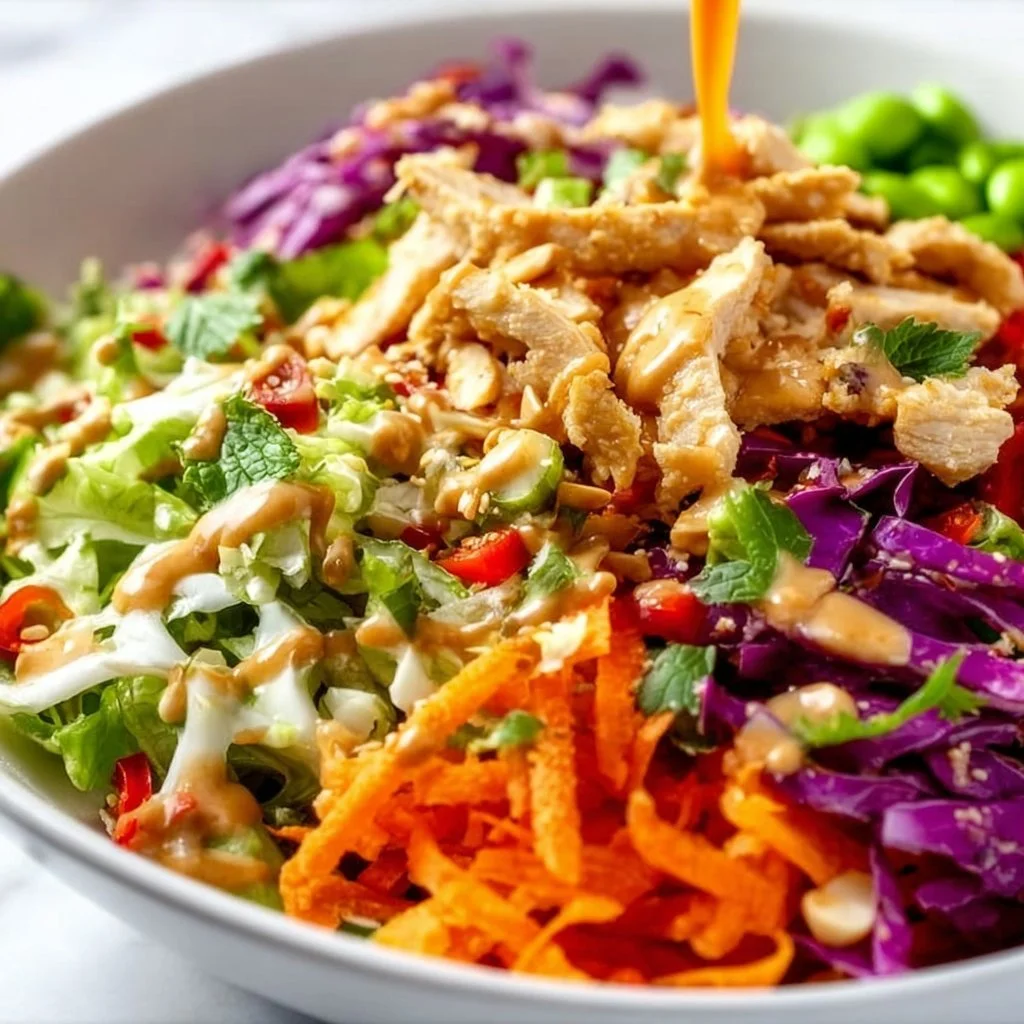
Asian Chicken Crunch Salad
Asian Chicken Crunch Salad: A Flavorful Journey from the Heart
Welcome back to my cozy kitchen! I’m so thrilled you’re here. Today, we’re diving into a delightful dish that’s not just a feast for your taste buds, but also a celebration of vibrant flavors and textures—the Asian Chicken Crunch Salad! This is not just a salad, friends; it’s an experience that transforms simple ingredients into a masterpiece, perfect for any lunch or dinner gathering.
Picture this: a rainbow of crisp veggies, tender juicy chicken, and a zesty sesame dressing that brings everything to life. This salad is my go-to for those days when I crave something refreshing yet satisfying. It’s packed with nutrients and seasoned to perfection, making it a staple in my kitchen.
Before we dig into the ingredients and instructions, let me share a little story about how this recipe came to be. You see, like all great dishes, it has a story worth telling. Back in my college days, I had a group of friends who were always a little skeptical about salads. They considered salads a boring sidekick to our favorite meals. So, I took it upon myself to change their minds with my version of the Asian Chicken Crunch Salad. The first time I served it was at an impromptu dinner party; let me tell you, the reaction was priceless!
Everyone went back for seconds, some even thirds! That magical moment sparked my love for combining simple ingredients into something beautiful and scrumptious. This salad encapsulates everything I adore about cooking – bringing people together, celebrating flavors, and creating something memorable in the process. So, are you ready to whip up a salad that could turn any skeptic into a salad lover? Let’s jump right in!
Personal Story
As I mentioned, the inception of the Asian Chicken Crunch Salad dates back to my college years. I vividly remember one rainy Saturday afternoon, when I decided to host a small get-together with a few friends who had the usual complaints about salads. Armed with a plethora of fresh veggies and roasted chicken, I giddily set to work, determined to whip up something special.
As the scents wafted through my tiny apartment’s open kitchen, one friend, in particular, raised an eyebrow, skeptically eyeing the colorful chaos I was creating. But then, I drizzled my homemade sesame dressing over the salad and tossed everything together, unveiling a gorgeous, colorful bowl that looked too good to resist.
When we sat down for dinner that night, the room filled with laughter and spirited conversation, punctuated by crunching sounds as my friends savored every bite. It was in that moment, surrounded by friends and good food, that I realized food has the power to bring people together, to connect, and to create lasting memories. Now, this salad continues to be a beloved fixture in my kitchen—and in the hearts of everyone who tries it.
Ingredients
Here’s what you’ll need to create this crunchy, flavor-packed goodness:
-
Chicken Breasts (2): Perfectly grilled or roasted, chicken breasts add protein and heartiness to this salad. Tip: For a quicker option, use rotisserie chicken from your local grocery store!
-
Cabbage (2 cups, shredded): The crunchiest base for your salad, cabbage provides both texture and nutrition. Bok choy or Napa cabbage can also work if you want something a bit different.
-
Carrots (1 cup, shredded): Add a sweet crunch to your salad. Feel free to use pre-shredded carrots for convenience, or you can spiralize them for a fun twist!
-
Bell Peppers (1, any color): Their vibrant color and sweetness brighten up the dish. Go for a mix of colors—red, yellow, and green sparkle beautifully in the salad!
-
Cucumber (1, sliced): Adds freshness and crunch. English cucumbers are great because of their thin skin—just wash them and chop!
-
Green Onions (3, chopped): A burst of flavor that uplifts the dish. You can substitute these with chives if you prefer a milder taste.
-
Chopped Peanuts (1/2 cup): For that essential crunch factor! If you’re allergic to peanuts, try toasted sunflower seeds or almonds instead.
-
Sesame Seeds (2 tablespoons): Toasted or raw, they add a nutty depth that can’t be missed. Black sesame seeds add a lovely contrast!
-
Soy Sauce (1/4 cup): The backbone of the dressing. For a gluten-free alternative, you can use tamari or coconut aminos.
-
Rice Vinegar (2 tablespoons): Provides a tart, lively flavor that balances the soy. You could also use apple cider vinegar in a pinch.
-
Honey (1 tablespoon): Just a touch of sweetness to round things out. Agave nectar or maple syrup are fantastic alternatives for a vegan option!
-
Sesame Oil (2 tablespoons): A little goes a long way for flavor—nutty and aromatic. If you don’t have sesame oil, a light olive oil works as well.
-
Olive Oil (1/4 cup): For the dressing’s base. Use extra virgin for the best flavor depth.
Chef Insight
Using fresh, high-quality ingredients is key to making this salad truly stand out. The freshness of your veggies directly impacts the flavor and crunch, so don’t skimp here! Also, the dressing can be adjusted to taste; don’t hesitate to add a hint more honey or soy sauce if you like things a bit sweeter or saltier.
Step-by-Step Instructions
Now, let’s get down to business! Here’s how to make this delightful Asian Chicken Crunch Salad.
1. Prepare the Chicken
- Cook Your Chicken: If you’re grilling or roasting chicken breasts, start by seasoning them with salt, pepper, and a splash of soy sauce. Grill them on medium heat for about 6-7 minutes on each side until fully cooked through.
- Chef Tip: Let the chicken rest for 5 minutes before slicing to keep it juicy!
2. Wash and Chop Your Veggies
- Cabbage & Carrots: Rinse and shred your cabbage, then finely shred the carrots.
- Bell Peppers and Cucumber: Slice your bell pepper and cucumber into thin strips or bite-sized pieces.
- Chef Insight: The more colors you add, the prettier and more nutritious your salad will be!
3. Whip Up the Dressing
- Combine Ingredients: In a small bowl, mix together the soy sauce, rice vinegar, honey, sesame oil, and olive oil. Whisk until well combined.
- Tip: Taste the dressing and adjust according to your preference!
4. Assemble the Salad
- Toss It Together: In a large bowl, combine the shredded cabbage, carrots, bell peppers, cucumber, green onions, and peanuts. Toss them gently to combine.
- Add the Chicken: Slice the cooked chicken and lay it on top. Drizzle the dressing over the salad and toss everything until fully coated.
- Chef Hack: If you’re preparing this for a gathering, I recommend keeping the dressing on the side until just before serving to keep everything crisp.
5. Garnish
- Finishing Touch: Sprinkle the salad with sesame seeds and more chopped peanuts for that extra crunch.
- Tip: A squeeze of lime or lemon juice adds a lovely zesty kick right before serving!
Serving Suggestions
To serve this vibrant salad, place it in a large, beautiful bowl centered on your table, or create individual servings in crispy lettuce cups for a fun twist! Pair it with some warm, crusty bread for a complete meal or serve it as a side dish alongside grilled fish or chicken. It’s also fantastic for meal prep—store it in an airtight container in the fridge for a refreshing lunch any day!
Recipe Variations
Get creative with your Asian Chicken Crunch Salad! Here are a few fun twists:
- Spicy Kick: Add thinly sliced jalapeños or a pinch of red pepper flakes for some heat.
- Fruit Fusion: Toss in some mandarin oranges or sliced strawberries for a sweet twist.
- Protein Alternatives: Swap out chicken for tofu, shrimp, or edamame to cater to different dietary preferences.
- Crunch Factor: Incorporate crunchy tortilla strips or crispy rice noodles for an added crunch.
- Herbs and Greens: Add fresh herbs like cilantro or mint for extra flavor.
Chef’s Notes
As you can see, this Asian Chicken Crunch Salad has evolved over the years, but the heart of it remains the same: fresh, simple ingredients that bring everyone together. I remember one summer when a few friends and I decided to host a “salad potluck,” and it was wonderful to see how everyone put their own spin on this incredibly versatile dish. One friend added avocados, another brought a homemade spicy dressing, and it was pure magic watching how a simple salad became a canvas for creativity!
FAQs and Troubleshooting
1. What if my dressing is too salty?
- If your dressing is overly salty, try adding a little more honey and vinegar to balance it out. Adding more oil can also help dilute the saltiness.
2. Can I make it ahead of time?
- Yes! You can prepare everything in advance, but keep the dressing separate until you’re ready to serve to maintain the salad’s crunch.
3. How long will leftovers last?
- Store leftovers in an airtight container in the fridge for up to 3 days. Use up any leftovers for a tasty lunch the next day!
4. Can I make this salad vegetarian?
- Absolutely! Just omit the chicken and consider adding tofu or chickpeas for protein. You can also amp up the veggies for a heartier meal.
So there you have it—the ultimate guide to creating an unforgettable Asian Chicken Crunch Salad that will knock your socks off! Thank you for joining me today in my kitchen, and I hope this recipe brings as much joy to your table as it has to mine. Happy cooking!
Print
Asian Chicken Crunch Salad
- Total Time: 30 minutes
- Yield: 4 servings 1x
- Diet: Gluten-Free
Description
A vibrant and refreshing salad featuring grilled chicken, crisp vegetables, and a zesty sesame dressing.
Ingredients
- 2 Chicken Breasts, grilled or roasted
- 2 cups Cabbage, shredded
- 1 cup Carrots, shredded
- 1 Bell Pepper, any color
- 1 Cucumber, sliced
- 3 Green Onions, chopped
- 1/2 cup Chopped Peanuts
- 2 tablespoons Sesame Seeds
- 1/4 cup Soy Sauce
- 2 tablespoons Rice Vinegar
- 1 tablespoon Honey
- 2 tablespoons Sesame Oil
- 1/4 cup Olive Oil
Instructions
- Cook your chicken: Season chicken breasts with salt, pepper, and soy sauce, then grill for 6-7 minutes on each side until cooked through.
- Rinse and shred the cabbage, and finely shred the carrots.
- Slice the bell pepper and cucumber into thin strips.
- Combine the soy sauce, rice vinegar, honey, sesame oil, and olive oil in a small bowl; whisk until well combined.
- Toss together the cabbage, carrots, bell peppers, cucumber, green onions, and peanuts in a large bowl.
- Add sliced chicken and drizzle with dressing; toss to combine.
- Sprinkle with sesame seeds and extra peanuts before serving.
Notes
For added flavor, consider a squeeze of lime or lemon juice before serving. Keep dressing separate until serving for freshness.
- Prep Time: 15 minutes
- Cook Time: 15 minutes
- Category: Salad
- Method: Mixing
- Cuisine: Asian
Nutrition
- Serving Size: 1 serving
- Calories: 400
- Sugar: 6g
- Sodium: 600mg
- Fat: 20g
- Saturated Fat: 3g
- Unsaturated Fat: 10g
- Trans Fat: 0g
- Carbohydrates: 34g
- Fiber: 4g
- Protein: 25g
- Cholesterol: 45mg
Keywords: salad, Asian Chicken, healthy recipe, summer salad, nutritious meal
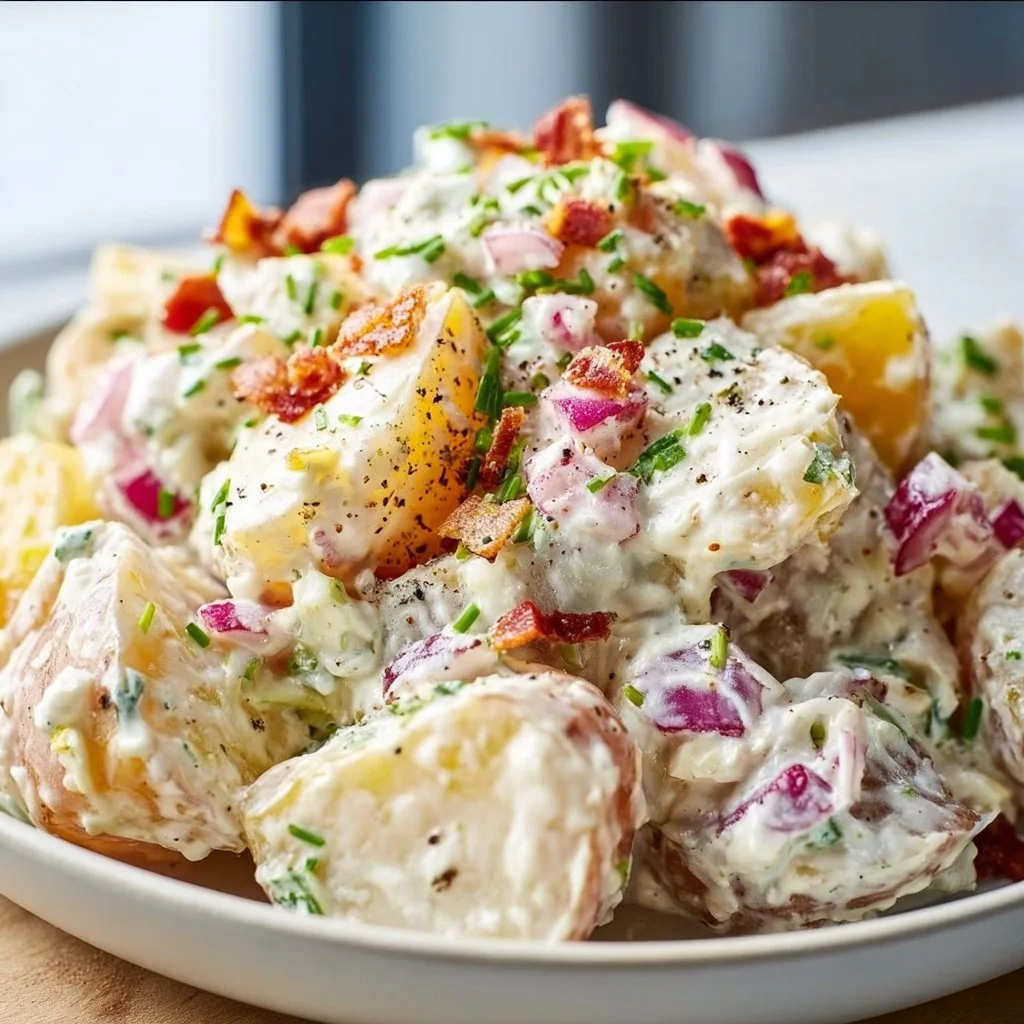
Steakhouse Potato Salad: A Creamy, Flavor-Packed Side Dish
Steakhouse Potato Salad: A Creamy, Flavor-Packed Side Dish
Welcome back to my kitchen, friends! Today, I’m thrilled to share a recipe that holds a special place in my heart — Steakhouse Potato Salad! This dish is the perfect blend of creamy, tangy, and savory flavors, making it an ideal sidekick for your grilled steaks, burgers, or even a cozy dinner when you want that steakhouse vibe at home.
Now, I know what you’re thinking: “Potato salad? Really?” But trust me, this isn’t your average picnic potato salad that gets kicked to the side of the table. Oh no, this recipe is packed with flavor and character. Picture this: tender potatoes mixed with a luscious, creamy dressing, smoky bacon, crunchy veggies, and a hint of tang from pickles. It’s a celebration of flavors that will keep everyone coming back for seconds!
What I love most about this potato salad is its nostalgia. It’s the kind of dish that takes me back to summer BBQs with my family. I remember my dad manning the grill while my mom tossed together this glorious potato salad in the kitchen — the scent of sizzling steak wafting through the air. There’s something magical about food that evokes memories, and I’m here to guide you through making your own memories with every bite of this delightful dish.
So, if you’re ready to elevate your side dish game and impress your friends and family, roll up those sleeves, put on that apron (trust me, it might get a little messy!), and let’s jump into this flavor-packed recipe together!
Personal Story
Growing up, summer meant family BBQs in the backyard. I still remember the vibrant green of the grass, the warm sun on my shoulders, and the aroma of grilled meats wafting through the air. My parents were the dream team; my dad flipped burgers while my mom elegantly whisked together her famous potato salad in a large mixing bowl.
I was always tasked with the important job of taste-testing, of course! For me, the pièce de résistance was the crispy bacon bits hidden among the creamy potatoes. With each taste, I could actually feel the joy radiating through our little gatherings as my family laughed, told stories, and savored every bite. That potato salad was more than just food; it was a symbol of love and togetherness. Fast forward to today, and I can’t help but recreate that same warmth in my own kitchen. With my version of Steakhouse Potato Salad, I aim to create those same joyful moments and delicious memories. Get ready to bring a slice of nostalgia and a whole lot of flavor to your table!
Ingredients
To whip up this delicious Steakhouse Potato Salad, you’ll need the following ingredients:
-
2 lbs of Baby Potatoes
- Look for small, waxy potatoes (such as Yukon Gold or red potatoes) for the best texture. Feel free to use larger potatoes; just remember to cut them into smaller cubes for even cooking!
-
4 slices of Bacon
- Because who doesn’t love bacon? It adds an irresistible smoky flavor. If you want a vegetarian option, try using smoked paprika or liquid smoke in the dressing instead.
-
1 cup of Mayonnaise
- The base of our creamy dressing! For a lighter version, swap half of the mayo with Greek yogurt; it gives a creamy consistency while cutting calories.
-
2 tablespoons of Dijon Mustard
- Adds that tangy kick! If you prefer a milder flavor, regular yellow mustard works just fine.
-
1 tablespoon of Apple Cider Vinegar
- A splash of acidity brightens the dish. Substituting with lemon juice also works wonderfully, lending a fresh citrusy note.
-
1 cup of Celery, diced
- For that crunchy texture! If you’re not a fan of celery, feel free to swap it with diced bell peppers or even chopped green onions.
-
1/2 cup of Green Onions, chopped
- These add freshness and color. You can replace them with chives or shallots for a different twist.
-
1/2 cup of Pickles, diced
- They add depth and tanginess; sweet, dill, or bread-and-butter pickles work well. For a healthier option, try using pickle relish for the same flavor without the chunks!
-
Salt and Pepper to taste
- Essential for enhancing the flavors. Spice it up with some paprika or cayenne if you like a little kick!
Step-by-Step Instructions
1. Prepare the Potatoes
Start by washing those baby potatoes well to remove any dirt. Put them into a large pot, cover with cold water, add a generous pinch of salt, and bring it to a boil. Chef’s Tip: Cooking potatoes in cold water ensures they cook evenly, giving you the perfect tenderness!
2. Boil the Potatoes
Once your water reaches a rolling boil, reduce the heat to medium and let the potatoes simmer for about 15-20 minutes or until they’re fork-tender. Take care not to overcook them; we want them soft but not mushy! Hack Alert: Test doneness with a fork or the tip of a knife; you should feel a little resistance!
3. Meanwhile, Cook the Bacon
While the potatoes are boiling, grab a skillet and cook your bacon over medium heat until crispy. After it cools, chop it into small bits. If you’d like to save time, feel free to use pre-cooked bacon or even bacon bits.
4. Make the Dressing
In a large mixing bowl, combine the mayonnaise, Dijon mustard, apple cider vinegar, salt, and pepper. Whisk it together until smooth. Chef’s Insight: A good dressing can make or break your potato salad, so don’t be afraid to taste it and tweak it to your liking!
5. Chop the Veggies
While the potatoes are boiling and the bacon is sizzling, dice your celery, green onions, and pickles. It’s all about those textures, plus they add flavor pop when you bite into this salad!
6. Combine Everything
Once the potatoes are tender, drain them and let them cool slightly before cutting them into bite-sized pieces. This is crucial because if they’re too hot, they’ll make the dressing warm, and nobody wants a warm potato salad! Gently fold the warm potatoes into the dressing and mix until they’re coated.
7. Add the Mix-ins
Now, fold in the crispy bacon pieces, diced celery, green onions, and pickles. Make sure everything is combined evenly. Pro Tip: A spatula works great here for gentle folding without mashing your precious potatoes.
8. Chill and Serve
Cover the salad and place it in the refrigerator for at least one hour. This allows all those flavors to meld beautifully. Before serving, give it a taste and adjust seasoning if needed. You might even want to drizzle in a little more vinegar for that zing!
Serving Suggestions
Plate this beauty in a large serving bowl and garnish with a sprinkle of chopped parsley or extra green onions for a pop of color. Serve alongside your favorite grilled meats, and don’t forget that inviting aroma filling the air!
Recipe Variations
- Herbed Potato Salad: Mix in fresh herbs like dill, parsley, or chives for an aromatic twist.
- Spicy Potato Salad: Add diced jalapeños or a splash of hot sauce for a kick.
- BBQ Bacon Potato Salad: Incorporate a bit of BBQ sauce into the dressing for a smoky flavorburst.
- Mediterranean Twist: Go for a Greek vibe using feta cheese, Kalamata olives, and a drizzle of olive oil.
- Vegan Version: Substitute the mayonnaise with vegan mayo and use coconut bacon or smoked tempeh for a delicious plant-based salad.
Chef’s Notes
This Steakhouse Potato Salad has had its fair share of evolution in my kitchen over the years. I’ve tried countless variations, from adding different herbs to experimenting with different dressings. But one thing remains constant: this recipe brings people together. I’ve had moments where friends have pulled up a chair and just dove into the bowl, laughing over the flavors and sharing stories. Food has a magical way of connecting us, and every time I make this potato salad, it brings me right back to those backyard BBQs. One time, I even had a ‘potato salad-off’ with friends, where we all brought our unique versions to the table — endless fun and a lot of laughter ensued!
FAQs and Troubleshooting
1. How can I make my potato salad less creamy?
If you want to tone down the creaminess, reduce the amount of mayonnaise or swap in Greek yogurt. Adding extra vinegar or lemon juice can also help balance the flavors.
2. Can I make this salad ahead of time?
Absolutely! In fact, making it a day ahead allows the flavors to meld beautifully. Just keep it tightly covered in the refrigerator.
3. What should I do if I overcooked my potatoes?
If they’re mushy, there’s no saving them for a salad, but you could transform them into a delicious mashed potato dish instead! Adding butter, cheese, and herbs can elevate them beautifully.
4. How do I store leftovers?
Keep any leftover potato salad in an airtight container in the refrigerator. It should stay fresh for about 3-4 days. Just give it a stir before serving again!
Nutritional Info
(Per 1 serving, ½ cup)
- Calories: 250
- Protein: 5g
- Carbohydrates: 26g
- Fat: 15g
- Fiber: 2g
And there you have it, my friends! A wonderfully creamy, flavorful Steakhouse Potato Salad that will steal the spotlight at any gathering or cozy dinner at home. Happy cooking, and may your kitchen be filled with love, laughter, and spectacular flavors! 🍽️
Print
Steakhouse Potato Salad
- Total Time: 45 minutes
- Yield: 4 servings 1x
- Diet: None
Description
A creamy, flavor-packed side dish perfect for complementing grilled meats and summer BBQs.
Ingredients
- 2 lbs of Baby Potatoes
- 4 slices of Bacon
- 1 cup of Mayonnaise
- 2 tablespoons of Dijon Mustard
- 1 tablespoon of Apple Cider Vinegar
- 1 cup of Celery, diced
- 1/2 cup of Green Onions, chopped
- 1/2 cup of Pickles, diced
- Salt and Pepper to taste
Instructions
- Prepare the potatoes by washing them well, placing them in a large pot, covering with cold water, and adding salt.
- Boil the potatoes for about 15-20 minutes or until fork-tender.
- Meanwhile, cook the bacon in a skillet over medium heat until crispy, then chop into small bits.
- Make the dressing by whisking together mayonnaise, Dijon mustard, apple cider vinegar, salt, and pepper in a large mixing bowl.
- Chop the celery, green onions, and pickles while the potatoes are boiling and bacon is cooking.
- Combine the warm potatoes with the dressing, folding gently to coat.
- Add the crispy bacon, diced celery, green onions, and pickles, mixing until evenly combined.
- Chill in the refrigerator for at least one hour before serving.
Notes
For a lighter version, you can swap half of the mayonnaise with Greek yogurt. Make the potato salad a day ahead for better flavor melding.
- Prep Time: 15 minutes
- Cook Time: 30 minutes
- Category: Side Dish
- Method: Boiling
- Cuisine: American
Nutrition
- Serving Size: 1/2 cup
- Calories: 250
- Sugar: 2g
- Sodium: 600mg
- Fat: 15g
- Saturated Fat: 4g
- Unsaturated Fat: 8g
- Trans Fat: 0g
- Carbohydrates: 26g
- Fiber: 2g
- Protein: 5g
- Cholesterol: 15mg
Keywords: potato salad, side dish, BBQ, summer, creamy salad
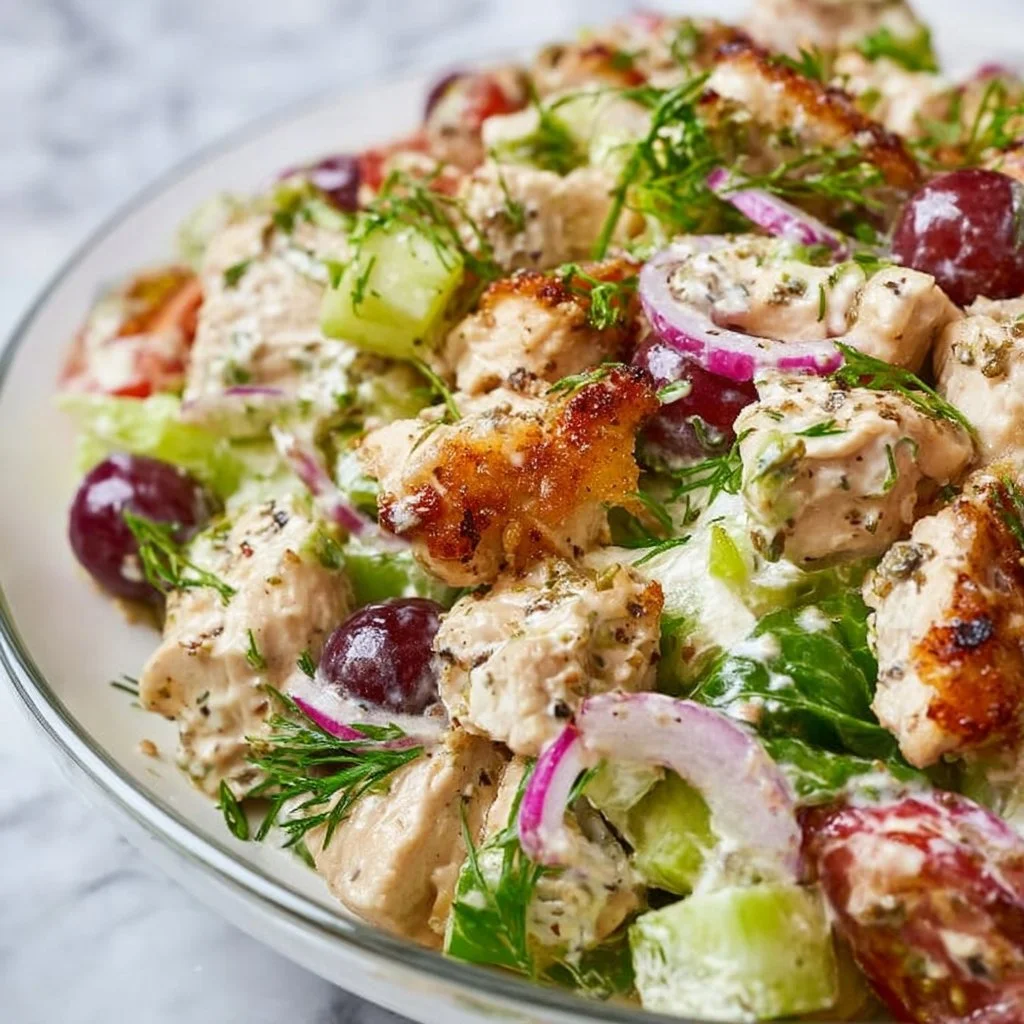
Chicken Salad
The Ultimate Chicken Salad: A Recipe to Bring You Joy
Welcome back to my cozy kitchen! Today, I’m excited to share a recipe that has not only become a staple in my home but has also charmed its way into the hearts of my friends and family: the classic Chicken Salad. This creamy, colorful concoction is so much more than just a dish; it’s a canvas for creativity, a reason to gather, and a mouthwatering reminder of all the delicious moments life has to offer.
Picture this: a warm Saturday afternoon, the sun shining brightly, and the scent of roasted chicken wafting through the air. As I chop, mix, and toss all the ingredients together, I can’t help but feel enveloped in a sense of nostalgia. This is the kind of meal that sparks conversation, laughter, and connection — but most importantly, it brings comfort. Whether served as a light lunch, a picnic treat, or a sophisticated appetizer, my Chicken Salad has truly stood the test of time.
As a self-taught home cook, I’ve had my share of experiments in the kitchen, and I’ve discovered that chicken salad is the ultimate playground for flavors. It’s endlessly customizable and can be dressed up or down depending on the occasion. Today, we’re diving into a straightforward, yet delightful Chicken Salad recipe that will get your taste buds dancing. Grab your apron and let’s embark on a culinary journey filled with scrumptious flavors and heartfelt stories!
Personal Story
Ah, Chicken Salad! It’s not just a recipe; it’s a treasured memory for me. I’ll never forget the summer BBQ gatherings at my grandparents’ house. My grandma would prepare her famous Chicken Salad, whipping it up in a large glass bowl that was older than I was. The sound of her knife slicing through the crunchy celery blended beautifully with the laughter and chatter of family members gathered around.
Every time I took a bite of that salad, I instantly felt wrapped in the warmth of family and love. Grandma’s secret? A splash of lemon juice and just the right amount of seasoning gave the salad a zing that made it unforgettable. From those sunny afternoons spent in the garden to the delightful family dinners that followed, her Chicken Salad became a beloved family tradition. Now, every time I make it, I can’t help but think of her and the love she infused into every dish. I hope this recipe brings you the same joy and connection that it has brought to me!
Ingredients
Here’s what you’ll need to create an incredible Chicken Salad, along with some insider tips:
-
Cooked Chicken (2 cups, shredded or cubed)
- Tip: You can use leftover rotisserie chicken or poach fresh chicken breasts. For quicker cooking, toss the chicken in a slow cooker with your favorite spices.
-
Mayonnaise (1/2 cup)
- Substitution: Greek yogurt works beautifully as a lighter alternative. It adds a creamy texture while boosting the protein!
-
Dijon Mustard (2 tablespoons)
- Chef Insight: This ingredient kicks up the flavor! If you prefer a milder mustard, yellow mustard will do just fine.
-
Celery (1/2 cup, diced)
- Substitution: Crunchy apple or bell pepper can be substituted for added sweetness and color.
-
Red Onion (1/4 cup, finely chopped)
- Tip: Soaking chopped onions in cold water for a few minutes before adding them reduces their pungent flavor.
-
Fresh Herbs (like parsley or dill) (1/4 cup, chopped)
- Variations: Fresh herbs brighten up the dish! Try basil or cilantro for something different or even dried herbs if fresh aren’t available.
-
Salt and Pepper (to taste)
- Chef Insight: Season in layers! Taste as you go to find your perfect balance of flavors.
-
Optional Add-ins: (1/4 cup each)
- Nuts (like almonds or walnuts) – for crunch
- Cranberries or Raisins – for sweetness
- Grapes – for a juicy pop
Step-by-Step Instructions
Alright, let’s jump into the fun part! Here’s how to whip up this fresh Chicken Salad in just a few easy steps:
Step 1: Prep the Chicken
Start by gathering your cooked chicken. If you’re using leftovers or rotisserie chicken, make sure to remove the skin and shred or cube the meat. If you’re starting from scratch, poach your chicken breasts in simmering water seasoned with a bit of salt for about 15-20 minutes until cooked through. Let it cool, then chop it into bite-sized pieces.
Step 2: Chop the Veggies
Next, wash and chop your vegetables! Dice the celery and finely chop the red onion. Remember, chopping is not just about size; it’s also about texture! You want everything to blend seamlessly with the chicken.
Pro tip: Use a sharp knife for cleaner cuts, and always keep your fingers curled under while chopping to avoid any accidents!
Step 3: Mix the Dressing
In a large bowl, combine the mayonnaise and Dijon mustard. Stir until they’re fully blended. This creamy dressing is the heart of your Chicken Salad — it ties everything together! Feel free to adjust the measurements according to your taste; perhaps you prefer it a bit creamier?
Step 4: Combine Everything
Now it’s time to bring everything together! Add the cooked chicken, diced celery, chopped red onion, and fresh herbs to the bowl with the dressing. Gently mix until every piece is coated in that creamy goodness.
Quick Hack: Use a spatula or wooden spoon to fold the mixture instead of stirring vigorously, which can break up the chicken!
Step 5: Season to Perfection
Sprinkle in salt and pepper to taste. The seasoning is where you can really personalize! Taste testers are essential in this step. Adjust the seasoning as needed until you feel that burst of flavor.
Step 6: Chill Out
If you have the patience (and trust me, it’s worth it), cover the bowl with plastic wrap and let it chill in the fridge for at least 30 minutes. This allows the flavors to meld beautifully.
Step 7: Serve and Enjoy!
When you’re ready to serve, give your Chicken Salad a final stir. It can be served as is, on a bed of greens, between fresh bread as a sandwich, or with crackers.
Serving Tip: Garnish with a sprinkle of fresh herbs or a few slices of radishes for that pop of color!
Serving Suggestions
Chicken Salad can be served in a variety of delightful ways! Consider plating a generous scoop on a bed of crisp mixed greens for a light lunch, or heap it into pita pockets or whole wheat wraps for a satisfying and portable meal. For a fun appetizer, scoop the salad into individual cucumber cups or endive leaves. Trust me, your guests will love it!
Recipe Variations
Now, let’s take this Chicken Salad up a notch! Here are a few indulgent variations for you to try:
- Mediterranean Chicken Salad: Toss in Kalamata olives, feta cheese, and sun-dried tomatoes for a flavor-packed twist.
- Curried Chicken Salad: Adding curry powder and diced apples will infuse your salad with an exotic flair.
- Southwestern Chicken Salad: Include black beans, corn, and diced jalapeños for a spicy kick — perfect with tortilla chips!
- Avocado Chicken Salad: Substitute half of the mayonnaise with mashed avocado for a creamy texture that’s bursting with healthy fats.
- Fruit-Infused Chicken Salad: Toss in some pineapple or grapes to balance the savory flavors with sweetness.
Chef’s Notes
Every recipe has its evolution, and the Chicken Salad is no exception. Over the years, I’ve experimented with countless ingredients until I found the perfect balance that reflects my family’s taste. And though it started out simply enough, I love how versatile it is, constantly changing with the seasons and our cravings.
One time, I made a dessert version of Chicken Salad using shredded coconut and a sweet yogurt dressing — let’s just say it never made it to the table! Who knew chicken salad could spark such creativity in the kitchen?
FAQs and Troubleshooting
1. My Chicken Salad is too dry — help!
If your salad turns out too dry, don’t panic! Just add a little more mayo or Greek yogurt to moisten things up. A splash of lemon juice can also help to balance flavors.
2. Can I use leftover grilled chicken?
Absolutely! Grilled chicken adds a wonderful smoky flavor. Just ensure it’s cooked through and shredded or cubed to your liking.
3. How long will my Chicken Salad last in the fridge?
Your Chicken Salad should stay fresh in an airtight container for about 3-4 days. But let’s be honest, it might not last that long because it’s so delicious!
4. What can I do if I don’t have any fresh herbs?
No worries! You can use dried herbs, although I recommend using less since they are more concentrated in flavor. You can also skip them entirely and still have a tasty salad.
Nutritional Info (Optional)
While I believe in enjoying food from the heart, here’s an approximate nutritional breakdown per serving (about 1/2 cup) if you make it traditionally:
- Calories: 250
- Protein: 20g
- Carbohydrates: 4g
- Fat: 18g
- Fiber: 1g
Now that you have this delicious Chicken Salad recipe, it’s time to gather your ingredients and get cooking! I can’t wait to hear how it turns out for you. Remember, cooking is all about having fun and bringing love into everything you do. Happy cooking, friends!
Print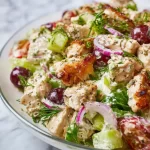
The Ultimate Chicken Salad
- Total Time: 35 minutes
- Yield: 4 servings 1x
- Diet: Gluten-Free
Description
A classic Chicken Salad that’s creamy, colorful, and customizable, perfect for any occasion.
Ingredients
- 2 cups Cooked Chicken, shredded or cubed
- 1/2 cup Mayonnaise
- 2 tablespoons Dijon Mustard
- 1/2 cup Celery, diced
- 1/4 cup Red Onion, finely chopped
- 1/4 cup Fresh Herbs (like parsley or dill), chopped
- Salt and Pepper, to taste
- Optional Add-ins: 1/4 cup each of Nuts (like almonds or walnuts), Cranberries or Raisins, or Grapes
Instructions
- Prep the Chicken: Gather your cooked chicken and either shred or cube it. If starting from scratch, poach chicken breasts in simmering water for 15-20 minutes until cooked. Cool and chop.
- Chop the Veggies: Wash and chop celery and red onion. Aim for cohesive texture in your salad.
- Mix the Dressing: In a large bowl, combine mayonnaise and Dijon mustard until blended.
- Combine Everything: Add the cooked chicken, diced celery, chopped red onion, and fresh herbs to the dressing. Mix gently until coated.
- Season to Perfection: Sprinkle salt and pepper to taste and adjust seasoning as necessary.
- Chill Out: Cover the bowl and refrigerate for at least 30 minutes to meld flavors.
- Serve and Enjoy: Give a final stir before serving. Enjoy on greens, as a sandwich, or with crackers.
Notes
Chilling allows flavors to meld. Optional garnishes include fresh herbs or slices of radishes.
- Prep Time: 15 minutes
- Cook Time: 20 minutes
- Category: Salad
- Method: Mixing
- Cuisine: American
Nutrition
- Serving Size: 1 serving
- Calories: 250
- Sugar: 5g
- Sodium: 400mg
- Fat: 18g
- Saturated Fat: 3g
- Unsaturated Fat: 10g
- Trans Fat: 0g
- Carbohydrates: 4g
- Fiber: 1g
- Protein: 20g
- Cholesterol: 70mg
Keywords: chicken salad, easy recipes, summer recipes, comfort food

Thai Chicken Salad
Thai Chicken Salad: A Flavor-Packed Journey to Your Dinner Table
Welcome back to my cozy corner of the culinary world! Today, we’re diving headfirst into a vibrant, crunchy, and oh-so-delicious dish that I cannot wait to share with you: Thai Chicken Salad. If you’ve ever taken a bite of a salad that made you feel like you were magically transported to a bustling street market in Thailand, then this dish is for you. It’s not just a salad; it’s a celebration of flavors, textures, and colors that will have you reaching for second servings—trust me!
Thai cuisine is celebrated for its balance of sweet, sour, salty, and spicy notes, and this salad embodies that spirit beautifully. Picture a bright medley of napa cabbage, tender chicken, crunchy peanuts, and a tangy dressing that dances on your taste buds—what’s not to love? Whether you’re looking to impress your friends at a potluck or simply enjoying a healthy meal at home, this salad checks all the right boxes.
Now, let’s embark on this culinary adventure together! I’ll guide you through every step, sprinkling in my kitchen wisdom so you can whip this up with ease, no matter your cooking experience. Ready to stir up some excitement in your kitchen? Grab your apron—it’s about to get delicious!
Personal Story
When I think of Thai Chicken Salad, I am transported back to a sun-soaked afternoon in the heart of Sydney, where my best friend invited me over for lunch. She’s an incredible cook with a penchant for all things Southeast Asian, and that day, she prepared her version of this salad. The aroma of garlic, lime, and fish sauce wafted through her open kitchen window, mingling with the sound of laughter and chatter from her family gathered around the table.
As we dug into the salad, I was struck by how something so simple could evoke such joy and community. Each of us piled our bowls high with colorful ingredients, squeezing fresh lime on top and adding that deliciously spicy dressing. The chorus of “Mmm!” that followed the first bites was music to my ears. That day not only filled my belly but also ignited my passion for cooking and sharing food with loved ones. It became a tradition for us to make this salad together, each time experimenting with new ingredients and flavors. I’m thrilled to share this experience with you, hoping it brings the same joy to your table!
Ingredients
Here’s what you’ll need to create this flavorful Thai Chicken Salad:
-
2 cups cooked chicken breast, shredded
- You can use rotisserie chicken for a time-saving hack, or poach your chicken with some ginger and garlic for extra flavor.
-
4 cups napa cabbage, finely shredded
- Napa cabbage has a mild flavor and crispy texture, but feel free to substitute with regular green cabbage or even kale if that’s what you have on hand.
-
1 cup carrots, grated
- Fresh carrots add a nice crunch. You can also swap in shredded red cabbage for a pop of color and a slightly different texture.
-
1 red bell pepper, thinly sliced
- This adds sweetness; consider using cucumbers instead for a refreshing twist.
-
1/2 cup fresh cilantro, chopped
- Cilantro provides that signature herbaceous taste. If you’re not a fan, use fresh mint for a variation.
-
1/4 cup chopped peanuts (or cashews)
- These add a lovely crunch. If you need this nut-free, sunflower seeds work wonderfully too!
Dressing Ingredients
-
1/4 cup fresh lime juice
- The zing from lime is essential! Bottled lime juice works, but fresh is always best.
-
2 tablespoons fish sauce (or soy sauce for a vegetarian option)
- This brings umami to the dressing—don’t skip it! You can substitute with coconut aminos for a gluten-free option.
-
1 tablespoon honey or maple syrup
- It balances the acidity perfectly. Use agave syrup for a vegan substitute.
-
1 teaspoon chili paste (adjust to taste)
- This is your spicy element! Sriracha or even red pepper flakes are great alternatives.
Step-by-Step Instructions
Now that we’ve gathered our ingredients, let’s get cooking! Here’s how you can whip up this delightful salad:
Step 1: Cook the Chicken
If you’re using raw chicken breast, season it with salt and pepper. In a pot, bring lightly salted water to a boil. Add the chicken and simmer for about 15-20 minutes, or until fully cooked. Once tender, remove from the pot and shred using two forks. Chef’s Hack: You can save time and hassle by shredding the chicken while it’s still slightly warm—it’s much easier that way!
Step 2: Prepare the Vegetables
While your chicken is cooking, it’s the perfect time to prep your vegetables. Take that napa cabbage and slice it thinly; parents love this sawing method! Grate the carrots, and julienne the bell pepper—these vibrant colors will make your salad pop. Tip: For an added crunch, soak the cabbage in ice-cold water for about 10 minutes before using. This will make it extra crispy.
Step 3: Make the Dressing
In a small bowl, whisk together the lime juice, fish sauce, honey, and chili paste until well combined. Little Chef Insight: Taste as you go! You want it to have a perfectly balanced flavor. Adjust the sweetness or heat according to your preference—there’s no wrong way to dress a salad!
Step 4: Assemble the Salad
In a large mixing bowl, combine the shredded chicken, napa cabbage, grated carrots, bell pepper, and chopped cilantro. Drizzle the dressing over the salad and toss gently until every bite is brightly flavored and coated in that zesty goodness. Chef’s Tip: Use tongs for easy mixing—this will keep your ingredients intact!
Step 5: Garnish
Sprinkle the chopped peanuts (or any nuts you’ve chosen) over the top of your salad before serving. This adds an inviting crunch and visual appeal—who doesn’t love a little texture?
Step 6: Serve
Scoop the salad into individual bowls and garnish each one with an extra wedge of lime on the side for those who love a little extra tang. Voilà! You now have a vibrant, colorful dish that’s sure to impress.
Serving Suggestions
This Thai Chicken Salad is stunning on its own, but it can shine even brighter when paired with other dishes. Consider serving alongside some crispy spring rolls or a warm bowl of coconut soup for a beautifully balanced meal. To plate, mound the salad high on a bright plate and sprinkle some additional cilantro for the wow factor!
Recipe Variations
Now that you’ve mastered the classic, here are some creative twists for your Thai Chicken Salad:
- Grilled Chicken Twist: Swap cooked chicken for thinly sliced grilled chicken marinated in lime and garlic for an extra smoky flavor.
- Vegetarian Delight: Replace chicken with chickpeas or baked tofu for a vegetarian powerhouse meal.
- Fruit Fusion: Toss in some fresh mango or diced pineapple for a touch of sweetness that pairs wonderfully with the salad’s tang.
- Spicy Kick: Add sliced jalapeños or a pinch more chili paste to dial up the heat.
- Crunch Factor: Mix in some crispy chow mein noodles for an unexpected crunch!
Chef’s Notes
This salad has evolved over time, mirroring my own culinary journey in the realm of vibrant, flavor-packed dishes. I remember the first time I adapted a traditional recipe—it felt like a block of weight had lifted from my shoulders. Cooking should be fun and free, an expression of your unique tastes!
Sometimes, I brighten it up even more with a few extra herbs or a sprinkling of sesame seeds. It’s gratifying to see how a simple recipe can adapt to various preferences and quickly become a staple in the kitchen. In my house, we love to pull this together as a quick lunch or a light dinner, especially on those warm summer evenings when cooking feels like too much work.
FAQs and Troubleshooting
Q: Can I make this salad ahead of time?
A: Absolutely! Make the dressing and prep the chicken the day before. However, it’s best to mix the salad just before serving to keep everything fresh and crunchy.
Q: My salad turned out too salty. What can I do?
A: If you find it too salty, try adding more shredded cabbage or carrots to balance out the flavors. Adding a touch of honey can also help draw some of that saltiness out.
Q: Can I make it gluten-free?
A: Yes, just ensure to use gluten-free tamari instead of regular soy sauce and double-check the fish sauce ingredient, as some may contain gluten.
Q: What’s the best way to store leftovers?
A: Store any leftovers in an airtight container in the fridge. It should last about 2 days, but the veggies might lose their crispness, so I recommend eating it fresh!
Nutritional Info
(Optional): Here’s a general nutritional breakdown per serving:
- Calories: 350
- Protein: 30g
- Carbohydrates: 20g
- Fat: 18g
- Fiber: 4g
There you have it! Your complete guide to making a vibrant Thai Chicken Salad that’s sure to delight. I hope it brings a touch of Thailand into your home and fills your kitchen with laughter and joy. Remember, cooking is about connection—both to the ingredients and to each other. Enjoy every delicious bite!
Print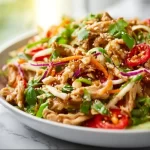
Thai Chicken Salad
- Total Time: 35 minutes
- Yield: 4 servings 1x
- Diet: Gluten-free, High-Protein
Description
A vibrant and crunchy Thai Chicken Salad loaded with flavors, textures, and colors that’s perfect for any occasion.
Ingredients
- 2 cups cooked chicken breast, shredded
- 4 cups napa cabbage, finely shredded
- 1 cup carrots, grated
- 1 red bell pepper, thinly sliced
- 1/2 cup fresh cilantro, chopped
- 1/4 cup chopped peanuts (or cashews)
- 1/4 cup fresh lime juice
- 2 tablespoons fish sauce (or soy sauce for a vegetarian option)
- 1 tablespoon honey or maple syrup
- 1 teaspoon chili paste (adjust to taste)
Instructions
- Cook the chicken: If using raw chicken, season and simmer in salted water until fully cooked, then shred.
- Prepare the vegetables: Slice napa cabbage, grate carrots, and julienne bell pepper.
- Make the dressing: Whisk lime juice, fish sauce, honey, and chili paste until combined.
- Assemble the salad: In a bowl, combine chicken, cabbage, carrots, bell pepper, and cilantro, then drizzle with dressing.
- Garnish the salad: Sprinkle chopped peanuts on top before serving.
- Serve: Place salad in bowls with extra lime wedges for garnish.
Notes
Make the dressing and prep the chicken a day before. Mix the salad just before serving to keep it fresh and crunchy.
- Prep Time: 15 minutes
- Cook Time: 20 minutes
- Category: Salad
- Method: No Cooking
- Cuisine: Thai
Nutrition
- Serving Size: 1 serving
- Calories: 350
- Sugar: 5g
- Sodium: 400mg
- Fat: 18g
- Saturated Fat: 3g
- Unsaturated Fat: 5g
- Trans Fat: 0g
- Carbohydrates: 20g
- Fiber: 4g
- Protein: 30g
- Cholesterol: 75mg
Keywords: Thai salad, chicken salad, healthy salad, quick meal, vibrant recipe

Meal Prep Cobb Salad
A Deliciously Colorful Journey: Meal Prep Cobb Salad
Welcome to my cozy little corner of the internet, fellow food lovers! I’m Olivia Bennett, and I’m thrilled to have you here. Today, we’re diving into a crunchy, colorful world of flavors with a timeless favorite: the Meal Prep Cobb Salad. This dish is not just a salad—it’s a symphony of textures, colors, and tastes that will brighten up your week ahead. Picture fresh greens, crispy bacon, creamy avocado, and a sprinkle of blue cheese all coming together to create something magical. Who doesn’t love a good salad that saves time and brings a burst of flavor?
Now, what I adore about Cobb Salad isn’t just its deliciousness—it’s the memories it sparks. This dish has a way of bringing people together, whether it’s a picnic in the park, a casual dinner with friends, or simply fueling your week with wholesome goodness. So, slip on your apron, and let’s get cooking!
Personal Story: A Family Tradition Rediscovered
Growing up, some of my fondest memories revolve around family dinners and the vibrant patchwork of dishes sprawling across our dining table. My mom was an incredible cook who could turn even the simplest ingredients into something exquisite. One summer evening, I remember her preparing a lavish spread that included her version of a Cobb Salad.
As she sliced the ingredients, the whole kitchen filled with the wafts of crispy bacon, fresh greens, and that unmistakable tang of blue cheese. We gathered around the table, laughter mingling with the melody of cutting boards and serving utensils clinking together. Each forkful was a joyful bite, reminding us of summer barbecues and the togetherness that good food can inspire. That meal turned into a cherished family ritual, with each forkful carrying echoes of laughter and love.
Now, whenever I whip up a Cobb Salad, I’m stirred by those simple, precious moments—a reminder of how food can create not just meals but memories.
Ingredients: What You’ll Need
Here’s a list of ingredients to create your perfect Meal Prep Cobb Salad. Each component plays a pivotal role, contributing to the symphony of flavors. And don’t worry; I’ve included some handy substitution tips to help you adjust according to your pantry!
-
Romaine Lettuce (or Mixed Greens)
- A crunchy, fresh base that provides a crisp texture. You can also swap it with kale for a more nutrient-dense option, or use spinach for a milder flavor.
-
Grilled Chicken Breast
- A lean protein that makes this salad filling. You can replace it with turkey, chickpeas for a vegetarian twist, or even tofu for a plant-based option.
-
Crispy Bacon
- The salty crunch brings a delightful contrast to the fresh ingredients. If bacon isn’t your thing, crispy pancetta or turkey bacon could work well, or even toasted nuts for a crunchy alternative.
-
Hard-Boiled Eggs
- They add creaminess and protein. If you’re short on time, you can use scrambled eggs or omit them for a lighter dish altogether.
-
Avocado
- This creamy fruit adds richness. If you’re short on avocados, consider using a dollop of Greek yogurt or some hummus for a similar creamy texture.
-
Cherry Tomatoes
- Bursting with sweetness, these beauties pop with color. If tomatoes aren’t in season, you can use diced bell peppers or radishes as a substitute.
-
Blue Cheese (or Feta)
- A tangy cheese that complements the salad beautifully. If blue cheese isn’t your favorite, crumbled feta or goat cheese works wonderfully.
-
Cucumber
- For added crunch and freshness. If you’re not keen on cucumbers, consider swapping them with bell peppers or snap peas.
-
Red Onion
- Just a hint of sharpness helps to elevate the flavors. If you want something milder, go for green onions or even omit it altogether.
-
Olive Oil & Vinegar (for dressing)
- A simple mix comes together for a light, zesty dressing. Use your favorite dressing instead—store-bought or homemade!
Step-by-Step Instructions
Now, let’s get into the fun part—the cooking! This Meal Prep Cobb Salad not only assembles quickly but can also be prepped in advance to make your week seamless. Follow along for a delicious adventure!
-
Prep Your Ingredients
- Start by washing your greens. If you’re using romaine lettuce, chop it into bite-sized pieces. For mixed greens, simply tear the leaves and place them in a large salad bowl. Pro Tip: A salad spinner can help those greens dry quickly and prevent sogginess!
-
Grill Your Chicken
- Season your chicken breast with salt, pepper, and a drizzle of olive oil. Heat a grill pan or skillet over medium-high heat. Cook the chicken for about 6-7 minutes on each side until golden brown and cooked through (internal temp shouldn’t exceed 165°F!). Once cooked, let it rest for a few minutes before slicing. Little Chef Hack: While resting the chicken, cover it with foil to keep it warm and juicy.
-
Cook Your Bacon
- In the same skillet (or a separate one if you like), cook your bacon until it’s crispy. This usually takes about 5-7 minutes. Once done, place it on a paper towel to absorb excess grease. Savory alert: Don’t toss that bacon fat! It can be saved to add flavor to future dishes—just be mindful of how much you use.
-
Boil Your Eggs
- Place your eggs in a pot, cover them with cold water, and bring to a boil. Once boiling, turn off the heat and cover. Let them sit for about 10-12 minutes. Afterward, transfer them to an ice bath (or cold water) to stop the cooking process and make peeling easier. Chef Insight: This method makes for perfect hard-boiled eggs!
-
Assemble the Salad
- In a large mixing bowl, combine your romaine base with the sliced grilled chicken, diced avocado, halved cherry tomatoes, chopped cucumbers, crumbled blue cheese, and sliced red onion. Chop the hard-boiled eggs and sprinkle them on top.
-
Prepare Your Dressing
- In a small bowl, whisk together olive oil and your choice of vinegar along with a pinch of salt and pepper. Feel free to add a dash of Dijon mustard for an extra kick! Drizzle the dressing over your salad and mix everything gently to combine. Just a note: Keep the dressing on the side if you’re meal prepping to retain freshness.
-
Pack for Meal Prep
- If meal prepping, use airtight containers and layer the ingredients starting with the dressing at the bottom, followed by your protein, then veggies, and greens on top to prevent wilting. You’ll have a vibrant, fresh salad ready to grab during the week!
Serving Suggestions
Present your gorgeous Cobb Salad in a shallow bowl, arranging the toppings in sections for a colorful display. You can sprinkle some extra blue cheese on top for a pretty finish or garnish with a few slices of lemon for that zesty touch! Pair it with a slice of crusty bread or crispy pita chips for a complete meal that’s both filling and incredibly satisfying.
Recipe Variations
-
Southwestern Cobb Salad: Swap out the blue cheese for queso fresco and add black beans and corn for a southwestern flair. A drizzle of chipotle dressing will enhance the flavor!
-
Mediterranean Cobb Salad: Use feta cheese instead of blue cheese, and toss in some Kalamata olives and diced bell peppers. Add a splash of lemon vinaigrette for freshness.
-
Fruit-Infused Cobb Salad: Toss in some sliced strawberries or mango for a sweet twist and switch to a light balsamic vinaigrette.
-
Vegan Cobb Salad: Substitute the chicken with roasted chickpeas, the bacon with crispy tempeh, and omit eggs and cheese or replace them with avocado and nutritional yeast.
Chef’s Notes
Looking back, my Cobb Salad recipe has evolved over time—it’s like a reflection of my culinary journey. I’ve experimented with countless variations, hunting for that perfect balance of textures and flavors. The things I love most about this salad? It’s versatile! Depending on what’s in season or what’s left in my fridge, it can turn out different every single time. Embrace that freedom! After all, cooking should be fun, not just a chore.
Oh, and a little kitchen humor—once, I thought I could juggle while cooking (what a sight!). Let’s just say the avocado didn’t survive the drop, but we all had a hearty laugh!
FAQs and Troubleshooting
-
Can I make this salad ahead of time?
- Absolutely! If you layer the ingredients correctly in an airtight container, it can last up to 3 days in the fridge. Just remember to keep the dressing separate until you’re ready to eat!
-
What do I do if my eggs crack while boiling?
- No worries! The key is to add a teaspoon of vinegar to the boiling water, which helps coagulate the egg white if it breaks. It won’t be perfect, but at least it won’t make a huge mess!
-
My avocado turned brown! How can I prevent this?
- Oxidation is the culprit here. A sprinkle of lemon juice can help slow down the process. If it happens, just slice off the brown areas—your salad will still taste amazing!
-
Can I use other proteins?
- Definitely! Beyond chicken, think grilled shrimp, fish, or even a hearty bean mix, such as black beans or lentils, for added protein and nutrition.
Nutritional Info (Optional)
While I won’t overload you with too many numbers, a typical serving of this Meal Prep Cobb Salad offers a fantastic balance of protein, healthy fats, and fiber. It’s loaded with vitamins and minerals, keeping your energy levels charged throughout the day!
So there you have it! Your guide to creating the ultimate Meal Prep Cobb Salad. I hope you dive into this colorful world of flavors, just like I have. Remember, cooking is all about enjoying yourself and experimenting! Happy cooking, and may your kitchen always be filled with warmth and joy! 🍳🥗💖
Print
Meal Prep Cobb Salad
- Total Time: 35 minutes
- Yield: 4 servings
- Diet: Gluten-Free
Description
A colorful and crunchy Cobb Salad, perfect for meal prepping and bursting with fresh flavors.
Ingredients
- Romaine Lettuce (or Mixed Greens)
- Grilled Chicken Breast
- Crispy Bacon
- Hard-Boiled Eggs
- Avocado
- Cherry Tomatoes
- Blue Cheese (or Feta)
- Cucumber
- Red Onion
- Olive Oil & Vinegar (for dressing)
Instructions
- Prep Your Ingredients
- Grill Your Chicken
- Cook Your Bacon
- Boil Your Eggs
- Assemble the Salad
- Prepare Your Dressing
- Pack for Meal Prep
Notes
Layer ingredients carefully in airtight containers if meal prepping. Keep dressing separate until ready to serve.
- Prep Time: 15 minutes
- Cook Time: 20 minutes
- Category: Salad
- Method: No Cook & Stovetop
- Cuisine: American
Nutrition
- Serving Size: 1 serving
- Calories: 400
- Sugar: 4g
- Sodium: 600mg
- Fat: 24g
- Saturated Fat: 6g
- Unsaturated Fat: 12g
- Trans Fat: 0g
- Carbohydrates: 12g
- Fiber: 4g
- Protein: 28g
- Cholesterol: 150mg
Keywords: Cobb Salad, Meal Prep, Healthy Recipe, Salad, Fresh Ingredients

Chickpea Feta Avocado Salad
The Ultimate Chickpea Feta Avocado Salad: A Flavor-Packed Journey
Hey there, fellow food lovers! I’m excited you’ve popped into my cozy kitchen today because we’re about to whip up something absolutely delicious — a Chickpea Feta Avocado Salad that will make your taste buds sing, and your heart warm. This salad is not just an appetizer; it’s a celebration of flavor, texture, and the joy that cooking and sharing food can bring.
Imagine this: a bowl brimming with tender chickpeas, creamy avocado, and tantalizing feta cheese, all tossed together in a light and zesty dressing. Whether you’re tossing together a quick lunch, prepping for a summer picnic, or impressing friends at a dinner party, this salad has you covered! Plus, it’s super easy to make and packed full of nutrients, making it the perfect companion for any season. And don’t worry if you’re a kitchen novice; I’ll guide you step by step. So, grab your apron (I know you have a messy one just like mine!) and let’s dive right in!
But wait—it’s not just about the flavors; it’s about the connections we make over our meals. Cooking is like a love language, and with every chop, stir, and sprinkle, we create stories. Now, let me share a little backstory about why this particular dish holds a special place in my heart!
Personal Story
One sunny afternoon a few summers ago, I found myself in the kitchen with my best friend, Clara. We had just finished a long day of gardening, and our newly grown veggies were calling to be transformed into something fabulous. As we brainstormed recipes, Clara’s eyes lit up at the mention of chickpeas. “What about a salad?” she suggested.
Her enthusiasm was infectious, and before I knew it, we were tossing ideas back and forth like seasoned chefs. We chopped, mixed, and laughed, trying not to spill the cornucopia of ingredients we had laid out before us. It was a joyful mess filled with the aroma of fresh herbs and zesty dressing.
As the sun began to set, we laid our salad out on the porch, accompanied by some homemade bread and chilled lemonade. Those moments—enjoying food under the golden hour, wrapped in laughter and nostalgia—are what led me to create this Chickpea Feta Avocado Salad. It’s a dish that brings me back to those blissful summer days, and I hope it can create lovely memories for you too!
Ingredients
Gather your ingredients for this mouthwatering Chickpea Feta Avocado Salad! Here’s what you’ll need:
-
Chickpeas (2 cans, drained and rinsed)
These little legumes are not only rich in protein and fiber, but they’re also a great base for salads. If you prefer, you can use dried chickpeas — just soak and cook them beforehand! -
Fresh Avocado (1 large, diced)
Creamy and rich, avocado adds the perfect texture to this salad. If you’re not a fan of avocados or can’t find ripe ones, try substituting with diced cucumber or even some roasted sweet potatoes for a twist. -
Feta Cheese (½ cup, crumbled)
Tangy feta brings a burst of flavor. If you’re dairy-free, you can substitute with a plant-based feta or even nutritional yeast for a cheesy flavor. -
Cherry Tomatoes (1 cup, halved)
Juicy tomatoes not only add color but a sweet juiciness that complements the nuttiness of chickpeas. You can choose any variety—grape tomatoes work great too! -
Red Bell Pepper (1, diced)
Crunchy and sweet, this pepper adds a delightful crunch. Feel free to swap with any color bell pepper or even diced cucumbers for added freshness. -
Red Onion (¼ cup, finely chopped)
Onions add a fantastic zing! If raw onion is too strong for you, try soaking the chopped pieces in cold water for 10 minutes to mellow out the flavor. -
Fresh Parsley (¼ cup, chopped)
Bright and herby, parsley adds a lovely finish. If you’re not a fan, mint or cilantro can also bring a fresh twist to the dish. -
Olive Oil (3 tablespoons)
A drizzle of good olive oil ties everything together. You can opt for avocado oil or any light oil if you prefer a different flavor. -
Lemon Juice (from 1 large lemon)
Freshly squeezed lemon juice adds brightness and tang. Lime juice works as an excellent substitute if you’re in a pinch! -
Salt and Pepper (to taste)
Always essential for enhancing flavors! Feel free to experiment with your favorite spices too—paprika or chili flakes can add a delightful kick!
Step-by-Step Instructions
-
Prep Your Veggies:
Start by washing all your fresh produce. Cut the cherry tomatoes in half (or quarters if they’re large) and dice the red bell pepper into bite-sized pieces. -
Get Those Chickpeas Ready:
In a large mixing bowl, add the drained and rinsed chickpeas. If you like a creamier salad, you can lightly mash a portion of the chickpeas with a fork before mixing. This will create a lovely texture. -
Toss In Your Veggies:
Add in the avocado, cherry tomatoes, red bell pepper, and red onion. Be gentle with the avocado to keep it intact; we want those lovely chunks that lend creaminess to the salad. -
Crumbled Feta and Parsley:
Now, sprinkle the crumbled feta cheese and chopped parsley over the heap of fresh ingredients. The feta adds a wonderful salty tang that plays so well with the other flavors! -
Whisk the Dressing:
In a small bowl, whisk together the olive oil, lemon juice, salt, and pepper. You can add a pinch of dried herbs like oregano or basil for an extra flavor kick! -
Combine Everything:
Drizzle the dressing over your salad and gently toss everything together until well combined. Make sure every piece is coated nicely to ensure a burst of flavor with every bite! -
Taste and Adjust:
Here’s where you get to play chef! Taste your salad and adjust the seasoning if needed—maybe a little more salt or a splash more lemon juice—whatever your heart desires! -
Let It Chill:
If you have time, let the salad sit for about 20-30 minutes before serving. This allows the flavors to meld beautifully!
Serving Suggestions
When it comes to serving this Chickpea Feta Avocado Salad, keep it simple yet delightful! Present it in a large, vibrant bowl and let the colors shine. For an elegant touch, garnish with an extra sprig of parsley and a drizzle of olive oil right before serving. You can enjoy it as a refreshing standalone dish or as a side to grilled chicken, fish, or even a hearty grain like quinoa.
Recipe Variations
Here are a few creative twists to keep things exciting:
-
Mediterranean Twist: Add some pitted olives and sun-dried tomatoes for a more Mediterranean vibe.
-
Spicy Kick: Toss in some diced jalapeños or sprinkle some red pepper flakes for added heat.
-
Grain Booster: For a more filling option, mix in cooked quinoa or farro for a hearty salad.
-
Herb Garden: Swap the parsley for fresh dill or basil for a completely different flavor profile.
-
Nutty Crunch: Toss in a handful of toasted nuts or seeds for an extra crunch and healthy fats!
Chef’s Notes
This Chickpea Feta Avocado Salad has become one of my go-to recipes for every occasion. I love how versatile it is—you can adjust the ingredients based on what you have on hand or what’s in season. I remember the first time I attempted to make it for a potluck and accidentally added too much lemon juice. Oh boy, did it turn into a zesty disaster! But with a bit of tossing and a sprinkle of sugar, it transformed into a beloved hit!
Cooking is all about learning and experimenting. So don’t be afraid to make your version of this salad, and remember: things don’t always have to be perfect to be delicious!
FAQs and Troubleshooting
1. Why did my avocado turn brown so quickly?
Avocado browning is completely normal due to oxidation. To slow this process, make sure to toss the avocado with lemon juice immediately after dicing it; this will help preserve its vibrant green color for longer!
2. Can I make this salad ahead of time?
Yes! You can prep your veggies and chickpeas ahead of time, but I suggest adding the avocado and dressing just before serving to keep everything fresh and delicious.
3. It’s too salty—help!
If your salad ends up too salty from the feta, you can balance it by adding extra chickpeas or veggies. A small drizzle of honey can also help counteract excessive saltiness!
4. How long can I store leftovers?
The salad will typically last 2-3 days in an airtight container in the fridge. However, if the avocado begins to brown, it may not look as appealing, so try to eat it fresh!
Nutritional Info
(Per serving, makes approximately four servings)
- Calories: 300
- Protein: 10g
- Carbohydrates: 35g
- Fat: 15g
- Fiber: 9g
There you have it! A delightful Chickpea Feta Avocado Salad that’s not only packed with flavor but also a story to tell. I hope you enjoy making and sharing this recipe as much as I do. Happy cooking, and may your kitchen always be filled with warmth and laughter!
Print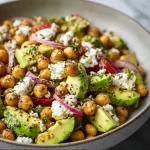
Chickpea Feta Avocado Salad
- Total Time: 15 minutes
- Yield: 4 servings 1x
- Diet: Vegetarian
Description
A flavorful and nutritious Chickpea Feta Avocado Salad packed with fresh ingredients and vibrant tastes, perfect for any occasion.
Ingredients
- 2 cans Chickpeas, drained and rinsed
- 1 large Fresh Avocado, diced
- ½ cup Feta Cheese, crumbled
- 1 cup Cherry Tomatoes, halved
- 1 Red Bell Pepper, diced
- ¼ cup Red Onion, finely chopped
- ¼ cup Fresh Parsley, chopped
- 3 tablespoons Olive Oil
- Juice from 1 large Lemon
- Salt and Pepper, to taste
Instructions
- Prep your veggies: Start by washing all your fresh produce. Cut the cherry tomatoes in half (or quarters if they’re large) and dice the red bell pepper into bite-sized pieces.
- Get those chickpeas ready: In a large mixing bowl, add the drained and rinsed chickpeas. You can lightly mash a portion of the chickpeas with a fork if you like a creamier salad.
- Toss in your veggies: Add in the avocado, cherry tomatoes, red bell pepper, and red onion. Be gentle with the avocado to keep it intact.
- Sprinkle the crumbled feta cheese and chopped parsley over the heap of fresh ingredients.
- Whisk the dressing: In a small bowl, whisk together the olive oil, lemon juice, salt, and pepper.
- Combine everything: Drizzle the dressing over your salad and gently toss until well combined.
- Taste and adjust: Taste your salad and adjust the seasoning if needed.
- Let it chill: If you have time, let the salad sit for about 20-30 minutes before serving.
Notes
Enjoy it as a refreshing standalone dish or as a side to grilled chicken, fish, or hearty grains like quinoa. You can prepare the veggies and chickpeas ahead of time but add the avocado just before serving.
- Prep Time: 15 minutes
- Cook Time: 0 minutes
- Category: Salad
- Method: Mixing
- Cuisine: Mediterranean
Nutrition
- Serving Size: 1 serving
- Calories: 300
- Sugar: 3g
- Sodium: 400mg
- Fat: 15g
- Saturated Fat: 4g
- Unsaturated Fat: 8g
- Trans Fat: 0g
- Carbohydrates: 35g
- Fiber: 9g
- Protein: 10g
- Cholesterol: 20mg
Keywords: chickpea salad, avocado salad, Mediterranean salad, healthy recipe, vegetarian recipe


