

Ingredient No-Bake Chocolate Jam Bites (Busy Weeknights)
Decadent Chocolate Jam Bites Recipe: A Sweet Adventure Awaits!
Welcome to my kitchen, fellow food lovers! Today, we are diving into the rich, indulgent world of chocolate with a treat that will send your taste buds on a delightful journey – my Chocolate Jam Bites. These little gems not only pack a flavorful punch but also bring back so many heartwarming memories of my childhood. Imagine biting into a soft, chocolatey shell to discover a gooey, fruity center. It’s the perfect balance of sweetness and tanginess, sure to satisfy even the most discerning dessert connoisseur.
The Sweet Backstory: A Journey Down Memory Lane
One of my fondest memories revolves around my grandmother’s kitchen. Every Sunday, the warmth of her oven enveloped the house, and the rich aroma of melted chocolate filled the air. She had this magical ability to turn simple ingredients into creations that brought the whole family together. One afternoon, I remember watching her as she delicately folded chocolate into a batter. “A touch of jam, my dear,” she said, her eyes twinkling like the chocolate chips scattered on her counter. She showed me how a little fruity surprise could elevate chocolate desserts into something ethereal.
As I immersed myself in her world of cooking, I learned that food is so much more than just sustenance; it’s a way to weave memories, share stories, and bring joy to others. It’s this spirit that inspired me to recreate those nostalgic Chocolate Jam Bites. With each bite, I hope to inspire friends and family to gather, share stories, and create their own cherished memories around the table. So, let’s don our aprons and embark on this delightful culinary adventure!
Ingredients You’ll Need
To make these scrumptious Chocolate Jam Bites, gather the following ingredients:
-
1 cup all-purpose flour
This creates the structure of your bites. If you’re looking for gluten-free options, you can substitute with almond flour or a gluten-free flour blend. -
1/2 cup unsweetened cocoa powder
Quality cocoa powder enhances the chocolate flavor; I prefer Dutch-processed for its rich taste. If you don’t have cocoa powder, you can use carob powder as a substitute, though the flavor will differ slightly. -
1/2 teaspoon baking powder
This is your leavening agent, helping the bites rise and become light. If you’re out of baking powder, you can create a substitute by combining 1/4 teaspoon baking soda with 1/2 teaspoon vinegar. -
1/4 teaspoon salt
Don’t skip this! Salt enhances the sweetness. Use sea salt for a touch of gourmet flair. -
1/2 cup granulated sugar
For that perfect sweetness. You can use coconut sugar for a lower-glycemic option. -
1/2 cup unsalted butter, melted
Butter brings a rich, creamy flavor. If you’re dairy-free, coconut oil is a great alternative. -
2 large eggs
These add moisture and help bind the ingredients together. For a vegan option, try flax eggs (1 tablespoon ground flaxseed + 2.5 tablespoons water = 1 egg). -
1 teaspoon vanilla extract
Vanilla enhances the overall flavor profile. For a twist, try almond extract instead! -
1/2 cup fruit jam
Choose your favorite! Raspberry, strawberry, or apricot add fantastic fruity flavors to contrast the chocolate.
Step-by-Step Instructions
Now that we have everything ready, let’s get cooking! Here’s how to create these delectable Chocolate Jam Bites, step by step:
-
Preheat the Oven
Preheat your oven to 350°F (175°C). As the oven warms up, it’s the perfect time to prepare your baking pan and ingredients. Trust me, having everything prepped makes the cooking process seamless! -
Grease the Baking Pan
Lightly grease a mini muffin tin with butter or line them with paper liners. This will prevent our delightful bites from sticking. Plus, it makes cleanup a breeze! -
Mix the Dry Ingredients
In a large mixing bowl, combine the flour, cocoa powder, baking powder, and salt. Whisk them together until well-blended. I love using a whisk for this – it’s satisfying to see the dry ingredients come together, creating a lovely cocoa cloud. -
Combine Sweet Ingredients
In another mixing bowl, whisk together the melted butter, granulated sugar, eggs, and vanilla extract until smooth. The velvety mixture is where the magic begins! If you see some bubbles forming, that means the eggs are contributing to a light and airy texture. -
Incorporate Dry to Wet
Gradually add the dry ingredients into the wet mixture, stirring until just combined. Avoid overmixing; we want these bites to stay tender, not tough! -
Fill the Muffin Tin
Spoon a heaping tablespoon of the batter into each muffin cup, filling them about halfway. Here’s a chef hack: you can use a cookie scoop for neat and even portions! -
Add Jam
Use a teaspoon to drop a small dollop of jam directly into the center of each batter-filled cup. The jam will sink into the chocolate as it bakes, creating a delightful surprise! -
Top with Remaining Batter
Add another tablespoon of the batter on top of the jam, covering it completely. This creates a delicious chocolate shell around your fruity filling. -
Bake
Bake for 12-15 minutes, or until a toothpick inserted into the center comes out clean. Keep an eye on them – you want to avoid overbaking, as they should remain moist and fudgy! -
Cool and Enjoy!
Once out of the oven, let your Chocolate Jam Bites cool for a few minutes before transferring them to a wire rack. I’m telling you, the smell wafting through your kitchen is the ultimate reward for your efforts!
Serving Suggestions
Presentation is everything, my friends! To serve these delectable bites, arrange them on a beautiful platter or cake stand. Dust a light sprinkle of powdered sugar over the top for an extra touch of elegance. Pair them with a scoop of vanilla ice cream for the perfect contrast to the rich chocolate or serve with a dollop of whipped cream and fresh berries for a summery vibe. Your dessert table will look irresistible!
Recipe Variations
-
Nutty Delight: Add chopped nuts (like walnuts or hazelnuts) to the batter for added crunch and flavor.
-
Peppermint Chocolate: Stir in a few drops of peppermint extract to the batter for festive holiday vibes.
-
Spicy Chocolate: Mix in a pinch of cayenne pepper or cinnamon for a warm, spicy twist to your chocolate bites.
-
Double Berry: Layer two types of jams, like raspberry and blueberry, for a mixed jam filling surprise.
-
Coconut Chocolate Bites: Toss in shredded coconut to the batter for a tropical flair!
Chef’s Notes
Oh, the times I’ve spent perfecting this recipe! I’ve had my fair share of kitchen adventures, including a recipe that turned into a chocolate tsunami – let’s just say it didn’t end with the desired outcome! Each mistake has taught me something, and now, these Chocolate Jam Bites are a well-loved staple in my home. They’ve evolved from a simple weekend treat into the star of every gathering, reminding us that the best recipes come from the heart and a sprinkle of good humor.
FAQs and Troubleshooting
1. Why did my chocolate bites sink?
This could happen if the batter is too thin or if you didn’t fill the cups enough. Make sure your batter is thick and give each cup sufficient batter to rise and envelop the jam.
2. Can I use frozen jam?
Absolutely! Just thaw it and drain any excess liquid before use, ensuring it won’t affect the batter consistency.
3. How do I know when they’re done baking?
The tops should look firm and slightly springy. A toothpick inserted in the center should come out clean, but a few crumbs are okay!
4. My bites are too dense; what went wrong?
Overmixing can cause a denser texture. Mix until just combined, and ensure your leavening agents (like baking powder) are fresh.
Nutritional Info
While I always focus on enjoying food, if you need nutritional information for these bites, one serving (1 bite) typically has about 150 calories, depending on ingredients like the type of jam used. Remember, enjoying in moderation is key!
Now, you’re ready to create your own Chocolate Jam Bites – a sweet delight that is sure to thrill your taste buds and warm your heart. I can’t wait for you to try them and make your own beautiful memories! Happy baking!
Print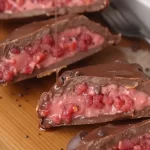
Decadent Chocolate Jam Bites
- Total Time: 30 minutes
- Yield: 12 servings 1x
- Diet: Vegetarian
Description
Indulge in these rich and gooey Chocolate Jam Bites, a delightful treat that balances chocolate with fruity centers.
Ingredients
- 1 cup all-purpose flour
- 1/2 cup unsweetened cocoa powder
- 1/2 teaspoon baking powder
- 1/4 teaspoon salt
- 1/2 cup granulated sugar
- 1/2 cup unsalted butter, melted
- 2 large eggs
- 1 teaspoon vanilla extract
- 1/2 cup fruit jam (e.g., raspberry, strawberry, apricot)
Instructions
- Preheat your oven to 350°F (175°C).
- Grease a mini muffin tin with butter or line with paper liners.
- Mix the flour, cocoa powder, baking powder, and salt in a large bowl.
- Combine melted butter, granulated sugar, eggs, and vanilla in another bowl.
- Incorporate the dry ingredients with the wet mixture until just combined.
- Fill each muffin cup halfway with batter.
- Add a dollop of jam in the center of each cup.
- Top with more batter to cover the jam.
- Bake for 12-15 minutes until a toothpick comes out clean.
- Cool for a few minutes before transferring to a wire rack.
Notes
For gluten-free options, substitute all-purpose flour with almond flour. You can also experiment with different fruit jams!
- Prep Time: 15 minutes
- Cook Time: 15 minutes
- Category: Dessert
- Method: Baking
- Cuisine: Global
Nutrition
- Serving Size: 1 bite
- Calories: 150
- Sugar: 10g
- Sodium: 100mg
- Fat: 8g
- Saturated Fat: 5g
- Unsaturated Fat: 3g
- Trans Fat: 0g
- Carbohydrates: 18g
- Fiber: 2g
- Protein: 2g
- Cholesterol: 30mg
Keywords: chocolate, dessert, jam, sweet treats, baking

Minute Tortellini Pasta Salad for Busy Weeknights
Tortellini Pasta Salad: A Burst of Flavor and Nostalgia in Every Bite
Welcome to my kitchen, food friends! Today, I’m excited to share a dish that’s not just a delicious meal but a delightful experience. We’re diving into the world of Tortellini Pasta Salad—a dish that brings back warm memories and plenty of flavor. Whether you’re preparing a quick weeknight dinner, hosting a potluck, or planning a summer picnic, this salad is sure to impress!
There’s something so comforting about the combination of tender tortellini, fresh veggies, and a zesty dressing. But let’s not forget the best part—it’s incredibly versatile! You can personalize it with your favorite ingredients, making it a canvas for your culinary creativity. But enough about that for the moment; let’s take a little stroll down memory lane.
A Nostalgic Dive into Family Gatherings
Growing up, my family had this wonderful tradition every summer where we’d gather in my grandma’s sunny backyard for a cookout. She would whip up her famous Tortellini Pasta Salad adorned with a medley of colorful veggies, a sprinkle of cheese, and a generous helping of her secret vinaigrette. The smell of fresh basil, the laughter of cousins running around, and the sight of a big bowl filled with deliciousness always filled my heart with joy.
I remember one year when I was tasked with “helping” Grandma. I was only eight, and my idea of help was mostly taste-testing. As she showed me how to mix the ingredients, I accidentally knocked over a jar of olives. The bright green gems rolled everywhere, and we spent more time laughing and picking them up than making the salad! That day taught me that cooking is not only about the food; it’s about the memories we create, the connections made, and the joy in sharing meals together.
And that’s precisely what this Tortellini Pasta Salad represents to me—a dish brimming with love, laughter, and of course, tasty bites. So, let’s roll up our sleeves and create some new memories together!
Ingredients
Now, let’s talk about what you’ll need for this delightful dish. Here’s a list of the main ingredients along with some fun insights and substitution tips!
-
Cheese Tortellini: This is the star of the dish! You can find cheese-filled tortellini at your local grocery store—fresh or frozen. If you’re feeling adventurous, try spinach or mushroom tortellini for a flavor twist!
-
Cherry Tomatoes: These bite-sized beauties are sweet and juicy. Look for vibrant red or yellow ones! If you can’t find them, you can use chopped regular tomatoes instead, but keep them in bite-sized pieces.
-
Cucumber: Adds a crisp crunch! Use English cucumbers for less bitterness. If you don’t like cucumbers, bell peppers offer a great crunch and sweetness.
-
Red Onion: This gives the salad a lovely bite! Soak chopped onion in cold water for 10 minutes to mellow out the flavor. If red onion isn’t your thing, green onions are a milder alternative.
-
Bell Peppers: I recommend a mix of colors for visual appeal. Use red, yellow, or orange for sweetness. Green peppers are fine too, just know they pack a sharper punch.
-
Fresh Basil: This herb adds a beautiful aroma and flavor. If basil isn’t available, try substituting with fresh parsley or even dill for a different flavor profile.
-
Feta Cheese: Crumbled feta brings a creamy, tangy element to the salad. If you prefer a non-dairy option, you can use vegan feta or leave it out entirely.
-
Olive Oil: A good quality extra virgin olive oil enhances the dressing immensely. For a lighter option, avocado oil works wonderfully too.
-
Red Wine Vinegar: Adds acidity and brightness. If you don’t have it, apple cider vinegar can be used as a substitute.
-
Honey or Maple Syrup: Just a touch of sweetness to balance the acidity. For a vegan alternative, stick with maple syrup.
-
Salt and Pepper: Essential for enhancing flavors. Don’t skip these!
Step-by-Step Instructions
Ready to create some kitchen magic? Let’s jump into the cooking process!
-
Cook the Tortellini: Start by bringing a large pot of salted water to a rolling boil. Gently add the tortellini and cook according to package instructions, usually around 5-7 minutes until they float to the top. Pro tip: don’t overcook! You want them tender but firm. Drain and rinse under cold water to stop the cooking process. This also helps keep them from sticking together.
-
Prep the Veggies: While the tortellini cooks, chop up your veggies. First, slice the cherry tomatoes in half, dice the cucumber, finely chop the red onion, and dice the bell peppers. Take a moment to appreciate how colorful your cutting board is—food is all about delighting the senses!
-
Make the Dressing: In a small bowl, whisk together the olive oil, red wine vinegar, honey (or maple syrup), and a sprinkle of salt and pepper. Taste it! Adjust the seasoning or sweetness as your palate desires. If you fancy a little zing, add a pinch of crushed red pepper flakes!
-
Combine Everything: In a large bowl, add the cooked tortellini, chopped vegetables, and crumbled feta. Drizzle the dressing over the top and gently toss everything together. Take care not to break the tortellini! Remember, they’re delicate little pockets of joy.
-
Add Fresh Herbs: Fold in the freshly chopped basil gently. The aroma will be intoxicating!
-
Taste and Adjust: This is the fun part! Taste your salad and see if it needs more seasoning or maybe some more dressing. Feel free to have a little nibble as you go—it’s really part of the process!
-
Chill: For the best flavor, let your pasta salad chill in the refrigerator for at least 30 minutes before serving. This allows the flavors to meld together beautifully.
Serving Suggestions
Now, let’s talk presentation! This Tortellini Pasta Salad is as pretty as a spring garden, so don’t shy away from showcasing that vibrant color. Serve the salad on a large platter for a family-style gathering or in individual bowls for a casual picnic. For a bit of flair, garnish it with extra basil on top and a drizzle of olive oil. Serve it alongside grilled chicken, crusty bread, or as a stand-alone meal—you really can’t go wrong.
Recipe Variations
-
Mediterranean Twist: Add olives, artichoke hearts, and sun-dried tomatoes for a Mediterranean vibe.
-
Protein Power: Toss in diced grilled chicken, shrimp, or chickpeas for extra protein.
-
Creamy Option: Mix in a dollop of Greek yogurt or mayonnaise to make it creamier.
-
Roasted Veggies: Roast your tomatoes and peppers before adding them to the salad for a different depth of flavor.
-
Spicy Kick: Add diced jalapeños or a few dashes of hot sauce to amp up the heat.
Chef’s Notes
This recipe is like a reliable friend—it’s easy to customize and always brings the smiles! Over the years, I’ve modified this Tortellini Pasta Salad countless times based on what I have on hand or what’s in season. One year, I used grilled veggies and drizzled balsamic reduction on top, which added a fabulous twist. Honestly, don’t be afraid to play with it! Cooking should be fun and an outlet for your creativity.
And remember that time I dropped my entire bowl of salad on the floor? What a disaster! My dog had the best day ever. But it also taught me to always have a backup salad on hand—which is why I often double this recipe.
FAQs and Troubleshooting
-
Can I make this salad ahead of time?
Absolutely! You can prepare it a day in advance. Just wait to add the basil until serving to keep it fresh! -
What if I have leftovers?
This salad holds up beautifully in the fridge for a couple of days. Just be aware that the tortellini may absorb some dressing. -
Can I freeze this salad?
I wouldn’t recommend freezing it, as freezing will change the texture of the tortellini and veggies once defrosted. -
What if I overcooked the tortellini?
No worries! They might be a bit mushy, but the vibrant flavors of the salad will help mask the texture. Consider adding some crunchy elements like nuts or crispy lettuce for contrast.
Now you have the ultimate guide to making Tortellini Pasta Salad! So, gather your ingredients, invite some friends over, and enjoy the process of cooking and sharing this delightful dish. Happy salad-making, friends!
Print
Tortellini Pasta Salad
- Total Time: 45 minutes
- Yield: 4 servings 1x
- Diet: Vegetarian
Description
A refreshing and versatile salad featuring cheese tortellini, fresh vegetables, and a zesty dressing.
Ingredients
- 12 oz cheese tortellini
- 1 cup cherry tomatoes, halved
- 1 cucumber, diced
- 1/2 red onion, finely chopped
- 1 bell pepper, diced
- 1/4 cup fresh basil, chopped
- 1/2 cup feta cheese, crumbled
- 1/4 cup olive oil
- 2 tbsp red wine vinegar
- 1 tbsp honey or maple syrup
- Salt and pepper to taste
Instructions
- Cook the tortellini in salted boiling water according to package instructions for 5-7 minutes until they float to the top. Drain and rinse under cold water.
- Prep the veggies: slice cherry tomatoes, dice cucumber, chop red onion, and dice bell pepper.
- Make the dressing by whisking together olive oil, red wine vinegar, honey, salt, and pepper.
- Combine the cooked tortellini, veggies, and feta in a large bowl. Drizzle with dressing and toss gently.
- Add fresh basil and fold it into the salad carefully.
- Taste the salad and adjust seasoning if necessary.
- Chill the salad in the refrigerator for at least 30 minutes before serving.
Notes
Customize with your favorite ingredients. Serve chilled for best flavor.
- Prep Time: 15 minutes
- Cook Time: 10 minutes
- Category: Salad
- Method: Boiling
- Cuisine: Italian
Nutrition
- Serving Size: 1 serving
- Calories: 350
- Sugar: 5g
- Sodium: 400mg
- Fat: 12g
- Saturated Fat: 4g
- Unsaturated Fat: 6g
- Trans Fat: 0g
- Carbohydrates: 45g
- Fiber: 3g
- Protein: 15g
- Cholesterol: 30mg
Keywords: tortellini salad, pasta salad, summer salad, vegetarian salad


