
The Ultimate Chocolate Peanut Butter Milkshake Recipe
Hey there, fellow food lovers! Welcome back to my cozy kitchen, where I whip up everything from hearty dinners to sweet delights! Today, we’re diving into a dreamy dessert that’s bound to make your taste buds dance: the Chocolate Peanut Butter Milkshake. Picture this: you’re nestled on the couch after a long day, and you crave something sweet, creamy, and utterly indulgent. That’s where this delightful concoction comes in.
This milkshake is not just a beverage; it’s a nostalgic sip of happiness that evokes memories of summer evenings and carefree childhood days. Whether you enjoyed it at a local diner or made it at home with your family, this icy treat has a way of bringing warmth to your heart—even on the chilliest days!
In today’s recipe, I’ll share my favorite methods to create this liquid joy filled with the classic combo of chocolate and peanut butter. Don’t worry if you’re new to the kitchen! I’ll walk you through every step, ensuring you not only make the perfect milkshake but enjoy the experience along the way. Grab your blender and let’s blend our way to milkshake magic!
Personal Story
I still remember the very first time I made a milkshake with my mom. We were having a lazy Sunday afternoon, and she decided to surprise me with a special treat. We gathered the ingredients—scoops of chocolate ice cream, rich peanut butter, and milk. I loved how she blended everything together, the sounds of the blender mixing our laughter, and of course, the rich aroma wafting through the kitchen.
As we poured the thick, creamy shake into tall glasses, I noticed the way Mom added a sprinkle of crushed peanuts on top for that extra crunch. With cherry-red straws and big grins, we annihilated those milkshakes within minutes! It was such a simple thing, yet the joy was unforgettable.
Years later, as I found my passion for cooking and blogging, I never forgot that happiness in a glass. Making this Chocolate Peanut Butter Milkshake has become a ritual—a way to relive those sweet memories and create new ones. So, fill your glass, sit back, and let the nostalgia take over.
Ingredients
Here’s what you’ll need to create this creamy delight:
-
Chocolate Ice Cream (2 cups): The star of our show! Use your favorite brand or homemade; bitter-sweet, dark, or classic chocolate ice cream all work fantastically. If you’re looking for a healthier option, try frozen bananas or yogurt instead.
-
Peanut Butter (¼ cup): The creamy (or chunky) texture adds a delightful richness to your shake! For nut-free versions, sunflower seed butter is a brilliant substitute—just as tasty, with a similar consistency!
-
Milk (1 cup): Choose your milk of choice—whole, skim, almond, or oat milk. For a thicker milkshake, you can reduce the amount a bit or even use heavy cream for added richness.
-
Chocolate Syrup (2 tablespoons): A drizzle will amplify the chocolate flavor and give you that perfect milkshake look! You can use store-bought syrup or homemade, depending on your preference.
-
Whipped Cream (for topping): An optional but highly encouraged topping! Make it homemade for that fluffy texture, or grab some canned whipped cream for convenience.
-
Crushed Peanuts (for garnish): Not mandatory, but they give your shake that extra crunch and blend beautifully with the chocolate and peanut butter flavors.
-
Optional Add-ins: Feeling adventurous? Add a pinch of sea salt to enhance flavors or a scoop of protein powder if you want a post-workout treat!
Step-by-Step Instructions
Alright, let’s get blending! Follow these steps to whipped up your fabulous Chocolate Peanut Butter Milkshake:
-
Gather Your Ingredients: Start by arranging all the ingredients on your countertop. A tidy workspace makes the whole cooking experience smoother and more enjoyable!
-
Blend the Goodies: Toss in the 2 cups of chocolate ice cream, ¼ cup of peanut butter, and 1 cup of milk into your blender. Use more or less milk depending on how thick you like your shakes. The ice cream and peanut butter will give you that wonderfully thick texture!
-
Add Chocolate Syrup: This is where the magic happens! Drizzle in 2 tablespoons of chocolate syrup for that indulgent flavor. If you’re a total chocolate lover like me, feel free to add an extra tablespoon.
-
Blend Away: Secure the lid tightly, and blend on high speed for about 30 seconds. Be sure to occasionally stop the blender to scrape down the sides—this ensures all the ingredients get mixed up beautifully. You want a smooth and creamy texture, so blend as necessary!
-
Tasting Time: Before you pour, give it a quick taste! Adjust the flavors if needed—a touch more peanut butter or an extra scoop of ice cream might just do the trick!
-
Serve It Up: Pour the delicious milkshake into tall glasses. I love using large mason jars for that vintage touch. Memory of that first milkshake floods back as I see those jars filled to the brim!
-
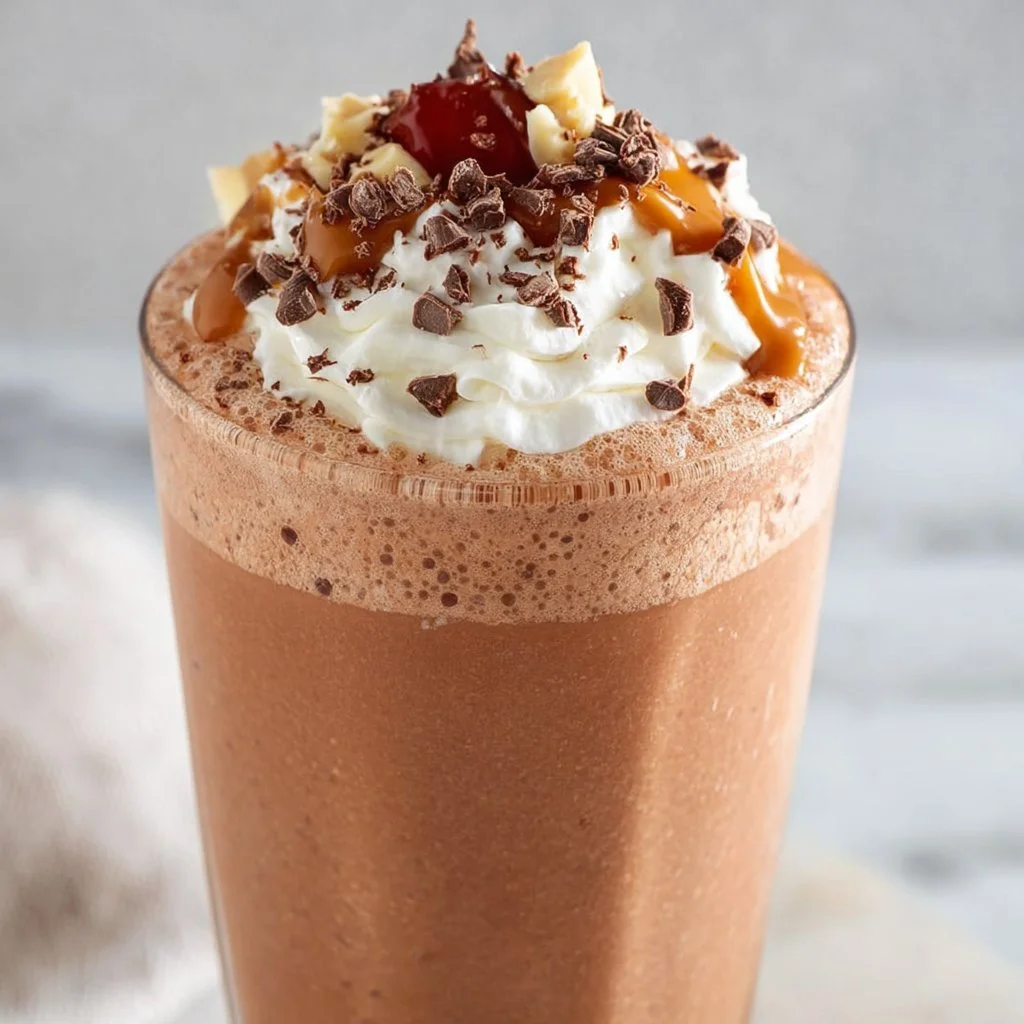
Top It Off: Here’s where you can get a bit fancy. Slather a swirl of whipped cream on top, drizzle more chocolate syrup, and sprinkle the crushed peanuts for some extra flair!
-
Grab a Straw and Enjoy: Finish it off with a colorful straw, take a delightful sip, and savor the flavors! This is where all the hard work pays off, my friend.
Serving Suggestions
Let’s get creative with how you serve this mouthwatering milkshake! Pour your Chocolate Peanut Butter Milkshake into frosty glasses and add a decorative touch with an extra dollop of whipped cream and a drizzle of chocolate syrup on top. For a festive occasion, serve with a side of cookies or brownies for the ultimate indulgence!
If you’re hosting a BBQ or party, consider setting up a milkshake bar with various toppings like crushed cookies, fruit, or even sprinkles. Everyone can customize their shake!
Recipe Variations
Feeling like mixing things up? Here are a few creative twists to elevate your milkshake game:
-
Banana Bliss: Toss in half a ripe banana for a hint of fruity flavor. The banana adds natural sweetness and creaminess.
-
Minty Fresh Twist: Add a few drops of peppermint extract before blending for a refreshing chocolate mint variation that’s reminiscent of your favorite ice cream parlor!
-
Cookie Monster Shake: Crumble some Oreo cookies into the milkshake for a delightful texture and extra chocolate indulgence.
-
Healthy Peanut Butter Version: Use frozen yogurt or the banana trick to create a lower-calorie shake without sacrificing flavor!
-
More Nutty Flavors: Toss in some almond butter or hazelnut spread in place of peanut butter for a different nutty profile!
Chef’s Notes
Oh, let me share a little kitchen side story. Once, I was making this marvel for a group of friends, but I mistakenly grabbed the chili chocolate ice cream instead of the regular chocolate. In a moment of panic, I just ran with it! I blended it up, and it turned out to be a spicy-sweet hit! Who knew experimenting could yield delightful surprises?
This recipe has evolved over time—different variations, experimental ingredients, but the core love for the classic remains. It truly represents the joy of cooking and creating something that speaks to your taste buds!
FAQs and Troubleshooting
1. My milkshake is too thick! What do I do?
Don’t worry! Just add milk a tablespoon at a time while blending until you reach your desired consistency.
2. Can I use frozen milk instead of ice cream?
Absolutely! If you’re looking for a healthier alternative, frozen bananas or yogurt will work perfectly as a base. Just blend them with milk to achieve a creamy texture!
3. Is it possible to make this milkshake dairy-free?
Definitely! Use your preferred non-dairy ice cream and milk (almond, coconut, or oat milk are fantastic options) to make it completely dairy-free!
4. My shake is too sweet; how can I tone it down?
If your shake is overly sweet, add a pinch of salt to balance the flavors. You can also mix in a scoop of plain yogurt to cut through the sweetness!
Nutritional Info (Optional)
- Calories: Approximately 500-600 kcal per serving (depends on specific brands and quantities used)
- Protein: 12-15g
- Fat: 20-25g
- Carbohydrates: 70-80g
Conclusion
And there you have it! Your very own Chocolate Peanut Butter Milkshake! Whether you’re enjoying it solo or sharing it with friends and family, this treat brims with charm and flavor that’ll leave everyone wanting more. Remember, cooking is a journey filled with delicious moments and lovely memories. So don’t hesitate to experiment, share your creations, and most importantly, enjoy every sip!
Thanks for joining me today in my kitchen. Keep that apron on and happy cooking!
Print
Chocolate Peanut Butter Milkshake
- Total Time: 10 minutes
- Yield: 2 servings 1x
- Diet: Vegetarian
Description
This indulgent Chocolate Peanut Butter Milkshake combines rich chocolate ice cream with creamy peanut butter for a delightful treat.
Ingredients
- 2 cups Chocolate Ice Cream
- ¼ cup Peanut Butter
- 1 cup Milk
- 2 tablespoons Chocolate Syrup
- Whipped Cream (for topping)
- Crushed Peanuts (for garnish)
- Optional Add-ins: pinch of sea salt, scoop of protein powder
Instructions
- Gather Your Ingredients: Start by arranging all the ingredients on your countertop.
- Blend the Goodies: Toss in the chocolate ice cream, peanut butter, and milk into your blender.
- Add Chocolate Syrup: Drizzle in chocolate syrup for that indulgent flavor.
- Blend Away: Secure the lid and blend on high speed for about 30 seconds.
- Tasting Time: Before you pour, give it a quick taste and adjust flavors if needed.
- Serve It Up: Pour the delicious milkshake into tall glasses.
- Top It Off: Slather a swirl of whipped cream on top and sprinkle crushed peanuts.
- Grab a Straw and Enjoy: Finish it off with a straw, take a sip, and savor the flavors!
Notes
For a healthier option, substitute chocolate ice cream with frozen bananas or yogurt. Customize with your favorite toppings!
- Prep Time: 10 minutes
- Cook Time: 0 minutes
- Category: Dessert
- Method: Blending
- Cuisine: American
Nutrition
- Serving Size: 1 serving
- Calories: 550
- Sugar: 60g
- Sodium: 300mg
- Fat: 25g
- Saturated Fat: 10g
- Unsaturated Fat: 12g
- Trans Fat: 0g
- Carbohydrates: 75g
- Fiber: 4g
- Protein: 15g
- Cholesterol: 80mg
Keywords: milkshake, chocolate, peanut butter, dessert, creamy, indulgent


