
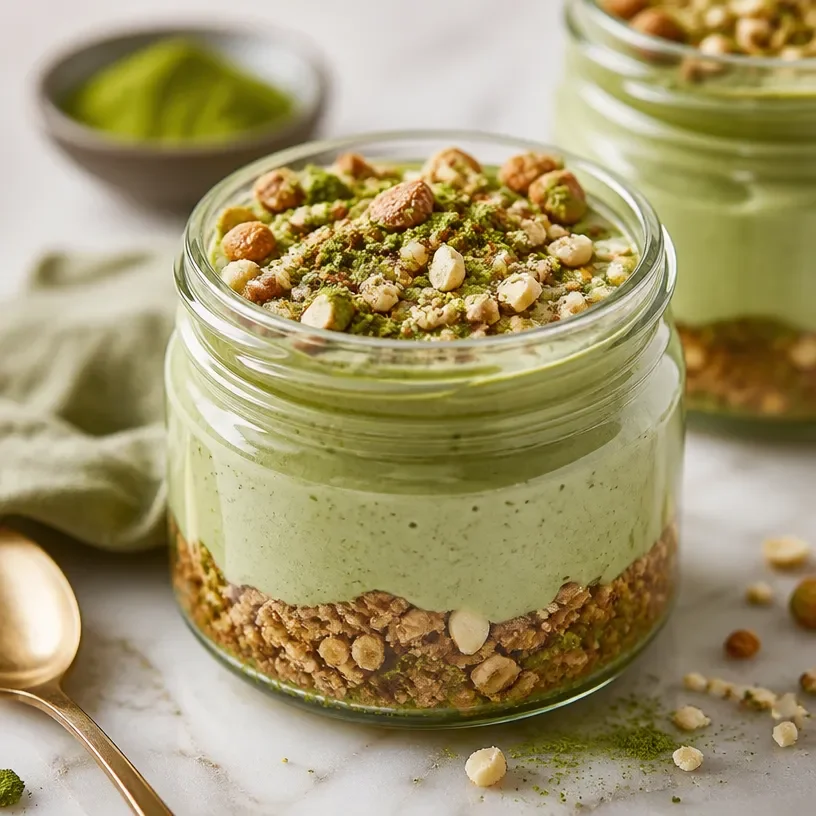
No-Bake Protein Matcha Cheesecake Jars for Easy Meal-Prep
Whip Up a Protein Matcha Cheesecake Jar: A Cozy Delight!
Welcome to my kitchen! I’m thrilled you’re here, ready to dive into a delicious and health-conscious treat that’s sure to bring a smile to your face: the Protein Matcha Cheesecake Jar. Now, I know what you might be thinking—cheesecake in a jar? Is that even possible? The answer is a resounding yes! And let me tell you, it’s pure bliss in each spoonful.
Imagine creamy layers of matcha-infused cheesecake smothered in a hint of sweetness, all perfectly blended with protein goodness. It’s the kind of dessert that checks all the boxes—it’s indulgent yet nutritious, elegant yet super simple to whip up. Plus, it looks fabulous layered in a jar, making it an Instagram-worthy treat to impress your friends or simply enjoy solo while snuggled up on your couch with a cup of tea.
But here’s the kicker: This recipe came to life on one rainy afternoon. I was reminiscing about my favorite desserts from childhood, those rich, creamy slices of cheesecake that my mom would whip up for special occasions. Then, I thought, why not give it a wholesome twist? That’s when the idea for a protein-packed matcha cheesecake jar blossomed. Not only does this treat satisfy your sweet tooth, but it also fuels your body with protein and antioxidants, thanks to the incredible matcha powder. Trust me, once you try this, it’ll become a go-to recipe in your home!
So grab your apron, and let’s get ready to create a dessert that’s as delightful to make as it is to eat.
A Peek into My Past: The Cheesecake Connection
I’ll never forget the first time I watched my mom make her famous cheesecake. I was just a kid, perched on a stool in our cozy kitchen, mesmerized by the way she blended the cream cheese, sugar, and lovely vanilla extract. I can still smell the fragrant aroma wafting through our little home, mingling with the warm scent of baked cookies cooling on the counter—divine!
One day, during a particularly gloomy winter day, she surprised us with mini cheesecake cups instead of a traditional cake. Each cup was lovingly layered in these adorable little ramekins, showcasing a smooth cream cheese layer on top of a buttery graham cracker crust. Sitting at the kitchen table, I savored each bite, feeling a wave of warmth and happiness wash over me.
Fast forward to now, as I recreate that joy with a healthier twist. This Protein Matcha Cheesecake Jar pays homage to those cherished family moments while offering a contemporary, guilt-free take that allows me to indulge without compromising on my health goals. It’s amazing how food has a way of connecting us to memories, isn’t it?
Ingredients You’ll Need
To whip up these delightful Protein Matcha Cheesecake Jars, gather the following ingredients:
- Cream Cheese (8 oz): The creamy base that gives cheesecake its signature richness. For a lighter option, use low-fat cream cheese or Greek yogurt.
- Greek Yogurt (1/2 cup): Adds creaminess and protein. You can substitute it with any plain yogurt or even non-dairy versions if you’re vegan.
- Matcha Powder (2 tablespoons): This green powder not only gives the cheesecake a beautiful hue but is also packed with antioxidants. Ensure you use ceremonial-grade matcha for the best flavor. If you’re not a fan of matcha, feel free to use cocoa powder for a chocolate version.
- Protein Powder (1 scoop): Adds a protein kick. Choose vanilla or unflavored protein powder to complement the matcha. For a plant-based variation, opt for pea or hemp protein.
- Honey or Maple Syrup (1/4 cup): Nature’s sweetener! Adjust the amount based on your sweetness preference. Agave or coconut sugar are fantastic vegan substitutes.
- Vanilla Extract (1 teaspoon): A splash of this makes everything better! Pure vanilla extract works best, but if you’re in a pinch, imitation vanilla will do.
- Graham Crackers (1 cup, crushed): The classic crust element. For a gluten-free option, use almond flour or gluten-free cookies. Or skip the crust entirely for a low-carb dessert!
- Butter (1/4 cup, melted): Binds the crust together. Coconut oil is a great dairy-free alternative.
By switching ingredients and trying new flavors, you can truly make this recipe your own!
Step-By-Step Instructions
Are you ready to get cooking? Let’s make these delicious jars step by step:
Step 1: Prepare the Crust
-
Crush the Graham Crackers: Place your graham crackers in a resealable bag and crush them with a rolling pin until they resemble fine crumbs. You can also pulse them in a food processor for a quicker option! It should be around one cup of crumbs.
-
Mix with Melted Butter: In a medium bowl, combine the crushed graham crackers and melted butter. Mix until all crumbs are coated, forming a sandy texture that will hold tightly once pressed into jars.
-
Layer the Crust: Take your jars (small mason jars work perfectly!) and spoon about 2 tablespoons of the crust mixture into each jar. Use a small spoon or your fingers to press it firmly into the bottom. This will be your scrumptious base!
Step 2: Make the Cheesecake Filling
-
Beat the Cream Cheese: In a mixing bowl, add the softened cream cheese. Use an electric mixer to beat it until smooth and creamy—about 2-3 minutes.
-
Add Greek Yogurt and Protein Powder: Blend in the Greek yogurt and protein powder until well combined. This adds a dreamy texture without skimping on nutrition.
-
Incorporate Matcha Powder: Sprinkle in the matcha powder and vanilla extract, then mix until the color is beautifully uniform. You’ll be greeted with a lovely green hue that screams healthiness!
-
Sweeten the Mix: Add honey or maple syrup to taste. Make sure to taste your mixture, adjusting as needed, because nobody likes an under-sweetened cheesecake!
Step 3: Layer, Layer, Layer!
-
Assembly Time: Spoon the matcha cheesecake filling over the graham cracker crust, filling the jars about halfway. Use the back of a spoon or a small spatula to smoothen the top.
-
Repeat the Layers: If you have enough filling and jars, feel free to create a second layer! Another layer of crust, followed by another dollop of cheesecake filling, will make it more indulgent.
-
Chill in the Fridge: Cover your jars with lids or plastic wrap and chill them in the fridge for at least 2 hours, or overnight if you can wait. This allows the flavors to meld beautifully and sets the cheesecake for a perfect bite!
Serving Suggestions
When you’re ready to serve, take your jars out of the fridge and enjoy the wonderful sight of those layers! I love to garnish my Protein Matcha Cheesecake Jar with a sprinkle of extra matcha on top, some fresh berries like raspberries or blueberries for a pop of color, and maybe even a drizzle of extra honey. You could also add some crushed nuts for crunch or a dollop of coconut whipped cream for an extra indulgent touch. Just remember, presentation is key!
Recipe Variations
One of the best things about any recipe is how we can tweak it to fit our preferences. Here are some fun variations to consider for your Protein Matcha Cheesecake Jar:
- Chocolate Lover’s Delight: Replace matcha with cocoa powder, adding a bit of espresso powder for a mocha flavor.
- Berry Burst: Mix some crushed berries—like strawberries or blueberries—into your cheesecake filling for a fruity twist.
- Vegan Version: Swap cream cheese and Greek yogurt with blended silken tofu and non-dairy yogurt, using agave for sweetness.
- Nutty Flavor: Add a tablespoon of almond or peanut butter to the filling for a rich and nutty flavor profile.
- Spiced Up: Incorporate a pinch of cinnamon or nutmeg into the cheesecake mixture for warm, cozy undertones.
Imagination is your only limit—feel free to play with flavors and create something uniquely you!
Chef’s Notes
As I’ve played around with this recipe over the years, one funny memory stands out: the first time I tried to make this without measuring anything was a total disaster! I thought, “How hard can it be?” Well, spoiler alert—I ended up with a soupy, overly sweet mess that tasted nothing like the delightful treat I had in my mind.
Now, I always measure my ingredients to strike that perfect balance. I’ve learned that cooking is as much about precision as it is about creativity. Each time I share this recipe with friends, I see their eyes light up, which reminds me of my childhood and why I do what I do. I truly believe that food should not just be enjoyed but also shared and celebrated, making this recipe a staple in my kitchen.
FAQs and Troubleshooting
Q1: Why does my cheesecake jar look lumpy?
If your mixture appears lumpy, it’s likely that the cream cheese wasn’t softened enough. Make sure to let it sit at room temperature for about 30 minutes before mixing.
Q2: How can I make the cheesecake less sweet?
Adjust the sweetness to your liking. Start with less honey or maple syrup and gradually add more until you reach your desired sweetness.
Q3: Can I freeze these cheesecake jars?
Yes! These cheesecake jars freeze beautifully. Just make sure to leave out any garnishes until you’re ready to serve. Store them in an airtight container and thaw them in the fridge before enjoying.
Q4: What can I use if I don’t have matcha?
If matcha isn’t in your pantry, try using cocoa powder or a flavored protein powder instead for a different taste sensation.
Nutritional Info (Optional)
This recipe packs a nutrient-rich punch:
- Total Calories per Jar: Approximately 250 calories
- Protein: 15g
- Carbs: 27g
- Fat: 10g
Feel free to adjust this info to better fit your ingredient choices!
Now that you’ve got the inside scoop on making these Protein Matcha Cheesecake Jars, it’s time to get in the kitchen and give it a whirl! Whether it’s for yourself, your family, or a gathering with friends, this dessert brings comfort, joy, and healthy indulgence to every occasion. Happy cooking!
Print
Protein Matcha Cheesecake Jar
- Total Time: 120 minutes
- Yield: 4 servings 1x
- Diet: Vegetarian
Description
A creamy, health-conscious dessert with layers of matcha-infused cheesecake and a delicious graham cracker crust, perfect for any occasion.
Ingredients
- 8 oz Cream Cheese
- 1/2 cup Greek Yogurt
- 2 tablespoons Matcha Powder
- 1 scoop Protein Powder
- 1/4 cup Honey or Maple Syrup
- 1 teaspoon Vanilla Extract
- 1 cup Graham Crackers, crushed
- 1/4 cup Butter, melted
Instructions
- Prepare the Crust
- Crush the graham crackers in a bag or food processor.
- Mix the crushed graham crackers with melted butter until coated.
- Layer about 2 tablespoons of the crust mixture into the bottom of jars.
- Make the Cheesecake Filling
- Beat the cream cheese with an electric mixer until smooth.
- Add the Greek yogurt and protein powder, blending until combined.
- Incorporate matcha powder and vanilla extract until uniformly mixed.
- Sweeten the mixture with honey or maple syrup to taste.
- Assemble the jars by spooning cheesecake filling over the crust.
- Repeat the layers as desired, then chill in the fridge for at least 2 hours.
Notes
Garnish with extra matcha, fresh berries, or whipped cream for added flavor and presentation.
- Prep Time: 15 minutes
- Cook Time: 0 minutes
- Category: Dessert
- Method: Chilling
- Cuisine: Fusion
Nutrition
- Serving Size: 1 jar
- Calories: 250
- Sugar: 15g
- Sodium: 200mg
- Fat: 10g
- Saturated Fat: 5g
- Unsaturated Fat: 3g
- Trans Fat: 0g
- Carbohydrates: 27g
- Fiber: 1g
- Protein: 15g
- Cholesterol: 30mg
Keywords: cheesecake, matcha, healthy dessert, protein dessert, layered dessert
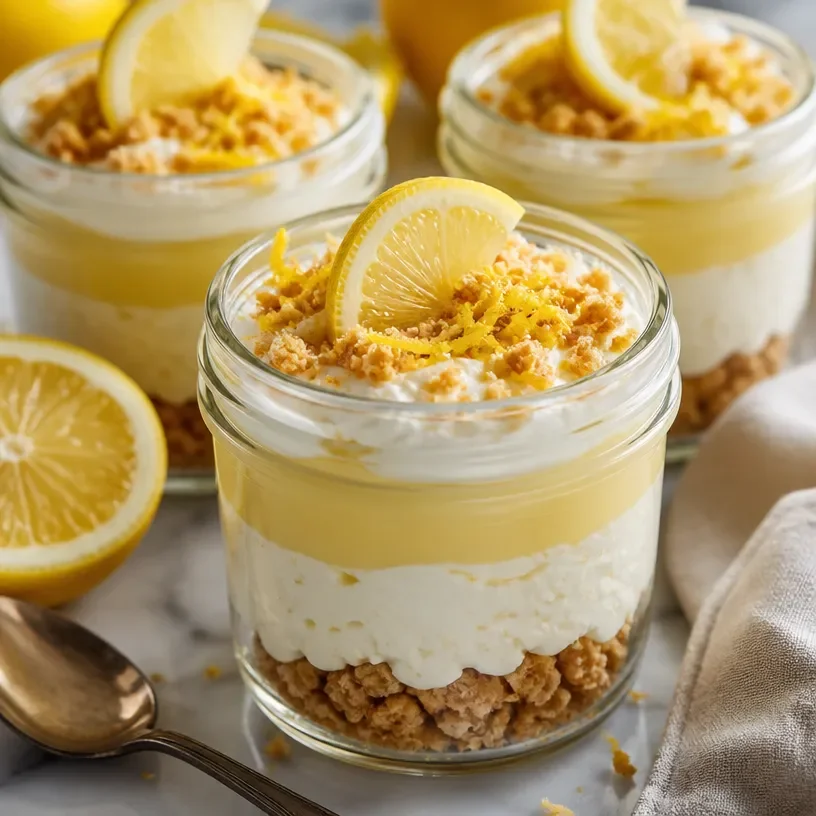
Minute Protein Lemon Cheesecake Jars for Quick Meal Prep
Dreamy Protein Lemon Cheesecake Jar
Welcome to my kitchen! I’m thrilled to have you here, ready to dive into a delightful dessert that’s not just a feast for the eyes but also a treat for your taste buds. Today, we’re whipping up a Protein Lemon Cheesecake Jar — a creamy, zesty treat that checks all the boxes for being both delicious and nutritious. Whether you’re trying to maintain a healthy lifestyle or simply want to indulge without guilt, this dessert is the perfect balance of protein and flavor, making it the ultimate sweet escape!
Now, let me take you on a little journey. Picture this: it’s a sunny afternoon, and I’m in my grandmother’s kitchen, the air thick with the aroma of citrus and sugar. I remember her bustling about, mixing fresh cream cheese with zesty lemons and a sprinkle of sugar. She always had a way of turning simple ingredients into something magical. These moments of joy and love have shaped my cooking philosophy. It’s not just about recipes; it’s about creating memories and connections through food.
Lemon desserts hold a special place in my heart. They remind me of family gatherings, where everyone would dig into her famous lemon meringue pie, eagerly sharing laughter and stories. Fast forward to today, and I find myself inspired to transform those nostalgic flavors into a lightened-up, protein-packed version that fits perfectly into our busy lives. So, grab your mixing bowl and let’s create this Protein Lemon Cheesecake Jar together!
Ingredients
For this delightful dessert, you’ll need the following ingredients:
-
Cream Cheese: The star of the dish! Choose full-fat or reduced-fat for creaminess. For a healthier twist, you can substitute it with Greek yogurt for a tangier flavor.
-
Greek Yogurt: This ingredient adds creaminess and a protein boost. Feel free to swap it for any dairy-free yogurt if you’re looking for a vegan option.
-
Protein Powder: Use your favorite flavor—vanilla works best here. Mixing it up can lead to different taste experiences, such as chocolate or strawberry!
-
Lemon Juice: Freshly squeezed is best, as it captures the vibrant, zesty flavor. If you’re in a pinch, bottled lemon juice works too, but nothing beats the real thing.
-
Lemon Zest: Zest elevates that lemon flavor. Always use organic lemons if possible to avoid pesticide residue on the skin.
-
Honey or Maple Syrup: A touch of natural sweetness goes a long way. You can adjust the quantity depending on your taste preference or use stevia if you’re cutting down calories.
-
Graham Cracker Crumbs: These are for the crust! You can use whole graham crackers or gluten-free alternatives. For a nutty flavor, crushed almonds work as a fantastic substitute.
-
Butter: Melted butter binds the crumbs together for a delicious base. If you’re looking for a healthier option, try coconut oil instead!
Collect all these delightful ingredients, and let’s head into the fun part of the kitchen: cooking!
Step-by-Step Instructions
-
Prepare the Crust: Start by preheating your oven to 350°F (175°C). In a bowl, combine your graham cracker crumbs with melted butter and mix until well combined. It should resemble wet sand. Press the mixture evenly into the bottom of your serving jars, about half an inch thick. This gives the cheesecake a lovely crunch!
-
Bake the Crust: Place the jars in the preheated oven for about 5-7 minutes, just until they are lightly golden. This step adds a lovely flavor and crunch to the crust. Allow them to cool while you prepare the filling. Pro tip: you can make the crust in advance and store it in the fridge until you’re ready for the next step.
-
Make the Filling: In a mixing bowl, combine your softened cream cheese and Greek yogurt. Use an electric mixer for a smooth consistency, or if you’re feeling strong, a whisk can do the trick! Blend until creamy, then add in your protein powder, lemon juice, lemon zest, and natural sweetener. Beat until all ingredients are combined and the mixture is fluffy.
-
Taste and Adjust: This is the fun part! Give the filling a taste. If you like it sweeter, add a bit more honey or maple syrup. If you want it tangier, add more lemon juice or zest. Your personal touch is what makes this dessert extra special!
-
Layering Time: Now, it’s time for the fun part: layering. Spoon the lemon cheesecake mixture on top of your cooled crust in the jars. Use a spatula to smooth the top and create beautiful layers. Feel free to get whimsical with the layers! You can alternate between crust and filling to your liking.
-
Chill: Cover the jars with lids or plastic wrap, then pop them into the fridge for at least 2-3 hours to let the flavors meld and the filling set. This step is crucial as it makes the cheesecake firm yet creamy when you dig in!
-
Garnish and Serve: Before serving, you can add extra toppings like fresh berries, a drizzle of honey, or a sprinkle of crushed graham crackers. This adds a pop of color and flavor to your jars!
Serving Suggestions
Serve your Protein Lemon Cheesecake Jars as a lovely individual dessert. They also make fantastic gifts! Just add a little ribbon and a cute tag, and you’ll have a thoughtful, homemade present that’s sure to impress. Set them out for a brunch gathering or as a post-dinner treat; everyone will love the vibrant flavors and charming presentation.
Recipe Variations
Get creative with these fun variations:
-
Berry Bliss: Top your cheesecake jars with fresh berries for a burst of flavor and a gorgeous look!
-
Chocolate Drizzle: Add a hint of decadence with a drizzle of dark chocolate sauce on top.
-
Coconut Cream: Substitute half of the Greek yogurt with coconut cream for a tropical twist.
-
Nutty Crunch: Introduce nuts! Chopped almonds or walnuts work beautifully as a crunchy topping.
-
Minty Fresh: Add a few fresh mint leaves or a drop of mint extract for an extra refreshing note.
Chef’s Notes
I have to tell you about the first time I made these jars for a potluck. I was running late, and as I quickly layered the cheesecake, I knocked over an entire jar! I stood there, cheesecake splattered everywhere, and I couldn’t help but laugh. The best part? Everyone loved them so much that they didn’t even notice my mini disaster! That’s why I aim to keep cooking fun and relaxed. Whether you have time to perfect every detail or are in a rush, what matters is the love you put into your cooking.
FAQs and Troubleshooting
1. Can I use low-fat cream cheese?
Absolutely! Low-fat cream cheese can work well, though it might alter the final texture slightly. Just make sure it’s softened for easy mixing.
2. What if my cheesecake filling is too runny?
If you find that your filling is too runny, try adding a bit more protein powder or let it chill for a bit longer. The longer it sets, the firmer it will become!
3. Can I make these in advance?
Yes! These jars can be made up to 3 days in advance, which makes them perfect for meal prepping or entertaining.
4. What should I do if the crust is too hard?
If your crust is too hard, consider reducing the amount of butter slightly or not baking it as long. You want it crunchy but still easy to eat!
Nutritional Info
While I don’t usually dive into the numbers, here’s the breakdown for one jar, just in case you’re counting:
- Calories: Approximately 250
- Protein: 18g
- Carbohydrates: 30g
- Fats: 10g
While this is a rough estimate, it’s always best to double-check with specific ingredients!
I hope this recipe inspires you to get in your kitchen and create something delicious! Remember, it’s all about having fun and sharing joy with food. So whip up these Protein Lemon Cheesecake Jars, gather your loved ones, and make some tasty memories. Happy cooking!
Print
Dreamy Protein Lemon Cheesecake Jar
- Total Time: 25 minutes
- Yield: 4 servings 1x
- Diet: Protein-rich, Vegetarian
Description
A creamy, zesty dessert that’s both delicious and nutritious, perfect for a healthy lifestyle.
Ingredients
- 8 oz Cream Cheese
- 1 cup Greek Yogurt
- 1/2 cup Protein Powder (vanilla)
- 1/4 cup Lemon Juice (freshly squeezed)
- 1 tbsp Lemon Zest
- 1/4 cup Honey or Maple Syrup
- 1 cup Graham Cracker Crumbs
- 1/4 cup Butter (melted)
Instructions
- Prepare the Crust: Preheat your oven to 350°F (175°C). In a bowl, combine graham cracker crumbs with melted butter until mixed. Press evenly into jars, about half an inch thick.
- Bake the Crust: Place jars in the oven for 5-7 minutes until lightly golden. Allow to cool while preparing the filling.
- Make the Filling: In a bowl, mix softened cream cheese and Greek yogurt until smooth. Add protein powder, lemon juice, lemon zest, and sweetener. Blend until fluffy.
- Taste and Adjust: Taste the filling and adjust sweetness or tanginess to preference.
- Layering Time: Spoon the cheesecake mixture over the cooled crust in jars. Smooth the top and create beautiful layers.
- Chill: Cover jars and refrigerate for at least 2-3 hours for flavors to meld and filling to set.
- Garnish and Serve: Add toppings like fresh berries, honey, or crushed graham crackers before serving.
Notes
These jars make a great individual dessert and can be prepared up to 3 days in advance.
- Prep Time: 15 minutes
- Cook Time: 10 minutes
- Category: Dessert
- Method: Baking
- Cuisine: American
Nutrition
- Serving Size: 1 jar
- Calories: 250
- Sugar: 12g
- Sodium: 150mg
- Fat: 10g
- Saturated Fat: 5g
- Unsaturated Fat: 4g
- Trans Fat: 0g
- Carbohydrates: 30g
- Fiber: 1g
- Protein: 18g
- Cholesterol: 35mg
Keywords: protein dessert, cheesecake, lemon cheesecake, healthy dessert, individual dessert




