
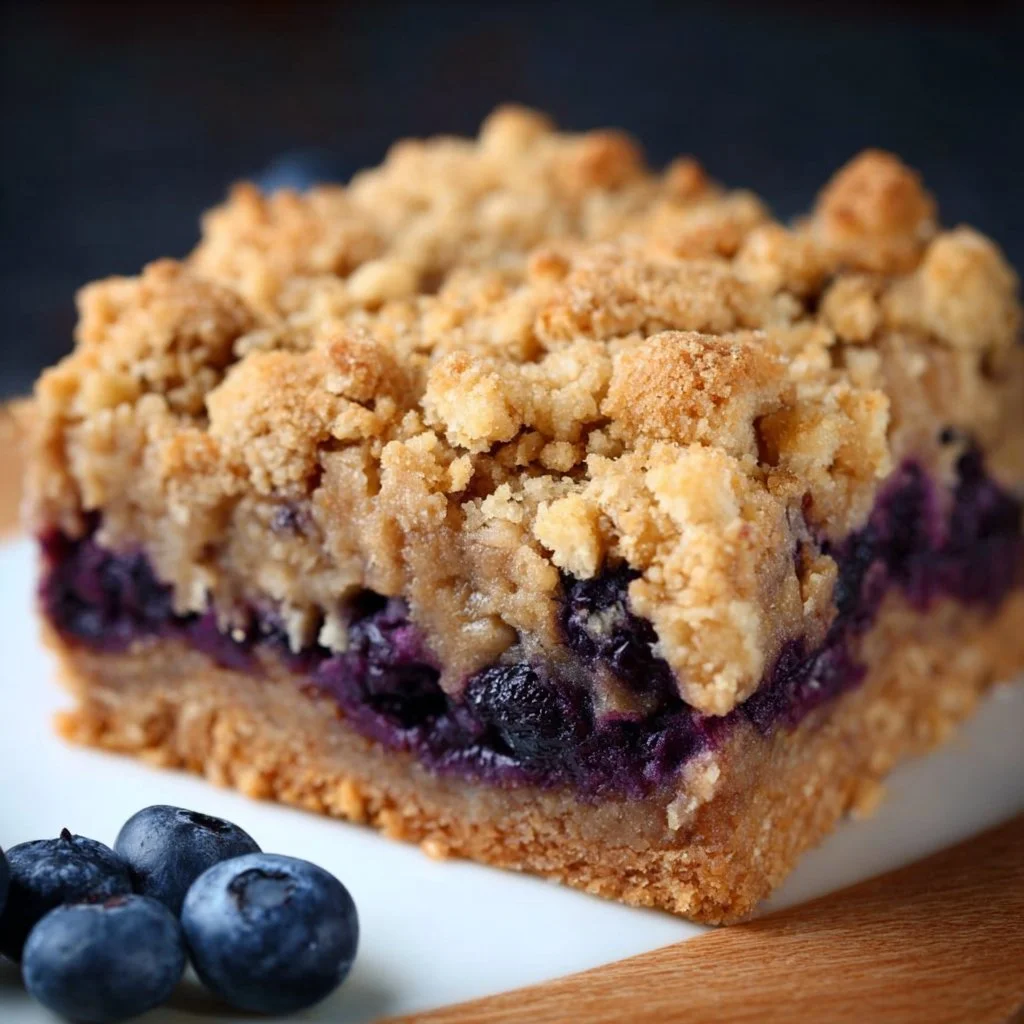
Healthy Blueberry Crumble Cake
A Slice of Sunshine: Healthy Blueberry Crumble Cake
Hey there, friends! Welcome back to my cozy kitchen! Today, I’m beyond excited to share a slice of my heart (and a sprinkle of happiness) with you — we’re diving into the delightful world of Healthy Blueberry Crumble Cake.
Let’s start with a little daydream: Picture yourself on a sunny Saturday morning, the air filled with the sweet scent of fresh blueberries, and the sound of laughter echoing from the dining table as friends or family gather around. That’s the magic I hope to create with this recipe. Whether it’s breakfast, brunch, or a sunny afternoon snack, this cake is a showstopper that’s equally delightful and healthier than your traditional dessert.
Now, let’s be clear — “healthy” doesn’t mean sacrificing flavor. I promise you that this cake maintains that rich, indulgent taste while sneaking in some nutritious ingredients. It’s packed with juicy blueberries that burst with flavor and topped with a crunchy crumble that’s simply irresistible! Plus, this cake is perfect for sharing, so you can spread the joy (and calories) with the ones you love.
Plus, it’s so simple to make — even if you’re a total kitchen novice, you’ll find that whipping this up is a breeze. So grab your apron (and maybe a cup of coffee), and let’s get our hands a bit messy as we bake some delicious memories together!
Personal Story
Whenever I think of blueberry cakes, I’m immediately transported back to my childhood summers spent at my grandparents’ farm. Every July, my family would gather to pick the plumpest blueberries straight from the bushes, which seemed to stretch on forever. I still remember my grandmother’s kitchen, filled with warmth and the comforting aroma of baked goods.
As she would mix the batter, I’d steal a few blueberries, their sweet juices staining my fingers blue — oh, those were the days! It was a simple blueberry cake she made, nothing fancy, but it was always gone within hours. The magic wasn’t just in the cake; it was in the conversations shared around the table and the laughter that filled the air. So, this recipe is my nod to those bright summer days and the joy of sharing simple pleasures with loved ones.
Ingredients
Here’s what you’ll need to whip up this Healthy Blueberry Crumble Cake:
-
Fresh Blueberries (2 cups)
These vibrant beauties are the star of the show! Packed with antioxidants and fiber, blueberries add natural sweetness and flavor. If fresh blueberries aren’t available, feel free to swap in frozen ones; just make sure to thaw and drain excess moisture first. -
Whole Wheat Flour (1 ½ cups)
Whole wheat flour is a wonderful source of nutrients and gives your cake a heartier texture. If you prefer, you can use spelt flour or gluten-free flour blends for those with dietary restrictions. -
Coconut Sugar (¾ cup)
This natural sugar is less processed than white sugar and has a lower glycemic index. If you don’t have coconut sugar, brown sugar or maple syrup works great too, but it’ll change the moisture content, so adjust accordingly. -
Baking Powder (2 teaspoons)
A must-have leavening agent to give your cake a nice, fluffy rise. -
Cinnamon (1 teaspoon)
This aromatic spice adds warmth and depth to the flavor. Feel free to play with nutmeg or cardamom for a unique twist! -
Greek Yogurt (½ cup)
Swap out traditional oil or butter for Greek yogurt to boost protein while keeping the cake moist. In a pinch, you can also use unsweetened applesauce. -
Eggs (2 large)
They act like a binder in this recipe. If you are looking for an egg-free option, try using flax eggs (1 tbsp ground flaxseed + 2.5 tbsp water = 1 egg). -
Vanilla Extract (1 teaspoon)
A splash of this enhances all the flavors and adds a touch of warmth. -
Oats (½ cup)
For the crumble topping! Oats add a lovely texture and health benefits. Quick oats or rolled oats can be used interchangeably. -
Butter (¼ cup, melted)
Just a little butter adds richness to the crumble topping. If you’d like a dairy-free option, melted coconut oil works perfectly!
Step-by-Step Instructions
Step 1: Preheat the Oven
Preheat your oven to 350°F (175°C). This essential step ensures that your cake will bake evenly. If you forget this step, don’t fret! Just pop it in once you’re ready, but it might take a bit longer to set.
Step 2: Prepare Your Baking Pan
Grease a 9-inch round cake pan with cooking spray or a bit of melted butter, then line the bottom with parchment paper for easy removal. Trust me; nobody wants a cake that sticks!
Step 3: Make the Batter
In a large mixing bowl, create a beautiful blend by whisking together the whole wheat flour, coconut sugar, baking powder, and cinnamon. Make a little well in the center and add Greek yogurt, eggs, and vanilla extract. Mix until just combined (don’t over-mix, or your cake may be dense).
Step 4: Fold in Blueberries
Gently fold in the fresh blueberries, taking care not to smush them (a light hand works wonders here). Using frozen blueberries? No problem! Just fold them in directly from the freezer.
Step 5: Pour and Smooth
Transfer the cake batter into your prepared pan, using a spatula to smoothly level the surface. This helps ensure even baking!
Step 6: Prepare the Crumble Topping
In a small bowl, mix oats, melted butter, and a pinch of cinnamon. Just knead it with your fingers until crumbly. It should resemble wet sand. If you want a sweeter crumble, add a tablespoon or two of coconut sugar here.
Step 7: Crumble it On
Evenly sprinkle your crumble topping over the cake batter. Do it generously — we love a chunky crumble!
Step 8: Bake Away!
Transfer the cake into the oven and bake for about 35-40 minutes, or until a toothpick comes out clean from the center. Your kitchen will start to smell heavenly, and that’s your cue that you’re on the right track!
Step 9: Cool and Slice
Once baked, remove the cake from the oven, let it cool in the pan for about 10 minutes, then transfer it to a wire rack. Once cool enough, slice and enjoy warm with a dollop of yogurt or a drizzle of honey.
Serving Suggestions
Serve your Blueberry Crumble Cake warm or at room temperature. It’s delightful alongside a hot cup of tea or coffee. For a special touch, consider garnishing with a sprinkle of powdered sugar, a swirl of cream cheese frosting, or a few extra fresh blueberries on top.
Recipe Variations
-
Zesty Lemon Blueberry Crumble: Add the zest and juice of one lemon to the batter for a bright, citrusy flair.
-
Nutty Boost: Mix in a half cup of chopped nuts (like walnuts or almonds) for a crunchy texture that compliments the blueberries perfectly.
-
Vegan Version: Substitute the eggs with flax eggs and use almond yogurt instead of Greek yogurt for a delicious vegan twist.
-
Spiced Twist: Experiment with a variety of spices such as nutmeg or ginger for an added flavor dimension.
Chef’s Notes
Baking this Blueberry Crumble Cake feels like giving a hug to yourself and those around you! Over the years, I’ve modified this recipe countless times—sometimes adding lemon, other times incorporating nuts —each variation has its story to tell. What remains constant, however, is the joy this cake brings. And oh, don’t be surprised if you find yourself “testing” the crumble topping before it even makes it to the oven. I won’t tell!
FAQs and Troubleshooting
1. Why is my cake dense?
If your cake didn’t rise like you hoped, it could be due to overmixing the batter. Always mix until just combined when adding dry and wet ingredients!
2. Can I freeze the cake?
Absolutely! You can freeze the cake once it’s completely cooled. Just wrap it tightly in plastic wrap and store it in an airtight container. When you’re ready to enjoy it, let it thaw at room temperature.
3. How do I know when the cake is done?
Insert a toothpick in the center of the cake. If it comes out clean (or with a few moist crumbs), you’re all set! If there’s wet batter, pop it back in for a few more minutes.
4. My crumble topping didn’t come out crunchy. Help!
If your crumble is soggy, it might be due to too much butter or not enough oats. Ensure to measure accurately and feel free to add a bit more oats if needed.
Nutritional Info
Calories per slice (based on 12 slices): Approximately 180
Fat: 6g, Carbs: 28g, Protein: 4g
And there you have it, my lovely foodies! Your forever go-to recipe for a scrumptious Healthy Blueberry Crumble Cake. I can’t wait for you to try this at home and savor every bite while sharing it with those you cherish. Happy baking, and as always, I’d love to hear your kitchen stories too — what twist did you add? Until next time, keep that oven warm and your heart even warmer!
Print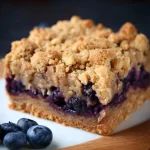
Healthy Blueberry Crumble Cake
- Total Time: 55 minutes
- Yield: 12 servings
- Diet: Vegetarian
Description
A delightful and healthier take on the classic blueberry crumble cake, packed with juicy blueberries and topped with a crunchy crumble.
Ingredients
- Fresh Blueberries (2 cups)
- Whole Wheat Flour (1 ½ cups)
- Coconut Sugar (¾ cup)
- Baking Powder (2 teaspoons)
- Cinnamon (1 teaspoon)
- Greek Yogurt (½ cup)
- Eggs (2 large)
- Vanilla Extract (1 teaspoon)
- Oats (½ cup)
- Butter (¼ cup, melted)
Instructions
- Preheat the oven to 350°F (175°C).
- Grease a 9-inch round cake pan with cooking spray or melted butter and line with parchment paper.
- Whisk together the whole wheat flour, coconut sugar, baking powder, and cinnamon in a large bowl.
- Add Greek yogurt, eggs, and vanilla extract to the dry ingredients, mixing until just combined.
- Fold in the fresh blueberries gently.
- Transfer the batter to the prepared pan and level the surface with a spatula.
- Mix oats, melted butter, and a pinch of cinnamon in a bowl for the crumble topping.
- Evenly sprinkle the crumble topping over the cake batter.
- Bake in the oven for about 35-40 minutes, or until a toothpick comes out clean.
- Cool for about 10 minutes in the pan before transferring to a wire rack to cool completely.
Notes
Serve warm or at room temperature, optionally garnished with powdered sugar or fresh blueberries.
- Prep Time: 15 minutes
- Cook Time: 40 minutes
- Category: Dessert
- Method: Baking
- Cuisine: American
Nutrition
- Serving Size: 1 slice
- Calories: 180
- Sugar: 8g
- Sodium: 150mg
- Fat: 6g
- Saturated Fat: 3g
- Unsaturated Fat: 2g
- Trans Fat: 0g
- Carbohydrates: 28g
- Fiber: 3g
- Protein: 4g
- Cholesterol: 50mg
Keywords: blueberry, crumble cake, healthy dessert, brunch recipe, vegetarian baking

Indulge Guilt-Free: Peanut Butter Cup Cottage Cheese Mousse
Indulge Guilt-Free: Peanut Butter Cup Cottage Cheese Mousse
Introduction
Hey there, fellow food lovers! Welcome to my cozy corner of the kitchen, where we create delicious dishes that bring a little joy into our everyday lives. Today, I’m thrilled to share a fantastic recipe that has been a delicious secret in my family—Peanut Butter Cup Cottage Cheese Mousse. Yes, you read that right! This delightful dessert gives you all the creamy, dreamy goodness you crave without the guilt.
Imagine this: you’re sitting down for a well-deserved treat after a long day. You want something truly decadent, but also healthy enough to keep you feeling good about your choices. This mousse ticks all the boxes. It’s light, fluffy, and utterly irresistible, making it the perfect indulgence for any occasion. Plus, if you have little helpers—perhaps your kids or friends—they will love getting involved, helping you whip it up in no time.
I’ll take you through the steps to make this beautiful dessert, and even share some of my warm kitchen stories that make this dish even more special. So, let’s roll up our sleeves and dive into this wonderfully yummy world of flavors!
Personal Story
Many years ago, I hosted a cozy gathering for a group of friends. We laughed, shared stories, and reminisced about our favorite desserts from childhood. That evening, my friend Sarah shared her obsession with peanut butter cups, while I gushed over the heavenly texture of mousse. As the night wore on, an idea blossomed: why not combine our favorites?
Armed with a tub of cottage cheese (don’t roll your eyes just yet!), I set out to create a guilt-free dessert that satisfied our sweet cravings without leaving us feeling weighed down. To my delight, it turned into a hit! As we savored the lightness of the mousse paired with the rich peanut buttery goodness, our laughter filled the kitchen, and I knew I had stumbled onto something magical.
Years later, this Peanut Butter Cup Cottage Cheese Mousse remains a staple at my gatherings, reminding me of friendship, laughter, and the joy of cooking. Plus, it’s incredibly versatile and can easily be adapted for any sweet tooth!
Ingredients
Here’s what you’ll need to create this delectable Peanut Butter Cup Cottage Cheese Mousse:
-
Cottage Cheese (1 cup)
- A creamy base that adds protein and a light texture. Opt for low-fat or full-fat, depending on your preference. For a dairy-free option, try silken tofu!
-
Natural Peanut Butter (½ cup)
- Choose a good-quality, unsweetened peanut butter for the best flavor. You can substitute it with almond butter or sunflower seed butter if allergies are a concern.
-
Honey or Maple Syrup (¼ cup)
- These natural sweeteners provide just the right amount of sweetness. Feel free to adjust to taste or use a sugar substitute like stevia if you want to cut down on the sugars.
-
Vanilla Extract (1 teaspoon)
- Adds a warm floral note to your mousse. Always use pure vanilla extract for a richer flavor.
-
Cocoa Powder (2 tablespoons)
- This will give you that chocolatey element, evoking the classic flavor of peanut butter cups. For a richer taste, opt for dark cocoa powder.
-
Greek Yogurt (¼ cup, optional)
- Adds extra creaminess and a tangy flavor kick. Feel free to leave this out if you want a lighter mousse.
-
Whipped Cream (for topping, optional)
- A dollop on top makes this dessert feel truly indulgent! You can whip up some coconut cream for a dairy-free version.
Step-by-Step Instructions
Ready to whip up this delightful dessert? Let’s get cooking!
-
Prep Your Ingredients
Start by gathering all your ingredients and measuring them out. This ensures a smooth cooking process. Plus, it’s a lot more fun to have everything ready to go! -
Blend the Cottage Cheese
Add the cottage cheese to a food processor or blender. This step is essential! Blend until the cottage cheese is silky and smooth—about 1-2 minutes. This ensures no lumps and a mousse-like texture. -
Incorporate the Peanut Butter
Once your cottage cheese is nice and creamy, add in the natural peanut butter. Blend again until the mixture is fully combined. You should get a luscious peanut butter cream that will make your KitchenAid swoon! -
Sweeten It Up
Now, add in the honey or maple syrup, vanilla extract, and cocoa powder. Blend until everything is well mixed. Give it a taste! Don’t be shy—feel free to adjust the sweetness to your liking. -
Optional Upgrades
If you’re feeling extra adventurous, mix in the Greek yogurt at this stage. It’ll give your mousse a slight tang and an even creamier texture. Blend once more until you achieve that beautiful mousse consistency! -
Chill the Mousse
Transfer your mousse into serving bowls or glasses. Pop them in the fridge for at least an hour to help set and chill. Trust me, this step makes a difference, allowing the flavors to meld beautifully! -
Serve and Enjoy
Once chilled, it’s time to garnish! You can top your mousse with whipped cream, a sprinkle of cocoa powder, or even a drizzle of melted chocolate for an extra touch of elegance.
Serving Suggestions
Presentation is key! Serve your peanut butter cup mousse in clear bowls or glasses to showcase its beautiful colors. You can add a few crushed peanuts or chocolate shavings on top for that extra flair. It’s honestly so simple yet oh-so-elegant. If you’re hosting, consider pairing it with fresh fruit like strawberries or banana slices on the side for a pop of color!
Recipe Variations
Now, let’s get creative! Here are some fun twists to try:
-
Add a Fruit Twist: Incorporate a layer of your favorite fruit puree, like banana or raspberry, at the bottom of your serving glasses before adding the mousse.
-
Choco-Peanut Butter Swirl: Simply fold in some melted dark chocolate into the mousse for a richer flavor.
-
Nutty Crunch: Mix in chopped nuts or granola for a delightful crunch!
-
Dairy-Free Delight: Swap cottage cheese with silken tofu and use coconut cream for topping to make it dairy-free and vegan-friendly.
-
Spicy Kick: Add a pinch of cayenne pepper or a dash of cinnamon for a surprising heat that pairs beautifully with peanut butter!
Chef’s Notes
One of my favorite things about cooking is that it’s always evolving. This recipe came together as a means to satisfy those late-night cravings without the guilt, and it has since become a go-to treat for me. I still remember the first time I brought it to a potluck, and everyone was surprised to learn it was made with cottage cheese. Their reactions were priceless!
Cooking should be fun and experimental, so don’t hesitate to play around with this recipe and make it your own. You may even come up with a twist that becomes your signature dish!
FAQs and Troubleshooting
Q: Can I use non-dairy alternatives?
Absolutely! You can use silken tofu instead of cottage cheese and coconut cream for whipped topping to keep it dairy-free.
Q: The mousse isn’t thickening. What did I do wrong?
It should thicken up in the fridge as it chills. If it’s still not to your liking, consider blending in a bit of gelatin (for non-vegan) or chia seeds to help it set.
Q: How long will leftovers last?
Stored in an airtight container in the fridge, this mousse should last about 3-5 days. Just give it a quick stir before serving!
Q: Can I freeze this mousse?
While it’s best enjoyed fresh, you can freeze it for up to a month. Just be aware that the texture may change slightly upon thawing.
Nutritional Info
Per serving (without optional toppings):
- Calories: ~210
- Protein: 12g
- Fat: 10g
- Carbohydrates: 20g (with natural sugars)
- Fiber: 2g (varies based on ingredients)
And there you have it! A guilt-free indulgence perfect for any occasion, packed with rich flavors and delightful textures. I hope you enjoy making this Peanut Butter Cup Cottage Cheese Mousse as much as I do. Happy cooking, and don’t forget to share your creations with me!
Print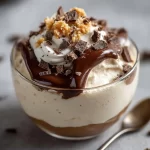
Peanut Butter Cup Cottage Cheese Mousse
- Total Time: 70 minutes
- Yield: 4 servings 1x
- Diet: Gluten-Free, Vegetarian
Description
A light and creamy mousse made with cottage cheese and peanut butter, perfect for a guilt-free indulgence.
Ingredients
- 1 cup Cottage Cheese
- ½ cup Natural Peanut Butter
- ¼ cup Honey or Maple Syrup
- 1 teaspoon Vanilla Extract
- 2 tablespoons Cocoa Powder
- ¼ cup Greek Yogurt (optional)
- Whipped Cream (for topping, optional)
Instructions
- Prep your ingredients by gathering and measuring them out.
- Blend the cottage cheese in a food processor until silky and smooth.
- Incorporate the peanut butter and blend until fully combined.
- Sweeten it up by adding honey or maple syrup, vanilla extract, and cocoa powder, then blend until mixed.
- Optional upgrades: mix in Greek yogurt for extra creaminess and blend again.
- Chill the mousse in the fridge for at least an hour to set.
- Serve and enjoy with toppings like whipped cream or cocoa powder.
Notes
This recipe can be easily adapted to be dairy-free by using silken tofu and coconut cream. Experiment with flavors and toppings!
- Prep Time: 10 minutes
- Cook Time: 0 minutes
- Category: Dessert
- Method: No-Cook
- Cuisine: American
Nutrition
- Serving Size: 1 serving
- Calories: 210
- Sugar: 12g
- Sodium: 130mg
- Fat: 10g
- Saturated Fat: 2.5g
- Unsaturated Fat: 7.5g
- Trans Fat: 0g
- Carbohydrates: 20g
- Fiber: 2g
- Protein: 12g
- Cholesterol: 10mg
Keywords: peanut butter, mousse, cottage cheese, dessert, healthy dessert, guilt-free dessert, no-bake dessert


