
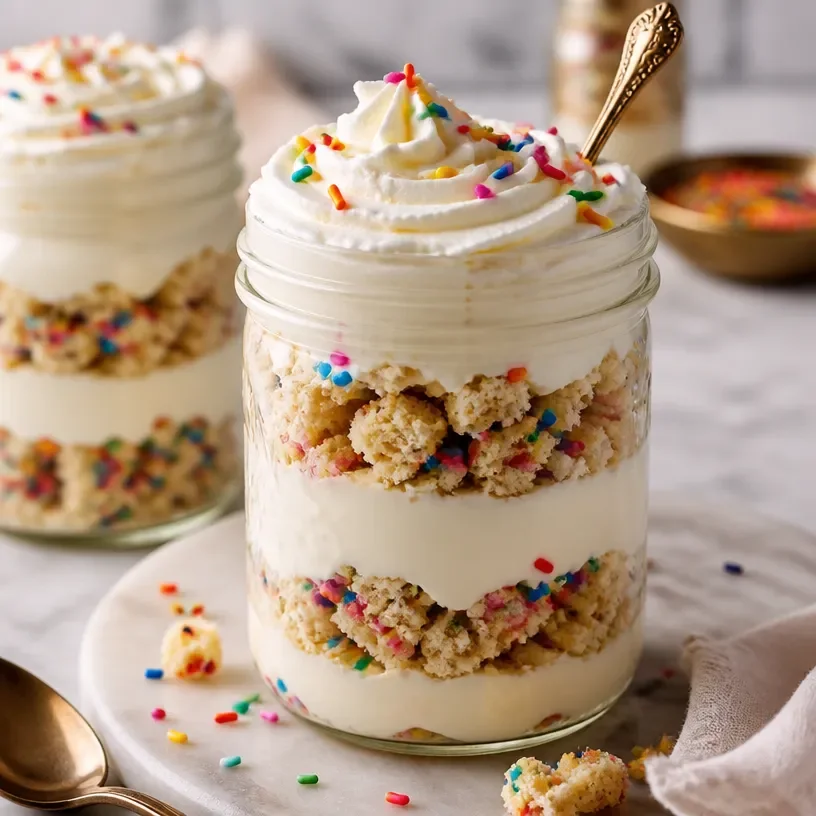
High-Protein Birthday Cake Jars: No-Bake Dessert in a Jar
Celebrate in Style with a Protein Birthday Cake Jar
Welcome back to my kitchen, friends! Today, we’re making a fun and festive treat: a Protein Birthday Cake Jar! Wondering what makes this dessert special? Not only is it a delicious way to celebrate a special occasion, but it’s packed with protein, making it a delightful treat that satisfies your sweet tooth while nourishing your body.
As someone who thrives on creating memories through food, this dessert holds a special place in my heart. Birthdays are always a big deal in my family, and over the years, I’ve learned to turn traditional sweets into healthier versions without sacrificing flavor. The Protein Birthday Cake Jar was born from the desire to indulge in a slice of birthday cake while feeling good about what I’m eating. Plus, layering it in a jar makes it feel extra special and allows you to showcase all those vibrant colors and textures!
Trust me when I say that you’ll want to whip these up for the next birthday party, whether it’s your own or a loved one’s. Let’s gather those ingredients and get started!
A Trip Down Memory Lane
One of my favorite birthday memories is from my eighth birthday party. I remember my mom baking a chocolate cake that filled our house with warmth and that familiar sweet aroma. It was the centerpiece of our celebration, adorned with rainbow sprinkles and surrounded by laughter as my friends and family sang “Happy Birthday.”
As a child, I was mesmerized by how, with just a few simple ingredients, my mom could create pure magic. Fast forward to today, and those memories inspire me to recreate that joyful feeling in my own kitchen. However, I wanted to give it a twist—a protein-packed twist! This way, we can still enjoy the nostalgia of a birthday cake while being mindful of our nutrition. Sweet memories and healthy choices? Sign me up!
Ingredients
Here’s what you’ll need to gather for our Protein Birthday Cake Jar:
-
Protein Powder: (vanilla or cake batter flavor works great)
- This is the star player, providing the protein you’re after! If you have a favorite brand, use that. Just be cautious about flavors, as they can change the taste of your cake.
-
Almond Flour:
- A fantastic gluten-free alternative to all-purpose flour, almond flour adds moisture and a lovely nuttiness. You can substitute with coconut flour, but be sure to adjust the amount, as it’s more absorbent.
-
Baking Powder:
- We need this to help our cake rise. If you’re out, a bit of baking soda combined with some vinegar can create a similar effect!
-
Eggs:
- They bind everything together and add moisture. If you’re vegan or egg-free, mash up a banana or use flaxseeds as a substitute (1 tablespoon ground flaxseed mixed with 2.5 tablespoons water).
-
Unsweetened Applesauce:
- This acts as a natural sweetener and keeps our cake moist without all the added sugars. For a sweeter jar, you can replace it with Greek yogurt.
-
Honey or Maple Syrup:
- Just a drizzle adds sweetness! If you’re looking to cut the sugars down, you can skip this or use a sugar substitute like stevia.
-
Vanilla Extract:
- A splash of vanilla elevates the flavors. If you don’t have any, almond extract can be a great alternative but use it sparingly, as it’s strong!
-
Sprinkles:
- Birthday cakes aren’t complete without sprinkles! Go for the colorful ones to brighten up your jars. If you want to keep it healthy, check for natural sprinkles or omit them entirely.
With these ingredients in hand, let’s dive into the steps. You might want to keep your apron handy—we’re about to have some fun!
Step-by-Step Instructions
-
Preheat the Oven:
Start by preheating your oven to 350°F (175°C). This is crucial, as you want your cake to bake evenly. -
Mix Dry Ingredients:
In a large mixing bowl, whisk together your almond flour, protein powder, and baking powder until well combined. This will help ensure that your cake has a nice, even texture. -
Combine Wet Ingredients:
In another bowl, mix your eggs, unsweetened applesauce, honey/maple syrup, and vanilla extract. Use a fork to whisk them together until smooth. This is where the magic starts to happen—combine those flavors! -
Combine Both Mixtures:
Slowly add the wet ingredients into the bowl of dry ingredients, stirring just until combined. Avoid overmixing to keep your cake light and fluffy. If you’d like to get creative, you can add a tablespoon of sprinkles into the batter at this stage for a fun surprise when they bite into it! -
Bake:
Pour your batter into a greased 9-inch round cake pan. Bake for approximately 20–25 minutes or until a toothpick inserted in the center comes out clean. Remember, every oven is different, so keep an eye on it! -
Cool:
Once baked, let it cool completely in the pan for about 10 minutes, then transfer it to a wire rack. This step is super important—no one likes a soggy bottom! -
Create the Layered Jar:
Now, here’s the fun part! Once your cake has cooled, crumble it into pieces. Grab your mason jars (or any clear jar) and layer in the crumbled cake followed by a layer of Greek yogurt or whipped cream, then another crumbled layer, and repeat until you reach the top! Don’t forget to finish it off with a sprinkle of your colorful sprinkles.
With your Protein Birthday Cake Jar ready, we’re almost at the finish line!
Serving Suggestions
To serve, pop a festive lid on those mason jars and tie a cute ribbon around the top for a personal touch. If you’re looking to impress, consider placing them on a beautifully arranged dessert table or serving them during a birthday brunch. Your guests will absolutely love the layered presentation!
Recipe Variations
Looking to switch things up? Here are a few delicious variations you can try:
-
Chocolate Chip: Mix in mini chocolate chips to the cake batter for an added burst of sweetness! Chocolate and vanilla are a match made in heaven.
-
Nut Butter Swirl: Before baking, add a swirl of your favorite nut butter (like almond or peanut butter) throughout the batter for a nutty flavor explosion.
-
Fruit Layering: Add some fresh berries or banana slices in between the layers for a fresh and fruity twist. Pecans or walnuts can add an extra crunch!
-
Dairy-Free: Opt for coconut yogurt or cashew cream instead of Greek yogurt to keep it dairy-free.
-
Festive Toppings: After layering, top your jars with whipped coconut cream or a dollop of chocolate ganache for an extra treat!
Chef’s Notes
Oh, the stories this recipe could tell! I’ve experimented with so many variations—from gluten-free to different flavors of protein powder. It’s a delightful journey to see how a simple recipe can evolve over time. One time, I forgot to add the eggs and tossed the mixture into the oven anyway. To my surprise, it turned out to be a unique grainy cake that we all enjoyed—though I’m not sure I’d recommend it as a regular occurrence!
Every time someone takes a bite of these jars, I’m reminded of my childhood birthday memories. I can’t help but smile as I think about how food has the power to bring us together and create unforgettable moments.
FAQs and Troubleshooting
1. Why is my Protein Birthday Cake dense?
- Overmixing the batter can lead to a dense cake since it develops gluten. Mix just until combined for a lighter texture!
2. Can I make this ahead of time?
- Absolutely! You can prepare the cake a day in advance and layer the jars just before serving for the freshest taste.
3. How long do these jars last?
- If sealed tightly, they can last up to 3–5 days in the fridge. The yogurt or whipped cream may separate slightly, so give it a little stir before serving.
4. What should I do if my cake sticks to the pan?
- Be sure to grease your pan well before adding the batter. If it does stick, run a knife around the edges gently and try turning it upside down on a cooling rack.
Nutritional Info
While the nutritional info can vary based on the exact ingredients you use, here’s a rough estimate for one serving (one jar):
- Calories: Approximately 230
- Protein: 21g
- Carbs: 30g
- Fats: 8g
Remember, friends, this Protein Birthday Cake Jar is more than just a dessert; it’s an experience, a celebration, and a way to create sweet memories in the kitchen. So go ahead, gather your loved ones, and let them indulge guilt-free—a symphony of flavors in every spoonful! Happy baking! 🥳
Print
Protein Birthday Cake Jar
- Total Time: 40 minutes
- Yield: 4 servings 1x
- Diet: High Protein
Description
A fun and festive protein-packed dessert that celebrates special occasions while satisfying your sweet tooth.
Ingredients
- 1 cup Protein Powder (vanilla or cake batter flavor)
- 1 cup Almond Flour
- 1 tsp Baking Powder
- 2 Eggs (or egg substitute)
- 1/2 cup Unsweetened Applesauce
- 2 tbsp Honey or Maple Syrup
- 1 tsp Vanilla Extract
- Sprinkles (for topping)
Instructions
- Preheat the oven to 350°F (175°C).
- Mix the almond flour, protein powder, and baking powder in a large mixing bowl.
- Combine the eggs, applesauce, honey (or maple syrup), and vanilla extract in another bowl.
- Add the wet ingredients to the dry ingredients and stir until just combined.
- Pour the batter into a greased 9-inch round cake pan and bake for 20–25 minutes.
- Cool the cake for 10 minutes in the pan, then transfer to a wire rack.
- Create layers in a jar by crumbling the cake and adding layers of yogurt or whipped cream.
- Top with colorful sprinkles before serving.
Notes
You can make this ahead of time and layer the jars just before serving for the freshest taste.
- Prep Time: 15 minutes
- Cook Time: 25 minutes
- Category: Dessert
- Method: Baking
- Cuisine: American
Nutrition
- Serving Size: 1 jar
- Calories: 230
- Sugar: 10g
- Sodium: 100mg
- Fat: 8g
- Saturated Fat: 1g
- Unsaturated Fat: 7g
- Trans Fat: 0g
- Carbohydrates: 30g
- Fiber: 3g
- Protein: 21g
- Cholesterol: 70mg
Keywords: birthday cake, protein dessert, healthy dessert, cake jar, festive treat




