
Mummy Pizza: A Deliciously Spooky Treat for Everyone!
Welcome to my cozy kitchen! I’m so excited to share a dish that’s both fun and delicious — Mummy Pizza! As the leaves begin to turn and the weather gets a little crisper, it’s time to gather your friends and family for some spooky season fun. Whether you’re looking for a dish to please kids at a Halloween party or a fun twist for your next family movie night, these Mummy Pizzas are sure to bring smiles all around!
Imagine the laughter as everyone gathers around the table, eyes wide with delight at these whimsical creations. Plus, they are incredibly easy to make! With some simple ingredients, you can whip up a batch in no time. Not only do these Mummy Pizzas look adorable, but they taste absolutely divine, loaded with gooey cheese and your favorite toppings.
Now, you may wonder about the inspiration behind this dish. Growing up, Halloween was a spectacular affair in my house. My parents always went all out with decorations, treats, and, of course, themed food! I remember one particular year when we had a Halloween gathering where my mom surprised us all with her “dead man’s fingers” (which were actually chicken tenders) and ghostly cupcakes. But the showstopper was, without a doubt, her Mummy Pizzas. I didn’t realize back then just how simple they were; I was mesmerized by her creativity.
These Mummy Pizzas bring back those nostalgic memories for me, and I can’t wait for you to experience the same joy. Let’s dive in!
Personal Story
I still remember the year my mom first made Mummy Pizzas. I was around eight years old, and Halloween was my favorite holiday. The excitement in the air was palpable, and my friends were invited over for a spooky movie marathon. My mom decided to add a twist to the usual pizza night by transforming our beloved pies into playful mummies.
As she draped strips of cheese over the dough to create little mummy wrappings, I watched in pure awe. The aroma of baking dough wafted through our home, mingling with the laughter of children — it felt magical! We gathered around the table, eagerly awaiting the oven timer. When the Mummy Pizzas finally emerged, all golden and gooey, we devoured them in seconds!
This memory is super special to me, showcasing how simple food can turn into a heartwarming experience when shared with loved ones. Now, each Halloween, I recreate this tradition with my own twist, and I can’t wait for you to do the same!
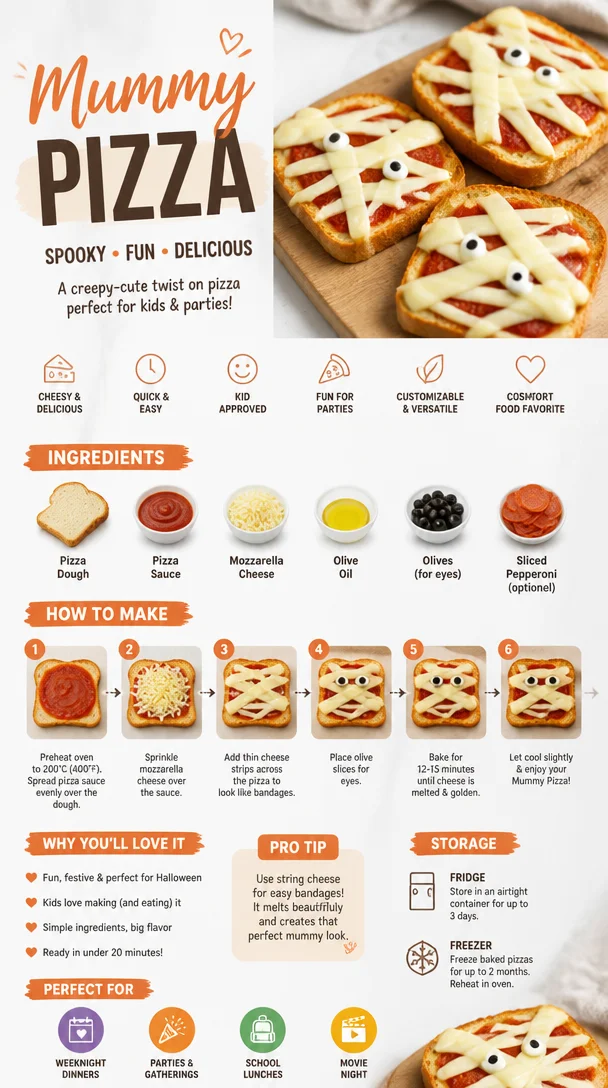
Ingredients
Here’s what you’ll need to create these delightful Mummy Pizzas:
-
Pizza Dough: You can use homemade dough or store-bought for convenience. If you’re opting for gluten-free, there are fabulous pre-made gluten-free options available as well!
-
Pizza Sauce: Traditional tomato sauce works well, but feel free to experiment with barbecue sauce or pesto for a unique flavor kick!
-
Shredded Mozzarella Cheese: The gooeyness is essential! If you’re feeling adventurous, try using a blend of mozzarella and provolone for a super creamy texture.
-
Olives: These will serve as the eyes! Black olives work best for their striking color contrast, but green olives could add a fun twist.
-
Toppings of Choice: Get creative! Pepperoni, bell peppers, or mushrooms can add flavor and excitement to your Mummy Pizzas.
-
Olive Oil: Just a drizzle to help your crust get that perfect golden-brown hue.
Each ingredient brings its own charm to the table; mix and match to make it your own!
Step-by-Step Instructions
Now let’s get cooking! Follow these detailed steps, and remember, kitchen magic happens when you approach it with a joyful heart!
-
Preheat the Oven: Start by preheating your oven to 425°F (220°C). This ensures that the crust will bake perfectly and become delightfully crispy.
-
Prepare Your Workspace: Lightly flour your counter or a clean surface. Roll out your pizza dough into small rounds. Aim for about 4-6 inches in diameter — perfect for a pleasing personal pizza!
-
Spread the Pizza Sauce: Using a spoon, spread a generous layer of pizza sauce over each round of dough. Don’t go overboard; you want to leave the edges clear for those glorious mummy wrappings!
-
Get Cheesy: Sprinkle a liberal amount of shredded mozzarella cheese over the sauce. This is the fun part, where more cheese equals more gooeyness!
-
Mummify Your Pizza: Now, it’s time to create the mummy effect! Tear cheese slices into thin strips and lay them across the pizza, leaving gaps where the sauce peeks out like a little face. Play around with the arrangement — no two mummies have to look the same!
-
Add the Eyes: Slice your olives to create two rounds for each mouth — these will represent the spooky eyes staring back at you! Position them strategically among the cheese strips.
-
Drizzle Olive Oil: This step is optional but worth it! A quick drizzle of olive oil over the crust will not only add flavor but also help it brown beautifully.
-
Bake: Carefully transfer your Mummy Pizzas onto a baking sheet lined with parchment paper and place them in the preheated oven. Bake for about 12-15 minutes or until the cheese is bubbling and the crust is golden. Keep a close eye as they cook, as ovens can vary!
-
Cool and Serve: Once baked, pull your Mummy Pizzas out of the oven and let them cool for a few minutes. It’s important to give them a moment so the cheese doesn’t burn your tongue when you take that first delectable bite!
Serving Suggestions
The best way to serve these Mummy Pizzas is hot out of the oven! Arrange them on a spooky-themed platter for that extra flair. Add some fresh basil or a sprinkle of dried oregano on top for a pop of color and flavor. You can also pair them with a fresh side salad or some carrot sticks and celery for a healthy crunch, keeping with the Halloween theme!
Recipe Variations
Feel free to switch things up with these fun variations:
-
Veggie Mummies: Load your Mummy Pizzas with toppings like bell peppers, onions, and spinach to add some seasonal veggies.
-
Meat Lovers: Pile on pepperoni, sausage, and cooked chicken for a hearty feast that will satisfy even the hungriest guests.
-
Gluten-Free Option: Use a gluten-free pizza crust to cater to dietary restrictions without sacrificing the fun!
-
Spicy Twist: Add some jalapeños or a drizzle of hot sauce on top of your finished Mummy Pizzas for a kick!
Chef’s Notes
Delicious recipes evolve over time, just like my Mummy Pizzas! What started as a quick family dinner idea has transformed into a fun tradition for my friends and me. I often experiment with different cheeses, sauces, and toppings — it’s amazing how many flavors you can create with a simple base.
One funny memory that comes to mind is the year I decided to make a “mini” version. I ended up with tiny Mummy Pizzas that were more work than I had anticipated! Let’s just say I learned that big mummies are much easier to assemble.
FAQs and Troubleshooting
-
Can I make Mummy Pizzas ahead of time?
Absolutely! You can prepare the pizzas up to the baking stage, cover them with plastic wrap, and refrigerate. Bake them fresh when you’re ready to eat — they’ll be just as tasty! -
What if my cheese strips melt and blend together?
No worries! Embrace the chaos of the kitchen. If they blend together, it just makes your mummy a little more unique. Aim for some gaps, but if it gets gooey, it’s still going to taste amazing! -
Can I freeze the Mummy Pizzas?
Yes! Just complete the assembling and freeze them before baking. When you’re ready, let them thaw in the fridge overnight, then bake as directed. -
How can I make these healthier?
Choosing whole wheat pizza dough and loading them with veggies can make for a healthier Mummy Pizza. Also, lighten the cheese or go for low-fat options!
Nutritional Info
(If desired, you can insert optional nutritional estimates here, but keep in mind these are variable based on specific ingredients chosen.)
Now you have a full guide on making Mummy Pizzas! I hope these delightful bites not only fill your belly but also gather your loved ones around the table, sharing laughter and memories. Happy cooking, and have a spooktacular Halloween! 🎃
Print
Mummy Pizza
- Total Time: 30 minutes
- Yield: 4 servings
- Diet: Vegetarian
Description
A fun and spooky twist on traditional pizza, perfect for Halloween parties or family movie nights.
Ingredients
- Pizza Dough
- Pizza Sauce
- Shredded Mozzarella Cheese
- Olives
- Toppings of Choice
- Olive Oil
Instructions
- Preheat the oven to 425°F (220°C).
- Prepare your workspace by lightly flouring a clean surface.
- Spread a generous layer of pizza sauce over each pizza dough round.
- Get cheesy by sprinkling shredded mozzarella over the sauce.
- Mummify your pizza with strips of cheese, leaving gaps for sauce to show through.
- Add sliced olives for eyes on each pizza.
- Drizzle a bit of olive oil over the crust.
- Bake for 12-15 minutes until cheese is bubbling and crust is golden.
- Cool for a few minutes before serving.
Notes
Mummy Pizzas can be customized with different toppings or sauces, and they can be made gluten-free.
- Prep Time: 15 minutes
- Cook Time: 15 minutes
- Category: Appetizer
- Method: Baking
- Cuisine: Italian
Nutrition
- Serving Size: 1 pizza
- Calories: 350
- Sugar: 5g
- Sodium: 400mg
- Fat: 12g
- Saturated Fat: 4g
- Unsaturated Fat: 6g
- Trans Fat: 0g
- Carbohydrates: 45g
- Fiber: 3g
- Protein: 15g
- Cholesterol: 30mg
Keywords: Halloween, pizza, spooky food, family meals, fun food


