
Homemade Huckleberry Jam: A Sweet Little Jar of Joy
Welcome to my kitchen! Today, we are diving headfirst into one of my absolute favorite recipes: homemade huckleberry jam. There’s something magical about spreading a sweet, tangy jam over buttered toast or fluffy pancakes, and when it’s homemade, every bite is filled with love and nostalgia. Huckleberries are like little bursts of sunshine, and their vibrant flavor makes them the perfect star for this jam.
Imagine waking up on a lazy Sunday morning, sunlight streaming through the kitchen window as you pull out a jar of huckleberry jam from the fridge. You can almost smell the sweet aroma wafting through the air already, can’t you? Whether you’re new to canning or an old pro, making homemade jam is not just about preserving fruit—it’s about creating cherished memories and sharing something truly special with your loved ones.
So, why huckleberries? Growing up, my family would go picking for these gems in the wilds of the Pacific Northwest. I’ll never forget the thrill of finding a bush full of plump, juicy huckleberries shining like little treasures under the sun. We’d spend hours filling our baskets, our fingers stained with the inky juice, and laughter echoing through the trees. Those summer days spent outdoors are some of my happiest memories, and now, I can recreate that joy in each jar of jam.
In this post, I’ll guide you step-by-step on how to make your very own huckleberry jam, share some kitchen tips, and sprinkle in a few personal stories along the way. So, grab your spoon, put on your favorite apron (mine’s always a bit messy), and let’s get cooking!
A Memory Worth Preserving
As I mentioned, my love for huckleberries started in childhood. My grandmother, the queen of jams and jellies, would gather the whole family for our annual berry-picking adventures. I remember one summer in particular—the sun was shining, and the berries were abundant. My little cousin and I were so engrossed in our hunt that we completely lost track of time. Suddenly, we were called back to the picnic blanket for lunch, and I was convinced we had the most huckleberries picked. My grandmother’s legendary huckleberry jam was the reward for our hard work, and as we spooned it onto buttermilk biscuits, I remember thinking that life couldn’t be sweeter.
Cooking for me is deeply intertwined with those beautiful moments of connection—sharing a meal, a story, or a simple jar of jam. Now, every time I scoop huckleberry jam from my fridge, it transports me back to those carefree childhood days, sharing laughter and sweet treats with loved ones. I want to help you create those same memories for you and your family!
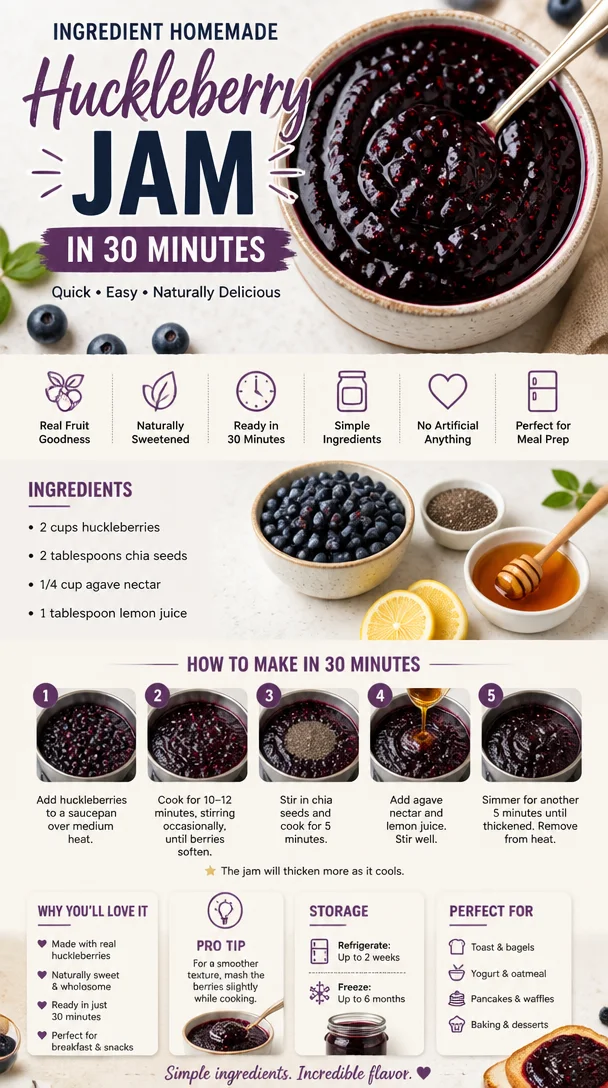
Ingredients
Before we dive into the recipe, here’s what you’ll need to make your huckleberry jam:
-
Huckleberries (4 cups): Look for ripe, plump huckleberries. If you can’t find them, blueberries can work as a substitute; they’ll yield a slightly different flavor but still delicious!
-
Sugar (2 cups): Regular granulated sugar works best, helping to balance the tangy flavor of the berries. You can reduce the sugar if you prefer it less sweet or use a sugar substitute (be sure to check the package for equivalent ratios).
-
Lemon juice (1/4 cup): Freshly squeezed lemon juice adds brightness to the jam and helps preserve it. If you don’t have fresh lemons, bottled juice will work as well; just aim for the organic kind, if possible.
-
Pectin (1 box): This is critical for helping your jam set. There are low-sugar pectins available if you want to cut down on the sugars. Just follow the instructions on the box for quantities.
-
Water (1/4 cup): Used to help simmer the fruit at the beginning.
Step-by-Step Instructions
Now that we’ve gathered our ingredients, let’s roll up our sleeves and get started!
-
Prepare Your Jars: First things first, let’s sanitize our jars. Begin by washing your jars and lids in hot, soapy water, then rinse well. You can sterilize them further by boiling them in water for 10 minutes. This step ensures your jam stays fresh longer!
-
Wash the Huckleberries: Rinse your huckleberries gently under cold running water. This step removes any dirt while keeping those precious berries intact. Drain well and set aside.
-
Cook the Berries: In a large pot, combine the huckleberries, sugar, lemon juice, and water. Stir everything together and bring it to a gentle boil over medium heat. Cook for about 10-15 minutes, stirring frequently to prevent sticking (I know it’s tempting to keep a spoon in there to taste the delightful mixture!).
-
Check for Consistency: This is where your jam magic happens! Using a ladle, take a small amount of the jam and spoon it onto a plate. Let it cool for a minute, then run your finger through it. If it holds its shape and wrinkles slightly, it’s ready for pectin. If not, continue cooking for another few minutes and test again.
-
Add the Pectin: Stir in the pectin according to the package instructions. Bring the mixture back to a boil for another minute, stirring constantly. It should start to thicken up beautifully!
-
Fill Your Jars: Carefully pour your hot jam into the sterilized jars, leaving about 1/4 inch of space at the top. Wipe the rims with a clean cloth to remove any sticky residue before sealing with the lids.
-
Process the Jars: To ensure a good seal and to keep your jam fresh, you can process the jars in a boiling water bath. Place them in a pot of boiling water and let them bath for 10-15 minutes. Once done, carefully remove the jars and allow them to cool on a clean kitchen towel. You should hear the satisfying "pop" of the lids sealing!
-
Cool and Store: Leave your huckleberry jam at room temperature for 24 hours. Make sure the lids are sealed properly (they should not flex when pressed). Store your jars in a cool, dark place for up to a year (if they last that long!).
Serving Suggestions
There’s no better way to enjoy your homemade huckleberry jam than by slathering it on warm, buttered toast! It also pairs beautifully with creamy yogurt, drizzled on top of pancakes or waffles, or even as a filling for pastries. I love it on a charcuterie board, served alongside cheeses and crackers. The tangy-sweet flavor complements many savory items perfectly!
Recipe Variations
Feeling adventurous? Here are a few creative twists to try with your huckleberry jam:
-
Spicy Twist: Add a pinch of cinnamon or a dash of cayenne pepper to the mix for some warming spice that will tickle your taste buds!
-
Herb Infusion: For a unique flavor, try adding fresh herbs like rosemary or thyme while the jam simmers. Just strain them out before jarring.
-
Tropical Blend: Mix in crushed pineapple or a bit of mango puree for a huckleberry-pineapple jam that brings a fun, tropical twist.
-
Chia Jam: Replace the pectin with chia seeds! They create a gel-like consistency and boost the nutritional value, plus it has a fabulous crunch.
-
Sugar-Free Version: Use a sugar substitute like erythritol or monk fruit sweetener if you’re looking for a low-sugar jam.
Chef’s Notes
As with any recipe, this huckleberry jam has evolved over the years in my kitchen. I’ve experimented with everything from adding spices to mixing fruits, and I love how versatile it is. I remember one time, I must have been in a creative mood, and I decided to throw in some fresh ginger. The results were delightful, and I was pleasantly surprised by how that little kick complemented the huckleberries!
Also, don’t be discouraged if your jam doesn’t set the very first time. There’s always a learning curve when you’re canning! Just know that your efforts are worth it; there’s nothing like the satisfaction of seeing rows of homemade jam lining your pantry shelves.
FAQs and Troubleshooting
-
Why didn’t my jam set?
If your jam didn’t set, it could be due to not enough pectin or cooking time. Make sure to boil long enough for the pectin to activate and dissolve fully. You can also reheat the jam and add more pectin if needed! -
How long does homemade huckleberry jam last?
If processed and sealed properly, it can last up to a year in a cool, dark place. Once opened, store in the fridge and consume within a month for freshness. -
Can I use frozen huckleberries?
Absolutely! Just thaw and drain excess liquid before using. Frozen berries are a great option when fresh ones aren’t in season. -
What do I do if my jam is too sweet?
If your jam turns out too sweet, try mixing in a bit of lemon juice or adding some tangy fruit like cranberries during cooking next time. A touch more acidity can balance out sweetness beautifully.
Nutritional Info
(Note: nutritionally, this will vary depending on the amount of sugar and fruit used):
- Serving Size: 1 tablespoon
- Calories: 50
- Total Fat: 0g
- Sugars: 12g
- Protein: 0g
Now, my kitchen friend, you have all the tools you need to create your own batch of huckleberry jam! I can’t wait for you to experience the same joy and nostalgia that fills my heart when I make it. Let me know how it turns out, and share your kitchen stories. Happy cooking!
Print
Homemade Huckleberry Jam
- Total Time: 55 minutes
- Yield: 4 cups
- Diet: Vegetarian
Description
A delightful homemade huckleberry jam that’s sweet, tangy, and perfect for spreading on toast or pancakes.
Ingredients
- Huckleberries (4 cups)
- Sugar (2 cups)
- Lemon juice (1/4 cup)
- Pectin (1 box)
- Water (1/4 cup)
Instructions
- Prepare your jars: Wash and sterilize the jars and lids in hot, soapy water or boil them for 10 minutes.
- Wash the huckleberries: Rinse them gently under cold running water and drain well.
- Cook the berries: Combine huckleberries, sugar, lemon juice, and water in a large pot and bring to a gentle boil over medium heat. Cook for 10-15 minutes.
- Check for consistency: Test the jam on a cooled plate to see if it holds its shape.
- Add the pectin: Stir in pectin according to package instructions and boil for another minute.
- Fill your jars: Pour hot jam into sterilized jars, leaving 1/4 inch space at the top.
- Process the jars: Process in a boiling water bath for 10-15 minutes to seal.
- Cool and store: Let jars sit at room temperature for 24 hours to ensure they are sealed.
Notes
If your jam doesn’t set, reheat and add more pectin. Store opened jars in the fridge and consume within a month.
- Prep Time: 30 minutes
- Cook Time: 25 minutes
- Category: Preserves
- Method: Canning
- Cuisine: American
Nutrition
- Serving Size: 1 tablespoon
- Calories: 50
- Sugar: 12g
- Sodium: 0mg
- Fat: 0g
- Saturated Fat: 0g
- Unsaturated Fat: 0g
- Trans Fat: 0g
- Carbohydrates: 13g
- Fiber: 0g
- Protein: 0g
- Cholesterol: 0mg
Keywords: huckleberry jam, homemade jam, preserves, sweet spread, canning, fruit jam


