
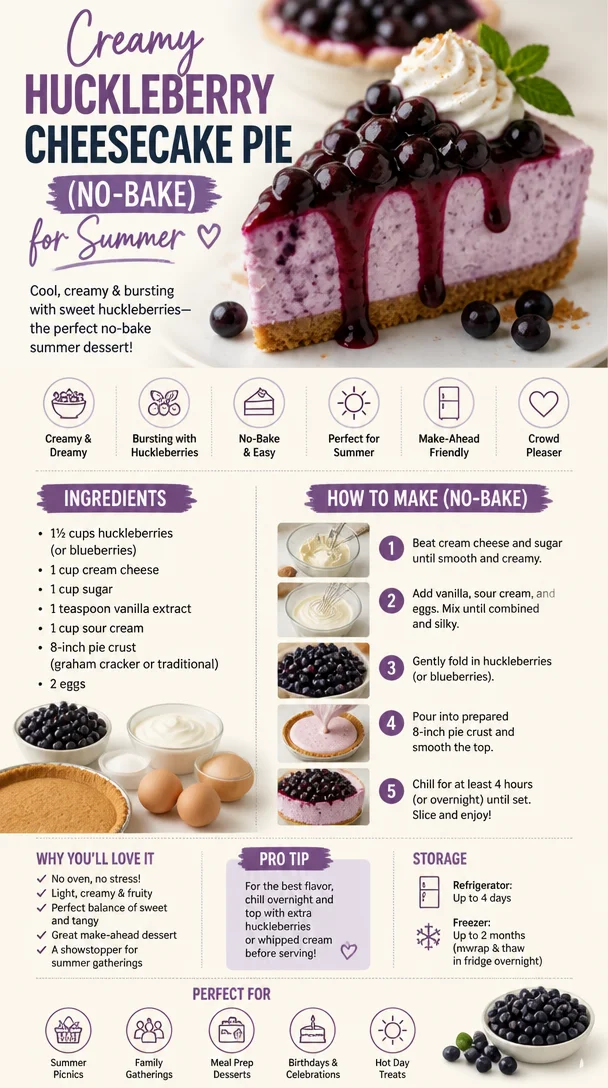
Huckleberry Cheesecake Pie: A Slice of Summer
Welcome to my kitchen! Today, we’re diving into a pie that’s not just a dessert but a celebration of flavors that feels like summer on a plate: the Huckleberry Cheesecake Pie. If you’ve never experienced the delight that is huckleberries, let me tell you—these tiny berries pack a punch of sweet-tart goodness that will have you rethinking every other fruit out there. Picture this: you take a bite and the flavor bursts in your mouth, transporting you to sun-drenched berry-picking adventures in the mountains. Isn’t that what cooking is all about?
There’s something magical about pies—especially creamy ones like this cheesecake pie. They not only tantalize your taste buds but also create moments. Whether it’s a backyard barbecue, a cozy family dinner, or simply a chill night in with your favorite people, nothing beats the joy of sharing a homemade dessert. Plus, huckleberries have a nostalgic charm; they remind me of warm summer days spent gathering wild berries with my family, laughing, and savoring the sweetness of life.
In this blog post, I’m going to take you through the entire process of making a Huckleberry Cheesecake Pie, from the dreamy ingredients to the last bite of velvety goodness. You don’t need to be a culinary wizard to whip this up; just some good vibes and a pinch of enthusiasm! Let’s get cooking, shall we?
A Sweet Memory
Every time I make this pie, I can’t help but think back to that one summer when my family decided to hit the road and explore the mountainous landscapes of Idaho. We were on the hunt for those elusive huckleberries that everyone raved about. I remember the scent of pine in the air and the thrill of seeing those tiny purple gems nestled among the leaves. My mom was quick to fill a basket, while my dad teased us about our “berry strategy.”
When we finally returned home, we decided to mix those fragrant huckleberries into my grandmother’s cheesecake recipe. It was like magic—each bite was a sweet reminder of that day in the mountains. We all gathered around the table, forks in hand, and the laughter filled the kitchen as we savored every creamy, fruity morsel. That pie was more than just a dessert; it was a symbol of our family unity and adventure. I still use that same recipe today, adding a twist of my own with a touch of creativity.
Ingredients
Here’s what you’ll need to create this scrumptious Huckleberry Cheesecake Pie:
-
Huckleberries (2 cups): The star of this dish! These tiny berries are packed with flavor and have a sweet-tart profile. If you can’t find huckleberries, blueberries are a great substitute, though you may need to adjust the sugar slightly.
-
Cream Cheese (16 oz, softened): This base adds that rich, creamy texture we love in cheesecake. Make sure it’s room temperature for easy mixing. For a lighter version, you can substitute with Greek yogurt.
-
Granulated Sugar (1 cup): This sweetens your filling. You can use coconut sugar or a sugar substitute, but it might alter the final taste a bit.
-
Sour Cream (1 cup): This adds a delightful tanginess and creaminess. For a non-dairy option, try using non-dairy sour cream or coconut cream.
-
Vanilla Extract (2 teaspoons): Adds warmth and depth. Make sure to use pure vanilla extract for the best flavor!
-
Eggs (2 large): These provide structure and richness. If you’re looking for a vegan option, try flax eggs (1 tablespoon of ground flaxseed mixed with 2.5 tablespoons of water per egg).
-
Graham Cracker Crust (store-bought or homemade): You can’t have cheesecake pie without this crust! Use a store-bought option for convenience or whip up a quick homemade version with crushed graham crackers, sugar, and melted butter.
-
Butter (1/2 cup, melted): This binds the crust together and gives it that wonderful flavor. If you’re making a gluten-free version, you can use gluten-free graham crackers.
Step-by-Step Instructions
Step 1: Prepare Your Crust
-
Mix the crust ingredients: In a mixing bowl, combine 1 ½ cups of crushed graham crackers, 1/3 cup of sugar, and 1/2 cup of melted butter. Give it a good stir until it resembles wet sand.
- Chef Tip: If you want a little extra flavor, consider adding a pinch of cinnamon or a tablespoon of cocoa powder to the crust.
-
Press and bake: Firmly press the mixture into the bottom and up the sides of a 9-inch pie pan. Bake at 350°F (175°C) for about 10 minutes or until golden brown. Once it’s done, remove it from the oven and let it cool.
- Commentary: A well-baked crust holds everything in place and adds a lovely crunch to your creamy filling—don’t skip this step!
Step 2: Make the Filling
-
Blend the cream cheese: In a large mixing bowl, beat the softened cream cheese until smooth and creamy.
- Chef Hack: Make sure there aren’t any lumps. A whisk or handheld mixer works wonders here!
-
Add sugar and sour cream: Gradually mix in the granulated sugar and sour cream until well combined. Then add in the vanilla extract.
- Pro Tip: Tasting the filling at this stage is crucial—adjust the sweetness if necessary to suit your taste!
-
Incorporate the eggs: Beat in the eggs, one at a time, mixing just until combined. Overmixing can lead to cracks during baking.
- Insider Info: If you’re making this pie for an event, beat the eggs in separately. This adds air and creates a fluffier texture in the final pie.
-
Fold in huckleberries: Gently fold in your fresh or frozen huckleberries with a spatula. You want to keep them intact for that burst of flavor in every bite!
- Little Joy: If using frozen huckleberries, there’s no need to thaw them first.
Step 3: Assemble and Bake
-
Pour into crust: Carefully pour the cheesecake filling into your cooled crust, smoothing the top with a spatula.
- Tip: To avoid bubbles, tap the pie pan on the counter a few times to release any air pockets.
-
Bake the pie: Bake in a preheated oven at 325°F (160°C) for about 50-60 minutes, or until the center is just set but still has a slight jiggle.
- Watch Out: Overbaking can lead to cracks! To prevent this, you can place a pan of water below the pie in the oven to create steam.
-
Cool and chill: Turn off the oven and crack the door open. Let the pie slowly cool down for about 1 hour before transferring it to the fridge to chill for at least four hours, preferably overnight.
- Classic Chef Note: Cooling slowly helps prevent the dreaded cracks.
Serving Suggestions
Once your pie has chilled and is ready to be savored, slice it up and serve it on a pretty plate. A dollop of whipped cream on top never hurt anyone! To elevate your presentation, consider garnishing with a sprig of mint or additional huckleberries. Trust me, the vibrant colors will make it Instagram-ready!
Recipe Variations
- Berry Medley: Swap huckleberries for a mix of your favorite berries like blueberries, raspberries, and strawberries for a mixed berry cheesecake pie.
- Chocolate Drizzle: Drizzle some melted dark chocolate over the cooled pie for an indulgent twist.
- Crunchy Topping: Add a crumble topping made from oats, nuts, and brown sugar for a textural contrast.
- Lemon Zest: Add a teaspoon of lemon zest to the filling for a refreshing tang that balances the sweetness.
- Vegan Version: Substitute cream cheese with a cashew cream or vegan cream cheese for a delicious dairy-free option.
Chef’s Notes
This recipe has traveled with me through years of experimentation, and I love how it always brings people together. One memorable mistake I made was forgetting to add the sugar once—let’s just say it was an unforgettable experience! Everybody found it hilarious, and it turned into a running joke in our family about a “diet cheesecake.”
Every time I revisit this recipe, I play with the balance of ingredients, and while I’m always perfecting it, the essence of that summer road trip is my guiding star. Feel free to put your own spin on it!
FAQs and Troubleshooting
1. Why did my cheesecake crack?
Cracks often form from overmixing eggs or baking at too high a temperature. Ensure you mix just until combined and bake slowly.
2. Can I use frozen huckleberries?
Absolutely! Frozen huckleberries work perfectly—just toss them directly into the batter without thawing.
3. How do I store leftovers?
Store your Huckleberry Cheesecake Pie in an airtight container in the fridge for up to 5 days. You can also freeze slices wrapped tightly for up to 2 months.
4. My pie isn’t setting properly—what went wrong?
If the filling remains too jiggly after baking, it may need more time in the oven. Check on it every 5-10 minutes until it firms up but still jiggles slightly in the center.
Nutritional Info
While loving dessert is important, it’s good to know what you’re indulging in! A slice of Huckleberry Cheesecake Pie is approximately:
- Calories: 320
- Protein: 6g
- Carbs: 40g
- Fat: 15g
(Note: Nutritional values may vary depending on the exact ingredients used and portion sizes.)
Thank you for joining me in my kitchen today! I hope this Huckleberry Cheesecake Pie recipe inspires you to create sweet memories in your own home. Remember, every slice is an opportunity to share love, laughter, and a taste of nostalgia. Happy baking!
Print
Huckleberry Cheesecake Pie
- Total Time: 85 minutes
- Yield: 8 servings
- Diet: Vegetarian
Description
A creamy pie filled with sweet-tart huckleberries, perfect for summer gatherings.
Ingredients
- Huckleberries (2 cups)
- Cream Cheese (16 oz, softened)
- Granulated Sugar (1 cup)
- Sour Cream (1 cup)
- Vanilla Extract (2 teaspoons)
- Eggs (2 large)
- Graham Cracker Crust (store-bought or homemade)
- Butter (1/2 cup, melted)
Instructions
- Mix the crust ingredients: In a mixing bowl, combine 1 ½ cups of crushed graham crackers, 1/3 cup of sugar, and 1/2 cup of melted butter. Give it a good stir until it resembles wet sand.
- Press the mixture into the bottom and up the sides of a 9-inch pie pan. Bake at 350°F (175°C) for about 10 minutes or until golden brown. Let it cool.
- Blend the cream cheese: In a large mixing bowl, beat the softened cream cheese until smooth and creamy.
- Add sugar and sour cream: Gradually mix in the granulated sugar and sour cream until well combined. Then add in the vanilla extract.
- Incorporate the eggs: Beat in the eggs, one at a time, mixing just until combined.
- Fold in huckleberries: Gently fold in the fresh or frozen huckleberries with a spatula.
- Pour the cheesecake filling into your cooled crust, smoothing the top with a spatula.
- Bake in a preheated oven at 325°F (160°C) for about 50-60 minutes, or until the center is just set but still has a slight jiggle.
- Cool and chill: Let the pie cool for about 1 hour before transferring it to the fridge to chill for at least four hours, preferably overnight.
Notes
Serve with whipped cream and garnish with a sprig of mint or additional huckleberries for a beautiful presentation.
- Prep Time: 15 minutes
- Cook Time: 70 minutes
- Category: Dessert
- Method: Baking
- Cuisine: American
Nutrition
- Serving Size: 1 slice
- Calories: 320
- Sugar: 20g
- Sodium: 120mg
- Fat: 15g
- Saturated Fat: 9g
- Unsaturated Fat: 6g
- Trans Fat: 0g
- Carbohydrates: 40g
- Fiber: 3g
- Protein: 6g
- Cholesterol: 80mg
Keywords: huckleberry, cheesecake, summer dessert, pie, creamy dessert


