

Homemade Oreo Milkshake Recipe
The Ultimate Homemade Oreo Milkshake Recipe
Hey there, fellow food lovers! Welcome back to my cozy little corner of the kitchen. Today, we’re diving into a treat that’s as comforting as a hug and as delightful as a sunny afternoon — the Homemade Oreo Milkshake! If you’ve never tried making this ice cream dream at home, let me tell you, you’re in for a real treat. The rich, creamy texture combined with those iconic chocolatey cookie crumbles is absolute bliss.
I don’t know about you, but I have a bit of a soft spot for milkshakes. They remind me of lazy summer afternoons spent hanging out with friends at the local diner, sharing stories and slurping up ice-cold goodness with those oversized straws. There’s something magical about the way a milkshake can transport you back to those carefree days.
This recipe is not just about creating a delicious milkshake; it’s about bringing back those nostalgic moments while adding your unique flair. Trust me, once you whip up this fabulous homemade Oreo milkshake, you’ll never want to buy one again!
The best part? You don’t need a fancy blender or a kitchen full of gadgets to make this magical concoction. With just a few simple ingredients, you can create a milkshake that’s perfect for any occasion, whether you’re throwing a party, celebrating a special moment, or just treating yourself after a long day. So grab your favorite glass, put on some tunes, and let’s get shaking!
Personal Story
I vividly remember the first time I made an Oreo milkshake. It was a hot summer day, and my sister and I decided we were old enough to tackle the kitchen without any adult supervision (probably not the best idea, but let’s roll with it!). Armed with a pack of Oreo cookies, vanilla ice cream, and a blender my mom swore was "the best thing since sliced bread," we were determined to make the ultimate summer treat.
We tossed the ingredients into the blender, cranked it up too high, and ended up with a chocolate explosion all over the kitchen! It was messy, chaotic, and oh so much fun. After we cleaned up (mostly), we finally poured the milkshake into tall glasses, topped it off with whipped cream and a few extra cookie crumbles for good measure.
That first sip? Pure bliss! The perfect balance of creamy ice cream, rich cookies, and just a hint of milk. Since that day, making Oreo milkshakes has been our little tradition — a way to bond, create memories, and indulge in something truly delicious. So let’s make some new memories together, shall we?
Ingredients
Here’s what you’ll need to create your own Oreo milkshake — simple ingredients that you probably already have at home!
-
Oreo Cookies (10-12 cookies)
The star of the show! These chocolatey sandwich cookies bring that signature flavor to our milkshake. If you’re feeling adventurous, you can swap out traditional Oreos for any flavored varieties — think mint, peanut butter, or even the seasonal pumpkin spice! -
Vanilla Ice Cream (2 cups)
A classic choice for any milkshake, vanilla ice cream provides the creamy base that pairs wonderfully with the cookies. You can substitute this with chocolate ice cream for an even richer treat or a dairy-free option if you prefer a non-dairy milkshake. -
Milk (1 cup)
The secret to achieving that perfect creamy consistency! I typically use whole milk, but feel free to use almond, oat, or soy milk for a lighter version. -
Whipped Cream (for topping)
Now, we don’t ‘have to’ add whipped cream, but trust me, it takes this milkshake over the top! Use store-bought or homemade whipped cream. If you’re dairy-free, coconut whipped cream is a fantastic alternative! -
Additional Oreo Crumbles (for garnish)
A little something extra to make your milkshake look as good as it tastes! You can crush a few Oreos in a zip-top bag or use a food processor to make those delectable shards of chocolate goodness.
Step-by-Step Instructions
Step 1: Gather Your Ingredients
Before you jump into blending, it helps to have all your ingredients within reach. Set everything out on the counter — trust me, it’ll make the process smoother (and less messy!).
Step 2: Crush Your Oreos
Grab a couple of Oreo cookies and throw them into a zip-top bag. Seal it up, and crush them with a rolling pin or even your hands. You want some chunky bits for texture, so don’t overdo it! Keep those cookie crumbles aside for later.
Step 3: Blend It Up
Now, grab your blender and add the vanilla ice cream, milk, and the majority (but not all) of those crushed Oreos. Blend until the mixture is smooth and creamy. Depending on your blender, this may take 30 seconds to a minute. If it’s too thick, add a splash more milk. Too runny? Toss in more ice cream! This is where you can customize the texture to your liking.
Step 4: Taste and Adjust
Once you’ve got your milkshake blended, take a quick taste. Need a little more chocolate flavor? Go ahead and add an extra cookie or two, then blend again. Don’t be shy about making it your own!
Step 5: Serve It Up
Grab your tall glasses or mason jars, and pour in that beautiful milkshake. You want to fill it about three-quarters of the way, leaving room for whipped cream and more Oreo crumbles. If you’re feeling fancy, use a piping bag to dollop the whipped cream on top.
Step 6: Garnish and Enjoy
Now it’s time for the fun part! Sprinkle those crushed Oreos over the whipped cream, and if you really want to impress, you can drizzle some chocolate syrup over the top. Serve with a straw or a spoon — or both! You’re all set to enjoy a delicious homemade Oreo milkshake!
Serving Suggestions
The beauty of milkshakes is the endless creativity! Serve these milkshakes in tall glasses garnished with whipped cream and a sprinkle of crushed Oreos for that perfect indulgent look. You can even add a cherry on top or drizzle some chocolate syrup for an extra touch of sweetness.
For a fun twist, try serving them in mini mason jars for a nostalgic feel. They make adorable individual servings for a party or a cozy afternoon treat. Add a sprinkle of cocoa powder or chocolate shavings for an elevated presentation!
Recipe Variations
If you’re feeling adventurous, here are a few fun variations to mix things up:
-
Mint Oreo Milkshake
Swap regular Oreos for mint-flavored ones for a refreshing twist. You can also add a drop of peppermint extract to enhance that minty flavor. -
Cookies and Cream Milkshake
Use chocolate ice cream instead of vanilla for an extra-rich cookies and cream experience. -
Vegan Oreo Milkshake
For a dairy-free version, use coconut milk and coconut or almond milk ice cream. Throw in some vegan whipped cream on top! -
Peanut Butter Oreo Milkshake
Add a tablespoon of peanut butter to give your milkshake a nutty flavor. It pairs perfectly with the chocolate! -
Chocolate Chip Oreo Milkshake
Toss in some mini chocolate chips for added texture and richness!
Chef’s Notes
I absolutely love creating a fantastic milkshake, and this Oreo version holds a special place in my heart. It’s evolved over the years as I’ve played around with different ice creams and flavors. One time, I accidentally grabbed spicy chai-flavored ice cream. It was an interesting experiment for sure — let’s just say some flavors are better left untouched!
I always keep a stash of Oreos in my pantry because you never know when a milkshake craving will hit! So whenever you feel a bit adventurous, feel free to add your personal touch. Remember, the kitchen is your playground!
FAQs and Troubleshooting
Q: My milkshake is too thick; how do I fix it?
Don’t panic! Just add a little bit of milk at a time and blend again until you’ve achieved your desired consistency.
Q: Can I make this dairy-free?
Absolutely! Just substitute regular ice cream and milk with non-dairy alternatives, like almond milk and coconut ice cream.
Q: What can I use if I don’t have a blender?
No blender? No problem! You can use a whisk to combine the ingredients in a large bowl. Crush the Oreos and mix everything until it’s combined. The texture will be a bit different, but still delicious!
Q: How do I store leftovers?
If you happen to have leftovers (not likely with how yummy these are!), simply cover the glasses with plastic wrap and freeze them. They’ll be a bit firmer once frozen, so allow them to sit out for a few minutes before enjoying again.
Nutritional Info
While milkshakes are a treat best enjoyed in moderation, here’s a rough breakdown of what you can expect per serving (when made with whole ingredients):
- Calories: Approximately 500-600
- Fat: 25g
- Carbohydrates: 65g
- Protein: 10g
And there you have it — the ultimate homemade Oreo milkshake you’ll want to make time and time again! So roll up those sleeves, don your favorite apron, and let’s whip up some joy in the kitchen! Cheers to tasty memories and homemade goodness!
Print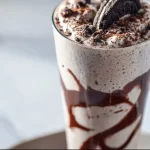
Ultimate Homemade Oreo Milkshake
- Total Time: 10 minutes
- Yield: 2 servings 1x
- Diet: Vegetarian
Description
A rich, creamy homemade Oreo milkshake with chocolatey cookie crumbles that captures the essence of nostalgic summer days.
Ingredients
- 10–12 Oreo Cookies
- 2 cups Vanilla Ice Cream
- 1 cup Milk
- Whipped Cream (for topping)
- Additional Oreo Crumbles (for garnish)
Instructions
- Gather Your Ingredients
- Crush Your Oreos
- Blend It Up
- Taste and Adjust
- Serve It Up
- Garnish and Enjoy
Notes
Feel free to customize the recipe with different ice cream flavors or mix-ins to make it your own.
- Prep Time: 10 minutes
- Cook Time: 0 minutes
- Category: Dessert
- Method: Blending
- Cuisine: American
Nutrition
- Serving Size: 1 serving
- Calories: 550
- Sugar: 40g
- Sodium: 200mg
- Fat: 28g
- Saturated Fat: 16g
- Unsaturated Fat: 10g
- Trans Fat: 0g
- Carbohydrates: 65g
- Fiber: 3g
- Protein: 10g
- Cholesterol: 70mg
Keywords: Oreo milkshake, homemade milkshake, dessert, summer treat


