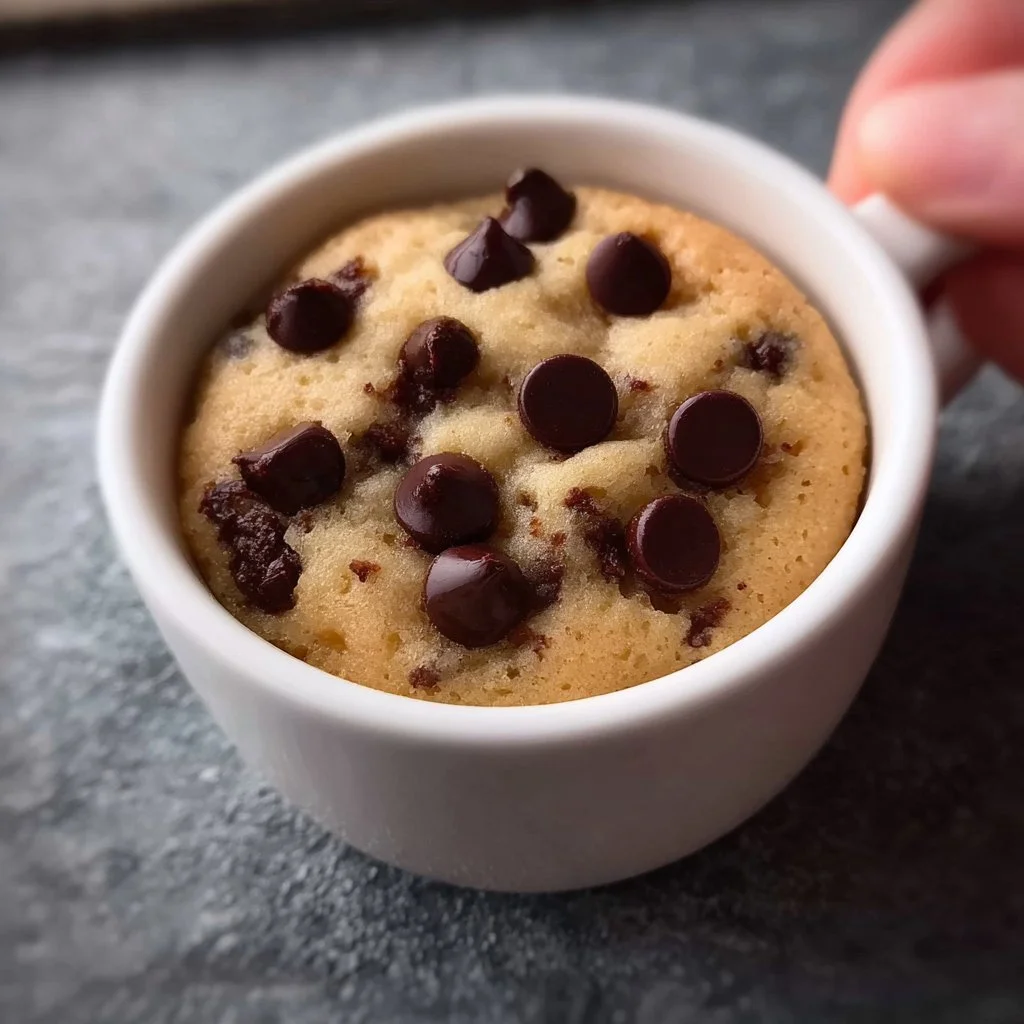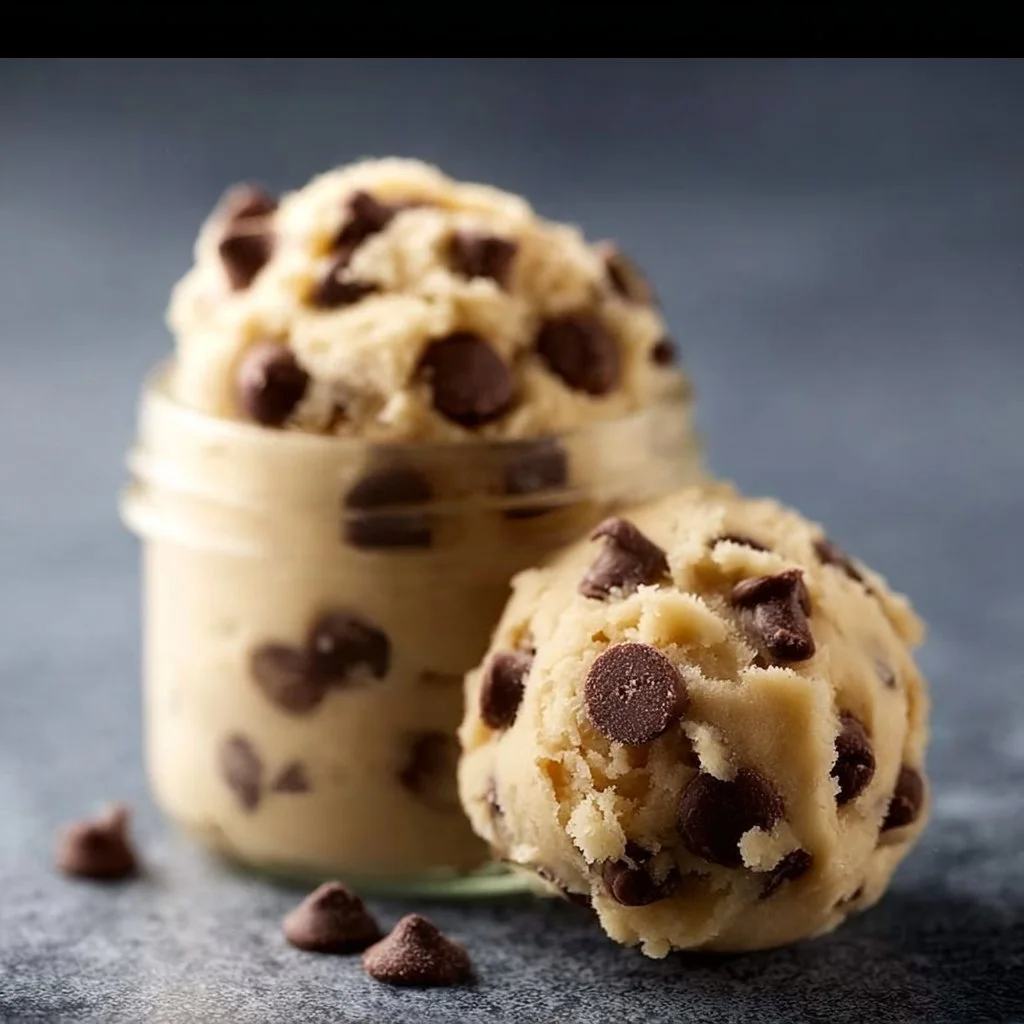
Chocolate chip edible cookie dough for one [3 variations]
The Ultimate Guide to Chocolate Chip Edible Cookie Dough for One (With 3 Delicious Variations!)
Welcome to my kitchen, fellow food enthusiasts! I’m Olivia Bennett, your enthusiastic home cook and culinary companion. Today, I’m excited to share one of my all-time favorite treats that never fails to spark joy—the irresistible chocolate chip edible cookie dough! That’s right, we’re diving into the delightful world of dough without the baking—perfect for those times when you need a sweet fix without the wait!
Let’s set the scene: Picture yourself settling in after a long day, craving something sweet and comforting. What better way to treat yourself than a generous scoop of soft, chewy chocolate chip cookie dough? The kind that melts in your mouth, packed with chocolatey goodness, and gives you all those cozy vibes!
I started making edible cookie dough during my college days. Back then, my idea of gourmet cooking was to whip up a batch of cookies just so I could sneak a spoonful of that raw goodness. However, the looming health warnings about raw eggs and raw flour led me to come up with a solution: edible cookie dough that was safe to eat! Fast forward to today, and I’ve perfected the art of making single-serving cookie dough that hits the spot without the extra guilt.
So get ready to embrace your sweet tooth without hesitation! In this blog post, we’ll not only make a classic chocolate chip edible cookie dough but explore some creative variations to tantalize your taste buds. Let’s get cooking!
Personal Story: My Cookie Dough Epiphany
Ah, the memories! It was a chilly evening, with rain pattering against my window, when I impulsively decided I needed something sweet. With a few basic ingredients on hand—flour, butter, sugar, and, of course, chocolate chips—I started mixing up a batch of cookies. As I stood there, savouring the aroma of vanilla and sugar dancing together, I couldn’t resist stealing a spoonful of that luscious dough.
But then it hit me: the alarming thoughts about salmonella and the risk of consuming raw flour! I was devastated—how could something so delicious possibly come with a warning? It was then I realized that I could perfect a safe-to-eat edible cookie dough, dedicating my evenings to fine-tuning this guilty pleasure. Eventually, I successfully created a recipe that allowed me to enjoy the flavors I loved while keeping my health in check. Now I can indulge whenever I want—while sharing the joy with all of you!
Ingredients
Let’s gather our ingredients! Here’s what you’ll need for our single-serving chocolate chip edible cookie dough, along with some tips to enhance your experience:
-
1 tablespoon unsalted butter
- Softened for easy mixing; if you’re in a hurry, you can microwave for just 10 seconds to soften it up but don’t melt it!
-
1 tablespoon brown sugar
- This adds that rich, caramel-like flavor. If you don’t have brown sugar, you can substitute with granulated sugar, but you might miss that deep taste.
-
1 tablespoon granulated sugar
- Balances out the molasses flavor from the brown sugar. You could also replace it with coconut sugar for a less processed option.
-
1 teaspoon vanilla extract
- A must-have for that dreamy cookie dough flavor! If you’re feeling adventurous, try using almond extract for a unique twist.
-
2 tablespoons all-purpose flour (heat-treated)
- Heat-treat your flour (microwave on high for 1 minute, then let cool) to kill any bacteria. You can also swap this for almond flour or oat flour for a gluten-free option.
-
2 tablespoons mini chocolate chips
- Because who doesn’t love extra chocolate? You can use dark, semi-sweet, or even white chocolate chips—whatever your heart desires.
-
Pinch of salt
- It enhances the sweetness and brings all the flavors together. Don’t skip this step!
Optional Mix-Ins
- Nuts: Chopped walnuts or pecans can add a lovely crunch.
- Sprinkles: For a festive or celebratory touch!
Step-by-Step Instructions
Let’s get down to the fun part—making our edible cookie dough! Follow these simple steps, and I’ll sprinkle in some tips for the best results:
-
Mix Your Butter and Sugars.
- In a small mixing bowl, combine the softened butter, brown sugar, and granulated sugar. Use a fork or a small whisk to blend them until it’s creamy and fluffy. This step builds the foundation for your cookie dough. If you want an extra kick of flavor, cream the butter for an extra minute until it’s light.
-
Add Vanilla Extract.
- Pour the vanilla extract into the butter-sugar mixture and stir until combined. The aroma will get your taste buds tingling in anticipation!
-
Incorporate the Flour.
- Gradually add the heat-treated flour to the mixture. This is where you start to see it come together! Mix until it’s fully combined. If your dough feels too dry, you can add a splash of milk (or plant-based milk) to smooth it out.
-
Fold in the Chocolate Chips.
- Gently fold in the mini chocolate chips. Don’t be shy—add as many as your heart desires! This is the moment when everything transforms into that classic cookie dough consistency.
-
Taste Test Time!
- Before you dive in, taste a spoonful. Adjust the sweetness by adding a bit more sugar if you like it sweeter. Yummm!
-
Chill (Optional).
- For a firmer texture, you can pop your cookie dough into the fridge for about 10 minutes. This isn’t necessary, but if you prefer a chilled version, it’s a nice option!
-
Serve.
- Spoon your cookie dough into a cute bowl or on a pretty plate. Add a sprinkle of sea salt on top to enhance the flavors. It’s time to enjoy your creation!
Serving Suggestions
It’s all about presentation! You can serve your edible cookie dough in a small bowl with some cute garnish. Try pairing it with fresh fruit on the side for a delightful, colorful plate, or enjoy it directly from the mixing bowl for that cozy home cook vibe. Bonus points if you serve it with a scoop of ice cream on the side—now that’s a dessert to celebrate!
Recipe Variations
Feeling adventurous? Here are three delightful twists you can add to your edible cookie dough:
-
Peanut Butter Chocolate Chip Dough
- Substitute half of the butter with creamy peanut butter for a nutty twist. This will give you the irresistible combination of chocolate and peanut butter!
-
Cookie Dough Brownie Bites
- Mix brownie batter into your dough, forming small balls. Chill them and enjoy them as bite-sized brownie cookie dough!
-
S’mores Cookie Dough
- Add crushed graham crackers and mini marshmallows to the dough for a campfire-inspired treat! The addition of a hint of cinnamon will truly elevate this version.
-
Nutty Chocolate Chip Dough
- Toss in some chopped nuts, like almonds or pecans, for an extra crunch and a satisfying texture!
-
Pumpkin Spice Cookie Dough
- For a seasonal twist, mix in canned pumpkin puree and a sprinkle of pumpkin spice! You’ll get the perfect fall-inspired dessert.
Chef’s Notes
As I’ve navigated the world of cookie dough recipes, I’ve learned that the key is to tailor it to your preferences. I remember one time experimenting with some leftover butterscotch chips—let me tell you, I nearly ate the whole batch! Experimentation is half the fun, so don’t shy away from trying out different flavor combinations or textures.
Also, I can’t stress enough how important it is to heat-treat your flour. It’s a small step that ensures you enjoy this sweet treat without any worries!
Cooking is an evolving experience for all of us, and my relationships with food have grown and changed over time—but this cookie dough recipe has always remained a comforting go-to.
FAQs and Troubleshooting
-
Can I use regular flour?
- I don’t recommend using raw flour because it can contain harmful bacteria. Always ensure to heat-treat it first!
-
Why does my cookie dough feel too sticky?
- If your dough is sticky, add a little more flour, one teaspoon at a time, until the consistency feels right.
-
How long can I store leftover cookie dough?
- Store the cookie dough in an airtight container in the refrigerator for up to one week. You can also freeze it for longer storage!
-
Can I make this without butter?
- Absolutely! You can substitute with coconut oil or even applesauce for a healthier twist, although the texture may vary slightly.
Nutritional Info (Optional)
While I usually don’t focus on numbers, I understand the importance of being mindful. A single serving of this cookie dough contains approximately:
- ~~Calories: 200-250 (depending on chocolate chips and substitutions)~~
- ~Protein: 2g~
- ~Carbohydrates: 30g~
- ~Fat: 10g~
- ~Sugar: 15g~
Feel free to adjust ingredients for a healthier version if you prefer. Remember, the joy of cooking lies in making it your own!
And there you have it—your guide to making a delicious, indulgent chocolate chip edible cookie dough! I hope you’re inspired to whip up your own batch, savoring every bite as you relax and enjoy life’s sweet moments. Happy cooking, and remember to always sprinkle a little love into everything you make! 🌟
Print
Chocolate Chip Edible Cookie Dough for One
- Total Time: 5 minutes
- Yield: 1 serving 1x
- Diet: Vegetarian
Description
Indulge in this delicious and safe-to-eat chocolate chip edible cookie dough, perfect for satisfying your sweet cravings without baking!
Ingredients
- 1 tablespoon unsalted butter, softened
- 1 tablespoon brown sugar
- 1 tablespoon granulated sugar
- 1 teaspoon vanilla extract
- 2 tablespoons all-purpose flour, heat-treated
- 2 tablespoons mini chocolate chips
- Pinch of salt
- Optional Mix-Ins: Chopped nuts, sprinkles
Instructions
- Mix your butter and sugars in a small mixing bowl until creamy and fluffy.
- Add the vanilla extract and stir until combined.
- Incorporate the heat-treated flour gradually into the mixture.
- Fold in the mini chocolate chips gently until well combined.
- Taste test and adjust sweetness if desired.
- Chill for 10 minutes if you prefer a firmer texture (optional).
- Serve in a bowl with a sprinkle of sea salt on top.
Notes
Always heat-treat your flour for safe consumption. Experiment with different mix-ins to customize your cookie dough!
- Prep Time: 5 minutes
- Cook Time: 0 minutes
- Category: Dessert
- Method: No-Cook
- Cuisine: American
Nutrition
- Serving Size: 1 serving
- Calories: 250
- Sugar: 15g
- Sodium: 50mg
- Fat: 10g
- Saturated Fat: 4g
- Unsaturated Fat: 6g
- Trans Fat: 0g
- Carbohydrates: 30g
- Fiber: 1g
- Protein: 2g
- Cholesterol: 15mg
Keywords: cookie dough, edible cookie dough, chocolate chip, dessert, quick dessert

3 Ingredient Banana Fudge
The Ultimate 3-Ingredient Banana Fudge Recipe – Your New Favorite Treat!
Welcome to my kitchen, friend! I’m thrilled you’re joining me today because we’re about to embark on a simple yet delectable journey into the world of flavors with my quick and easy 3-ingredient banana fudge. Not only is this recipe bursting with chocolatey goodness and the natural sweetness of bananas, but it’s also so easy that even the most novice of bakers can whip it up with confidence. Plus, who doesn’t love a dessert that requires minimal effort and delivers maximum happiness?
Now, let’s talk a little about what makes this dish so special. This banana fudge is a perfect example of how simplicity can lead to extraordinary flavors. With just three humble ingredients, we’ll transform your ripe bananas into a heavenly treat that’s perfect for snacking, sharing, or indulging after a long day. It’s one of those recipes that’ll make you wonder how something so ridiculously easy can taste so darn good.
But enough intro—let’s dive into the sweet, sweet world of banana fudge! By the time we’re done here, you’ll have a delightful treat that will impress your friends and family, all while making your kitchen smell like a dreamy, chocolatey paradise. I can’t wait for you to try this!
A Nostalgic Moment in the Kitchen
Growing up, my kitchen was a buzzing hub of activity, laughter, and, of course, incredible smells. One of my fondest memories is helping my mom whip up homemade fudge during the summer. The fun started with melting chocolate chips on the stovetop, and I, being a curious little chef, was always there to taste-test. While we stirred the chocolate, we would share stories, and I loved how my mom’s face lit up when the fudge turned out perfectly.
Years later, vermilion-hued memories of those kitchen escapades inspired me to experiment with my favorite flavors. That’s when this 3-ingredient banana fudge recipe was born. It felt so fitting to combine the simplicity of childhood joys with the flavors I adore. Now, instead of traditional fudge, we’re making it banana-style, and believe me, it’s been a game changer! Picture this: smooth and creamy, every square of fudge melts in your mouth, delivering sweet banana goodness with a hint of chocolate. It’ll make you feel like a kid in a candy shop all over again!
Ingredients You’ll Need
Let’s gather our ingredients, shall we? Here’s what we need to make this delightful banana fudge:
-
Ripe Bananas (2 large): The stars of our show! Choose bananas that have plenty of brown spots for maximum sweetness. If you have overripe bananas lying around, now is the perfect time to use them! A great substitute would be mashed avocado for a healthier twist.
-
Chocolate Chips (1 cup): I prefer semi-sweet or dark chocolate chips for a richer flavor, but feel free to switch it up with milk chocolate or even white chocolate if you’d like! For a dairy-free option, go for vegan chocolate chips.
-
Nut Butter (1/2 cup): I love natural peanut butter, but almond or sunflower seed butter works beautifully too. This will add creaminess to our fudge and give it a nutty flavor. If you’re looking for a nut-free version, you can try coconut cream instead, but note that it will change the texture a bit.
Chef Insight
- When selecting bananas, the more speckles, the better! These spots indicate ripeness and sweetness, two essential components for delicious fudge!
Step-by-Step Instructions
Now, let’s get to the fun part—making the banana fudge! Grab your apron and let’s get cooking!
Step 1: Prepare YourBananas
First, peel your ripe bananas and slice them into chunks. Then, place them in a mixing bowl. Use a fork or potato masher to mash them until they’re smooth and creamy, with just a few small lumps for texture. This is where the banana flavor really shines through! Tip: If you ever feel like you’re spending too much time mashing, let me tell you a secret—get a handheld immersion blender! It’ll make the process super fast.
Step 2: Melt the Chocolate Chips
In a microwave-safe bowl, add your chocolate chips. Microwave them in 30-second intervals, stirring in between until melted and smooth. Make sure not to overheat the chocolate, as it can seize up! Chef Hack: If you prefer the stovetop method, melt the chocolate in a double boiler for a more controlled heat.
Step 3: Mix in the Nut Butter
Once your chocolate is ready and perfectly gooey, stir in the nut butter. The combination of the warm chocolate and nut butter will create an irresistible, silky texture. Pro Tip: If your nut butter is too thick, microwave it for a few seconds to soften it up.
Step 4: Combine Everything
Pour the mashed bananas into the melted chocolate and nut butter mixture. Stir it all together until you achieve a smooth, uniform blend. The key here is to incorporate all the flavors well! It should look rich and inviting.
Step 5: Set the Fudge
Line a square baking dish (about 8×8 inches) with parchment paper, leaving a little overhang for easy removal later. Pour the fudge mixture into the dish and gently press it down to create an even layer. Tip: For added texture and flavor, consider sprinkling some chopped nuts or sea salt on top.
Step 6: Chill
Pop your fudge into the refrigerator for about 2-3 hours or until it’s set. This step is essential for creating the perfect fudge consistency. Chef’s Secret: Don’t rush this step; it’s all about patience for that perfect slice later!
Step 7: Slice and Serve
Once the fudge is set, remove it from the dish using the parchment paper overhang and cut it into squares. Place the fudge on a fun serving plate—don’t forget to take a few beautiful photos for your Instagram!
Serving Suggestions
These delightful banana fudge squares are perfect for sharing! You can serve them as a decadent dessert, a fun treat for gatherings, or simply keep them for late-night snack sessions. If you want a little extra flair, serve them on a rustic wooden board garnished with fresh banana slices or a sprinkle of flaky sea salt. A dollop of whipped cream or a scoop of vanilla ice cream alongside wouldn’t hurt either!
Recipe Variations
Feeling adventurous? Here are a few fun twists on the classic banana fudge:
- Add Some Spice: Mix in a pinch of cinnamon or a dash of vanilla extract to elevate the flavors.
- Nutty Delight: Fold in some chopped nuts for added crunch and richness. Walnuts or pecans work wonderfully.
- Fruit Burst: Incorporate chopped dried fruits like cranberries or apricots for a sweet-tart twist.
- Minty Fresh: Add a few drops of peppermint extract for a refreshing mint-chocolate combo!
- Caramel Swirl: Drizzle some caramel sauce on top before chilling for a sweet surprise.
Chef’s Notes
It’s amazing how just three ingredients can create something so delicious and comforting! I’ve experimented with this base recipe over the years, tweaking it a bit here and there. However, the beauty of this fudge is in its adaptability. After years of making these for myself and friends, I discovered that it’s not just a treat; it’s a canvas for creativity! Every batch tends to have its own personality, thanks to the addition of different nut butters or toppings. In the end, it always brings a smile to my face—and a satisfied one at that!
FAQs and Troubleshooting
Q: How do I store the leftovers?
A: Keep the fudge in an airtight container in the refrigerator for up to a week. You can also freeze it for longer storage!
Q: Can I use frozen bananas?
A: Absolutely! Just make sure to thaw them and drain any excess liquid before mashing.
Q: Why did my fudge turn out too soft?
A: If the fudge is too soft, it might need some extra chilling time. Ensure the mixture is completely set before cutting.
Q: Can I make it vegan?
A: Yes! Simply use dairy-free chocolate chips and any nut or seed butter that’s plant-based!
Nutritional Info (Optional)
While I believe in indulging freely, it can be helpful to know what you’re munching on. Each square of this fabulous fudge is packed with protein, healthy fats, and natural sugars from the bananas—definitely a guilt-free treat for your sweet tooth!
And there you have it—your comprehensive guide to making this mouthwatering 3-ingredient banana fudge! I hope this recipe brings back nostalgia and creates new memories in your kitchen. Happy cooking and even happier eating!
Print
3-Ingredient Banana Fudge
- Total Time: 180 minutes
- Yield: 12 squares 1x
- Diet: Vegan
Description
A quick and easy recipe for delicious banana fudge made with just three ingredients.
Ingredients
- 2 large Ripe Bananas
- 1 cup Chocolate Chips
- 1/2 cup Nut Butter
Instructions
- Prepare your bananas by peeling and slicing them into chunks, then mash until smooth.
- Melt the chocolate chips in a microwave-safe bowl in 30-second intervals.
- Mix in the nut butter until combined with the melted chocolate.
- Combine the mashed bananas with the chocolate mixture until smooth.
- Set the mixture in a lined baking dish, pressing down to create an even layer.
- Chill in the refrigerator for 2-3 hours until set.
- Slice into squares and serve.
Notes
Use overripe bananas for maximum sweetness. Consider adding chopped nuts or sea salt for added texture.
- Prep Time: 10 minutes
- Cook Time: 0 minutes
- Category: Dessert
- Method: Chilling
- Cuisine: American
Nutrition
- Serving Size: 1 square
- Calories: 150
- Sugar: 8g
- Sodium: 5mg
- Fat: 7g
- Saturated Fat: 1g
- Unsaturated Fat: 6g
- Trans Fat: 0g
- Carbohydrates: 20g
- Fiber: 2g
- Protein: 3g
- Cholesterol: 0mg
Keywords: banana fudge, vegan dessert, easy recipes, quick treats, chocolate