

Dairy Queen Banana Milkshake
Dairy Queen Banana Milkshake Recipe: A Cozy, Creamy Delight!
Hey there, fellow food lovers! Welcome back to my kitchen — I’m so glad you’ve joined me today! If you’re anything like me, there’s something about the sweetness of a banana blended with creamy ice cream that just sends your taste buds into orbit. Today, I’m excited to share with you a delightful recipe that captures the essence of one of those cherished childhood treats we all know and love: the legendary Dairy Queen Banana Milkshake!
Ah, the memories of standing in line at Dairy Queen, that enticing aroma of waffle cones wafting through the air, and the joyful anticipation as you watched the friendly staff whip up your favorite milkshake. There’s just something magical about the way a milkshake brings back those sunny, carefree days, filled with laughter and a sprinkle of nostalgia. You can almost taste that creamy, dreamy blend of real bananas, rich ice cream, and a touch of vanilla goodness.
But here’s the thing — you don’t have to dash out to your nearest DQ to satisfy that dairy-filled craving. Nope! I’ve crafted a super easy, delicious banana milkshake recipe that you can whip up right in the comfort of your own home. Grab your blender, dig into those ripe bananas on your counter, and let’s transform those humble ingredients into a delightful treat!
In this blog post, I’ll walk you through every step of the process, share some personal anecdotes, and sprinkle in a few chef tips to ensure you master this creamy concoction. Whether you’re sipping this milkshake after a long day or serving it at a backyard barbecue, trust me — it’s bound to be a crowd-pleaser. Ready to blend? Let’s dive in!
Personal Story
Growing up, my family had a tradition: every Sunday after church, we’d stop by the local Dairy Queen before heading home for the afternoon. My brother always opted for the chocolate fudge sundae, while I eagerly anticipated my favorite banana milkshake. There was something undeniably special about that treat; it wasn’t just a dessert; it was a little bit of joy in a cup!
I remember sitting at our favorite booth, my cheeks smeared with whipped cream as I savored that cold, creamy blend while chatting about my week. The way those flavors danced on my palate — the smoothness of the vanilla ice cream with the sweet, natural flavor of the bananas — was a moment of sheer bliss.
Eventually, as I grew older and began experimenting in my kitchen, I found that making this nostalgic treat at home was not only easy but oh-so-rewarding! It has since turned into one of my go-to recipes for gatherings and quiet evenings alike. Recreating that sensation of joy in a milkshake now feels like a warm hug from my childhood. With that said, let’s gather our ingredients and get blending!
Ingredients
To make the perfect Dairy Queen-style banana milkshake, you’ll need the following ingredients:
-
Ripe Bananas (2 medium)
- Explanation: Bananas that have a few brown spots are perfect because they’re extra sweet and creamy.
- Substitution tips: If you’re not a banana fan (gasp!), try using frozen strawberries or mango for a fruity twist.
-
Vanilla Ice Cream (2 cups)
- Explanation: Using good-quality vanilla ice cream makes a world of difference in flavor.
- Substitution tips: Dairy-free ice cream or frozen yogurt can work if you’re looking for a lighter version.
-
Milk (1/2 cup)
- Explanation: Milk helps create that perfect pourable consistency.
- Substitution tips: Use almond milk or oat milk for a dairy-free version.
-
Vanilla Extract (1 teaspoon)
- Explanation: A splash of vanilla elevates the flavor to delicious new heights.
- Substitution tips: You can omit this if you’re in a pinch, but it really does enhance the banana flavor!
-
Whipped Cream (for serving)
- Explanation: Because what’s a milkshake without a fluffy topping?
- Tip: Feel free to use store-bought or make your own using heavy whipping cream.
-
Optional: A Pinch of Cinnamon
- Explanation: Adding a pinch of cinnamon can introduce a warm spice note that enhances the banana flavor.
Gather these delightful ingredients, and you’re on your way to creating a cool, creamy treat that’s sure to put a smile on your face!
Step-by-Step Instructions
Let’s get to the fun part — blending it all together! Follow these simple steps:
-
Prepare Your Bananas
- Slice your ripe bananas into smaller pieces (about 1-2 inches). This not only makes blending easier but also ensures a smooth consistency. If you like your milkshake extra frosty, you can freeze the banana slices beforehand for a thick delight.
-
Measure Your Ingredients
- In your trusty blender, add the sliced bananas first, followed by the vanilla ice cream. This order typically helps things blend better, especially if you’re using a less powerful blender.
-
Pour in the Milk
- Add 1/2 cup of milk to your blender. You can adjust this later for thickness; start with less if you want a thicker shake.
-
Add Vanilla Extract
- Pour in the teaspoon of vanilla extract to infuse that extra layer of flavor.
-
Blend It Up!
- Secure the blender lid tightly (we don’t want any banana explosions here!). Blend on medium speed until all the ingredients are well-combined and you achieve a smooth and creamy texture—around 30-60 seconds. Stop to scrape down the sides if needed.
-
Check Consistency
- This is the fun part! Stop blending and take a spoon to taste your milkshake. If you prefer it thicker, add a bit more ice cream. For a thinner version, splash in a little more milk.
-
Serve the Shake
- Once you’re happy with the consistency, pour the milkshake into your favorite tall glasses. Don’t be shy — I love to fill mine to the brim!
-
Top with Whipped Cream
- Earn extra style points by generously topping each glass with whipped cream. If you’re feeling fancy, you can drizzle some chocolate syrup on top or even sprinkle a bit of cinnamon for that extra flair.
-
Grab a Straw and Enjoy!
- Now, grab a straw (or a spoon if you prefer) and indulge in your homemade banana milkshake. Sip slowly to relish every delicious drop!
Serving Suggestions
To serve your delectable banana milkshake, choose a tall glass that shows off its lovely swirls of creamy goodness. Add a vibrant straw, perhaps in a fun color, and a generous puff of whipped cream on top. For a charming touch, you might want to garnish with a banana slice or a drizzle of chocolate syrup to make it feel extra special.
Don’t forget, this milkshake pairs perfectly with homemade cookies or a slice of pie, making it a delightful dessert for parties or cozy evenings at home.
Recipe Variations
Want to switch things up a bit? Here are a few creative variations to consider:
-
Chocolate Banana Milkshake: Just add two tablespoons of chocolate syrup or some cocoa powder along with the other ingredients for a delightful chocolatey twist!
-
Peanut Butter Banana Milkshake: Add two tablespoons of creamy peanut butter for a protein boost and a rich, nutty flavor.
-
Nutty Banana Milkshake: Stir in some crushed nuts (like walnuts or almonds) for added texture and nutty flavor.
-
Vegan Option: Swap the vanilla ice cream for a banana-flavored coconut or almond ice cream and use almond milk for a delicious vegan treat.
-
Berry Banana Blend: Throw in a handful of frozen berries (like strawberries or blueberries) for an added fruity burst — yum!
Chef’s Notes
Every time I make this banana milkshake, I think back to those sunny Sundays at Dairy Queen with my family and friends. Whether we were sharing laughs or chatting about life, those moments made the milkshake taste even sweeter.
This recipe has evolved over time in my kitchen. I remember the early days when I attempted to make it, mixing and matching ingredients haphazardly without much success. It’s funny how a simple recipe can turn into something so reliable and beloved!
Every now and then, I’ll experiment with new flavors or toppings, but the classic banana still reigns supreme in my heart. No matter how many twists I try, nothing beats that first sip that reminds me of home.
FAQs and Troubleshooting
1. My milkshake turned out too thick! What should I do?
- If your milkshake is too thick, simply add a little more milk and blend until you reach your desired consistency. You can also add extra banana if you want to keep the flavor strong!
2. Can I use frozen bananas?
- Absolutely! Frozen bananas work great and often create an even thicker texture. Just keep in mind that you may need to adjust your milk amount for blending.
3. What if I don’t have a blender?
- You can use an immersion blender if you have one! Alternatively, mash the bananas well and then mix all the ingredients using a whisk or fork for a chunkier milkshake.
4. How can I prevent the bananas from turning brown?
- To avoid browning, you can squeeze a bit of lemon juice on the banana slices right after cutting them, though this might add a slight tang.
Remember, cooking is all about experimenting and finding what works for you — don’t stress too much, and just enjoy the process!
Nutritional Info (Optional)
While I believe in enjoying delicious treats without guilt, if you’re curious about the nutritional breakdown, here’s a rough estimate for one serving (using the ingredients listed):
- Calories: 400-500
- Protein: 7g
- Fat: 15g
- Carbohydrates: 75g
- Sugars: 65g
Keep in mind that this can vary based on the specific brands you use.
Well, there you have it! A delightful, creamy Dairy Queen-inspired banana milkshake recipe that’s not just delicious but also brings a wave of nostalgia with every sip. Whether it’s a hot summer day or a cozy winter evening, this milkshake is sure to lift your spirits and evoke all those heartwarming memories. So grab your ingredients, invite a friend, and let’s blend some happiness together. Happy cooking, friends! 🍌🥤❤️
Print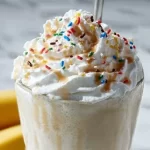
Dairy Queen Banana Milkshake
- Total Time: 10 minutes
- Yield: 2 servings 1x
- Diet: Vegetarian
Description
A delightful, creamy banana milkshake inspired by the classic Dairy Queen treat, perfect for any occasion.
Ingredients
- 2 medium ripe bananas
- 2 cups vanilla ice cream
- 1/2 cup milk
- 1 teaspoon vanilla extract
- Whipped cream (for serving)
- A pinch of cinnamon (optional)
Instructions
- Prepare your bananas by slicing them into smaller pieces (about 1-2 inches).
- Measure your ingredients by adding the sliced bananas first into your blender, followed by the vanilla ice cream.
- Pour in the milk, adjusting the quantity for thickness as desired.
- Add the vanilla extract to enhance the flavor.
- Blend on medium speed for 30-60 seconds until smooth and creamy.
- Check the consistency and adjust by adding more ice cream or milk as needed.
- Serve the milkshake in tall glasses, filling them to the brim.
- Top with whipped cream and any optional toppings like chocolate syrup or cinnamon.
- Grab a straw and enjoy your homemade banana milkshake!
Notes
For added flavor variations, consider chocolate syrup, peanut butter, nuts, or using dairy-free alternatives.
- Prep Time: 10 minutes
- Cook Time: 0 minutes
- Category: Dessert
- Method: Blending
- Cuisine: American
Nutrition
- Serving Size: 1 serving
- Calories: 450
- Sugar: 65g
- Sodium: 100mg
- Fat: 15g
- Saturated Fat: 9g
- Unsaturated Fat: 4g
- Trans Fat: 0g
- Carbohydrates: 75g
- Fiber: 3g
- Protein: 7g
- Cholesterol: 50mg
Keywords: banana milkshake, dessert, creamy, Dairy Queen, nostalgic, ice cream


