
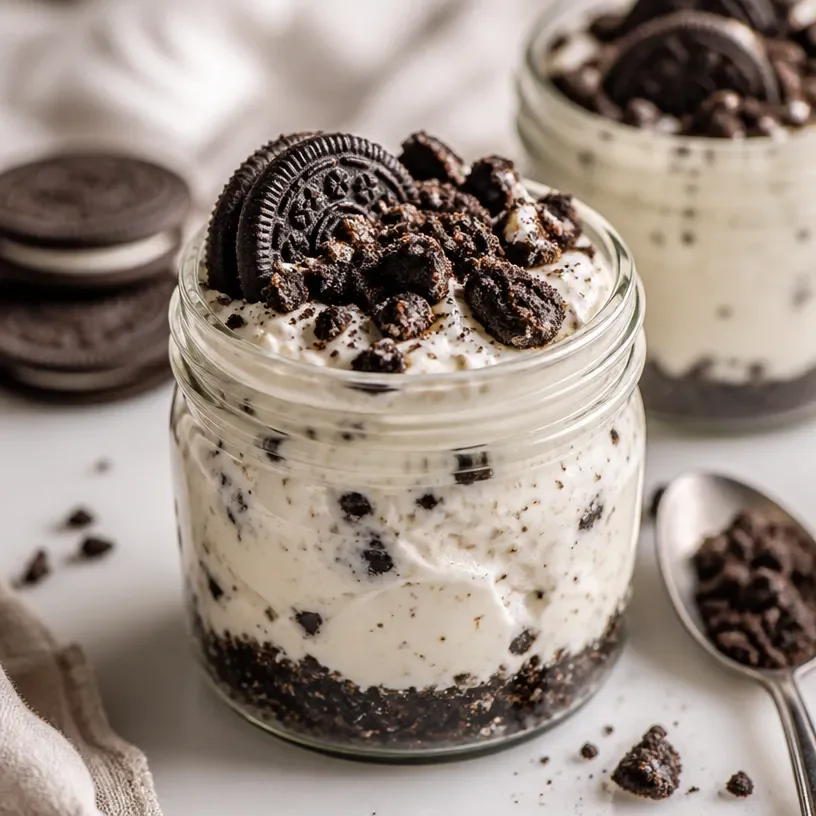
High-Protein Oreo Cheesecake Jars: No-Bake in 15 Minutes
Protein Oreo Cheesecake Jar: Indulge Without the Guilt!
Welcome back to my cozy kitchen, food lovers! Today, we’re diving into a delightful dessert that will satisfy your sweet tooth and keep those post-workout cravings at bay. Who says you can’t have your cake and eat it too? I’m talking about the Protein Oreo Cheesecake Jar—a layered masterpiece that effortlessly combines rich flavors with a punch of protein. This treat is perfect for those times when you want a sweet indulgence without sacrificing your health goals. Spoon into these dreamy jars, and you’ll see why they’re a hit in my home!
Now, I know a cheesecake can intimidate some folks, but trust me—not only is this recipe simple, it’s also wonderfully customizable! Plus, the combination of crunchy Oreos and creamy cheesecake filling feels like a warm hug on a chilly evening.
But before we get into the details, let’s take a little stroll down memory lane.
A Sweet Memory in Every Bite
I remember the first time I ever made cheesecake. It was a humble attempt in my tiny college kitchen, equipped with only the essentials: a hand mixer, a flimsy baking sheet, and a questionable oven. I didn’t have a fancy springform pan, so I poured my batter into a shallow dish, crossing my fingers that it wouldn’t turn into a complete disaster.
As my cheesecake baked, the scent filled my tiny apartment, and eager friends gathered around, drawn in by the wafting aroma. When I finally pulled it out, it may not have been the prettiest, but when I served it with a drizzle of chocolate sauce, it was a hit! That day, I discovered the magic of cooking—how it brings people together, ignites laughter, and creates cherished memories.
Fast forward to today, I’ve put a healthier spin on my nostalgic cheesecake with this Protein Oreo Cheesecake Jar! You can express your creativity while enjoying a wholesome dessert everyone will adore.
Ingredients
Here’s what you’ll need to whip up your delicious Protein Oreo Cheesecake Jar:
-
Low-Fat Cream Cheese (8 oz): A rich base for our cheesecake filling that remains creamy without all the fat. If you’re looking for a dairy-free option, try using vegan cream cheese instead!
-
Vanilla Protein Powder (1 scoop): This adds a protein boost to our treat—perfect for those post-workout cravings! Any vanilla protein powder will work; just keep in mind that flavored powders may change the taste.
-
Greek Yogurt (½ cup): It adds creaminess and a tangy flavor. Greek yogurt also provides a nice protein punch! Swap for vegan yogurt if you need a dairy-free version.
-
Powdered Sugar (¼ cup): A touch of sweetness to balance out the tartness of the cream cheese. For a healthier option, feel free to use stevia or monk fruit sweetener instead.
-
Oreo Cookies (6-10 cookies): The star of the show! Crush these up for the quintessential cookie crust and crunchy layers. No Oreos? No problem! Try any chocolate sandwich cookies or even chocolate graham crackers.
-
Butter (2 tbsp, melted): This helps bind the crushed cookies into a crust. You can use coconut oil or vegan butter as a substitute to keep things dairy-free.
-
Milk (¼ cup): Just a splash to blend everything wonderfully without being too dense. Almond milk, oat milk, or any other non-dairy milk work just fine, too.
-
Whipped Topping (optional): For an extra touch of decadence, top your cheesecake jars with whipped cream. Coconut whipped cream is a lovely dairy-free option!
Step-by-Step Instructions
-
Prep the Jars: Start by gathering your jars (four or five 8 oz jars work best). This is where your delicious cheesecake will shine! You can use glass jars for a classic look or small plastic containers for take-along treats.
-
Make the Oreo Crust: In a food processor or by hand, crush the Oreo cookies into fine crumbs. In a bowl, mix the crushed cookies with the melted butter until it resembles wet sand. This crust is the perfect crunchy contrast to the creamy filling!
-
Layer the Crust: Divide the Oreo mixture evenly among your jars. Press the crumbs down with the back of a spoon or your fingers to create a sturdy base. Don’t skimp on this layer—it’s essential!
-
Blend the Cheesecake Filling: In a large mixing bowl, beat the low-fat cream cheese until smooth and creamy. You definitely want to remove lumps for that silky texture—no one wants a chunky cheesecake!
-
Add Protein and Creaminess: Now, add the vanilla protein powder, Greek yogurt, and powdered sugar to the cream cheese. Mix until fully combined; the filling should be thick but spreadable. At this point, take a little taste; if you like it sweeter, add another sprinkle of powdered sugar!
-
Layer the Flavors: Spoon your luscious cheesecake filling over the Oreo crust, dividing it evenly among the jars. Tap the jars lightly on the counter to settle the filling—this creates beautiful, compact layers.
-
Repeat the Layers: If you wish, you can add another layer of crushed Oreos and cheesecake filling. I often like two layers, but you can definitely stick to one base layer if you prefer.
-
Chill the Jars: Cover the jars with lids or plastic wrap and chill them in the fridge for at least 2 hours (or overnight for the ultimate indulgence!). This step helps everything set and allows the flavors to meld together beautifully.
-
Serve with Whipped Cream: When you’re ready to dig in, take the jars out of the fridge. Top each with a dollop of whipped topping (if using) and maybe a sprinkle of crushed Oreos for that artistic flair!
-
Dig In: Grab a spoon and enjoy the creamy, dreamy, and totally guilt-free delight that is your Protein Oreo Cheesecake Jar! Each scoop will reveal those beautiful layers—it’s like dessert art on a spoon.
Serving Suggestions
When it comes to plating, these jars are simply irresistible on their own. For an extra touch, you could place each jar on a colorful dessert plate or serve with a side of fresh berries for added freshness. If you’d like to impress your friends at a gathering, line up the jars on a beautiful platter or wooden board with a mix of garnish options like mint leaves or extra cookie crumbles for style!
Recipe Variations
Feeling adventurous? Here are some fun variations to play with:
- Chocolate Chip Cookie Version: Swap out Oreos for chocolate chip cookies for a different flavor twist!
- Fruit Swirl: Add a layer of your favorite fruit preserves or fruit puree between the cheesecake filling layers for a fruity zing.
- Nutty Flavor: Incorporate crushed nuts like almonds or pecans into the crust or as a topping for added crunch.
- Layered Parfaits: Exclusive to health enthusiasts? Swap out the Oreos for granola for a breakfast-appropriate treat!
Chef’s Notes
This Protein Oreo Cheesecake Jar recipe has evolved over the years from my classic cheesecake creations. Initially, I thought dessert couldn’t be healthy, but it turns out there are so many ways to enjoy our favorites without guilt! As I played with the ingredients and took a few culinary risks, I found that adapting beloved treats into healthier versions could be extraordinarily satisfying—and surprisingly easy! The best part? Sharing these jars with friends and family brings me joy every time.
Oh, and don’t forget: if your cheesecake mixture appears a little too thick, don’t hesitate to add a splash of milk more until you reach the desired creamy consistency. We want this to be a joy to eat, after all!
FAQs and Troubleshooting
Can I make these jars ahead of time?
Yes! Feel free to make these up to 2-3 days in advance. Just store them in the fridge with lids on to keep them fresh.
What can I use instead of cream cheese?
If you’re dairy-free or want a lighter version, silken tofu blended until creamy works wonders as a substitute and keeps the texture smooth.
My cheesecake is too runny—what did I do wrong?
This can happen if you added too much liquid or didn’t allow it to chill long enough to set. Make sure to follow the ingredient measurements, and for runny results, simply pop it in the freezer for about 15 minutes before serving to help it firm up.
How long does this dessert stay fresh?
These jars will stay fresh in the fridge for up to a week! Though I doubt they’ll last that long; they’re so delicious, you’ll find them disappearing fast!
Nutritional Info (Optional)
If you’re keeping tabs on nutritional content, here’s a rough estimate per jar (while keeping in mind ingredient variations):
- Calories: 250
- Protein: 18g
- Carbs: 30g
- Fat: 10g
And there you have it—a decadent treat that packs a protein punch without the guilt! I hope you find as much joy in making and sharing these Protein Oreo Cheesecake Jars as I do. Happy cooking, friends!
Print
Protein Oreo Cheesecake Jar
- Total Time: 120 minutes
- Yield: 4 servings
- Diet: Protein-rich
Description
A delightful dessert that satisfies sweet cravings while packing in protein. Perfect for post-workout indulgence.
Ingredients
- Low-Fat Cream Cheese (8 oz)
- Vanilla Protein Powder (1 scoop)
- Greek Yogurt (½ cup)
- Powdered Sugar (¼ cup)
- Oreo Cookies (6-10 cookies)
- Butter (2 tbsp, melted)
- Milk (¼ cup)
- Whipped Topping (optional)
Instructions
- Prep the jars: Gather four or five 8 oz jars for your cheesecake.
- Make the Oreo crust: Crush the Oreo cookies and mix with melted butter until it resembles wet sand.
- Layer the crust: Divide the Oreo mixture among the jars and press down to create the base.
- Blend the cheesecake filling: Beat the low-fat cream cheese until smooth and creamy.
- Add protein and creaminess: Mix in the vanilla protein powder, Greek yogurt, and powdered sugar until well combined.
- Layer the flavors: Spoon the cheesecake filling over the crust in each jar.
- Repeat the layers: Optionally, add another layer of crushed Oreos and cheesecake filling.
- Chill the jars: Cover and refrigerate for at least 2 hours, or overnight for best results.
- Serve with whipped cream: Top with whipped topping if desired before enjoying.
- Dig in: Enjoy your creamy, protein-packed cheesecake jar!
Notes
Feel free to customize your cheesecake jars with different flavors or toppings!
- Prep Time: 15 minutes
- Cook Time: 0 minutes
- Category: Dessert
- Method: No-Bake
- Cuisine: American
Nutrition
- Serving Size: 1 jar
- Calories: 250
- Sugar: 10g
- Sodium: 250mg
- Fat: 10g
- Saturated Fat: 4g
- Unsaturated Fat: 4g
- Trans Fat: 0g
- Carbohydrates: 30g
- Fiber: 2g
- Protein: 18g
- Cholesterol: 25mg
Keywords: cheesecake, dessert, protein, healthy dessert, no-bake cheesecake




