
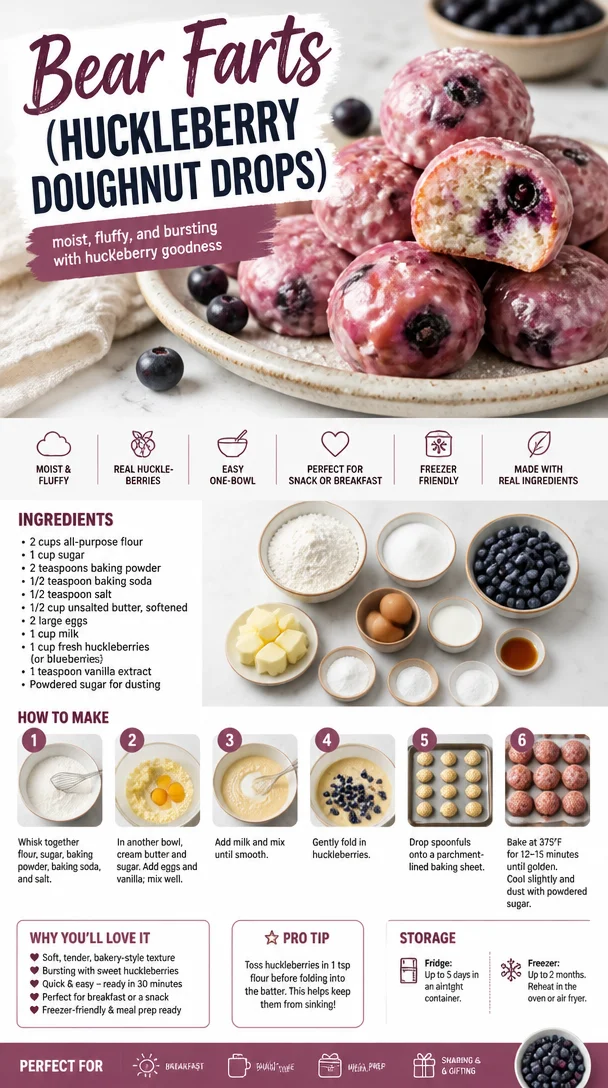
Bear Farts (Huckleberry Doughnut Drops)
Bear Farts: Huckleberry Doughnut Drops
Welcome to my cozy corner of the kitchen! I’m thrilled to share one of my favorite recipes with you today—Bear Farts! Now, don’t let the quirky name fool you; these delightful huckleberry doughnut drops are anything but silly. They’re fluffy little bites of heaven, bursting with bright berry flavor and a hint of sweetness that will make your taste buds sing. This recipe holds a special place in my heart, and I can’t wait to take you along on this delicious journey.
Introduction: A Foodie’s Magical Experience
Imagine stepping into a kitchen filled with the glorious smell of something sweet baking in the oven. It’s warm and inviting, the kind of place where laughter dances in the air and memories are made over shared meals. That’s exactly what Bear Farts remind me of—an experience steeped in nostalgia and joy. My love for baking was significantly influenced by the many summers I spent in my grandmother’s kitchen, where her infectious laughter could whisk away any worries.
It was during those golden afternoons that I first tasted huckleberries. Grandma used to take me on berry-picking adventures, her wicker basket slung over her arm, a mischievous twinkle in her eye. We would venture deep into the woods, the soft rustle of leaves underfoot and the sweet burden of ripe huckleberries waiting to be picked. My favorite part? Grandma’s secret recipe for huckleberry pastries—hot, crispy, and just sweet enough to make you feel like you were eating a slice of heaven!
Fast forward to today, and I’m proud to say I’ve put my own spin on those cherished memories. These Bear Farts, or huckleberry doughnut drops, are my way of keeping that spark alive. They’re easy to make, and the recipe yields a soft, fluffy treat that tastes like pure joy. So whether you’re whipping them up for breakfast, brunch, or just because—trust me, these little drops will bring a touch of magic to your kitchen.
Now, let’s roll up those sleeves and get to it! You’ll find that this recipe is not only simple but adaptable, perfect for chefs of all skill levels.
Personal Story: Berry Picking Adventures
Let me take you back to one of my fondest memories—an early summer morning spent berry picking with Grandma. The sun peeked through the trees, and the air was still crisp. Armed with our wooden baskets and a shared determination, we set out into the woods, excitement bubbling inside us both. Every step felt like a treasure hunt, with Grandma humming a sweet tune, her love for nature and food resonating with every note.
After what felt like hours of joyful picking, we returned to her kitchen, our baskets overflowing with slender, violet-hued huckleberries. Grandma brought them to life in her famous huckleberry doughnuts, an old family recipe passed down through generations! I remember getting flour everywhere and giggling uncontrollably, our culinary skills still in their infancy. As we pulled those golden, doughy delights from the oven, the entire house filled with warmth and love—a hallmark of her cooking.
Now, as I stand here baking my own version of those doughnuts, I can almost hear her laughter echoing in the kitchen. The memories are powerful, and the flavors are even better!
Ingredients
Here’s what you’ll need to whip up your huckleberry doughnut drops:
-
2 cups all-purpose flour: The base of your doughnuts. For a healthier twist, you can substitute with whole wheat or gluten-free flour.
-
½ cup granulated sugar: To sweeten the deal. Brown sugar can give a deeper flavor if you prefer.
-
1 tablespoon baking powder: This magical ingredient makes your doughnut drops rise beautifully.
-
½ teaspoon salt: Enhances the sweetness and brings all the flavors together.
-
2 large eggs: Add rich moisture and help bind the mixture. You can replace them with flax eggs or applesauce for a vegan option.
-
¾ cup buttermilk: This gives a tender crumb. If you don’t have buttermilk, mix regular milk with a tablespoon of vinegar and let it sit for a few minutes to sour.
-
½ cup huckleberries: The star player! If huckleberries aren’t available, blueberries or even cranberries can work.
-
1 teaspoon vanilla extract: A splash of this will elevate the dish with warmth.
-
1 tablespoon melted butter (optional): Adds extra richness. You could also try coconut oil for a dairy-free version.
Every ingredient adds a layer of flavor and character to these huckleberry doughnut drops, marrying nostalgia with a modern twist.
Step-by-Step Instructions
Ready to dive in? Let’s break this down step-by-step!
1. Preheat your oven.
Start by preheating your oven to 375°F (190°C). This ensures that your doughnut drops will bake evenly and achieve that perfect golden hue.
2. Prepare your baking pan.
Grease a mini muffin tin or doughnut drop pan (if you have one) with cooking spray or softened butter. This will help your doughnuts release easily after baking.
3. Mix the dry ingredients.
In a large mixing bowl, combine the flour, sugar, baking powder, and salt. Whisk them together until evenly distributed. This is where the magic starts! Sifting the dry ingredients can also help to lighten the batter.
4. Whisk the wet ingredients.
In another bowl, beat the eggs and add the buttermilk, vanilla extract, and melted butter (if using). Mix until fully combined. Feel free to add a pinch of nutmeg or cinnamon at this stage for an extra flavor boost!
5. Combine wet and dry ingredients.
Pour the wet mixture into the dry ingredients, gently folding them together. Be careful not to over-mix—just combine until you see no more dry flour. A few lumps are perfectly fine!
6. Add huckleberries.
Now, gently fold in the huckleberries. If you’re using frozen huckleberries, don’t thaw them beforehand; this helps prevent them from bursting and bleeding into the batter.
7. Fill those pans!
Use a spoon or a cookie scoop to fill each muffin tin section about two-thirds full. This allows room for the doughnut drops to rise and expand.
8. Bake to perfection.
Pop the tray in the preheated oven and bake for 12-15 minutes, or until a toothpick inserted into the center comes out clean. Keep an eye on them—you want a lovely golden brown on top!
9. Cool them down.
Let the doughnut drops cool in the pan for about 5 minutes, then gently remove them to a wire rack. This step makes a real difference in texture!
10. Glaze or dust.
Once cooled, you can dust them with powdered sugar or dunk them in a warm glaze made of powdered sugar and milk. You can also sprinkle some extra huckleberries on top for a stunning presentation. Yum!
Serving Suggestions
Serving these huckleberry doughnut drops is as fun as making them! Arrange them on a beautiful platter, dusted with powdered sugar, and maybe even add a few fresh huckleberries for flair. Pair them with a pot of freshly brewed coffee or tea on the side. These delightful bites are perfect for brunch gatherings, casual family breakfasts, or even as a sweet afternoon snack.
Recipe Variations
Get creative with your Bear Farts! Here are a few variations you can try:
- Citrus Bliss: Add a teaspoon of lemon or orange zest to the batter for a fresh citrus twist.
- Chocolate Dipped: Dip the top of each doughnut drop in melted chocolate for an indulgent treat.
- Nuts About It: Mix in chopped nuts like pecans or walnuts for added texture and flavor.
- Spiced Up: Experiment with adding a pinch of cardamom or ginger for a different aromatic note.
- Vegan Version: Swap the eggs for flaxseed meal and use almond or oat milk in place of buttermilk.
Chef’s Notes
One of the best parts about cooking is the endless possibilities for creativity! This recipe has evolved over time as I’ve experimented with different ingredients and flavors. I recall a time early on when I accidentally added too much baking powder and ended up with balloon-like doughnut drops! While they were funny to look at, they weren’t exactly appetizing. Now, I always recommend measuring carefully, but hey, that’s how we learn, right? Cooking is an art, and I’m living proof that every mishap leads to wisdom in the kitchen.
FAQs and Troubleshooting
1. My doughnut drops didn’t rise! What went wrong?
This usually happens due to expired baking powder or over-mixing the batter. Always check the expiration date on your baking powder, and remember to mix gently.
2. Can I use frozen huckleberries?
Absolutely! Frozen berries are a great option, and they’ll add moisture and flavor. Just add them directly to the batter without thawing.
3. Why are my doughnut drops dense?
Dense doughnut drops can be caused by over-mixing or using too much flour. For fluffier doughnuts, lighten up on the mixing, and measure your flour correctly—spoon it into the measuring cup instead of scooping directly from the bag.
4. How should I store leftovers?
These delightful treats are best enjoyed fresh but can be stored in an airtight container at room temperature for up to two days or in the fridge for up to five days. You can also freeze them! Just thaw and warm them up when you’re ready to indulge again.
Nutritional Info (Optional)
If you’re curious about the nutritional breakdown, here you go! Per doughnut drop (without glaze):
- Calories: 80
- Protein: 2g
- Carbohydrates: 12g
- Fat: 3g
- Fiber: 1g
Now you’re all set to enjoy a little slice of nostalgia with these Bear Farts! I hope this recipe brings warm memories to your table just as it has for me. Remember, cooking is all about creativity and love, so have fun with it—your kitchen adventures await!
Print
Bear Farts: Huckleberry Doughnut Drops
- Total Time: 30 minutes
- Yield: 12 servings 1x
- Diet: Vegetarian
Description
Fluffy huckleberry doughnut drops that are sweet, nostalgic, and easy to make—perfect for breakfast or a snack!
Ingredients
- 2 cups all-purpose flour
- ½ cup granulated sugar
- 1 tablespoon baking powder
- ½ teaspoon salt
- 2 large eggs
- ¾ cup buttermilk
- ½ cup huckleberries
- 1 teaspoon vanilla extract
- 1 tablespoon melted butter (optional)
Instructions
- Preheat your oven to 375°F (190°C).
- Prepare a mini muffin tin or doughnut drop pan by greasing it with cooking spray or softened butter.
- Mix the flour, sugar, baking powder, and salt in a large mixing bowl until well combined.
- Whisk the eggs, then add the buttermilk, vanilla extract, and melted butter (if using) and mix until fully combined.
- Combine the wet ingredients into the dry ingredients and fold gently until just combined.
- Add in the huckleberries, folding them into the batter carefully.
- Fill each section of the muffin tin about two-thirds full.
- Bake for 12-15 minutes, until a toothpick comes out clean.
- Cool the doughnut drops for about 5 minutes before transferring to a wire rack.
- Glaze or dust with powdered sugar before serving.
Notes
Great served with coffee or tea. These are best enjoyed fresh but can be stored in an airtight container at room temperature or in the fridge.
- Prep Time: 15 minutes
- Cook Time: 15 minutes
- Category: Dessert
- Method: Baking
- Cuisine: American
Nutrition
- Serving Size: 1 doughnut drop
- Calories: 80
- Sugar: 5g
- Sodium: 150mg
- Fat: 3g
- Saturated Fat: 1g
- Unsaturated Fat: 2g
- Trans Fat: 0g
- Carbohydrates: 12g
- Fiber: 1g
- Protein: 2g
- Cholesterol: 30mg
Keywords: huckleberry, doughnut drops, easy dessert, sweet treat, breakfast recipe

Ingredient Lemon Raspberry Cookies: Soft-Baked Citrus
Lemon Raspberry Cookies: The Ultimate Soft-Baked Citrus and Berry Recipe
Welcome to my kitchen, everyone! Today, we’re diving into a delightful family favorite that’s all about bright flavors and cozy memories: Lemon Raspberry Cookies. These little jewels of baking not only smell heavenly as they come out of the oven, but they also deliver a sweet and tangy burst with each soft bite. So, grab your apron, and let’s bake something delicious together!
A Whiff of Nostalgia
There’s a specific moment in my childhood that I want to take you back to — imagine it’s a warm summer afternoon, and my grandmother’s kitchen is filled with the unmistakable aromas of lemon zest and freshly baked cookies. My grandma wasn’t just an amazing cook; she was a culinary wizard, especially when it came to incorporating fruits into her treats. One particular summer, she introduced me to her Lemon Raspberry Cookie recipe that, to this day, holds a special place in my heart.
As I stood beside her, covered in flour and more than a little bit of raspberry juice, she taught me the secrets of how citrus could enhance the sweetness of fruits. We would turn the simple act of baking into an exciting adventure, filled with laughter and the occasional kitchen mishap. I’ll never forget the time I tried to sneak an extra raspberry into the dough when she wasn’t looking, ending up with a blob of dough that wouldn’t hold its shape!
Those cookies were my initiation into the magical world of baking, a joyful dance of flavors and a connection to my roots. Today, I want to share that tradition with you, adding my own twists and hints to ensure you can create your own delicious memories.
Ingredients
Here’s what you’ll need to whip up these delightful Lemon Raspberry Cookies:
-
2 cups all-purpose flour
This is the backbone of the cookie. Feel free to substitute with a gluten-free blend if needed! -
1 teaspoon baking soda
This helps your cookies rise. If you prefer, you can switch to baking powder in a pinch — just use about 2 teaspoons. -
1/2 teaspoon salt
Enhances flavor. You can skip it if you want, but just know it adds balance. -
1 cup unsalted butter, softened
Butter makes everything better! If you’re in a dairy-free mood, try coconut oil instead — but note it may change the texture a bit. -
1 cup granulated sugar
Sweetens the deal! For a less-processed option, try using coconut sugar. -
1 large egg
Adds moisture and binding. If you want an egg-free version, you can use 1/4 cup of unsweetened applesauce instead. -
1 tablespoon lemon zest
A hero ingredient! It brightens up the flavor and matches beautifully with raspberries. Freshly grated is best, but pre-packaged will do too. -
2 tablespoons fresh lemon juice
For that citrus kick! Bottled lemon juice will work if you’re in a bind. -
1 cup fresh or frozen raspberries
Bursting with flavor! If using frozen, don’t thaw them to maintain the cookie integrity. -
1 teaspoon vanilla extract
A must for that lovely aromatic quality.
Now that you have all your ingredients lined up, you’re ready to embark on this baking adventure. Whether you’re a newbie or a seasoned pro, there’s something so rewarding about creating a delicious treat that will bring people together.
Step-by-Step Instructions
-
Preheat Your Oven
Start by preheating your oven to 350°F (175°C). Your oven is like the entryway to this baking journey. -
Combine Dry Ingredients
In a bowl, whisk together the flour, baking soda, and salt. This is an important step — it ensures that the baking soda is evenly distributed throughout the dough, leading to an even rise. -
Cream the Butter and Sugar
In a large mixing bowl, beat the softened butter and granulated sugar together until light and fluffy. This usually takes about 3–5 minutes and is essential in ensuring your cookies have that tender, soft texture. -
Add the Egg and Flavorings
Mix in the egg, lemon zest, lemon juice, and vanilla extract until everything is well incorporated. The mixture should look smooth and creamy; this is where the magic starts happening. -
Incorporate Dry Ingredients
Gradually add the flour mixture into the butter mixture, combining until just mixed. Over-mixing here can result in tough cookies, so feel free to stop when the dough comes together. -
Gently Fold in the Raspberries
Using a spatula, gently fold in your raspberries. If you’re using frozen raspberries, be extra gentle! We want to maintain their shape while combining them into the dough. -
Scoop the Dough
Using a cookie scoop or two spoons, drop rounded tablespoons of dough onto a parchment-lined baking sheet. Make sure to leave enough space between each one, as they will spread a bit during baking. -
Bake Your Cookies
Pop them in the preheated oven for about 12–15 minutes, or until the edges are just starting to turn golden. Don’t worry if they seem soft when you take them out; they will firm up as they cool. -
Cool and Enjoy
Let the cookies cool on the baking sheet for about 5 minutes before transferring them to a wire rack to cool completely. Trust me, the aroma wafting through your kitchen will be well worth the wait!
Serving Suggestions
These Lemon Raspberry Cookies look lovely on a decorative platter or in a cozy cookie jar. You can enhance their presentation by dusting them with a bit of powdered sugar or pairing them with a drizzle of lemon glaze (mix powdered sugar and lemon juice!). They make stunning additions to brunch tables or dessert trays, and believe me, they are bound to spark smiles and conversations around your table.
Recipe Variations
Here are a few fun ways to put your own twist on these cookies:
-
Lemon Blueberry Cookies: Switch out the raspberries for blueberries for a different fruity experience. The flavor profile is equally delightful!
-
Chocolate Chip Raspberry Cookies: Add some chocolate chips to the dough for a sweet and tangy combination that’s hard to resist.
-
Lemon Almond Cookies: Swap out some of the flour for almond flour for a nutty flavor, giving a wonderful texture twist.
-
Vegan Option: Use coconut oil instead of butter and substitute the egg with flaxseed meal or applesauce, and you’ll have a delicious vegan variant.
Chef’s Notes
This recipe has undergone some evolution over the years. Initially, I would add quite a bit more sugar, which led to a cookie that was a bit too sweet for my taste. After some experimentation, I found a perfect balance with the tartness of the lemon, which elevates the flavor beautifully. I love how baking brings out creativity — there’s always something new to discover!
Oh, and I’ve had my fair share of cookie disasters too! Once, I got distracted mid-baking and accidentally added salt instead of sugar. Let me just say, those cookies were remarkably… unique!
FAQs and Troubleshooting
1. My cookies spread too much — what did I do wrong?
This can happen if your butter was too warm or if the dough was overmixed. Make sure your butter is softened, not melted, and try chilling the dough for about 30 minutes before baking.
2. Can I use store-bought lemon zest?
While it’s possible, I highly recommend using fresh zest for the best flavor. It really makes a difference in capturing that bright citrus note!
3. How can I store the cookies?
Store your cookies in an airtight container at room temperature for up to a week. They can also be frozen for longer storage — just make sure to separate them with parchment paper!
4. The cookies turned out too dry – what happened?
This could be due to overbaking or too much flour in the dough. A good rule is to measure your flour by spooning it into the cup and leveling it off with a knife instead of scooping directly from the bag.
Nutritional Info
(You can add this section if needed; just include approximate values based on the ingredients used.)
There you have it! These Lemon Raspberry Cookies are sure to become a staple in your home, brimming with memories and flavors that will bring joy to any occasion. So go ahead, gather your ingredients and create some delicious moments in your kitchen. Happy baking!
Print
Lemon Raspberry Cookies
- Total Time: 30 minutes
- Yield: 24 cookies 1x
- Diet: Vegetarian
Description
Delightful soft-baked cookies bursting with the flavors of lemon and raspberry, perfect for making lasting memories.
Ingredients
- 2 cups all-purpose flour
- 1 teaspoon baking soda
- 1/2 teaspoon salt
- 1 cup unsalted butter, softened
- 1 cup granulated sugar
- 1 large egg
- 1 tablespoon lemon zest
- 2 tablespoons fresh lemon juice
- 1 cup fresh or frozen raspberries
- 1 teaspoon vanilla extract
Instructions
- Preheat your oven to 350°F (175°C).
- Combine the flour, baking soda, and salt in a bowl.
- Cream the butter and sugar together until light and fluffy.
- Add the egg, lemon zest, lemon juice, and vanilla extract.
- Incorporate the dry ingredients into the butter mixture until just mixed.
- Gently fold in the raspberries.
- Scoop rounded tablespoons of dough onto a baking sheet.
- Bake in the oven for 12–15 minutes until edges are golden.
- Cool the cookies on the baking sheet for 5 minutes before transferring to a wire rack.
Notes
For a vegan version, substitute coconut oil for butter and use flaxseed meal or applesauce in place of the egg.
- Prep Time: 15 minutes
- Cook Time: 15 minutes
- Category: Dessert
- Method: Baking
- Cuisine: American
Nutrition
- Serving Size: 1 cookie
- Calories: 150
- Sugar: 8g
- Sodium: 100mg
- Fat: 7g
- Saturated Fat: 4g
- Unsaturated Fat: 2g
- Trans Fat: 0g
- Carbohydrates: 20g
- Fiber: 1g
- Protein: 2g
- Cholesterol: 30mg
Keywords: cookies, lemon, raspberry, dessert, baking




