
The Ultimate Guide to Classic Homemade Cinnamon Rolls
Welcome to my kitchen! Today, we’re diving into something incredibly cozy and indulgent: classic homemade cinnamon rolls. There’s something magical about the aroma of cinnamon wafting through your home as these delightful rolls bake in the oven. Trust me, it’s a scent that invites warmth and joy into any space, making it one of my favorite experiences in the kitchen.
As the seasons change and the air cools, I often think about the simple pleasures that bring us all together. Whether it’s a leisurely Sunday morning or a casual weekend brunch with friends, warm cinnamon rolls are the ultimate sweet treat that can turn any moment into a celebration. I promise you, this recipe won’t just fill your belly — it’ll fill your heart too.
Now, before we roll up our sleeves and get started on this delicious adventure, let me share a special memory that highlights just how much these cinnamon rolls mean to me.
A Sweet Symphony of Nostalgia
Growing up, my family had a tradition of making cinnamon rolls every Sunday morning. My mom always awakened each of us with the smell of fresh coffee and the promise of gooey rolls rising in the oven. I have vivid memories of my siblings and me fighting our way into the kitchen, trying to sneak a sample of that warm dough before it was even baked!
I can still hear the sound of laughter as we rolled out the dough and sprinkled it generously with cinnamon and sugar. There was something so exciting about waiting near the oven, peeking through the glass, and watching those rolls puff up like little clouds of happiness. And when they finally came out, we topped them with a sweet, creamy glaze that we’d artfully drizzle as we huddled around the table, jaws ready for the first bite.
Those rolls weren’t just a breakfast item; they were a symbol of love, warmth, and family bonding. Today, I’m thrilled to share this treasured recipe with you, hoping you create your own lasting memories with those you love.
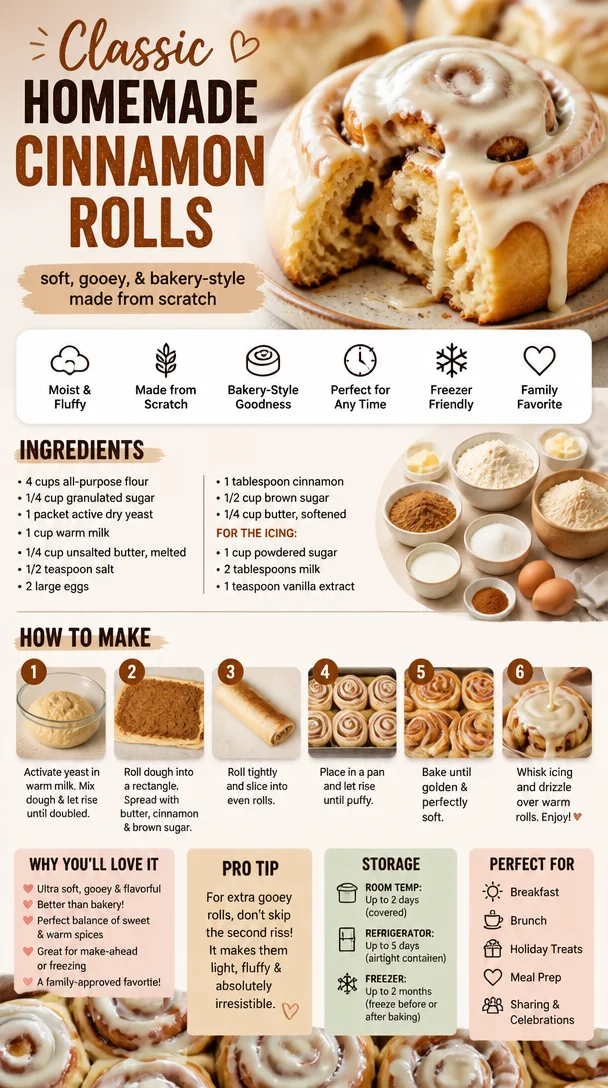
Ingredients
Before we dive into the cooking process, let’s gather our ingredients. Here’s what you’ll need to create these delightful homemade cinnamon rolls:
-
All-Purpose Flour (4 cups): The backbone of our dough! You can substitute with bread flour for a chewier texture.
-
Granulated Sugar (½ cup + 1 tbsp): This sweetens both the dough and filling. Feel free to use brown sugar in the filling for a deeper flavor.
-
Active Dry Yeast (2 ¼ tsp, or 1 packet): The magic worker that makes your rolls fluffy. Be sure it’s fresh; if it foams when mixed with warm water, you’re good to go!
-
Milk (1 cup): Provides moisture and richness. Use whole milk for extra creaminess or substitute with almond milk for a dairy-free version.
-
Unsalted Butter (½ cup, melted): Adds flavor and moisture to the dough. Use the same for the filling to keep things simple.
-
Large Eggs (2): Help bind the dough. If you’re vegan, you can use flax eggs (1 tbsp ground flaxseed mixed with 2.5 tbsp water = 1 egg).
-
Cinnamon (2 tbsp): The star of our show! Feel free to experiment with other spices, like nutmeg or cardamom, if you’re feeling adventurous.
-
Brown Sugar (⅓ cup): Perfect for the filling, adding delicious caramel notes. You can substitute white sugar if needed.
-
Salt (1 tsp): Balances sweetness and enhances flavor. Don’t skip this — it’s a crucial ingredient!
-
Powdered Sugar (for glazing, optional): If you want that classic creamy glaze, you’ll want this on hand. You can also skip it for a lighter finish.
Step-by-Step Instructions
Now that we’ve got our ingredients lined up, let’s roll into the fun part — actually making these cinnamon rolls! Follow these steps for a guaranteed success:
Step 1: Activate the Yeast
In a small bowl, combine ½ cup of warm milk (make sure it’s about 110°F — just warm to the touch, not hot). Add 1 tablespoon of sugar and sprinkle the active dry yeast over the top. Let it sit for about 5-10 minutes until it becomes frothy. This means your yeast is alive and kicking!
Step 2: Create the Dough
In a large mixing bowl, combine 4 cups of all-purpose flour and 1 teaspoon of salt. Pour in the yeast mixture, melted butter, 2 eggs, and the rest of the milk. Mix everything together using a wooden spoon or your hands until a shaggy dough forms. Don’t worry about it being perfect — it’s supposed to be a bit messy at this point!
Step 3: Knead the Dough
Transfer your dough to a lightly floured surface and knead it for about 5-7 minutes until it’s smooth and elastic. This is where the magic happens! If the dough is too sticky, sprinkle in a bit more flour, but be careful not to overdo it. Once done, form it into a ball and place it in a greased bowl, turning it so it’s coated in oil. Cover it with a clean kitchen towel and let it rise in a warm spot for 1-2 hours or until it doubles in size.
Step 4: Roll Out the Dough
After your dough has puffed up, punch it down to release the air and turn it out onto a floured surface. Use a rolling pin to roll it into a rectangle, about 16×24 inches. Aim for about ½ inch thick. Don’t fret if your rectangle isn’t perfect; it’ll still taste divine!
Step 5: Add the Filling
Spread ½ cup of melted butter over the rolled dough. In a small bowl, combine ½ cup of brown sugar and 2 tablespoons of cinnamon, then sprinkle this heavenly mixture evenly over the buttered dough. Feel free to get creative here — if you want nuts or raisins, this is the time to toss them in!
Step 6: Roll It Up
Starting from the long edge, gently roll the dough away from you into a tight log. Make sure to keep it snug but not so tight that the filling spills out. Once it’s rolled, pinch the seam closed to seal it.
Step 7: Slice the Rolls
Using a sharp knife or dental floss (yes, you heard that right – no squishing here!), slice the roll into 12 even pieces. Each slice should be about 1.5 inches wide. Place the rolls, cut side up, into a greased 9×13 inch baking dish.
Step 8: Second Rise
Cover the dish with a towel and allow the rolls to rise again for about 30-45 minutes. Preheat your oven to 350°F while you wait.
Step 9: Bake
Once the rolls have puffed up nicely, pop them in the oven and bake for 25-30 minutes until golden brown. The smell will be absolutely intoxicating, and if you have an air vent in your house, it’ll become your neighbor’s envy!
Step 10: Glaze
While the rolls are baking, you can prepare the glaze (if you want!). In a bowl, mix 1 cup of powdered sugar with a few tablespoons of milk until you reach your desired consistency. Drizzle it over the warm rolls as soon as they come out of the oven for that ultimate finishing touch!
Serving Suggestions
When it comes to serving these classic cinnamon rolls, presentation is key! Arrange your warm rolls on a large plate or cake stand, drizzling with your luscious glaze. You can add a sprinkle of chopped nuts or a dusting of extra cinnamon on top for visual flair. To take it a step further, serve with a side of fresh fruit or a warm cup of coffee or tea. Enjoy them fresh out of the oven for the best experience!
Recipe Variations
Now, let’s get creative! Here are a few fun variations you can try with this classic recipe:
-
Maple Pecan Twist: Swap out some cinnamon for maple syrup in the filling and toss in chopped pecans for a delightful crunch.
-
Pumpkin Spice Rolls: In the dough, add 1 cup of pumpkin puree and a mix of pumpkin spices (nutmeg, ginger, allspice) for a seasonal twist.
-
Cream Cheese Filling: Instead of butter and cinnamon, mix softened cream cheese with sugar and a touch of vanilla for a rich, creamy filling.
-
Vegan Cinnamon Rolls: For a plant-based version, replace the milk with almond milk, use coconut oil instead of butter, and substitute flax eggs for traditional eggs.
Chef’s Notes
Making cinnamon rolls is like storytelling in a kitchen! Over the years, I’ve experimented with different fillings and toppings, but my heart always returns to this classic. I have witnessed my friends and family come together over these rolls, sharing laughter, stories, and, of course, second helpings.
Oh, and here’s a little secret: If you have some rolls left over (though that’s rare!), they’re fantastic reheated in the microwave for a few seconds or toasted in a pan with a tad of butter for that fresh-out-of-the-oven taste!
FAQs and Troubleshooting
Q: What if my dough doesn’t rise?
A: If your dough doesn’t rise, your yeast may have been expired or the water may have been too hot or too cold. Ensure it’s around the perfect warm temperature (110°F) and give it time!
Q: Can I make these ahead of time?
A: Absolutely! You can prep the rolls a day in advance, cover them tightly, and place them in the fridge after the first rise. Just take them out to come to room temperature before baking.
Q: Why are my cinnamon rolls dense?
A: If your rolls are too dense, be mindful of your flour measurements. Use a spoon to fluff up your flour before scooping it into your measuring cup.
Q: How do I store leftover cinnamon rolls?
A: Store any leftovers in an airtight container at room temperature for up to 2 days, or in the fridge for about a week. You can also freeze them (without glaze) for up to three months!
Nutritional Info
If you’re curious about the nutrition, here’s a general estimate for one classic cinnamon roll (without glaze):
- Calories: 300
- Protein: 4g
- Carbs: 45g
- Fat: 10g
- Sugar: 10g
Remember, these figures can vary based on ingredient choices and portion sizes, so consider them approximate!
Now that you have everything you need, it’s time to roll up those sleeves and dive into the wonderful world of cinnamon rolls! I can’t wait for you to enjoy these treats as much as I do. Happy baking, friends!
Print
Classic Homemade Cinnamon Rolls
- Total Time: 60 minutes
- Yield: 12 servings 1x
- Diet: Vegetarian
Description
Indulge in the cozy aroma and delightful taste of homemade cinnamon rolls, perfect for any gathering or leisurely morning.
Ingredients
- 4 cups All-Purpose Flour
- ½ cup + 1 tbsp Granulated Sugar
- 2 ¼ tsp Active Dry Yeast
- 1 cup Milk
- ½ cup Unsalted Butter, melted
- 2 Large Eggs
- 2 tbsp Cinnamon
- ⅓ cup Brown Sugar
- 1 tsp Salt
- Powdered Sugar (for glazing, optional)
Instructions
- Activate the yeast by combining warm milk, sugar, and yeast in a bowl, letting it sit until frothy.
- Create the dough by mixing flour, salt, yeast mixture, melted butter, eggs, and remaining milk.
- Knead the dough on a floured surface for 5-7 minutes until smooth.
- Roll out the dough into a 16×24 inch rectangle.
- Add melted butter and sprinkle the cinnamon and brown sugar mixture over the dough.
- Roll the dough into a tight log and pinch the seam closed.
- Slice the roll into 12 even pieces and place them in a greased baking dish.
- Second rise for 30-45 minutes while preheating the oven to 350°F.
- Bake for 25-30 minutes until golden brown.
- Glaze the rolls with a mixture of powdered sugar and milk after baking.
Notes
These rolls can be made ahead of time. Store leftovers in an airtight container for up to 2 days or freeze for up to three months.
- Prep Time: 30 minutes
- Cook Time: 30 minutes
- Category: Dessert
- Method: Baking
- Cuisine: American
Nutrition
- Serving Size: 1 roll
- Calories: 300
- Sugar: 10g
- Sodium: 400mg
- Fat: 10g
- Saturated Fat: 4g
- Unsaturated Fat: 4g
- Trans Fat: 0g
- Carbohydrates: 45g
- Fiber: 1g
- Protein: 4g
- Cholesterol: 30mg
Keywords: cinnamon rolls, sweet rolls, baking, breakfast, dessert


