
The Ultimate Peanut Butter Cup Milkshake: A Creamy Dream Come True
Hey there, fellow food enthusiasts! 🎉 I’m Olivia Bennett, your go-to guide for all things delicious and homemade! Today, we’re diving into a sweet treat that takes me straight back to my childhood: the Peanut Butter Cup Milkshake. If you adore the rich flavor of peanut butter mingling with the sweetness of chocolate, this dreamy milkshake is about to become your new favorite indulgence.
Picture this: it’s a hot summer day, and my brothers and I were running around outside, laughter echoing as we played tag on the lawn. Nothing could cool off those sun-kissed moments quite like heading into the kitchen, where my mom would be melting chocolate over low heat. She had a knack for crafting milkshakes that were not just drinks, but blissful experiences that shaped our love for food. One day, she surprised us with what she called a “Peanut Butter Cup” shake, inspired by our beloved candy. I still remember the anticipation as we waited, the kitchen filled with the heavenly scent of creamy peanut butter and rich chocolate. Each sip took us on a delicious ride, leaving us giggling about the peanut butter mustaches we’d inevitably sport.
Fast forward a few years, and I knew I had to recreate that beloved moment. And guess what? I’ve perfected my version, adding a few creative spins to make it even more delightful! This Peanut Butter Cup Milkshake is loaded with flavors that dance together in perfect harmony and promises to transport you back to carefree days while indulging your adult cravings. Whether you’re treating yourself to a midweek pick-me-up or hosting friends for a fun dessert night, this milkshake is sure to impress. So grab your blender and let’s get mixing, shall we?
Personal Story
One afternoon, as I played in the yard, the mouthwatering aroma of chocolate wafting in from the kitchen drew me inside like a magnetic force. Little did I know, my mom was whipping up her famous Peanut Butter Cup Milkshake. My brothers and I huddled at the counter, our eyes wide with excitement as she blended together creamy vanilla ice cream, rich peanut butter, and a generous drizzle of chocolate syrup.
When she handed us those frosty glasses topped with whipped cream, it felt like Christmas! Each sip was pure joy, with the chocolate and peanut butter layers creating a flavor explosion in my mouth. It was our unofficial summer ritual, turning even the most mundane days into something extraordinary. It taught me how food could create memories, spark laughter, and bring people together—all while satiating our sweet tooth. Even now, every time I take a sip of a Peanut Butter Cup Milkshake, I’m reminded of those cherished summer afternoons, laughter echoing while chocolate mustaches were the insignia of our sweet adventures.
Ingredients
Let’s gather our ingredients for this heavenly shake! Here’s what you’ll need:
-
Vanilla Ice Cream: This is the base of your milkshake. Use quality, creamy vanilla for the best flavor. If you want to lighten this up, you can also substitute with frozen yogurt or a dairy-free ice cream!
-
Whole Milk: Adds the perfect creaminess. If you’re looking for a lower-fat option, skim milk works just fine, or try almond milk for a nutty twist!
-
Creamy Peanut Butter: The star ingredient! Smooth peanut butter gives a luscious texture. For a twist, try crunchy peanut butter for added texture, or almond butter for a new flavor.
-
Chocolate Syrup: It adds that rich chocolate flavor we love. You can use store-bought or make your own by mixing cocoa powder with a bit of sugar and water.
-
Reese’s Peanut Butter Cups: Chop these up and add them for that delicious candy crunch. In a pinch, use any other chocolate-peanut butter combination candy.
-
Whipped Cream: For topping! Store-bought is convenient, but homemade is always a classy touch—just whip some heavy cream and sugar until fluffy!
-
Chocolate Shavings (optional): For a gourmet finish! You can make these by shaving a chocolate bar or using mini chocolate chips.
Step-by-Step Instructions
Step 1: Gather Your Ingredients
Before you start, make sure you have all your ingredients measured and ready to go. It helps everything blend together smoothly and quickly—like a pro! 🎉
Step 2: Blend It Up!
Throw the following into your blender:
- 2 cups of vanilla ice cream
- 1 cup of whole milk
- ½ cup of creamy peanut butter
- ¼ cup of chocolate syrup
Blend it on high until everything is perfectly smooth. Chef’s Tip: If your milkshake is too thick, add more milk a tablespoon at a time until desired consistency is reached. If it’s too thin, you can always toss in an extra scoop of ice cream!
Step 3: Add the Crunch
Once your base is beautifully blended, it’s time to fold in the fun part! Add about 1 cup of chopped Reese’s Peanut Butter Cups to the blender, and pulse gently a few times. You want chunks, not mush! This way, you get delightful bites of candy in every sip.
Step 4: Taste Test
Now, this is the most essential step—taste it! Use a spoon and let this luscious concoction pass your lips. Feel free to add a drizzle more of chocolate syrup or peanut butter to elevate it further. Remember, this is your masterpiece!
Step 5: Prep the Glasses
Grab your favorite tall milkshake glasses and drizzle the inside with chocolate syrup for that stunning presentation. You can get creative here! Swirl it around for a marbled effect—your guests will be trying to take pictures before they even take a sip!
Step 6: Pour and Top
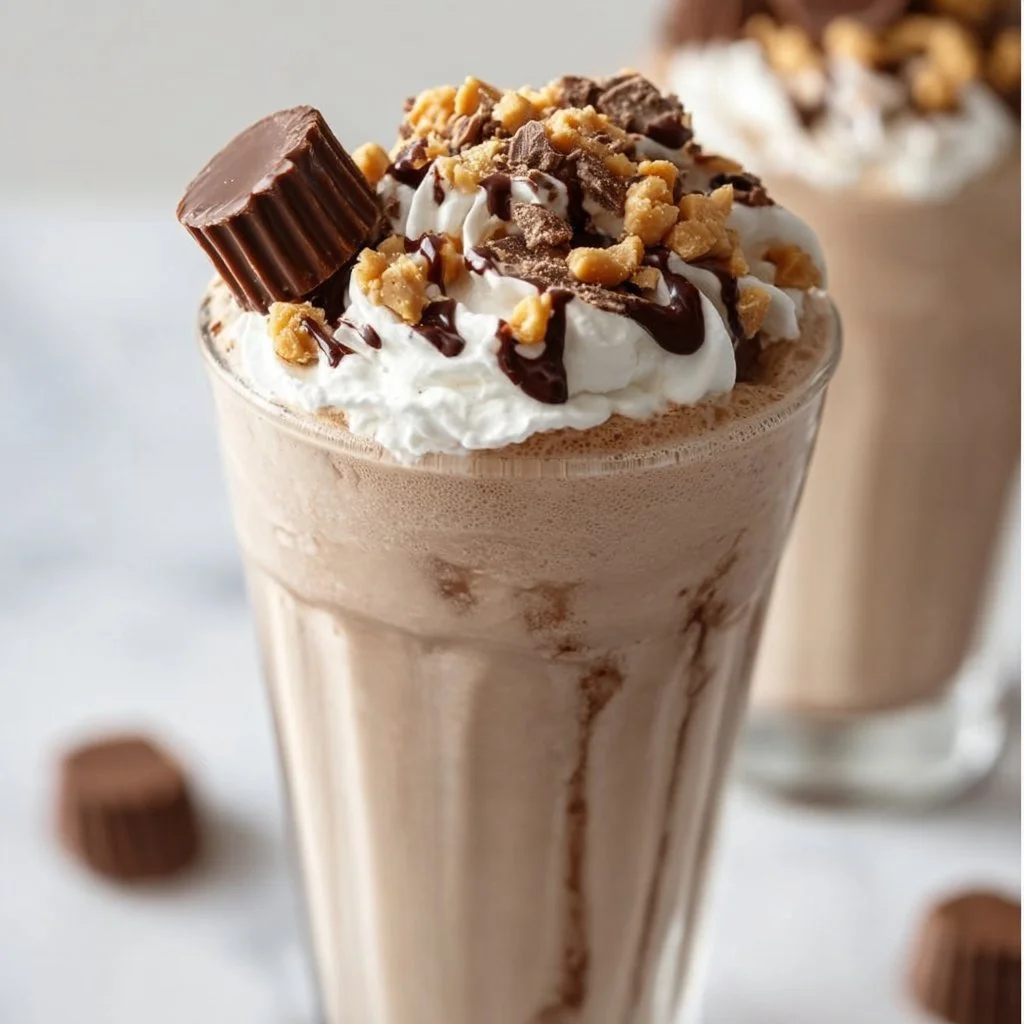
Pour your milkshake into the prepared glasses, filling them just to the brim. Go ahead and let some froth spill over—it’s part of the fun! Then, top generously with whipped cream, a sprinkle of chocolate shavings, and maybe even a mini Reese’s on top for good measure!
Step 7: Serve Immediately
Grab some cute straws and get ready to dig in! There’s no waiting around; this milkshake is best enjoyed fresh! Gather around with friends or family and enjoy each sip.
Serving Suggestions
This Peanut Butter Cup Milkshake makes for an irresistibly fun dessert! Serve it alongside hot brownies or a slice of your favorite chocolate cake for a true dessert experience. You can also place the milkshake in a large bowl, add extra toppings (think crushed cookies, sprinkles, or a drizzle of caramel), and hand out spoons for a delightful sharing experience!
Recipe Variations
Feel like mixing things up? Here are some fun twists you could try:
- Banana Peanut Butter Milkshake: Add a ripe banana for a creamy, fruity version that pairs beautifully with chocolate!
- Mint Chocolate Peanut Butter Shake: Add a few drops of peppermint extract for a refreshing green shake.
- Dairy-Free Option: Use coconut milk ice cream and almond milk for a delicious dairy-free version.
- Protein Packed: Add a scoop of your favorite protein powder for a post-workout treat.
- Mocha Peanut Butter Shake: Mix in a tablespoon of instant espresso powder to kick it up a notch with coffee flavor.
Chef’s Notes
Oh, the memories this shake brings back! I’ve experimented a lot over the years with this recipe, from adding different candies to trying out various ice cream bases. I’ve even served this as a sundae at dinner parties, and every time it’s a hit! A funny story: one day during a holiday gathering, I made a huge batch, thinking it would last, but it vanished within ten minutes! This shake has a magical way of making everyone feel like a kid again, and I’ve come to realize the secret sauce is all in sharing it with loved ones.
FAQs and Troubleshooting
1. My milkshake is too thick; what do I do?
Add more milk gradually, blending in between additions until the desired consistency is achieved.
2. What if I don’t have peanut butter?
You can swap in any nut butter or even sun butter for a nut-free option.
3. Can I make this ahead of time?
While best enjoyed fresh, you can make it a few hours in advance, just keep it in the freezer in an airtight container to maintain its thickness.
4. Can I make it lower in sugar?
Absolutely! Use unsweetened almond milk instead of regular milk, and opt for no-added sugar peanut butter or reduce the amount of chocolate syrup in the recipe.
With each delicious sip of this Peanut Butter Cup Milkshake, I hope you feel a connection with those joyful moments and that it inspires laughter and warmth in your kitchen. Happy blending, and may delicious memories abound! 🍦🥳
Print
Ultimate Peanut Butter Cup Milkshake
- Total Time: 10 minutes
- Yield: 4 servings 1x
- Diet: Vegetarian
Description
A delightful milkshake blending creamy peanut butter and rich chocolate, reminiscent of childhood summer days.
Ingredients
- 2 cups Vanilla Ice Cream
- 1 cup Whole Milk
- ½ cup Creamy Peanut Butter
- ¼ cup Chocolate Syrup
- 1 cup Reese’s Peanut Butter Cups, chopped
- Whipped Cream, for topping
- Chocolate Shavings (optional)
Instructions
- Gather your ingredients.
- Blend the vanilla ice cream, whole milk, creamy peanut butter, and chocolate syrup on high until smooth.
- Add the chopped Reese’s Peanut Butter Cups and pulse gently a few times.
- Taste the milkshake and adjust sweetness as desired.
- Prep the glasses by drizzling chocolate syrup inside.
- Pour the milkshake into the glasses and top with whipped cream and chocolate shavings.
- Serve immediately with straws.
Notes
For variations, try adding a banana, mint extract, or protein powder for extra nutrition.
- Prep Time: 10 minutes
- Cook Time: 0 minutes
- Category: Dessert
- Method: Blending
- Cuisine: American
Nutrition
- Serving Size: 1 serving
- Calories: 450
- Sugar: 50g
- Sodium: 200mg
- Fat: 20g
- Saturated Fat: 10g
- Unsaturated Fat: 6g
- Trans Fat: 0g
- Carbohydrates: 60g
- Fiber: 3g
- Protein: 12g
- Cholesterol: 30mg
Keywords: milkshake, peanut butter, chocolate, dessert


