

Cheesy Garlic Chicken Wraps
Cheesy Garlic Chicken Wraps: A Cozy Kitchen Adventure
Welcome back to the kitchen, my food-loving friends! Today, I’m thrilled to share a recipe that has become a staple in my culinary repertoire: Cheesy Garlic Chicken Wraps. Imagine the aroma of sizzling chicken, melting cheese, and fragrant garlic wafting through your space, wrapping around you like a warm hug. These wraps aren’t just a dish; they’re an experience—a beautiful mix of flavors that can bring joy to a casual weeknight dinner or serve as a show-stopping crowd-pleaser for your next get-together.
Cooking has a way of connecting us, doesn’t it? Whether we’re gathering round the table with loved ones or diving into a solo cooking session, each bite tells a story and evokes memories. That’s exactly what these wraps do for me, and I hope they will for you too! With simple ingredients and a few steps, you’ll create a meal that feels like a cozy embrace. Plus, you don’t need to be a culinary expert to whip these up; whether you’re a kitchen novice or a seasoned gourmet, I promise these wraps will grace your plate beautifully.
So, roll up those sleeves, pour yourself a glass of your favorite drink, and let’s dive into the magic of Cheesy Garlic Chicken Wraps. Trust me, once you embrace the warm, cheesy goodness of these wraps, they might just become your new favorite recipe to share with friends and family!
Personal Story
Every great dish has a story, and for these cheesy garlic chicken wraps, my story begins with my grandmother, Maude, who was the queen of comfort food. I fondly remember spending countless afternoons in her bustling kitchen, the air thick with the warm scent of garlic butter sizzling in a pan. One special Saturday, she decided to teach me how to make her famous chicken wraps.
As a child, I was fascinated by how she could turn simple ingredients into something delicious. The memory of her giggling as we tried to roll the wraps tightly—only to have cheese ooze out the sides—still brings a smile to my face. It wasn’t just the food; it was the laughter, the shared stories, and the camaraderie that came with cooking together. Those wraps created a bridge of love between us, uniting family and friends around the table.
Today, I’ve taken that nostalgic recipe and added my own twist with lots of cheese and a subtle kick of flavor to create Cheesy Garlic Chicken Wraps. So, as we cook together, I hope you feel that same warmth and connection in your kitchen, just like I did all those years ago!
Ingredients
Here’s what you’ll need to make these delightful wraps:
-
2 cups cooked chicken breast (shredded or diced)
- Chef Insight: You can use rotisserie chicken to save time or grill your own chicken for a smoky flavor.
-
1 cup shredded mozzarella cheese
- Substitution Tip: Feel free to replace with any melty cheese like Monterey Jack or cheddar for a different twist.
-
2 tablespoons garlic (minced)
- Quick Tip: Use fresh garlic for a punchy flavor, but jarred minced garlic works just fine in a pinch.
-
1 tablespoon olive oil
- Substitution: Melted butter can be used for a richer taste, or choose an oil of your liking for sautéing.
-
4 large tortillas (flour or whole wheat)
- Chef’s Insight: Experiment with flavored tortillas to add an extra kick, like spinach or sun-dried tomato!
-
1/2 cup fresh spinach (optional)
- Health Boost: This is a fantastic way to sneak in some greens! You can substitute with other greens like arugula or kale if you prefer.
-
Salt and pepper to taste
- Chef Secret: A pinch of smoked paprika can beautifully enhance the flavor profile and add depth.
Step-by-Step Instructions
-
Prep the Ingredients:
Start by gathering all your ingredients. It’s always easier to cook when everything is in reach! If you haven’t cooked the chicken yet, simply dice it up and either grill or sauté it in olive oil until cooked through. This step usually takes about 8-10 minutes on medium heat. Don’t forget to season with salt and pepper! -
Sauté the Garlic:
In a large skillet, warm 1 tablespoon of olive oil over medium heat. Once hot, add the minced garlic and sauté for about 1-2 minutes until fragrant. Do not let it brown—burnt garlic is not friendly! -
Combine Chicken, Cheese, and Spinach:
Add the cooked chicken to the skillet and stir it around well, allowing it to soak up that fabulous garlic aroma. Then, throw in your mozzarella cheese and fresh spinach. Stir until the cheese is melty and gooey, about 2-3 minutes. Chef Hack: If the mixture looks a bit dry, you can add a splash of chicken broth for a nice finishing touch. -
Assemble the Wraps:
Lay out your tortillas on a clean surface. Spoon about a quarter of the cheesy chicken mixture onto the center of each tortilla. Roll it up tightly, tucking in the sides as you go to ensure nothing spills out. It helps to wrap it in foil if you plan to serve it warm later on! -
Toast the Wraps (Optional):
For an extra crunch, wipe down that skillet and add a little olive oil (or butter) back onto the pan. Place the wrapped tortillas seam side down and toast them for about 3-4 minutes on each side, until golden brown and crispy. Tip: Use a panini press if you have one—works like a charm! -
Slice and Serve:
Remove the wraps from the skillet and allow them to cool for a minute before slicing them in half (if you can resist!). This helps the cheesy goodness stay intact.
These cheesy garlic chicken wraps are ready to be plated and enjoyed!
Serving Suggestions
Arrange your delicious wraps on a colorful platter and add a small bowl of marinara sauce or ranch dressing for dipping. Garnishing with chopped fresh herbs like parsley or basil can add a pop of color and elevate the presentation. You could even serve them alongside a fresh salad for a balanced accompaniment and additional crunch!
Recipe Variations
Feeling creative? Try out these delicious variations:
- Buffalo Chicken Wraps: Add some hot sauce to your chicken mixture for a spicy kick!
- Mediterranean Style: Substitute feta cheese for mozzarella, toss in olives, and include chopped tomatoes for a refreshing twist.
- BBQ Chicken Wrap: Replace garlic with some BBQ sauce for a smoky-sweet flavor—perfect for summer gatherings!
- Veggie Delight: Go meatless by using grilled vegetables like zucchini, bell peppers, and sautéed mushrooms combined with cheese.
Chef’s Notes
This recipe is one of those that has evolved beautifully over the years. At first, I simply combined garlic and cheese with chicken, but I’ve learned that experimenting brings out the best flavors. I often invite friends over for a “wrap night,” where everyone creates their own personalized versions of these wraps with different fillings. It’s a fun way to bond over cooking, share ideas, and taste a variety of flavors. Remember, there are no hard and fast rules—embrace the joy of creating something special in your kitchen!
FAQs and Troubleshooting
Q: Can I make these wraps ahead of time?
Absolutely! You can prep everything up to the assembly stage and refrigerate the filling for up to 2 days. Just warm it through before wrapping and toasting.
Q: What if my wrap is falling apart?
No worries! If you have extra filling, try placing more in your wrap and roll it tighter. If that doesn’t work, consider making a bowl instead and serving the filling over a bed of greens!
Q: How can I make this dairy-free?
You can use dairy-free cheese alternatives or simply leave out the cheese altogether and substitute avocado for creaminess!
Q: Can I freeze these wraps?
Yes! Just make sure they are fully wrapped in foil or an airtight container. When you’re ready to eat, thaw and bake them in the oven to retain maximum crispiness.
Nutritional Info
(Approximate per wrap if using flour tortilla)
- Calories: 500
- Fat: 20g
- Protein: 30g
- Carbohydrates: 45g
- Fiber: 4g
So there you have it—your guide to making mouthwateringly delicious Cheesy Garlic Chicken Wraps! I hope you have as much fun making them as I do. Remember, the kitchen is all about joy and experimentation, so don’t hold back! Get those pans sizzling, gather your loved ones, and let’s create some unforgettable meals together. Happy cooking!
Print
Cheesy Garlic Chicken Wraps
- Total Time: 25 minutes
- Yield: 4 servings 1x
- Diet: Non-Vegetarian
Description
Delicious cheesy garlic chicken wraps that are easy to make and bursting with flavor, perfect for a cozy dinner or a crowd-pleasing meal.
Ingredients
- 2 cups cooked chicken breast (shredded or diced)
- 1 cup shredded mozzarella cheese
- 2 tablespoons garlic (minced)
- 1 tablespoon olive oil
- 4 large tortillas (flour or whole wheat)
- 1/2 cup fresh spinach (optional)
- Salt and pepper to taste
Instructions
- Prep the Ingredients: Start by gathering all your ingredients. If you haven’t cooked the chicken yet, dice it up and grill or sauté it in olive oil until cooked through—about 8-10 minutes.
- Sauté the Garlic: Warm 1 tablespoon of olive oil in a large skillet over medium heat. Add minced garlic and sauté for 1-2 minutes until fragrant, being careful not to let it brown.
- Combine Chicken, Cheese, and Spinach: Add the cooked chicken to the skillet, stir well, and then add mozzarella cheese and fresh spinach. Stir until the cheese is melty, about 2-3 minutes.
- Assemble the Wraps: Lay out tortillas and spoon about a quarter of the cheesy chicken mixture onto each. Roll up tightly, tucking in the sides.
- Toast the Wraps (Optional): Wipe down the skillet, add a little olive oil, and toast the wraps seam side down for 3-4 minutes on each side until golden brown.
- Slice and Serve: Allow the wraps to cool for a minute before slicing in half and serving.
Notes
Serve with marinara sauce or ranch dressing for dipping. Feel free to experiment with different fillings.
- Prep Time: 10 minutes
- Cook Time: 15 minutes
- Category: Main Course
- Method: Sautéing
- Cuisine: American
Nutrition
- Serving Size: 1 wrap
- Calories: 500
- Sugar: 2g
- Sodium: 800mg
- Fat: 20g
- Saturated Fat: 10g
- Unsaturated Fat: 8g
- Trans Fat: 0g
- Carbohydrates: 45g
- Fiber: 4g
- Protein: 30g
- Cholesterol: 60mg
Keywords: chicken wraps, cheesy wraps, garlic chicken
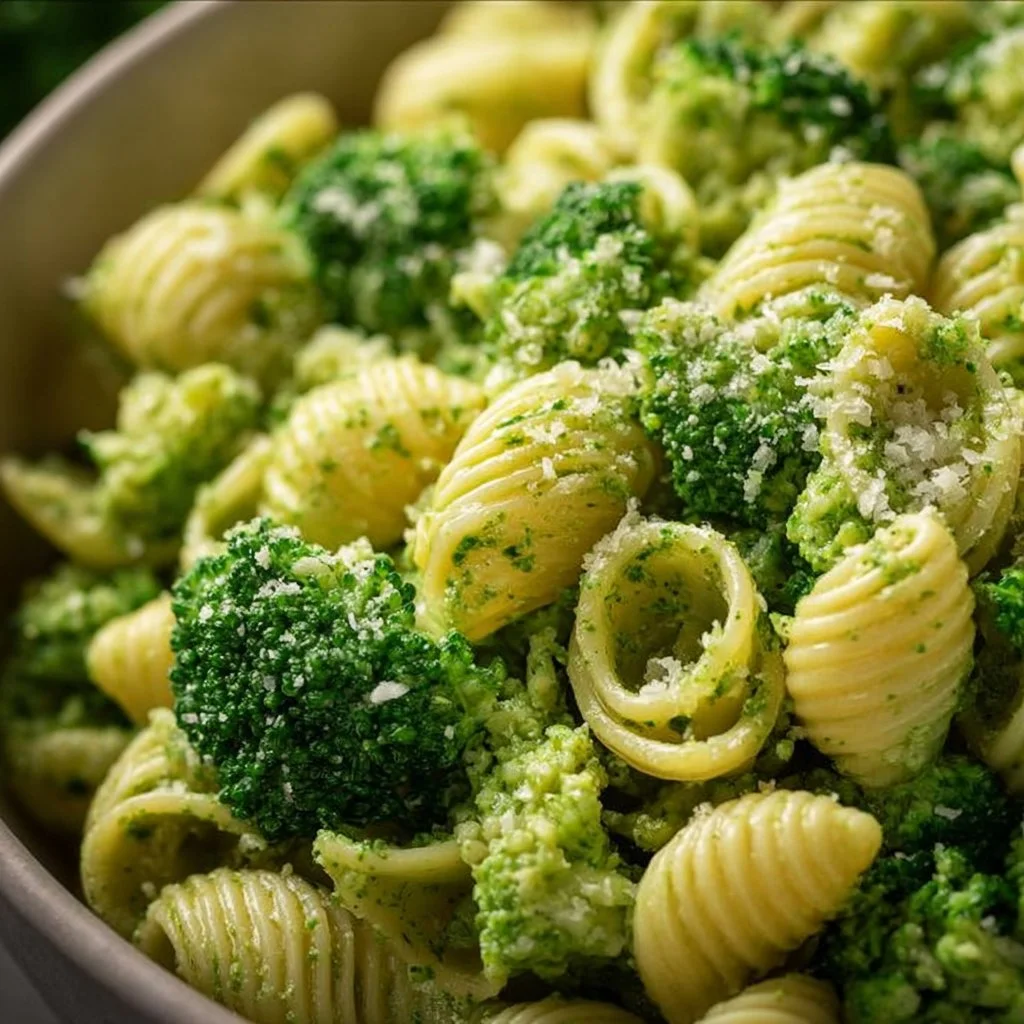
Easy Healthy Broccoli Pasta
Easy Healthy Broccoli Pasta: A Recipe to Savor
Welcome back to my cozy kitchen! Today, I’m excited to share a delightful dish that beautifully balances health and taste—Easy Healthy Broccoli Pasta. This dish is a celebration of fresh ingredients, vibrant flavors, and the simplicity of home-cooking. Picture this: you walk into your kitchen, and the aroma of garlic wafts through the air, mingling with fresh broccoli and al dente pasta—it’s enough to make anyone’s heart skip a beat!
This recipe is not just about feeding yourself; it’s about nourishing your spirit and those you love. Broccoli is the unsung hero of vegetables—packed with nutrients and a proud member of the cruciferous family. When paired with whole grain pasta and a hint of zest, it transforms into a meal that’s both comforting and energizing. Each bite whispers of sunshine (yes, even in the depths of winter!) and carries you through your busy day with ease.
And let’s be honest, who doesn’t love a one-pan wonder? This Easy Healthy Broccoli Pasta comes together in under 30 minutes, giving you more time to kick back, either on your couch or at your dinner table, enjoying the company of family and friends. Whether it’s a casual weeknight dinner or a fun get-together with loved ones, this dish is versatile, delicious, and a great way to get your greens!
With straightforward steps and ingredients you likely already have on hand, cooking becomes an enjoyable experience, rather than a chore. So, grab your apron, and let’s dive into the world of pasta, where broccoli is not just a side dish but a star player in a delightful symphony of flavors!
Personal Story
Whenever I make this Easy Healthy Broccoli Pasta, I’m transported back to Sunday dinners at my grandma’s house. My brothers and I would rush into the kitchen, where the golden light illuminated a table laden with steaming dishes—each plate a testament to her culinary prowess. One of my favorites was her simple broccoli pasta.
She had a magical way of making even the simplest meals feel special—usually by adding a sprinkle of fresh herbs or a dash of lemon zest that made everything come alive. I remember our laughter filling the room as we fought over the last bite of broccoli, trying to outsmart each other for that deliciously garlicky morsel.
Years later, when I first started cooking seriously, I found myself recreating her recipes, trying to infuse them with the same warmth and love. This Easy Healthy Broccoli Pasta reminds me not only of those cherished family gatherings but also of forging my own path in the kitchen. It’s a dish that wraps you in a cozy hug, encouraging you to slow down and enjoy life, one delicious bite at a time.
Ingredients
Here’s what you’ll need for your Easy Healthy Broccoli Pasta:
-
Whole Grain Pasta (12 oz)
- Whole grain options like whole wheat or brown rice pasta offer more fiber and nutrients than traditional pasta. If you’re gluten-free, try chickpea or lentil pasta!
-
Fresh Broccoli (2 cups, chopped)
- Broccoli is rich in vitamins K and C. Choose firm, bright green heads for the best flavor. If you’re short on fresh, frozen broccoli works too; just be sure to thaw and drain it well.
-
Garlic (4 cloves, minced)
- Garlic not only adds flavor but also has numerous health benefits. Fresh is best, but if you’re short on time, pre-minced garlic can save the day.
-
Olive Oil (3 tablespoons)
- A good quality extra virgin olive oil enhances flavor and is full of healthy fats. You can swap it out for avocado oil if you prefer a neutral taste.
-
Lemon Juice (1 tablespoon, freshly squeezed)
- Fresh lemon juice brings brightness to the dish. If you don’t have fresh lemons, bottled juice will do in a pinch—but fresh is always better!
-
Parmesan Cheese (½ cup, grated)
- Parmesan adds a salty, umami-rich flavor that ties everything together. Nutritional yeast is a fantastic dairy-free alternative for a similar flavor profile.
-
Salt and Pepper (to taste)
- Seasoning is personal! Adjust the salt and pepper to your taste—don’t be shy with these kitchen staples!
-
Red Pepper Flakes (optional)
- A sprinkle of red pepper flakes adds a bit of heat. Feel free to leave it out if you prefer a milder dish!
Step-by-Step Instructions
Step 1: Cook the Pasta
-
Boil a large pot of salted water.
- Bring it to a roaring boil before adding your whole grain pasta. The salt helps flavor the pasta.
-
Add the pasta and cook according to package instructions.
- Typically, this should take about 8–12 minutes for whole grain pasta. Stir occasionally to prevent sticking.
-
Reserve some pasta water.
- Before draining the pasta, make sure to scoop out about 1 cup of the starchy cooking water. It will be used later to create a lovely sauce.
-
Drain the pasta and set it aside.
- Remember: don’t rinse the pasta! It’s coated with starch, which helps the sauce cling better.
Step 2: Sauté the Broccoli and Garlic
-
In a large skillet, heat the olive oil over medium heat.
- Wait until it’s shimmering—not smoking—before moving on to the next step.
-
Add minced garlic and sauté for about a minute.
- You want the garlic to turn golden but not burnt, as this will keep its robust flavor intact. Stir often!
-
Toss in the chopped broccoli.
- Cook for about 3–5 minutes, stirring frequently, until the broccoli is vibrant and just tender.
-
Season with salt and pepper.
- This step enhances the broccoli’s natural sweetness; don’t skip it!
Step 3: Combine Pasta and Broccoli
-
Add the drained pasta to the skillet with broccoli and garlic.
- If your skillet isn’t large enough, you could also transfer everything back into the pasta pot.
-
Pour in the reserved pasta water.
- Start with half a cup, and gradually add more if needed. This starchy water helps create a luscious sauce.
-
Add fresh lemon juice and grated Parmesan cheese.
- Toss everything together over low heat. The cheese will melt beautifully, coating the pasta and broccoli.
-
Adjust seasoning to taste.
- This is your final chance to taste and tweak. More salt? More lemon juice? Go for it!
Step 4: Serve and Enjoy!
-
Remove from heat and serve immediately.
- Spoon into bowls, reserving a bit of the grated Parmesan for garnish on top.
-
Top with red pepper flakes if desired.
- This adds a lovely kick for those who enjoy a bit of spice!
-
Pair with a light salad or crusty bread.
- The freshness of a side salad or the heartiness of bread complements this dish beautifully.
Serving Suggestions
To make your Easy Healthy Broccoli Pasta pop visually on the plate, consider adding a handful of fresh basil or parsley just before serving. A sprinkle of lemon zest can elevate it even further, providing a refreshing brightness and an eye-catching finish. Serve it with a side of garlic bread or a light arugula salad for a complete meal. This dish shines best when shared among friends and family, so set the table, pour some sparkling water, and let the conversations flow as freely as the flavors!
Recipe Variations
- Pasta Primavera: Add seasonal vegetables such as bell peppers, cherry tomatoes, or zucchini for a vibrant twist.
- Pesto Addition: Mix in a couple of tablespoons of your favorite pesto for an extra layer of flavor and creaminess.
- Protein Boost: Toss in grilled chicken, shrimp, or chickpeas to make this dish heartier and more filling.
- Vegan Option: Omit the cheese or substitute it with nutritional yeast and use a plant-based pasta.
- Herb Infusion: Swap out broccoli for spinach, kale, or even asparagus depending on what you have on hand!
Chef’s Notes
This Easy Healthy Broccoli Pasta is one of those dishes that feels both comforting and nourishing—a real win-win! It’s evolved over the years; my original version was much simpler, but I always found adding garlic and a splash of lemon juice made it feel festive and special. The beauty of this dish lies in its adaptability; you can swap around ingredients based on what you have or what’s fresh at the market.
And here’s a funny story: one time, I was in a rush to whip this up for dinner and accidentally mistook sugar for salt while seasoning. Let’s just say my family got a rather sweet surprise! Learn from my mistake—double-check your ingredients, and have fun with it! The kitchen should be a place of laughter, learning, and lots of delicious food.
FAQs and Troubleshooting
1. Why is my pasta mushy?
Mushy pasta typically occurs when it’s overcooked. Make sure to watch your cooking times closely and consider sampling a strand a minute or two before the full time is up!
2. Can I store leftovers?
Absolutely! Store any leftovers in an airtight container in the fridge for up to three days. Just reheat it in a skillet with a splash of water to keep it moist.
3. What if my sauce is too thick?
If you find that the dish has become too dry after cooking, just add a bit more reserved pasta water! It’s an easy fix to bring back that creamy consistency.
4. Can I use frozen broccoli?
Definitely! Frozen broccoli can be a great time-saver. Just make sure to thaw and drain it before adding it to the skillet to avoid excess moisture.
5. What side dishes pair well with this pasta?
This broccoli pasta goes wonderfully with a light, refreshing salad or a slice of garlic bread for a comforting touch.
Nutritional Info
While precise nutritional values will depend on your specific ingredients and portion sizes, this Easy Healthy Broccoli Pasta is packed with whole grains, fiber, and essential vitamins. It’s a wholesome dish that’s relatively low in calories but high in nutrients, making it a fantastic choice for anyone looking to eat healthily without sacrificing taste!
So there you have it, my friends—an Easy Healthy Broccoli Pasta that’s perfect for any day of the week. I’m thrilled to share this with you, and I hope it brings as much joy to your kitchen as it has to mine. Happy cooking, and enjoy every delicious bite!
Print
Easy Healthy Broccoli Pasta
- Total Time: 30 minutes
- Yield: 4 servings
- Diet: Vegetarian
Description
A delightful dish that balances health and taste, featuring fresh broccoli and whole grain pasta.
Ingredients
- Whole Grain Pasta (12 oz)
- Fresh Broccoli (2 cups, chopped)
- Garlic (4 cloves, minced)
- Olive Oil (3 tablespoons)
- Lemon Juice (1 tablespoon, freshly squeezed)
- Parmesan Cheese (½ cup, grated)
- Salt and Pepper (to taste)
- Red Pepper Flakes (optional)
Instructions
- Boil a large pot of salted water.
- Add the pasta and cook according to package instructions.
- Reserve some pasta water before draining.
- Drain the pasta and set it aside.
- Heat the olive oil over medium heat in a large skillet.
- Add minced garlic and sauté for about a minute.
- Toss in the chopped broccoli and cook for about 3–5 minutes.
- Season with salt and pepper.
- Add the drained pasta to the skillet with broccoli and garlic.
- Pour in the reserved pasta water.
- Add fresh lemon juice and grated Parmesan cheese.
- Adjust seasoning to taste.
- Remove from heat and serve immediately.
- Top with red pepper flakes if desired.
Notes
Serve with a side salad or garlic bread for a complete meal. You can customize by adding other vegetables or protein.
- Prep Time: 10 minutes
- Cook Time: 20 minutes
- Category: Main Course
- Method: Sautéing
- Cuisine: Italian
Nutrition
- Serving Size: 1 serving
- Calories: 350
- Sugar: 3g
- Sodium: 400mg
- Fat: 12g
- Saturated Fat: 2g
- Unsaturated Fat: 8g
- Trans Fat: 0g
- Carbohydrates: 45g
- Fiber: 6g
- Protein: 15g
- Cholesterol: 10mg
Keywords: broccoli, pasta, healthy cooking, vegetarian recipe, quick meal




