Pesto Grilled Cheese
The Joy of Pesto Grilled Cheese: A Cozy Kitchen Adventure
Welcome to my kitchen, friends! Today, we’re diving headfirst into a recipe that feels like a warm hug on a rainy day: the Pesto Grilled Cheese. If you’re anything like me, the mere thought of grilled cheese brings back an avalanche of comforting childhood memories—cheesy goodness melting between buttery, golden slices of toasted bread. Now, let’s kick it up a notch with a luscious layer of homemade or store-bought pesto!
So, what’s the big deal about pesto, you might ask? Well, it’s a fabulous mixture of fresh basil, garlic, nuts, olive oil, and cheese, packing a punch of flavor in every bite. When you slather it onto your favorite bread along with that gooey cheese, the result is nothing short of magic. Think about it: the crispy, crunchy exterior giving way to that stretchy, gooey melted cheese, infused with the herbal goodness of pesto. Absolutely heavenly, right?
Grilled cheese is the ultimate comfort food, but my goal is to show you that it can also be an avenue for creativity. You don’t need to be a culinary wizard to impress your loved ones (or yourself!) with this dish. Between the nostalgia of a classic grilled cheese and the freshness of a vibrant pesto, this recipe is all about embracing flavors while keeping it simple and delightful. Whether you’re making a quick lunch for yourself or hosting a cozy gathering with friends, this Pesto Grilled Cheese is sure to become a staple in your culinary repertoire.
Let’s pull up those aprons and get cooking. You’ll soon find out how easy it is to create a masterpiece in your own kitchen!
Personal Story
Growing up, I spent countless afternoons after school in the kitchen with my grandmother. She had this magical touch that transformed everyday ingredients into something extraordinary. One of my favorite memories is when she made her famous grilled cheese sandwiches. But what set hers apart was the secret ingredient: a dollop of her homemade pesto.
I remember standing on a stool, trying to peek over the counter as she mixed the vibrant green paste in the food processor. The smell of fresh basil and garlic wafting through the air was irresistible. She would spread her pesto on the bread before layering in the cheese, telling me stories about how each ingredient held a special place in her heart. As we waited for the cheese to melt, we chatted and sometimes even danced a little to the music playing in the background.
Those grilled cheese sandwiches weren’t just lunch; they were a representation of love served on a plate. Now, as an adult, I find myself recreating those moments in my own kitchen. My version, the Pesto Grilled Cheese, is deeply inspired by those afternoons spent with Grandma. Each bite recalls laughter, warmth, and the smell of baking bread—a gentle reminder that food has the power to bring us together.
Ingredients
Here’s what you’ll need to whip up your Pesto Grilled Cheese:
-
Sourdough Bread (or your favorite bread)
Sourdough provides a wonderful tang and crispness, but feel free to use whole grain, rye, or even gluten-free options. -
Mozzarella Cheese (fresh or shredded)
Melty mozzarella adds a lovely stretchy texture. You can swap for cheddar, gouda, or provolone for different flavors. -
Pesto (store-bought or homemade)
The star of the show! You can buy it in a jar, but if you have fresh basil, try making your own. It’s easier than you think and can be customized with nuts, cheese, or even sun-dried tomatoes. -
Butter (for grilling)
Always use real butter for that rich, golden crunch. Want to make it dairy-free? Use vegan butter or olive oil! -
Garlic Powder (optional)
*Sprinkling a bit of garlic powder on the buttered side elevates the flavor.
Here’s a quick pro tip: You can also mix the pesto with a sprinkle of red pepper flakes for a little kick if you’re feeling adventurous!
Step-by-Step Instructions
Step 1: Prepare Your Ingredients
Before diving in, let’s gather everything. Grab your bread, cheese, pesto, and butter. If you’re making homemade pesto, whip that up first using a food processor: combine fresh basil, garlic, nuts (like pine nuts or walnuts), Parmesan cheese, and olive oil. Blend until you get your desired consistency.
Step 2: Butter Your Bread
Every perfect grilled cheese starts with butter. Generously spread butter on the outside of each slice of bread. Don’t skimp here! This will give us that delightful golden crust. If you want, add a sprinkle of garlic powder to the butter—that’s my secret touch!
Step 3: Assemble the Sandwich
On the unbuttered side of one slice, slather a hearty layer of pesto. Then, add a mound of mozzarella cheese on top. Don’t go too thin on the cheese; we want this sandwich to be decadent! If you’re using another cheese type, layer it on nicely and consider adding more for extra flavor. Place the second slice of bread on top, buttered side facing out.
Step 4: Heat Up That Pan
Preheat a non-stick skillet or griddle over medium heat. Now, gently place your assembled sandwich in the pan. Resist the urge to flip it immediately—let that butter do its magic.
Step 5: Grill to Perfection
Cook for about 3-4 minutes on one side until it’s golden brown and crispy. As the cheese begins to melt, press down gently with a spatula to ensure even cooking and melting. After the time is up, carefully flip the sandwich and cook the other side for another 3-4 minutes.
Don’t forget: if you’re using fresh mozzarella, it can release moisture. If that happens, just turn the heat down a tad and cook a bit longer—it’ll get there!
Step 6: Serve and Enjoy!
Once both sides are golden and melty, remove your Pesto Grilled Cheese from the pan. Let it rest for a minute before cutting it in half—this part is essential to keep all that cheesy goodness from oozing out. Serve it warm, possibly alongside a nice tomato soup or a simple salad for that perfect cozy meal!
Serving Suggestions
For plating, cut the sandwich in half diagonally and serve it open-faced, with the gooey cheese peeking out, or stack the halves neatly on a rustic wooden board. Offer a small bowl of extra pesto for dipping and perhaps a sprinkle of freshly grated Parmesan on top to finish it off. Voilà! Your Pesto Grilled Cheese is ready to wow!
Recipe Variations
-
Caprese Grilled Cheese: Layer in sliced tomatoes and fresh basil along with mozzarella for a refreshing twist, perfect for summer.
-
Spicy Pesto Grilled Cheese: Add a bit of crushed red pepper or sliced jalapeños to the pesto for a spicy kick.
-
Mediterranean Delight: Swap the mozzarella for feta cheese and mix in chopped olives and sun-dried tomatoes for a Mediterranean spin.
-
Savory Mushrooms: Sauté mushrooms with garlic and thyme before adding them to your sandwich for an earthy flavor.
-
Nut-Free Version: Replace pine nuts in your pesto with sunflower seeds or simply leave them out, keeping the other ingredients intact.
Chef’s Notes
As I look back on my culinary journey, this Pesto Grilled Cheese has become a hallmark of cozy gatherings and late-night munchies. What started as a simple childhood favorite evolved into something I look forward to improvising each time. Whether I’m trying a new cheese or experimenting with different types of homemade pesto, there’s an element of joy and curiosity every time I prepare it. And let’s be honest, it’s hard to resist that craving for something warm, cheesy, and delicious!
Many of my friends have told me that this grilled cheese rekindled their love for cooking. It’s a reminder that sometimes, less is more. And remember: every kitchen mishap can lead to a spectacular kitchen story.
FAQs and Troubleshooting
Q: Why isn’t my cheese melting?
A: If you’re using fresh mozzarella, it can be a bit wetter than shredded cheese. Make sure you’re cooking over medium heat, and don’t be afraid to turn down the heat to give it more time to melt!
Q: Can I make this sandwich in the oven?
A: Absolutely! Preheat your oven to 375°F (190°C), assemble the sandwich, and place it on a baking sheet. Bake for about 15 minutes, flipping halfway through, until the cheese is melted and the bread is golden.
Q: What if I don’t have pesto?
A: No worries! Try substituting with hummus, balsamic glaze, or a thick tapenade. It won’t be the same, but it can still result in a delightful sandwich.
Q: How do I store leftovers?
A: If you have any leftover sandwiches (which is rare), store them in an airtight container in the fridge for up to 2 days. To reheat, pop them in a pan or toaster oven for best results!
Nutritional Info
(This is optional, but informative! Feel free to skip or include)
- Calories: Approximately 400 calories per sandwich
- Protein: 18g
- Fat: 24g
- Carbohydrates: 30g
And there you have it—your complete guide to crafting the ultimate Pesto Grilled Cheese! I hope you find joy in making this dish as much as I do. Remember, cooking should be fun and full of laughter, so gather your loved ones and enjoy every bite! Happy cooking! 🥪💚
Print
Pesto Grilled Cheese
- Total Time: 18 minutes
- Yield: 2 servings
- Diet: Vegetarian
Description
A delightful twist on the classic grilled cheese, infused with the vibrant flavors of pesto and melty mozzarella.
Ingredients
- Sourdough Bread (or your favorite bread)
- Mozzarella Cheese (fresh or shredded)
- Pesto (store-bought or homemade)
- Butter (for grilling)
- Garlic Powder (optional)
Instructions
- Prepare Your Ingredients: Gather bread, cheese, pesto, and butter. If making homemade pesto, blend fresh basil, garlic, nuts, Parmesan cheese, and olive oil in a food processor.
- Butter Your Bread: Spread butter on the outside of each slice of bread. Optionally, add garlic powder to the butter.
- Assemble the Sandwich: On the unbuttered side of one slice, spread pesto, then add a mound of mozzarella cheese. Top with the second slice of bread, buttered side out.
- Heat Up That Pan: Preheat a non-stick skillet over medium heat and place the assembled sandwich in the pan.
- Grill to Perfection: Cook for 3-4 minutes on one side until golden brown, then flip and cook for another 3-4 minutes until both sides are crispy and cheese is melted.
- Serve and Enjoy: Let the sandwich rest for a minute before cutting in half. Enjoy with tomato soup or a salad.
Notes
For extra kick, mix the pesto with red pepper flakes. Use different cheeses or add tomatoes for variations.
- Prep Time: 10 minutes
- Cook Time: 8 minutes
- Category: Main Course
- Method: Grilling
- Cuisine: American
Nutrition
- Serving Size: 1 sandwich
- Calories: 400
- Sugar: 2g
- Sodium: 600mg
- Fat: 24g
- Saturated Fat: 12g
- Unsaturated Fat: 8g
- Trans Fat: 0g
- Carbohydrates: 30g
- Fiber: 2g
- Protein: 18g
- Cholesterol: 50mg
Keywords: grilled cheese, pesto, comfort food, vegetarian, quick meal
Loaded Potato Taco Bowl
Loaded Potato Taco Bowl: A Cozy Culinary Adventure
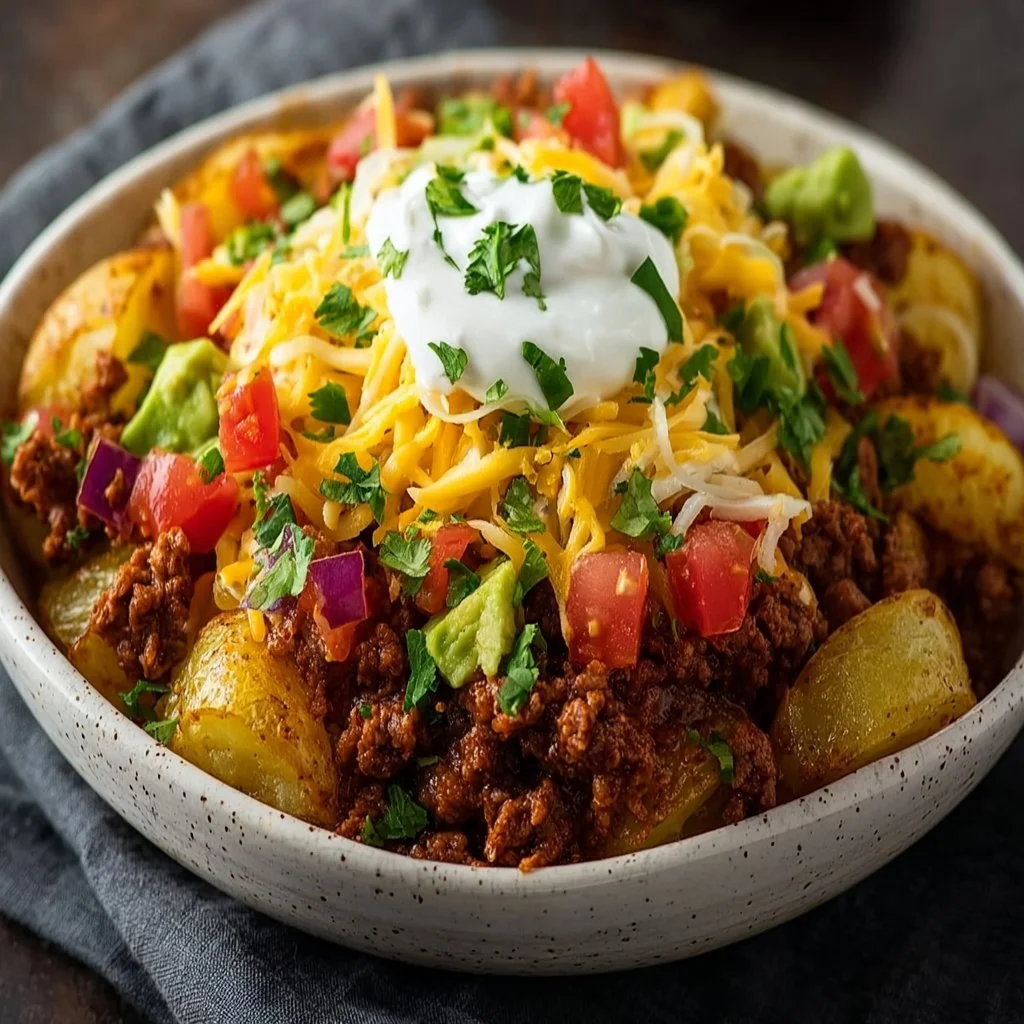
Welcome to my kitchen, my foodie friends! Today, we’re diving into a dish that is equal parts comforting and fun: the Loaded Potato Taco Bowl. Picture this: crispy roasted potatoes topped with all your favorite taco fixings, lovingly layered in a bowl that feels like a warm hug! Seriously, who doesn’t love tacos and potatoes? They’re the ultimate comfort food duo, and together they practically sing a cozy tune of flavor.
Now, why do I adore this Loaded Potato Taco Bowl? Well, it goes beyond just deliciousness. It brings people together! Whether it’s a cozy weeknight dinner for two or a vibrant gathering with friends, this dish is all about connection and celebration of flavors. So grab your apron, and let’s whip up something extraordinary that will not only satisfy your taste buds but also spread joy around your table!
My Culinary Journey with Loaded Potato Taco Bowls
Ahh, memories of my younger self in the kitchen always bring a smile to my face! Growing up, taco night was a sacred ritual in my household. The aroma of seasoned meat sizzling on the stove, the vibrant colors of freshly chopped veggies, and the unmistakable sound of laughter and chatter created a warm atmosphere that felt like home. I have a special memory of my dad, a skilled home cook himself, teaching me to make his legendary loaded burritos.
One evening, I had a sudden craving for tacos, but we were out of tortillas! Instead of a boring dinner, we rummaged through our pantry and transformed simple roasted potatoes into the base for our “taco bowl.” Oh, friends, it was a game-changer! The crunchiness of the potatoes combined with the traditional taco flavors was a delightful surprise that I still cherish today. Fast forward to now, and I can’t help but recreate that nostalgic magic—not just in my own kitchen but in yours too!
Ingredients
Let’s chat about the ingredients! Below is what you’ll need to create your Loaded Potato Taco Bowl, complete with some handy tips and suggestions.
-
Potatoes (Yukon Gold or Russet): The star ingredient! Yukon Golds are creamy and buttery, while Russets are fluffy. Choose whichever you prefer or have on hand; both work beautifully for roasting. You could even try sweet potatoes for a slightly healthier twist.
-
Olive Oil: A must for that perfect roasting! It helps achieve a crispy exterior. You can substitute with avocado oil or melted coconut oil to infuse a different flavor.
-
Taco Seasoning: You can buy pre-made mixes or whip up your own with chili powder, cumin, garlic powder, onion powder, and salt. This blend is where the magic begins!
-
Ground Beef or Turkey: A classic choice! If you’re looking for a lighter version, try chicken or even a plant-based alternative like black beans or lentils for a vegetarian option.
-
Black Beans: Packed with protein and fiber! You can swap them for kidney beans or chickpeas if you wish.
-
Corn (frozen or fresh): Adds a nice sweetness! Feel free to skip it or replace it with diced bell peppers for that extra crunch.
-
Shredded Cheese (Cheddar or Mexican Blend): Who can resist melted cheese? Want a healthier option? Opt for a sprinkle of nutritional yeast instead!
-
Sour Cream or Greek Yogurt: A dollop of creamy deliciousness on top! If you prefer dairy-free, try cashew cream or avocado for a creamy texture.
-
Fresh Cilantro: A pop of freshness! If cilantro isn’t your jam, try fresh parsley or even green onions for added flavor.
-
Sliced Jalapeños: For those who love a kick! You can choose pickled jalapeños for a tangy twist or leave them out altogether if spice isn’t your thing.
Step-by-Step Instructions
Alright, my friends, let’s get this cooking show on the road! Here’s how you’ll turn these fresh ingredients into a loaded potato fiesta!
Step 1: Preheat the Oven
Preheat your oven to 425°F (220°C). Let’s get that heat going so our potatoes can crisp up beautifully!
Step 2: Prep the Potatoes
- While the oven warms up, wash and dice your potatoes into bite-sized chunks (about 1 inch). You want them to roast evenly and get nicely crispy.
Pro Tip:
Leave the skin on for added texture and nutrients.
Step 3: Season the Potatoes
- In a large mixing bowl, toss the diced potatoes with olive oil, taco seasoning, and a pinch of salt. Make sure every piece is coated for maximum flavor!
Chef’s Insight:
Feel free to add other spices you love. Smoked paprika is a delicious addition!
Step 4: Roast the Potatoes
- Spread the seasoned potatoes in a single layer on a baking sheet lined with parchment paper. Bake for 25-30 minutes, flipping halfway through, until golden and crispy. You want them to have that irresistible crunch!
Tip:
Keep an eye on them towards the end. Ovens vary, and you don’t want any burnt morsels!
Step 5: Cook Your Protein
- While the potatoes are roasting, it’s time to cook your protein! In a skillet over medium heat, add a splash of olive oil and brown your ground meat. Stir in a bit of taco seasoning to enhance the flavor, cooking until it’s fully cooked.
Quick Hack:
If you’re using canned black beans, remember to rinse them first to remove excess sodium!
Step 6: Warm the Corn and Beans
- If you’re using canned corn and beans, just toss them into the skillet until warmed through. If you’re using fresh corn, you may want to sauté it for a few minutes for that perfectly sweet taste!
Step 7: Assemble the Bowls
- Now comes the fun part! Grab your favorite bowls and start by adding a generous layer of crispy potatoes as your base.
Step 8: Top it Off!
- Like a taco bar, layer on your meat, beans, corn, and a sprinkle of cheese. Add a dollop of sour cream or Greek yogurt and garnish with fresh cilantro and jalapeños.
Serving Suggestions
Serving this dish is as much about presentation as it is about flavor! To plate your Loaded Potato Taco Bowl, layer each component artfully, allowing the colors to shine. Consider a drizzle of homemade salsa or guacamole on top for an extra burst of flavor. Feel free to set up a toppings bar so everyone can customize their bowls just the way they like it!
Recipe Variations
Get creative with your Loaded Potato Taco Bowl! Here are a few tasty twists you can try:
-
Buffalo Chicken Loaded Potato Bowl: Swap the taco seasoning for buffalo sauce, adding shredded chicken and a side of ranch dressing.
-
Veggie-Loaded Bowl: Go vegetarian and pile on roasted veggies like zucchini, bell peppers, and mushrooms instead of meat for a rainbow of flavors.
-
Breakfast Taco Bowl: In place of the regular toppings, use scrambled eggs, avocado, and salsa for a cozy brunch twist!
-
Spicy Shrimp Bowl: Toss shrimp in taco seasoning and sauté them for a spicy seafood twist on this recipe.
-
BBQ Loaded Potato Bowl: Replace taco seasoning with BBQ sauce and top with pulled pork or brisket—perfect for a Southern feast!
Chef’s Notes
This Loaded Potato Taco Bowl is one of those versatile recipes that has evolved since that fateful taco night. I remember trying it out for a casual dinner party, and it was an instant hit! The best part? You can always adjust the toppings based on what’s in your fridge, making it a fantastic "clean out the pantry" dish. Honestly, the laughter and joy it brings around the table are more satisfying than any Michelin star!
FAQs and Troubleshooting
Let’s address some common questions and potential problems you might encounter with this recipe:
-
What if my potatoes aren’t crispy?
If your potatoes are soft and not crispy, it’s likely that they weren’t spread out in a single layer on the baking sheet. Next time, give them enough space to roast efficiently! -
Can I make this vegetarian?
Absolutely! Swap the meat for more beans, lentils, or roasted veggies, and you’ll have a delicious vegetarian option that’s just as satisfying. -
How do I store leftovers?
Store any leftovers in an airtight container in the fridge. Reheat in the oven or toaster oven for the best texture—avoid the microwave if you want those potatoes crispy again! -
What if I don’t have taco seasoning?
No worries! Mix together chili powder, cumin, garlic powder, onion powder, and paprika. It’ll do the trick just fine!
Nutritional Info
While I’m not a nutritionist, the Loaded Potato Taco Bowl is packed with nutrients from the potatoes, beans, and colorful veggies. It’s a balanced meal when you include lean protein, and you can tweak it for your dietary needs—making it a versatile option for everyone!
Now that we’ve come to the end of our cozy culinary adventure, I hope you feel inspired to whip up this Loaded Potato Taco Bowl. It’s not just a meal; it’s a chance to create memories with the people you love. Gather around the table, share your stories, and enjoy this blend of flavors that’s sure to bring a smile. Happy cooking, friends!
Print
Loaded Potato Taco Bowl
- Total Time: 45 minutes
- Yield: 4 servings 1x
- Diet: Optional Vegetarian
Description
A cozy and comforting bowl of crispy roasted potatoes topped with your favorite taco fixings, perfect for any gathering.
Ingredients
- 2 large Potatoes (Yukon Gold or Russet)
- 2 tablespoons Olive Oil
- 2 tablespoons Taco Seasoning
- 1 pound Ground Beef or Turkey (or plant-based alternative)
- 1 can Black Beans
- 1 cup Corn (frozen or fresh)
- 1 cup Shredded Cheese (Cheddar or Mexican Blend)
- 1/2 cup Sour Cream or Greek Yogurt
- 1/4 cup Fresh Cilantro
- 1/4 cup Sliced Jalapeños
Instructions
- Preheat the oven to 425°F (220°C).
- Prep the potatoes by washing and dicing them into bite-sized chunks.
- Season the potatoes with olive oil, taco seasoning, and salt.
- Roast the potatoes on a baking sheet for 25-30 minutes, flipping halfway.
- Cook your protein in a skillet over medium heat with a splash of olive oil.
- Warm the corn and beans in the skillet until heated through.
- Assemble the bowls with a layer of crispy potatoes.
- Top with cooked meat, beans, corn, cheese, sour cream, cilantro, and jalapeños.
Notes
Customize your bowl with additional toppings like homemade salsa or guacamole. Excellent for clean-out-the-pantry meals.
- Prep Time: 15 minutes
- Cook Time: 30 minutes
- Category: Main Course
- Method: Baking
- Cuisine: Mexican
Nutrition
- Serving Size: 1 serving
- Calories: 400
- Sugar: 4g
- Sodium: 300mg
- Fat: 18g
- Saturated Fat: 7g
- Unsaturated Fat: 10g
- Trans Fat: 0g
- Carbohydrates: 45g
- Fiber: 7g
- Protein: 20g
- Cholesterol: 60mg
Keywords: loaded potato, taco bowl, comfort food, easy recipes, weeknight dinner
Healthy Sweet Potato Hash Browns
Healthy Sweet Potato Hash Browns
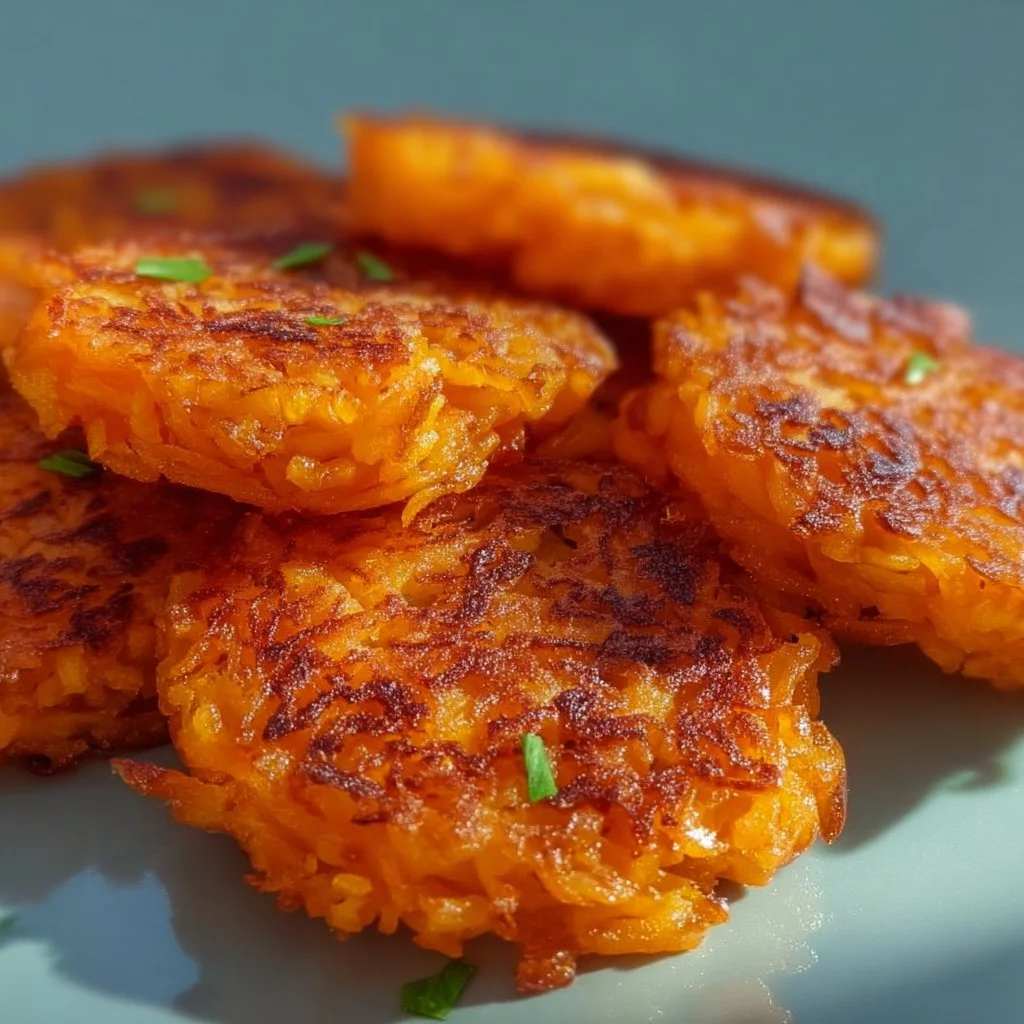
Welcome back to my cozy kitchen, food lovers! Today, we’re diving into one of the most comforting and satisfying dishes that I can think of: sweet potato hash browns! If you’ve ever found yourself wanting to recreate that crisp, golden perfection you get at your favorite brunch spot, but in a healthier way, you’re in for a real treat. These hash browns are bursting with flavor, easy to whip up, and packed with nutrients. Plus, they’ll make your home smell absolutely divine!
Sweet potatoes are not just great for savory dishes; they are an exceptionally versatile ingredient that can elevate a simple breakfast to a gourmet experience. Here’s why I’m obsessed with them: they’re not only rich in vitamins A and C, but they also have natural sweetness that pairs beautifully with spices and savory toppings. Whether you’re feeding a crowd on a lazy weekend morning, or simply want a quick yet wholesome side for dinner, these hash browns are ready to take center stage!
Now, let me tell you, making sweet potato hash browns is not just about cooking; it’s about creating a delightful experience. You’ll love hearing the sizzle in the pan, and trust me, the crispy edges will have everyone in the house gathering around the kitchen in no time. As we embark on this culinary adventure together, I promise you’ll feel empowered and excited to cook. So grab your apron, and let’s get started on making these healthy sweet potato hash browns!
Personal Story
Ah, sweet potato hash browns hold a special place in my heart. It all started during those cozy Sunday mornings at my grandmother’s house. You see, every weekend, she would treat us to a hearty breakfast spread featuring her famous hash browns. I can still remember the way her kitchen would fill up with laughter and the aroma of sizzling potatoes blending with the scent of freshly brewed coffee.
Those moments were not just about the food; they were about family, warmth, and connection. As a child, I was always captivated by how she transformed simple ingredients into something magical. Once I learned how to make them myself, I made it a point to tweak her classic recipe over the years, swapping out traditional potatoes for sweet potatoes to give it a healthier twist—even adding kale or spinach on occasion for an extra veggie boost! The feel and flavors of those memories are what inspire each batch of these hash browns in my kitchen today.
Growing up, feeding loved ones has always been a way to show care and create lasting memories. Now, every time I prepare these sweet potato hash browns, I’m reminded of my grandmother and those precious mornings. It’s that nostalgia and love that I hope you’ll also feel as you make this dish.
Ingredients
Here’s what you’ll need to whip up your own batch of heavenly sweet potato hash browns:
-
Sweet Potatoes (2 large)
- The star of the show! Sweet potatoes are packed with vitamins, minerals, and fiber. They add a lovely sweetness and a gorgeous color to your dish. Swap for Yukon gold or mashed potatoes if you’re in a pinch, but trust me, the sweet potatoes really shine here!
-
Onion (1 medium)
- Adds a savory depth to the flavor. Use yellow, white, or even red onions for a sweeter taste. If you’re not an onion fan, try a small amount of garlic powder instead.
-
Garlic (2 cloves, minced)
- For that lovely aromatic kick. You can also use garlic powder, but fresh garlic brings an extra pop!
-
Egg (1 large, optional)
- For binding the mixture and adding protein. If you’re looking for a vegan alternative, a flax egg (1 tablespoon flaxseed meal mixed with 2.5 tablespoons water) or even some mashed banana could work to hold everything together!
-
Olive Oil (2-3 tbsp)
- Perfect for frying to create that crispy exterior. You can substitute with avocado oil for a high smoke point or coconut oil for a subtle sweetness.
-
Salt and Pepper (to taste)
- Essential for seasoning! Feel free to add additional spices like paprika, cumin, or cayenne pepper for a kick.
-
Fresh Herbs (like parsley or cilantro, optional)
- These add a fresh note and brighten up the dish. Dried herbs can work too if fresh isn’t available.
Step-by-Step Instructions
Are you ready to get your hands dirty? Let’s create some crispy, golden, and utterly delicious sweet potato hash browns! Follow these simple steps for the best results:
-
Prep the Sweet Potatoes:
- Start by peeling the sweet potatoes and then grating them using a box grater or a food processor. You want them finely grated, almost like you’d prepare for a slaw. Trust me, the finer the grate, the crispier the hash browns will be!
-
Remove Excess Moisture:
- After grating, place the sweet potatoes in a clean kitchen towel or cheesecloth, twist it up, and wring out as much moisture as you can. This is a crucial step! The more moisture you remove, the crispier the hash browns will turn out.
-
Sauté the Onion and Garlic:
- In a large skillet, heat 1 tablespoon of olive oil over medium heat. Add the chopped onion and sauté until translucent (about 5 minutes). Stir in the minced garlic and sauté for another minute, until fragrant—oh, the smells are heavenly!
-
Mix Ingredients:
- After sautéing, transfer the onion and garlic to a mixing bowl. Add the grated sweet potatoes, beaten egg (if using), salt, and pepper. Mix it all together until it’s well combined. This is where you can also add any spices and herbs you wish. Mix, mix, mix!
-
Cook the Hash Browns:
- In the same skillet, add another tablespoon of olive oil and turn the heat up to medium-high. Once the oil is hot, scoop about a quarter cup of the sweet potato mixture into the skillet, flattening it down with a spatula into a patty shape. Repeat this with the remaining mixture, ensuring not to overcrowd the skillet.
-
Let it Sizzle:
- Allow the hash browns to cook undisturbed for about 4-5 minutes on one side until golden brown and crispy. Resist the urge to flip them too soon; the crust needs time to form!
-
Flip and Finish Cooking:
- Gently flip each hash brown using a spatula, adding a little more oil if necessary. Cook for another 4-5 minutes until that beautiful golden color is achieved.
-
Drain on a Paper Towel:
- Once they’re cooked, transfer the hash browns onto a plate lined with paper towels to absorb any excess oil.
-
Repeat:
- Cook the remaining batter, adding more oil to the skillet as needed. This is a great time to touch-up on other breakfast items—maybe scramble some eggs or prepare some avocado!
-
Serve and Enjoy:
- These delicious hash browns are best served immediately! Act fast, as they tend to lose their crispiness over time.
Serving Suggestions
When it comes time to serve, think about adding a pop of color and flavor to your plate! You can serve these sweet potato hash browns with a fresh dollop of sour cream or Greek yogurt on the side, topped with green onions or chopped herbs. For even more color and nutrition, add sliced avocado or a vibrant homemade salsa. If you’re feeling extra indulgent, a drizzle of sriracha or a sprinkle of feta cheese can take these hash browns over the top!
Recipe Variations
Here are some creative twists to keep your sweet potato hash browns exciting:
-
Add Spinach or Kale: Toss in a handful of chopped greens to amp up the nutrition and flavor.
-
Spicy Sweet Potato Hash: Add diced jalapeños or red pepper flakes for a kick!
-
Herb-Infused: Mix in fresh herbs like thyme or rosemary for an aromatic touch.
-
Cheesy Delight: Fold in some shredded cheese like cheddar or feta before cooking for a cheesy hash brown experience!
-
Breakfast Bowls: Use them as a base for a breakfast bowl, topped with an egg any style, sautéed veggies, or your favorite proteins.
Chef’s Notes
As I reflect on this recipe, I love how it has evolved over time in my kitchen. Initially, it started as a simple comfort food option for my family. But as I began experimenting, I found ways to incorporate healthy ingredients and bold flavors, turning it into a wholesome dish. I remember one time hosting a brunch and accidentally running out of sweet potatoes. In a rush, I mixed in some grated zucchini, and folks, it was a game changer! The variation was a hit and drew attention for its unique texture and flavor.
It’s these happy kitchen accidents that keep me excited as a home cook. Remember, cooking is about having fun and making it your own, so don’t be afraid to let your creativity shine through!
FAQs and Troubleshooting
1. Why are my hash browns soggy?
- If they come out soggy, it’s likely due to excess moisture. Be sure to squeeze out as much liquid as possible after grating the sweet potatoes.
2. Can I make these ahead of time?
- Absolutely! You can prep the mixture ahead and store it in the fridge for up to a day. Just remember to cook them before serving!
3. Are they freezer-friendly?
- Yes! You can freeze the uncooked hash brown patties between layers of parchment paper, then store them in a freezer-safe bag. Just cook them from frozen—add a few extra minutes to the cooking time.
4. What should I do if they fall apart while cooking?
- If your hash browns crumble, try adding an extra egg for binding or lightly pressing them with a spatula while cooking to help them hold together.
Nutritional Info
Note: Nutritional values may vary based on specific ingredients and portion sizes.
- Calories: 200
- Protein: 3g
- Fat: 7g
- Carbohydrates: 34g
- Fiber: 4g
- Sugars: 6g
And there you have it, my dear foodies! This recipe for healthy sweet potato hash browns is sure to brighten up your breakfast table—or any meal for that matter! I hope you feel inspired to get cooking and create amazing memories in your kitchen, just as I did in my grandmother’s. Remember, food is love, and every bite tells a story. Happy cooking!
Print
Healthy Sweet Potato Hash Browns
- Total Time: 35 minutes
- Yield: 4 servings 1x
- Diet: Vegetarian
Description
Delicious and nutritious sweet potato hash browns that are crispy on the outside and soft on the inside. Perfect for breakfast or as a side dish.
Ingredients
- 2 large Sweet Potatoes
- 1 medium Onion
- 2 cloves Garlic, minced
- 1 large Egg (optional)
- 2–3 tbsp Olive Oil
- Salt and Pepper, to taste
- Fresh Herbs (optional)
Instructions
- Prep the sweet potatoes by peeling and grating them.
- Remove excess moisture by wringing them in a towel.
- Sauté the onion in olive oil until translucent, then add garlic.
- Mix the sautéed onion and garlic with grated sweet potatoes, egg, salt, and pepper.
- Cook mixture in the skillet, forming patties and frying until golden brown.
- Flip the patties and cook until the other side is crispy.
- Drain on paper towels before serving.
- Serve immediately with your choice of toppings.
Notes
These hash browns are best served fresh. Consider adding toppings like sour cream, salsa, or avocado for extra flavor.
- Prep Time: 15 minutes
- Cook Time: 20 minutes
- Category: Breakfast
- Method: Frying
- Cuisine: American
Nutrition
- Serving Size: 1 serving
- Calories: 200
- Sugar: 6g
- Sodium: 400mg
- Fat: 7g
- Saturated Fat: 1g
- Unsaturated Fat: 5g
- Trans Fat: 0g
- Carbohydrates: 34g
- Fiber: 4g
- Protein: 3g
- Cholesterol: 70mg
Keywords: sweet potato, hash browns, breakfast, vegetarian, healthy recipes