
Your New Favorite Holiday Cookie is Here!
Hey there, friend! Come on in, the oven’s preheating and I’ve got a fresh cup of coffee with your name on it. Is there anything in the world that smells more like pure, unadulterated joy than cookies baking in the oven? That warm, buttery, sugary aroma just seems to wrap itself around you like a cozy hug, promising something delicious is just minutes away. Especially during the holiday season, baking becomes more than just making a treat—it’s a ritual. It’s the soundtrack of festive music, the glitter of sprinkles on the counter, and the happy chaos of creating something to share with the people you love most.
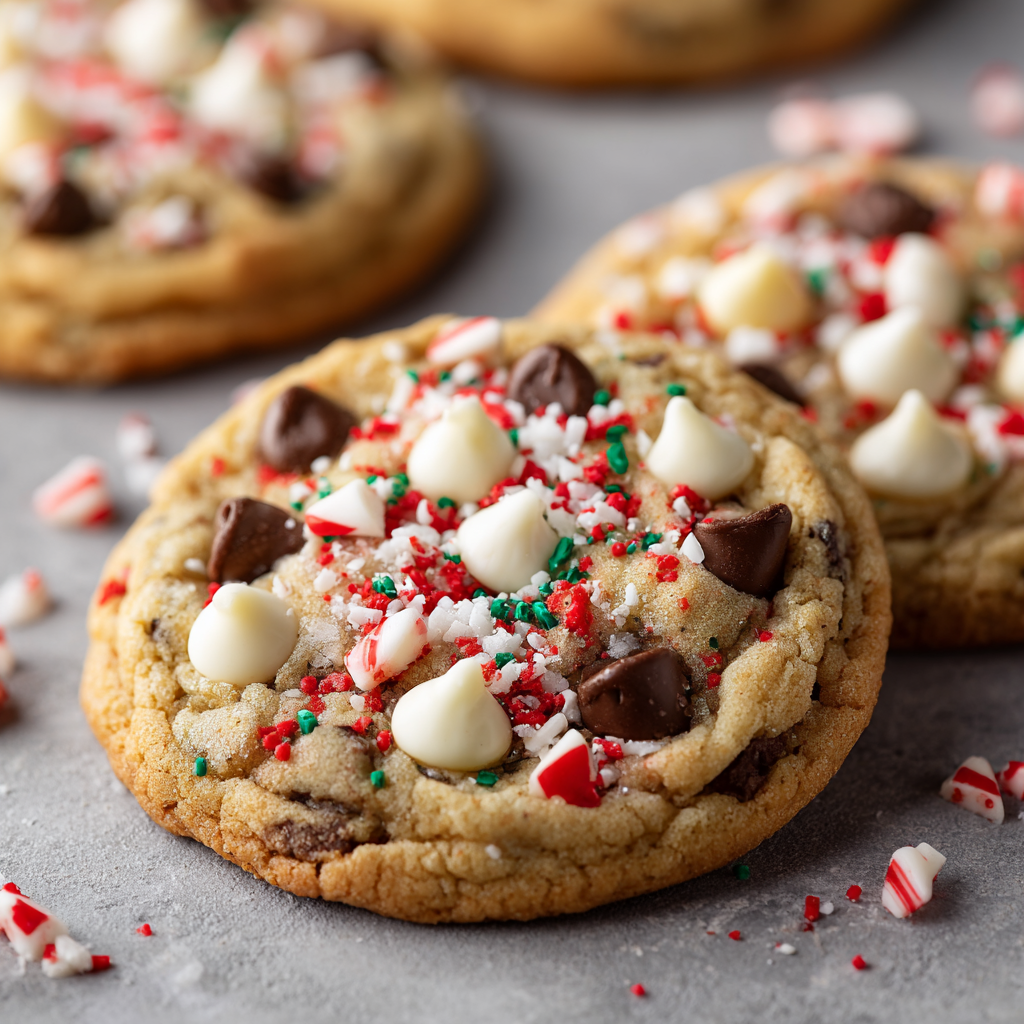
And today, we’re taking that feeling and dialing it all the way up to eleven. We’re making my absolute, hands-down, must-bake-every-year Winter Chocolate Chip Christmas Cookies. This isn’t just your standard chocolate chipper (though I love those dearly!). This is a festive, show-stopping version that’s soft, chewy, and absolutely bursting with holiday magic. We’re talking rich semi-sweet chocolate, creamy pockets of white chocolate, a cool, crunchy peppermint surprise, and a snowy topping of the prettiest sprinkles. They’re the cookie that makes everyone’s eyes light up, and I cannot wait to share them with you. So, tie on your favorite apron—the messy one with the stories—and let’s make some memories together.
The Cookie That Started a Tradition
This recipe has a special place in my heart because it was born from a near-disaster! Years ago, I was whipping up a classic batch of chocolate chip cookies for our annual holiday party. In my rush, I accidentally knocked over a box of candy canes my niece had been decorating with. A shower of red-and-white peppermint shards went flying… right into my mixing bowl of cookie dough! My first instinct was to panic, but my husband (the ever-pragmatic taste-tester) said, “Wait… that might be genius.”
We baked them off, crossed our fingers, and what emerged from the oven was nothing short of a holiday miracle. The warm chocolate paired with the cool, melting peppermint was a revelation. The classic cookie had been transformed into something utterly festive and new. Now, I intentionally “accidentally” add candy canes every year. It’s become our little family’s official start to the season—the moment we crush the first candy cane, we know the magic has begun. It’s a happy little reminder that the best creations often come from a beautiful mess.
Gathering Your Cookie Crew (The Ingredients!)
Here’s your shopping list for holiday happiness! The beauty of this recipe is its flexibility—I’ve included my favorite substitutions and chef insights so you can make it your own.
- 1 cup unsalted butter, softened – This is the foundation of our rich, chewy texture. Chef’s Tip: “Softened” means cool to the touch but your finger can leave a gentle indent. Don’t let it get oily or melted! For a dairy-free swap, a high-quality plant-based butter works wonderfully.
- 1 cup granulated sugar + 1 cup packed brown sugar – The white sugar helps them spread and crisp up slightly, while the brown sugar (pack it tight!) brings that deep molasses flavor and super-soft, chewy center.
- 2 large eggs – They act as the binder, bringing everything together. Make sure they’re at room temperature to create a smoother, more emulsified dough.
- 2 tsp vanilla extract – The flavor enhancer! Use the real stuff—it makes a world of difference.
- 3 cups all-purpose flour – The structure of our cookie. For a slightly denser, chewier cookie, you can swap one cup for bread flour.
- 1 tsp baking soda + ½ tsp baking powder – Our leavening dream team. The baking soda helps with browning and spread, while the baking powder gives a little lift.
- ¼ tsp salt – Do not skip this! Salt balances the sweetness and makes all the flavors pop.
- 2 cups semi-sweet chocolate chips – My personal favorite for that classic, rich chocolate hit. Feel free to use dark chocolate chips for a less sweet option.
- ½ cup white chocolate chips – These add creamy, sweet pockets that look like little snow drifts in the baked cookie.
- 1 cup crushed candy canes – The star of the show! I place them in a zip-top bag and crush them with a rolling pin. You want a mix of fine powder and small chunks for the perfect texture and flavor.
- Snowflake sprinkles (for decoration) – Because we eat with our eyes first! These are purely for festive joy.
Let’s Bake! Your Step-by-Step Guide to Cookie Perfection
Ready? Let’s do this! Follow these steps, and you’ll have a kitchen that smells like Santa’s workshop in no time.
- Preheat oven to 350°F (175°C). Line baking sheets with parchment paper. – This is non-negotiable for me! Parchment paper prevents sticking and makes cleanup an absolute dream. Silicone baking mats work great, too.
- In a large bowl, cream butter, granulated sugar, and brown sugar until light and fluffy. – This is the MOST important step for texture! Cream for a good 2-3 minutes with a hand mixer or stand mixer. You want it to be pale in color and fluffy. This incorporates air, which is key for a perfect cookie.
- Beat in eggs and vanilla until well combined. – Add them one at a time, mixing well after each addition. Scrape down the sides of the bowl to ensure everything is perfectly mixed.
- In a separate bowl, whisk together flour, baking soda, baking powder, and salt. – Whisking the dry ingredients separately ensures the leavening agents and salt are evenly distributed throughout the flour, so you get a consistent bake in every single cookie.
- Gradually add dry ingredients to the wet mixture. – I add it in three parts, mixing on low speed just until the flour disappears. Do not overmix! Overworking the flour can lead to tough, cakey cookies.
- Fold in chocolate chips, white chocolate chips, and crushed candy canes. – Use a sturdy spatula and gently fold until everything is evenly distributed. Try to save a handful of each to press on top of the dough balls before baking—this makes them look bakery-level gorgeous.
- Scoop dough into 1½ tbsp-sized balls. Place on baking sheets and top each with snowflake sprinkles. – I use a medium cookie scoop for uniform size and easy portioning. Give them about 2 inches of space to spread. Press a few extra chips and candy cane pieces on top for that picture-perfect finish.
- Bake for 10–12 minutes or until edges are lightly golden. Centers will continue to set as they cool. – They might look a tad underdone in the middle—that’s exactly what you want! They will set up beautifully as they cool, giving you that dreamy, soft-and-chewy texture.
- Let cool on the baking sheet for 5 minutes, then transfer to a wire rack. – This allows them to firm up just enough to move without breaking. Try to resist eating one straight from the oven… though I won’t judge if you can’t!
How to Serve These Holiday Stars
Presentation is part of the fun! Pile these warm, festive cookies high on a beautiful vintage platter or a rustic wooden board. For the ultimate holiday experience, serve them alongside a glass of ice-cold milk, a mug of rich hot chocolate, or a warm peppermint tea. They are the perfect ending to a festive dinner, the star of your cookie swap, or a wonderful homemade gift stacked high in a cellophane bag tied with a big red ribbon.
Make It Your Own! Delicious Recipe Variations
This dough is your canvas! Get creative with these fun twists:
- Peppermint Explosion: Add ½ tsp of peppermint extract to the wet ingredients for an extra burst of cool, wintery flavor.
- Peppermint Bark Swap: Instead of white chocolate chips, use ¾ cup of chopped peppermint bark for double the peppermint goodness.
- Cozy Spice: Whisk ½ tsp of cinnamon and a pinch of nutmeg into the dry ingredients for a subtle, warm note that feels like Christmas.
- Nutty Delight: Fold in ¾ cup of chopped toasted pecans or walnuts for a fantastic crunch.
- Double Chocolate: Replace ¼ cup of flour with ¼ cup of unsweetened cocoa powder for the ultimate chocolate lover’s cookie.
Olivia’s Chef Notes & Kitchen Stories
Over the years, I’ve learned a few tricks that make these cookies even better. First, if you have the time, chill the dough for at least 30 minutes (or up to 48 hours!). Chilled dough spreads less, resulting in a thicker, chewier cookie with even more developed flavor. It’s a game-changer!
Second, this recipe is a fantastic make-ahead option. You can scoop the dough balls, freeze them solid on a baking sheet, and then toss them into a freezer bag. Then, whenever cookie cravings strike (or unexpected guests arrive!), you can bake them straight from the freezer, adding just a minute or two to the bake time. Fresh, warm cookies in 15 minutes? Yes, please!
This recipe is a testament to the fact that the best things in life are often unplanned. My candy cane catastrophe turned into our most beloved tradition. So don’t be afraid of a little kitchen chaos—it might just lead to your next masterpiece.
Your Cookie Questions, Answered!
Q: My cookies spread too much and turned out flat. What happened?
A: This is usually caused by butter that is too warm or melted. Ensure your butter is just softened, not melted. Another culprit could be your baking soda—make sure it’s fresh! Finally, try chilling your dough for 30 minutes before baking to prevent excessive spreading.
Q: Can I make these cookies without the candy canes?
A: Absolutely! If you’re not a peppermint fan, simply leave them out. You’ll still have an incredible double chocolate chip cookie. You could replace them with an extra ½ cup of chocolate chips or some toasted nuts.
Q: Why are my cookies cakey and puffy instead of flat and chewy?
A: Cakey cookies are often the result of using too much flour. Next time, try fluffing your flour with a spoon, spooning it into your measuring cup, and leveling it off with a knife instead of dipping the cup directly into the bag. This prevents over-packing. Also, ensure you’re not overmixing the dough once the flour is added.
Q: The candy canes melted and made a huge mess. Help!
A> They will melt and spread a little—that’s part of their charm! But to keep the pretty red-and-white swirls, make sure you’re using real candy canes or peppermint candies, not soft starlight mints. Also, incorporating them as chunks (not just fine dust) and making sure your dough is properly chilled before baking will help them hold their shape better.
Winter Chocolate Chip Christmas Cookies
- Total Time: 0 minute
Description
Soft, chewy, and sparkling with holiday magic—these cookies are everything you want on a festive table. With rich semi-sweet chocolate, creamy white chocolate, a peppermint crunch, and a snowy sprinkle finish, they’re the kind of treat that brings everyone back for “just one more.” Perfect for gifting, swapping, or pairing with a mug of cocoa by the tree.
Ingredients
-
1 cup unsalted butter, softened
-
1 cup granulated sugar
-
1 cup packed brown sugar
-
2 large eggs (room temp)
-
2 tsp vanilla extract
-
3 cups all-purpose flour
-
1 tsp baking soda
-
½ tsp baking powder
-
¼ tsp salt
-
2 cups semi-sweet chocolate chips
-
½ cup white chocolate chips
-
1 cup crushed candy canes
-
Snowflake sprinkles (for decorating)
Instructions
-
Preheat oven to 350°F (175°C). Line baking sheets with parchment.
-
Cream butter and both sugars until pale and fluffy (2–3 minutes).
-
Beat in eggs, one at a time, then vanilla.
-
In a separate bowl, whisk flour, baking soda, baking powder, and salt.
-
Gradually add dry mix to wet, stirring until just combined.
-
Fold in chocolate chips, white chocolate, and crushed candy canes.
-
Scoop 1½ tbsp dough balls onto baking sheets; top with sprinkles and extra chips.
-
Bake 10–12 min until edges are golden and centers soft.
-
Cool 5 min on sheets, then transfer to a wire rack.
Notes
-
Peppermint Bark: Swap white chocolate for chopped peppermint bark.
-
Spiced Holiday: Add ½ tsp cinnamon + pinch of nutmeg to dry mix.
-
Nutty Crunch: Fold in ¾ cup toasted pecans or walnuts.
-
Double Chocolate: Replace ¼ cup flour with cocoa powder.
- Prep Time: 20 min
- Cook Time: 10–12 min
Nutrition
- Calories: 180 cal Per Serving
- Fat: 9g
- Carbohydrates: 23g
Nutritional Information (Approximate, Per Cookie)
This is just a general estimate and will vary based on specific ingredients used.
- Calories: 180 kcal
- Fat: 9g
- Sugar: 15g
- Carbohydrates: 23g
Final Thoughts: Share the Love & the Cookies
Well, friend, we’ve reached the best part: the eating. I hope your kitchen is filled with that incredible holiday scent and your cooling rack is stacked high with these beautiful, festive cookies.
More than just a recipe, I hope this becomes a moment of joy in your season. I hope you find yourself licking batter off your thumb, laughing as you crush candy canes, and feeling that deep, simple satisfaction of creating something wonderful with your own hands.


