
A Love Letter in Layers: White Chocolate Raspberry Tiramisu
Picture this: It’s the evening of February 13th. You want to create a stunning, romantic dessert for tomorrow, but the thought of tempering chocolate or mastering a delicate pastry makes you want to hide under a blanket. Sound familiar? Friend, I’ve been there. That’s exactly why I’m pulling you into my kitchen today to share one of my all-time favorite secrets: the most elegant, show-stopping desserts are often the least complicated to make.
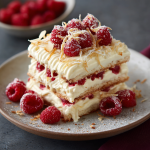
Enter this dreamy White Chocolate Raspberry Tiramisu. Imagine sweet-tart raspberry syrup soaking into delicate ladyfingers, layered with a cloud of mascarpone cream that’s been kissed with white chocolate, all finished with a delicate snowfall of more chocolate on top. It’s a symphony of textures and flavors—creamy, fruity, and just the right amount of sweet—that looks like it came from a fancy patisserie but comes together in your own kitchen, no oven required.
This isn’t just a dessert; it’s a mood. It’s the perfect centerpiece for a Valentine’s Day dinner, a Mother’s Day brunch, or any day you want to treat yourself and your people to something extraordinary. The best part? It must be made ahead of time, which means zero stress on the day you serve it. You get to be the cool, collected host who magically produces a masterpiece from the fridge. So, tie on that apron (the messy one is a badge of honor here), and let’s create some delicious magic together.
The Tiramisu That Started It All
My love affair with tiramisu began not in Italy, but in my tiny first apartment, with a very determined (and slightly clumsy) attempt to impress a date. I attempted a classic coffee version. Let’s just say my “quick dip” of the ladyfingers turned into a tragic, soggy collapse. The result was… a delicious puddle. A tasty, coffee-flavored puddle, but a puddle nonetheless.
That experience, though hilarious in hindsight, taught me the finesse of balance. Years later, for a summer dinner party, I wanted that same luxurious, layered feeling but with a bright, berry-forward twist. I thought of my grandma’s raspberry jam and the white chocolate bar I’d sneak from her pantry. The idea clicked! After a few tweaks (and remembering my earlier puddle lesson), this raspberry version was born. It’s since become my signature “I-care-about-you” dessert. It says “love” and “celebration” in every bite, without any of the pastry-chef pressure. It’s the dessert that proves beautiful things can come from happy little kitchen experiments—even the ones that start as puddles.
Gathering Your Flavor Magic
Here’s what you’ll need to build this masterpiece. Don’t be intimidated by the list—it’s mostly simple things, and I’ll walk you through the why and how of each one.
- 4 cups raspberries (fresh or frozen): The star of our show! Frozen berries are fantastic here—they’re picked at peak ripeness, often cheaper, and work perfectly for the syrup. Chef’s Insight: If using fresh, give them a taste. If they’re a little tart, you might not need to adjust anything. If they’re super sweet, you could reduce the sugar in the syrup by a tablespoon or two.
- ½ cup water & ¾ cup granulated sugar: Our simple syrup base. The water helps the berries break down, and the sugar balances their natural tartness to create a beautiful, glossy syrup.
- 1 tbsp lemon juice: The brightening agent! A little acid makes the raspberry flavor pop and prevents the syrup from being one-dimensionally sweet.
- 1½ cups heavy cream: This is for volume and that dreamy, cloud-like texture in our filling. Make sure it’s very cold—it whips up faster and higher. For a lighter option, you can use whipping cream, but the final cream will be slightly softer.
- 16 oz mascarpone cheese: The heart of any tiramisu. This Italian cream cheese is rich, buttery, and less tangy than American cream cheese. Pro-Tip: Let it sit on the counter for 15-20 minutes before using to take the chill off—it blends much more smoothly and avoids lumps.
- ¾ cup granulated sugar: For sweetening the mascarpone filling. It dissolves into the creamy mixture perfectly.
- 1 tsp vanilla extract: The flavor enhancer. It adds a warm, familiar depth that makes the whole dessert taste more “homemade.”
- 1 (7 oz) package Savoiardi ladyfingers: These are the long, dry, finger-shaped cookies. They’re perfect because they’re sturdy enough to hold their shape when dipped but porous enough to soak up all that gorgeous raspberry flavor. Substitution Tip: In a pinch, you can use soft ladyfingers (like the ones in the bakery section), but don’t dip them—just brush the syrup on lightly, or they’ll turn to mush.
- 1 oz good-quality white chocolate: For that elegant finish. Use a vegetable peeler or a fine grater to create delicate shavings. The better the chocolate, the better the flavor! I look for one with real cocoa butter.
Let’s Build This Beauty, Step-by-Step
Ready? Let’s get layering. I’ll be with you for each step with my best tips to ensure success.
Step 1: Make the Raspberry Syrup. In a medium saucepan, combine the raspberries and water. Cook over medium heat, gently mashing the berries with the back of a spoon or a potato masher. Let it simmer for just about 2 minutes—you just want to break them down and release their juices. Now, here’s the slightly tedious but totally worth it part: strain the mixture through a fine-mesh sieve into a bowl, pressing on the solids to get every last drop of that vibrant juice. Discard the seeds. Pour the beautiful juice back into the pan, add the sugar and lemon juice, and bring it back to a simmer. Let it cook for 4-5 minutes until it thickens just slightly—it should coat the back of a spoon. Pour it into a shallow dish or bowl and pop it in the fridge. We need this completely cold before we assemble! (This is a great do-ahead step.)
Step 2: Whip & Mix the Filling. First, grab a large bowl and your cold heavy cream. Using a hand mixer or stand mixer, whip the cream to stiff peaks. This means when you lift the beaters, the cream stands straight up. Set this bowl aside. In another large bowl, combine the (slightly softened) mascarpone, sugar, ¾ cup of your cooled raspberry syrup, and the vanilla. Beat this on medium speed until it’s completely smooth and creamy, scraping down the sides as needed. Now, the magic move: folding. Add about one-third of the whipped cream to the mascarpone mixture. Using a rubber spatula, gently cut through the center, sweep along the bottom, and fold over the top. Turn the bowl a quarter turn and repeat. This incorporates the cream without deflating all the air you whipped into it. Add the remaining whipped cream and fold gently until no white streaks remain. You should have a gloriously pink, fluffy cloud of filling.
Step 3: The Assembly Line. Grab your 8-inch square dish (a glass one is pretty for showing off the layers!). Take your package of ladyfingers and have your chilled syrup ready. Here is the GOLDEN RULE I learned from my puddle days: Dunk, don’t soak. Working quickly, dip one ladyfinger at a time into the syrup for just 1-2 seconds per side. You want it to be coated and softened but not saturated and falling apart. Immediately place it in your dish. Repeat, lining them up snugly in a single layer. You may need to break a few to fit the ends. Spread half of your magnificent mascarpone filling over the ladyfingers. Use an offset spatula or the back of a spoon to make it nice and even. Grab your white chocolate and grate or shave half of it right over this layer.
Step 4: Repeat & Rest. Create a second layer of quickly-dipped ladyfingers on top of the first cream layer. Gently spread the remaining filling over the top. This is your canvas! You can smooth it perfectly, or create pretty swirls with your spatula. Finish with the rest of the white chocolate shavings, covering the top in a delicate snowfall. Cover the dish tightly with plastic wrap. Now, the hardest part: walk away. You must let it chill in the fridge for at least 6 hours, but overnight is truly best. This waiting time is non-negotiable—it allows the flavors to marry, the ladyfingers to soften perfectly into cake-like layers, and the whole dessert to set so you get clean, beautiful slices.
Presenting Your Masterpiece
When it’s time to serve, I love to lean into the romance. For a clean slice, run a thin knife under hot water, wipe it dry, and then cut. Lift each portion out with a small spatula or pie server. Plate it on a simple, elegant dish. For a final flourish, add a few fresh raspberries on the side, a tiny mint leaf, or even a light dusting of powdered sugar. The contrast of the creamy white and pink layers against a dark plate is absolutely stunning. Serve it with a smile—you’ve just made something incredible!
Make It Your Own: Delicious Twists
Love the base recipe? Try one of these fun variations next time!
- Chocolate Raspberry Dream: Add 1/4 cup of sifted cocoa powder to the mascarpone filling along with the sugar. Use a microplane to grate a little dark chocolate over the top instead of white for a decadent twist.
- Lemon-Raspberry Bliss: Add the zest of one lemon to the mascarpone filling. It brightens everything up beautifully!
- Berry Medley: Use a mix of frozen berries (raspberries, blackberries, blueberries) for the syrup. The flavor will be deeper and more complex.
- Gluten-Free & Alcohol-Free: Use your favorite gluten-free ladyfingers or a thin gluten-free sponge cake sliced into strips. The recipe is naturally alcohol-free, making it great for all guests.
- Individual Portions: Assemble in pretty glasses or mason jars for adorable, ready-to-go desserts. Just break the ladyfingers to fit!
From My Kitchen to Yours: A Few Final Thoughts
This recipe has been my faithful friend for years, and it has never let me down. I’ve made it in a frantic hurry for last-minute guests (the long chill time is a lifesaver) and I’ve made it slowly, savoring the process for a special anniversary. It always feels like a gift. One of my favorite kitchen stories involves making this for a friend’s wedding shower. I doubled the recipe in my biggest trifle bowl, and it was such a hit that I ended up writing the recipe on about twenty napkins for guests! That was the moment I knew I had to start sharing these recipes properly. Over time, I’ve learned that the quality of the mascarpone makes a huge difference—splurge on the good stuff if you can. And remember, the messy apron is part of the fun. A little pink syrup on your sleeve is just a badge of a dessert made with love.
Your Questions, Answered
Q: My filling seems runny/soft. What happened?
A: This usually has two culprits: 1) The mascarpone was too cold when mixed, causing it to seize or not blend smoothly, or the whipped cream was over-beaten and started to separate (butter). Ensure your mascarpone is slightly softened, and stop whipping the cream as soon as stiff peaks form. Also, make sure your raspberry syrup is completely cool before adding it. Don’t worry—even if it’s soft, after the long chill it will still set up and taste amazing.
Q: Can I make this more than a day ahead?
A: Absolutely! You can assemble it up to 48 hours in advance. The flavors will continue to develop and meld. Just keep it tightly covered. I don’t recommend freezing it, as the texture of the creamy filling can become grainy.
Q: I can’t find mascarpone. Is there a substitute?
A: In a true pinch, you can use full-fat, brick-style cream cheese. Let it soften completely, and beat it with 2 tablespoons of sour cream or heavy cream to mimic mascarpone’s richer, looser texture. The flavor will be slightly tangier but still delicious.
Q: My ladyfinger layer seems dry/hard. Help?
A: This means they needed just a touch more time in the syrup. Next time, try a 3-second dip per side. For this batch, no one will notice once they dig into the creamy layers! The moisture from the filling will also continue to seep into them as it chills.
White Chocolate Raspberry Tiramisu : No-Bake Valentine’s Dessert with Mascarpone
Description
This White Chocolate Raspberry Tiramisu is one of those desserts that feels fancy but is secretly easy. It’s layered with raspberry-soaked ladyfingers, fluffy mascarpone cream, and delicate white chocolate, creating a balance of sweet, creamy, and fruity in every bite. Best of all, it’s completely no-bake and actually better when made ahead — perfect for special occasions or stress-free hosting.
Ingredients
Raspberry Syrup
-
4 cups raspberries (fresh or frozen)
-
½ cup water
-
¾ cup granulated sugar
-
1 tbsp lemon juice
Cream Filling
-
1½ cups cold heavy cream
-
16 oz mascarpone cheese, slightly softened
-
¾ cup granulated sugar
-
¾ cup cooled raspberry syrup (from above)
-
1 tsp vanilla extract
Layers & Finish
-
1 package ladyfingers (savoiardi style, about 7 oz)
-
1 oz good-quality white chocolate, finely shaved or grated
-
Optional garnish: fresh raspberries, mint leaves
Instructions
1️⃣ Make the Raspberry Syrup
-
Add raspberries and water to a saucepan over medium heat.
-
Cook 2–3 minutes, mashing berries to release juice.
-
Strain through a fine sieve into a bowl; discard seeds.
-
Return liquid to pan, add sugar and lemon juice.
-
Simmer 4–5 minutes until slightly thickened.
-
Chill completely before using.
2️⃣ Make the Cream Filling
-
In a large bowl, whip cold heavy cream to stiff peaks. Set aside.
-
In another bowl, beat mascarpone, sugar, vanilla, and ¾ cup cooled raspberry syrup until smooth.
-
Gently fold whipped cream into mascarpone mixture in two additions until fluffy and uniform.
3️⃣ Assemble the Tiramisu
-
Quickly dip each ladyfinger in the cold raspberry syrup — 1–2 seconds per side only.
-
Arrange a single layer in an 8-inch square dish.
-
Spread half the cream filling over top.
-
Sprinkle with half the white chocolate.
-
Repeat with another dipped ladyfinger layer and remaining cream.
-
Finish with remaining white chocolate.
4️⃣ Chill
-
Cover and refrigerate at least 6 hours, preferably overnight.
-
This step is essential for clean slices and full flavor.
Notes
-
Cold cream whips better — keep it refrigerated until needed.
-
Room-temp mascarpone blends smoother and prevents lumps.
-
Dip, don’t soak ladyfingers or layers will collapse.
-
Cool the syrup fully before mixing into the cream.
-
For neat slices, cut with a knife dipped in hot water and wiped dry.
Nutritional Information (Per Serving, Approximate)
This information is an estimate based on the specific ingredients used. Servings: 9.
Calories: ~420 | Fat: 28g | Saturated Fat: 17g | Carbohydrates: 38g | Fiber: 2g | Sugar: 27g | Protein: 6g
Final Thoughts
A Love Letter in Layers: White Chocolate Raspberry Tiramisu
As I sit here writing this, a chilled slice of this pink-and-white beauty sits beside me, fork poised for one last bite. The ladyfingers have softened into the most perfect cake-like texture, the mascarpone is cloud-soft and whisper-sweet, and every few bites, a burst of bright raspberry cuts through like a happy surprise. This, right here, is what I hoped to share with you—not just a recipe, but a feeling.
You know, we often reserve desserts like this for “special occasions.” Valentine’s Day. Anniversaries. Dinner parties where we want to impress. But here’s what I’ve learned after making this tiramisu more times than I can count: you are a special occasion. The Tuesday night when you need something beautiful to look forward to after a long day? That counts. The lazy Sunday afternoon when you want to fill your kitchen with something that smells like love? That counts, too.
This recipe has traveled with me through so many seasons of life. It was there for that long-ago puddle-disaster that taught me to laugh at my kitchen mistakes. It was there for summer barbecues and winter birthdays. It was scribbled on napkins at a wedding shower and photographed in golden afternoon light for this very post. And now, it’s here for you.
What I want you to take away from all of this—beyond the technique of the perfect ladyfinger dunk (just 1-2 seconds, friend, I’m serious!) and the magic of folding whipped cream—is this: you are capable of creating something stunning. No culinary degree required. No fancy equipment needed. Just a little patience, a willingness to get a smear of raspberry syrup on your favorite apron, and the desire to make something with your own two hands that says, “I care about you.”
Because at its heart, that’s what food is, isn’t it? It’s love made visible. It’s “I see you” and “you matter” and “let’s sit down together and savor something sweet.” In a world that often feels rushed and disconnected, taking the time to layer ladyfingers and whip cream and grate chocolate over a waiting dessert is a small act of rebellion. It’s choosing presence. It’s choosing to slow down.
So whether you’re making this for a Valentine, a mother, a friend, or just for yourself on a quiet evening—know that the effort, however small, matters. The messy kitchen matters. The anticipation as it chills overnight matters. And that first bite, when all the layers come together in perfect harmony? That matters most of all.
Now go on. Tie on that apron (messy is beautiful, remember?). Gather your raspberries and your mascarpone and your patience. And make something that tastes like love.
I’ll be right here, cheering you on.


