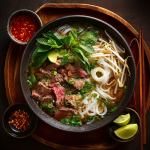
Your Kitchen Awaits: The Ultimate Bowl of Comfort
Hey there, friend! Come on in, pull up a stool. Can you smell that? It’s the scent of toasted spices, rich beef broth, and fresh herbs wafting through the air—it’s pure magic, I tell you. There’s something almost sacred about a steaming bowl of pho. It’s not just soup; it’s a warm hug from the inside out, a fragrant journey to the bustling streets of Hanoi, and the ultimate comfort food that somehow feels both light and deeply satisfying all at once.
I know what you might be thinking: “Olivia, that sounds incredible, but pho is restaurant food. It’s too complicated for my kitchen!” I’m here to tell you, with a warm heart and a (slightly) messy apron, that you can absolutely create this masterpiece at home. You don’t need a professional kitchen or a secret family recipe. All you need is a little time, a few key ingredients, and a sense of adventure. We’re going to demystify this Vietnamese classic together, turning simple, wholesome ingredients into a soul-warming experience that will have everyone at your table begging for seconds. So, grab your favorite pot, and let’s make some magic!
The Bowl That Started It All
My love affair with pho began not in a fancy restaurant, but in a tiny, hole-in-the-wall spot during a rain-soaked afternoon in college. My best friend, Linh, who is Vietnamese-American, dragged me in, promising it would “fix my soul” after a particularly grueling week of midterms. I was skeptical. It was just soup, right?
Oh, how wrong I was. The moment that enormous bowl was set in front of me, I was captivated. The aroma was a complex symphony of star anise, ginger, and beef. I watched Linh expertly squeeze lime, tear herbs, and add a dot of sriracha, customizing her bowl into a personal work of art. I followed her lead, and that first spoonful? It was a revelation. The rich, clear broth, the tender beef, the springy noodles—it was pure, unadulterated comfort. It wasn’t just a meal; it was a moment of connection, of warmth, of shared joy. That bowl taught me that the best food isn’t about perfection; it’s about heart, history, and the people you share it with. It’s a feeling I’ve been trying to recreate in my own kitchen ever since, and now I get to share it with you.
Gathering Your Pho-nomenal Ingredients
Don’t let the list intimidate you! Many of these are pantry staples, and the fresh components are easy to find at most well-stocked grocery stores or Asian markets. The magic is in the layering of these flavors.
For the Aromatic Broth:
- 1 onion, halved & 1 (3-inch) piece of ginger, halved: We’re going to char these! This isn’t just for looks; it adds a incredible smoky depth that is the secret backbone of a great pho. Chef’s Insight: No broiler? A dry cast-iron skillet on high heat works perfectly!
- 2 star anise: The rockstar of pho spices! It provides that iconic, sweet, licorice-like fragrance. Please don’t skip this—it’s what makes pho, well, pho!
- 3 cloves & 1 cinnamon stick: These warm spices add complexity and round out the flavor profile. Sub Tip: If you only have ground cinnamon, use about 1/4 teaspoon and add it directly to the broth (but whole is best!).
- 1 tbsp coriander seeds: They bring a subtle, citrusy warmth. Toasting them unlocks their beautiful aroma.
- 4 cups beef broth & 2 cups water: Using a good-quality, low-sodium beef broth gives you a head start on flavor. The water ensures the broth isn’t too overpowering.
- 1 tbsp fish sauce: This is your umami powerhouse! It adds a savory, salty depth, not a “fishy” taste. Sub Tip: For a vegetarian version, use soy sauce or tamari, but the flavor will shift.
- 1 tsp sugar: Just a touch to balance the salty and savory notes. Palm sugar is traditional, but white or brown sugar works fine.
- Salt to taste: Always taste at the end! Between the broth and fish sauce, you might need just a pinch.
For the Bowls & Garnishes (The Fun Part!):
- 8 oz rice noodles (pho-style): Look for flat, dry rice noodles labeled “Banh Pho.” Chef’s Hack: Soak them in hot water before assembling to make them perfectly tender and prevent them from sucking up all your glorious broth.
- 1/2 lb very thinly sliced raw beef (sirloin or flank): The key word is thin. Partially freezing the beef for 30-60 minutes makes it infinitely easier to slice paper-thin. The hot broth will cook it perfectly.
- Fresh herbs, bean sprouts, lime, etc.: This is where you make it your own! Thai basil, cilantro, mint, crisp bean sprouts, sharp chilies, and tangy lime wedges are non-negotiable for that fresh, vibrant contrast. Hoisin (sweet) and sriracha (spicy) on the side let everyone customize their bowl to their heart’s content.
Let’s Build Some Flavor: Step-by-Step Pho
Ready? Apron on, let’s do this! The process is simple and incredibly rewarding.
- Char Your Aromatics: Place your halved onion and ginger cut-side down in a dry skillet over medium-high heat. Let them blacken and char for about 5-7 minutes. You’re not burning them; you’re building flavor. Alternatively, you can place them on a baking sheet and broil for a few minutes per side. Once charred, you can even give the ginger a light whack with your knife to help release its juices. Set aside.
- Toast Those Spices: In your large soup pot, add the star anise, cloves, cinnamon stick, and coriander seeds. Toast them over medium heat for 2-3 minutes, until they become incredibly fragrant. This wakes up the essential oils and is a total game-changer. Chef’s Tip: Don’t walk away! Spices can go from toasted to burnt in a flash.
- Simmer Your Broth: Carefully pour in the beef broth and water—it might sizzle a bit! Add the charred onion and ginger. Stir in the fish sauce and sugar. Bring it all to a boil, then immediately reduce the heat to low, cover, and let it simmer gently for 30-40 minutes. Your kitchen will smell like heaven. This is the time to taste and adjust with a pinch of salt if needed.
- Strain and Shine: After simmering, place a fine-mesh strainer over another large pot or bowl. Carefully pour the broth through the strainer to catch all the spices and aromatics. You’re left with a beautiful, clear, aromatic broth. Discard the solids—they’ve given their all! Return the strained broth to the pot and keep it on a very low simmer. This is your liquid gold.
- Noodle Prep: While the broth is simmering, prepare your rice noodles according to the package directions. Usually, this involves soaking them in hot water until they are pliable and tender. Drain them well and divide them equally among your four serving bowls.
- The Grand Finale—Assembly! This is the best part. Arrange your thinly sliced raw beef on top of the noodles in each bowl. The heat from the broth will cook it. Ladle the piping hot broth directly over the beef and noodles. You’ll see the beef turn from pink to perfectly cooked in seconds. Now, the stage is set for your garnishes!
Setting the Stage: How to Serve Pho
Pho is an interactive experience! Serve it immediately while the broth is scalding hot. Bring the bowls to the table alongside large platters piled high with all the fresh garnishes: herb sprigs, bean sprouts, lime wedges, sliced chili, and small dishes of hoisin and sriracha. Encourage everyone to dive in, customizing their bowl by tearing herbs, squeezing lime, and adding as much or as little heat as they like. The act of building the perfect bite is half the fun. Don’t forget the soup spoons and chopsticks!
Make It Your Own: Delicious Pho Variations
The beauty of this recipe is its flexibility. Don’t be afraid to play!
- Chicken Pho (Pho Ga): Swap the beef broth for chicken broth and use thinly sliced cooked chicken breast or shredded rotisserie chicken instead of raw beef.
- Vegetarian/Vegan Pho: Use a rich vegetable broth and swap the fish sauce for soy sauce or tamari. Load up the bowls with tofu, shiitake mushrooms, and extra veggies like bok choy or broccoli.
- Spicy Sriracha Bomb: For heat lovers, stir a teaspoon of sriracha directly into the broth while it simmers for a pervasive, warming spice.
- Breakfast Pho: Top your bowl with a soft-boiled or poached egg for an extra protein-packed, luxurious twist.
From My Kitchen to Yours: Chef’s Notes
This recipe has evolved so much since I first tried to replicate that life-changing bowl from college. My first attempt was… edible. The broth was weak, I didn’t char the aromatics, and I definitely overcooked the beef. But every time I made it, I learned something new. I learned that toasting the spices is non-negotiable. I learned that a sharp knife is your best friend for that paper-thin beef. Most importantly, I learned that pho is forgiving. It doesn’t demand perfection; it just asks for a little patience and a lot of heart.
One of my favorite kitchen memories is the time I was so excited to serve pho to friends that I completely forgot to strain the broth! We spent the meal fishing whole star anise and cloves out of our bowls, laughing the entire time. It was still delicious, and it’s now a running joke. So please, don’t stress. Embrace the process, and remember: even “imperfect” homemade pho is still a glorious thing.
Pho FAQs: Your Questions, Answered!
Q: My broth tastes a bit flat. What can I do to give it more depth?
A: This is common! First, ensure you really charred your onion and ginger—that smokiness is key. Second, double-check that you toasted your spices long enough to make them fragrant. Lastly, don’t be shy with the fish sauce! It’s your primary seasoning. Add another half tablespoon, let it simmer for 5 more minutes, and taste again. A squeeze of lime at the end can also brighten everything up.
Q: How can I get my beef super thin without a deli slicer?
A: The freezer is your secret weapon! Place your piece of beef (sirloin or flank work best) in the freezer for about 30-45 minutes. It will firm up significantly, making it infinitely easier to slice into those delicate, paper-thin slices using a very sharp chef’s knife. Just be careful with your fingers!
Q: Can I make the broth ahead of time?
A: Absolutely! In fact, many argue it tastes even better the next day. Let the broth cool completely, then store it in an airtight container in the refrigerator for up to 3 days, or freeze it for up to 3 months. When you’re ready to serve, simply reheat it to a rolling boil.
Q: My noodles are gummy or stuck together. Help!
A: This usually means they were overcooked or not drained well enough. Follow the package directions for soaking (not boiling) carefully. After draining, you can even give them a quick rinse with cold water to stop the cooking process and toss them with a tiny drop of oil to prevent sticking.
Vietnamese Pho with Beef & Star Anise
Description
This simplified version of the Vietnamese classic delivers incredible, aromatic flavor without requiring hours of simmering. It’s a warm, comforting, and interactive meal that’s perfect for a cozy night in.
Ingredients
For the Aromatic Broth:
-
1 yellow onion, halved
-
1 (3-inch) piece of ginger, halved lengthwise
-
2 whole star anise
-
3 whole cloves
-
1 cinnamon stick
-
1 tbsp coriander seeds
-
4 cups low-sodium beef broth
-
2 cups water
-
1 tbsp fish sauce
-
1 tsp sugar (palm, white, or brown)
-
Salt, to taste
For the Bowls:
-
8 oz dried flat rice noodles (Banh Pho)
-
1/2 lb beef sirloin or flank steak, very thinly sliced
For Serving (The Garnish Tray):
-
Fresh Thai basil or mint sprigs
-
Fresh cilantro sprigs
-
Bean sprouts
-
Lime wedges
-
Sliced jalapeño or Thai chili
-
Hoisin sauce
-
Sriracha
Instructions
1. Char the Aromatics:
-
Place the halved onion and ginger cut-side down in a dry skillet over medium-high heat. Cook for 5-7 minutes until deeply charred and fragrant. (Alternatively, broil on a baking sheet for a few minutes per side). Set aside.
2. Toast the Spices:
-
In a large soup pot, add the star anise, cloves, cinnamon stick, and coriander seeds. Toast over medium heat for 2-3 minutes until fragrant. Do not burn.
3. Simmer the Broth:
-
Carefully add the beef broth, water, charred onion, ginger, fish sauce, and sugar to the pot. Bring to a boil, then reduce heat to low. Cover and simmer gently for 30 minutes to let the flavors meld.
-
Taste and adjust seasoning with more fish sauce or a pinch of salt if needed.
4. Prepare the Noodles:
-
While the broth simmers, place the rice noodles in a large bowl and cover with hot water. Soak according to package directions (usually 15-20 minutes) until soft and pliable. Drain well.
5. Strain the Broth:
-
Place a fine-mesh strainer over another pot. Pour the broth through to strain out and discard all the solids (spices, onion, ginger). Return the clear broth to the pot and keep it at a low simmer.
6. Assemble the Bowls:
-
Divide the drained noodles among four large bowls. Top each with a pile of the thinly sliced raw beef.
-
Ladle the piping hot broth directly over the beef and noodles. The hot broth will cook the beef perfectly.
7. Serve Immediately:
-
Serve the bowls immediately, accompanied by all the fresh garnishes and sauces. Let everyone customize their own bowl.
Notes
-
Slice Meat Thinly: Partially freeze the beef for 30-45 minutes first; it will be much easier to slice paper-thin.
-
Don’t Skip the Char: Charring the onion and ginger is essential for that classic, smoky pho depth.
-
Broth is Key: Use a good-quality, low-sodium beef broth as your base. The straining step ensures a beautifully clear broth.
-
Make-Ahead: The broth can be made up to 3 days in advance and refrigerated, or frozen for 3 months. Reheat to a boil before assembling bowls.
Nutrition
- Calories: 380 cal Per Serving
- Sodium: 900mg
- Fat: 15g
- Carbohydrates: 35g
- Protein: 28g
Nutritional Information*
Per serving (approx. 1 bowl): Calories: ~380 | Protein: 28g | Carbohydrates: 35g | Fat: 15g | Sodium: ~900mg
*Please note: This is an estimate based on the ingredients used and can vary significantly based on specific brands, portion sizes, and garnishes added. The sodium level can be controlled by using low-sodium broth and adjusting the fish sauce to taste.
Final Thoughts
Embarking on the journey to make homemade pho is about so much more than replicating a restaurant favorite. It is an invitation to slow down, to engage deeply with the process of cooking, and to discover the profound satisfaction that comes from creating something complex and beautiful with your own hands. It teaches invaluable kitchen lessons: the transformative power of fire on aromatics, the magic unlocked by toasting whole spices, and the importance of balancing flavors with patience and care.