
Toasted Marshmallow S’mores Cookies: Your New Favorite Treat!
Hello, my fellow flavor seekers! Olivia here, welcoming you back to my cozy kitchen corner. Is there anything in this world that captures pure, unadulterated joy quite like the smell of something incredible baking in the oven? That warm, buttery, sugary aroma that wafts through the house and promises something magical is about to happen. It’s my favorite form of welcome home. And today, my friends, we are creating pure magic. We’re taking everything we love about a crackling campfire, the sticky-sweet fun of toasting marshmallows, and the classic chocolate-graham combo, and we’re baking it all into one unforgettable cookie.
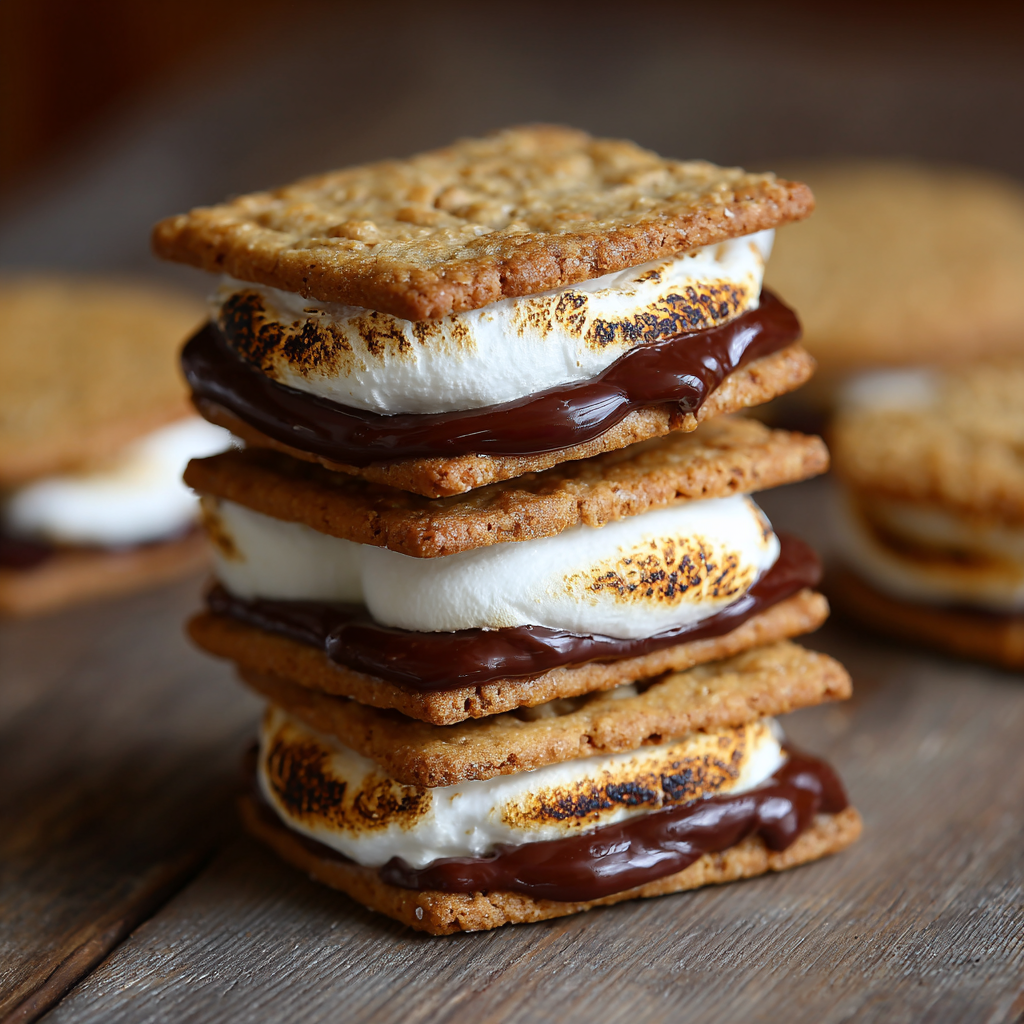
These aren’t just any cookies. These are Toasted Marshmallow S’mores Cookies. Imagine a cookie dough that tastes like the most buttery, cinnamon-kissed graham cracker you’ve ever had, studded with pools of melty chocolate and pockets of gooey, toasted marshmallow. And then we take it a step further with a final torch kiss that gives it that authentic, nostalgic campfire finish. No kindling required, just your trusty oven (and maybe a kitchen torch for some extra fun). This recipe is for anyone who has ever wished they could capture the essence of a perfect summer night and enjoy it all year round. So, tie on your favorite apron—it might get a little messy, and that’s how we know we’re doing it right—and let’s bake some joy.
A Story by Firelight
This recipe was born from a serious case of s’mores envy. You see, my husband and I live in a cozy little apartment with a strict no-open-flames-on-the-balcony policy (buzzkill, I know). One dreary January evening, we were watching a movie where characters were happily roasting marshmallows over a perfect campfire, and the craving hit us both like a ton of bricks. We needed s’mores. Right then.
We did the sad, apartment-dweller version: marshmallows gingerly toasted over a gas stove burner and hastily sandwiched between graham crackers and chocolate. It was… a valiant effort, but it was messy, uneven, and left us wanting more. That’s when the lightbulb went off. What if we could bake that exact feeling into a cookie? A portable, shareable, infinitely better version that we could enjoy anytime? After a few (dozen) deliciously messy test batches, these cookies were the glorious result. They now are our go-to for satisfying that campfire craving, no fire escape necessary. They taste like a hug from a happy memory.
Gathering Your Cookie Crew (The Ingredients!)
Here’s your shopping list for happiness. The beauty of this recipe is in its simplicity and the power of its parts. Let’s break it down:
- 1 cup (2 sticks) unsalted butter, softened – This is the foundation of our rich, tender cookie. Chef’s Insight: “Softened” means it should give slightly when you press it, but your finger shouldn’t sink right through. If you forget to take it out of the fridge, you can cut it into chunks and it will soften faster! For a deeper flavor, try browning one of the sticks of butter first and letting it cool slightly.
- ¾ cup brown sugar (packed) & ½ cup granulated sugar – The dynamic duo! Brown sugar brings moisture and that warm, caramel-like molasses flavor, while white sugar helps the cookies spread and gives them a lovely crisp edge.
- 2 large eggs – Our binding agents, bringing everything together. Make sure they’re at room temperature to emulsify properly with the butter and sugar for a smoother dough.
- 2 tsp vanilla extract – The flavor enhancer. Don’t skimp! Pure vanilla extract makes a world of difference.
- 1 ¾ cups all-purpose flour – The main structure of our cookie. For a slightly chewier cookie, you can swap in ¼ cup of bread flour.
- 1 cup graham cracker crumbs – The secret weapon! This is what gives the cookie its iconic s’mores flavor. You can buy pre-crumbled crumbs or just pulse whole graham crackers in a food processor until fine.
- 1 tsp baking soda – Our leavening agent, helping the cookies rise and become perfectly puffy.
- ½ tsp salt – Crucial for balancing all the sweetness and making the flavors pop. If you only have salted butter, just reduce this to a ¼ tsp.
- 1 ½ cups chocolate chunks or chips – I am a firm believer in chunks for those beautiful, melty chocolate pockets. But chips work perfectly too! Use semi-sweet for classic s’mores vibes, or dark chocolate if you prefer a less sweet cookie.
- 1 ½ cups mini marshmallows – The mini ones distribute the gooey marshmallow goodness throughout the cookie perfectly. Sub Tip: If you only have large marshmallows, just scissor them into smaller pieces!
- Extra mini marshmallows + chocolate for topping – This is for that picture-perfect, professional-looking finish after baking.
Let’s Get Baking: The Step-by-Step Fun!
Okay, team! Let’s turn these ingredients into cookie magic. Read through all the steps first—it’s like reading the map before a road trip!
Step 1: Preheat your oven to 350°F (175°C). This is non-negotiable for even baking. Line your baking sheets with parchment paper. Chef’s Hack: If you don’t have parchment, you can use a silicone baking mat or even just give the pan a very light greasing, but parchment is the MVP for no-stick cleanup.
Step 2: In a large bowl, cream together the softened butter, brown sugar, and granulated sugar. Use an electric mixer on medium speed for about 2-3 minutes. We’re not just mixing; we’re “creaming.” This process incorporates air into the butter and sugar, which is what gives our cookies that light, slightly cakey texture instead of being dense. You’ll know it’s ready when the mixture turns pale yellow and looks fluffy.
Step 3: Beat in the eggs one at a time, making sure each egg is fully incorporated before adding the next. This ensures a smooth, emulsified batter. Then, mix in the vanilla extract. Scrape down the sides of the bowl with a spatula—this is a key step to make sure everything is evenly mixed!
Step 4: In a separate, medium-sized bowl, whisk together the all-purpose flour, graham cracker crumbs, baking soda, and salt. Whisking these dry ingredients separately does two things: it ensures the baking soda and salt are evenly distributed, and it aerates the flour, making your cookies lighter. Gradually add the dry ingredients to the wet ingredients, mixing on low speed just until the flour disappears. Pro Tip: Do not overmix at this stage! Overmixing develops gluten and can lead to tough cookies.
Step 5: Now for the fun part! Use a sturdy spatula or wooden spoon to fold in the 1 ½ cups of chocolate chunks and the 1 ½ cups of mini marshmallows. Fold gently until they’re evenly distributed throughout the dough.
Step 6: Using a cookie scoop (about 1.5 tablespoons in size), drop rounded balls of dough onto your prepared baking sheets, leaving about 2 inches between them because they will spread. Now, take your extra marshmallows and chocolate pieces and gently press a few onto the top of each dough ball. This guarantees that gorgeous, bakery-style look with visible goodies on top.
Step 7: Bake for 10-11 minutes. The cookies might still look a little soft in the middle—that’s perfect! They will continue to set as they cool on the hot baking sheet. You’re looking for golden brown edges. Let them cool on the baking sheet for at least 5 minutes before transferring them to a wire rack to cool completely. This patience prevents cookie breakage!
Step 8: The Grand Finale – The Toast! If you have a kitchen torch, gently wave the flame over the top of each marshmallow on the warm cookies until they are golden brown and toasty. If you don’t have a torch, no worries! Simply place the cookie sheet under your oven’s broiler for 30-60 seconds. WATCH THEM CONSTANTLY. They can go from perfectly golden to completely charred in a heartbeat. This step gives you that authentic campfire flavor and smell!
How to Serve These Beauties
These cookies are a showstopper all on their own, piled high on a rustic wooden board or a cute plate. They are best served slightly warm when the chocolate is still gloriously melty. A cold glass of milk is their absolute best friend. For an over-the-top dessert, crumble one over a scoop of vanilla bean ice cream and maybe even drizzle with a little hot fudge. You’ve earned it.
Mix It Up! Recipe Variations
- Peanut Butter Cup: Swap the chocolate chunks for chopped peanut butter cups for a Reese’s-inspired twist.
- Salty Sweet: Fold in ½ cup of crushed pretzel pieces along with the chocolate and marshmallows. Finish with a light sprinkle of flaky sea salt after toasting.
- Gluten-Free: Use a 1:1 gluten-free all-purpose flour blend and ensure your graham crackers are a certified gluten-free brand.
- Campfire Cinnamon: Add ½ teaspoon of ground cinnamon to the dry ingredients for an extra warm spice note.
- Dark Forest: Use dark chocolate chunks and dried tart cherries for a more sophisticated, grown-up flavor profile.
Chef’s Notes & Kitchen Confessions
This recipe has seen some things, my friends. The first time I tested it, I made the rookie mistake of mixing the marshmallows in with the electric mixer. Let’s just say I created a pink, sticky, marshmallow-fluff dough that was… interesting, but not what we were going for. Folding them in by hand is the only way! I’ve also learned that the broiler method requires the vigilance of a hawk. I may have set off the smoke alarm once (or twice) in pursuit of the perfect toast. It’s all part of the adventure! These cookies have become my signature bake for potlucks and cookie swaps—they always disappear first and someone always asks for the recipe. That’s the biggest compliment a home cook can get.
Your Questions, Answered!
Q: My marshmallows completely melted and disappeared into the cookie! What happened?
A: This usually means they were over-mixed into the dough or the dough was too warm. Make sure to fold them in gently at the very end, and if your kitchen is very hot, you can even chill the dough for 15-20 minutes before scooping and baking. Also, using mini marshmallows (instead of large ones you’ve cut) helps them hold their shape better.
Q: Can I make the dough ahead of time and bake it later?
A: Absolutely! Scoop the dough balls onto a baking sheet, freeze them until solid, and then transfer them to a freezer bag. You can bake them straight from the freezer; just add 1-2 minutes to the baking time. It’s the best way to have fresh, warm cookies on demand!
Q: My cookies spread too much and came out flat.
A: This is likely because your butter was too warm or your baking sheet was still warm from a previous batch. Make sure your butter is just softened, not melted. And always allow your baking sheets to cool completely between batches. Chilling the dough for a bit can also help prevent overspreading.
Q: I don’t have a kitchen torch and I’m scared of the broiler. Can I skip the toasting step?
A: You can, and they’ll still be delicious cookies! But that final toast is what really gives them the authentic s’mores flavor and wow factor. If you’re broiler-shy, just try it with one cookie first to get a feel for the timing. It’s worth conquering the fear!

Toasted Marshmallow S’mores Cookies
- Total Time: 25 min
Description
Bring the magic of a campfire into your kitchen with these gooey, chocolate-studded s’mores cookies. Every bite is a mix of buttery graham-cracker dough, melty chocolate, and toasted marshmallows—no fire pit required! Perfect for sharing, gifting, or keeping all to yourself, they’ll quickly become the treat everyone requests.
Ingredients
-
1 cup (2 sticks) unsalted butter, softened
-
¾ cup brown sugar (packed)
-
½ cup granulated sugar
-
2 large eggs (room temperature)
-
2 tsp vanilla extract
-
1 ¾ cups all-purpose flour
-
1 cup graham cracker crumbs
-
1 tsp baking soda
-
½ tsp salt
-
1 ½ cups chocolate chunks or chips
-
1 ½ cups mini marshmallows
-
Extra chocolate & marshmallows (for topping)
Instructions
-
Preheat oven to 350°F (175°C). Line baking sheets with parchment.
-
Cream butter + sugars until light and fluffy (2–3 min).
-
Beat in eggs one at a time, then add vanilla.
-
In another bowl, whisk flour, graham crumbs, baking soda, salt. Add to wet mix; stir just until combined.
-
Fold in chocolate and marshmallows.
-
Scoop dough balls (1.5 tbsp each) onto baking sheet, 2 inches apart. Top with extra marshmallows & chocolate.
-
Bake 10–11 min, until golden at edges but soft in center. Cool 5 min before transferring.
-
Optional magic: Torch marshmallows OR broil 30–60 sec for a toasted finish.
- Prep Time: 15 min
- Cook Time: 10–11 min
Nutrition
- Calories: 200 cal Per Serving
- Fat: 10g
- Saturated Fat: 6g
- Carbohydrates: 26g
Nutritional Information*
*Estimated values per cookie
Calories: ~200 | Fat: 10g | Saturated Fat: 6g | Carbohydrates: 26g | Sugar: 15g | Protein: 2g
Final Thoughts: More Than Just a Cookie
So, there you have it. The cookie that brings the campfire into your kitchen, no permit required. These Toasted Marshmallow S’mores Cookies are more than just a treat; they’re a experience. They’re the answer to a winter craving, the star of the summer potluck, and the secret to making any ordinary day feel a little bit magical.


