The Best Crispy Baked Chicken Nuggets – Healthy, Easy & Kid-Approved
Hey there, fellow flavor-seeker! Come on in, grab an apron (a messy one is totally welcome here), and let’s talk about one of life’s great universal joys: a really, really good chicken nugget. You know the kind. The ones with that irresistible, shatteringly crisp coating that gives way to the most tender, juicy bite of chicken. The kind that makes everyone, from the pickiest toddler to the most discerning foodie uncle, light up and ask for “just one more.”
For years, I thought that magical crunch was the exclusive domain of deep fryers and drive-thru windows. But then, through a little kitchen experimentation (and a few not-so-perfect batches), I cracked the code. I’m so excited to share with you my absolute favorite method for making crispy baked chicken nuggets that are not only healthier but, I swear, taste even better than the takeout kind. We’re talking golden-brown, audibly crunchy perfection on the outside, and perfectly moist and flavorful on the inside—all without a vat of oil in sight.
This recipe is my weeknight hero, my party pleaser, and my secret weapon for happy kids. It’s deceptively simple, uses pantry-friendly ingredients, and comes together in about 30 minutes. Whether you’re meal-prepping for easy lunches, hosting a game-day spread, or just need a surefire win for dinner tonight, these nuggets are your answer. So, preheat that oven, and let’s make some magic happen!
Why These Nuggets Hold a Special Place in My Heart (and Freezer)
My love affair with this recipe started not in a fancy test kitchen, but at my slightly wobbly kitchen table, covered in construction paper and glitter. It was my niece Lily’s 5th birthday, and she had one request: “Auntie Liv, can we have a nugget party? But the kind you make, not the box.” My heart melted, and then immediately panicked. Could my from-scratch version really compete with the iconic, salty bliss of her usual favorite?
I tweaked and tested, finally landing on this combo of toasted panko and simple spices. The moment I pulled that first tray out of the oven, the whole house smelled like a cozy, happy dream. Watching Lily’s eyes go wide as she took her first bite, followed by a solemn, sauce-covered thumbs-up, was a victory sweeter than any five-star review. Now, I always keep a batch in the freezer. They’re my edible hug, my go-to for playdates, sick days, and those “I just need something delicious and uncomplicated” evenings. They remind me that the best recipes aren’t about perfection; they’re about connection, one crispy, joyful bite at a time.
Your Nugget Toolbox: Simple Ingredients, Big Flavor
Here’s everything you’ll need to create this crispy masterpiece. I’ve added my little chef notes next to each one because knowing your ingredients is the first step to kitchen confidence!
- 1 ½ cups panko breadcrumbs: This is the MVP of crunch! Panko is a Japanese-style breadcrumb that’s lighter, flakier, and crisps up way better than regular breadcrumbs. Chef’s Tip: Toasting them first is the non-negotiable secret for maximum crunch and golden color.
- Olive oil cooking spray: Helps the panko toast in the oven and gives our nuggets that beautiful, all-over crispness when we spray them before baking. You can use any neutral oil spray you like.
- 1 ½ tsp kosher salt: I prefer kosher salt for its clean taste. If using fine table salt, reduce to about 1 tsp to avoid over-salting.
- 1 tsp black pepper: Freshly ground is always best for the brightest flavor!
- 1 tsp onion powder & ½ tsp garlic powder: These dried wonders add a savory, aromatic base that permeates the coating. No chopping required!
- 1 tsp paprika: Sweet paprika adds a lovely color and a subtle, smoky warmth. Smoked paprika is a fantastic twist if you have it!
- ¼ tsp cayenne pepper (optional): Just a tiny pinch adds a background hum of warmth without being “spicy.” Feel free to skip it for super-sensitive palates.
- 2 large eggs: Our glue! They help the crunchy coating stick to the chicken beautifully.
- 2 tbsp almond milk (or milk of choice): A splash of milk lightens the egg wash just a touch. Any milk—dairy or non-dairy—works perfectly here.
- 1 ½ lbs boneless, skinless chicken breast: The star! Look for evenly-sized breasts for uniform nuggets. Pro Tip: For even more tender nuggets, you can use chicken thighs. They have more fat and stay incredibly juicy.
Let’s Get Cooking: Your Path to Crunchy Bliss
Okay, friends! It’s time to turn these ingredients into golden glory. Follow these steps, lean into my little hacks, and you’ll be a nugget maestro in no time.
Step 1: The Crunch Catalyst (Toast That Panko!)
Preheat your oven to 400°F (200°C). Now, take your panko breadcrumbs and spread them in a thin, even layer on a large, rimmed baking sheet. Give them a generous mist with your cooking spray. This bit of oil helps them toast evenly and get that perfect golden hue. Pop the tray in the oven for 5-6 minutes, but don’t walk away! Stir them around at the halfway mark. You’ll know they’re ready when they turn a light, toasty brown and smell wonderfully nutty. This step is the absolute game-changer—it locks in the crunch before the nuggets even hit the oven.
Step 2: Build Your Flavor Station
Transfer your beautifully toasted panko to a wide, shallow bowl—a pie plate works great here. Immediately stir in all your spices: the salt, pepper, onion powder, paprika, garlic powder, and that optional cayenne. Mixing the spices into the warm panko helps “wake up” their flavors. In a second shallow bowl, whisk your eggs and milk together until completely smooth and uniform. Set up an assembly line: chicken cubes, egg wash, seasoned panko, and finally, a baking sheet fitted with a wire rack that you’ve lightly sprayed with nonstick spray. The wire rack is another key player—it lets hot air circulate all around the nugget for 360-degree crispiness!
Step 3: The Coating Dance
Let’s get those hands messy! Take one piece of chicken and fully submerge it in the egg wash. Let the excess drip off for a second—this prevents a gloopy coating. Then, roll it firmly in the panko mixture, using your dry hand to press the crumbs onto all sides to form a solid, even crust. Place it on the wire rack. Repeat with all pieces, leaving a little space between each nugget on the rack so they crisp up instead of steam. Once they’re all coated, give the tops one more light, even mist of cooking spray. This final spray mimics the effect of frying, helping every nook and cranny turn golden and crisp.
Step 4: Bake to Perfection
Slide your loaded rack into the hot oven and bake for 15-20 minutes. Ovens can vary, so start checking at 15 minutes. You’re looking for a deep, golden-brown crust and an internal temperature of 165°F (74°C) on an instant-read thermometer. Trust me, the thermometer is your best friend for never-overcooked, always-juicy chicken. The nuggets will be firm to the touch and smell absolutely incredible. Let them cool on the rack for just a couple of minutes—this lets the coating set into its final, crunchy form.
Dipping & Serving: The Grand Finale
Now for the fun part! Pile these warm, crispy nuggets high on a big platter or into individual baskets. The serving options are endless! I love setting up a “dipping station” with small bowls of honey mustard, classic ketchup, tangy BBQ sauce, and maybe a creamy ranch or zesty marinara. For a full meal, tuck them into a soft bun with slaw for a killer sandwich, slice them over a big green salad, or serve them alongside some baked sweet potato fries and crunchy veggie sticks. They’re the ultimate crowd-pleasing centerpiece!
Mix It Up! Creative Twists on the Classic
Once you’ve mastered the base recipe, the world is your nugget! Try these easy variations:
- Parmesan-Herb: Add ½ cup finely grated Parmesan and 1 tbsp of dried Italian herbs to the panko mix.
- Gluten-Free: Use certified gluten-free panko breadcrumbs. Almond flour (toasted first) also makes a great crunchy coating.
- Extra Zesty: Add the zest of one lemon to the panko mixture and serve with a lemon-herb yogurt dip.
- Air Fryer Method: Cook at 400°F for 10-12 minutes, shaking halfway. They get insanely crispy!
- “Buffalo” Style: After baking, toss the hot nuggets in a mix of ¼ cup melted butter and ½ cup hot sauce. Serve with blue cheese dressing.
Olivia’s Kitchen Notes & Stories
This recipe has evolved from a “let’s see if this works” experiment to a rock-solid staple in my home. I’ve learned that patting the chicken pieces very dry before dipping is a small step with a big payoff—it helps the coating stick like a dream. And one time, I accidentally used seasoned croutons, blitzed into crumbs, when I was out of panko… and you know what? They were delicious! Don’t be afraid to improvise.
The biggest laugh came when my husband tried to “help” by coating an entire piece of chicken in just the spice mix, forgetting the panko entirely. We called it “Naked Nugget” and it was… intensely seasoned. We still joke about it. The moral? Cooking is supposed to be fun. A little mess, a little laughter, and a lot of flavor—that’s the real recipe.
Your Nugget Questions, Answered
Q: My coating sometimes falls off after baking. How can I prevent that?
A: The most common culprit is not letting the excess egg wash drip off. A quick drip ensures the coating is a thin, adhesive layer, not a thick, sliding one. Also, really press the panko on firmly! And finally, the wire rack is key—it prevents the bottom from getting soggy, which can loosen the crust.
Q: Can I make these ahead of time?
A: Absolutely! You have two great options: 1) Freeze before baking: Prepare nuggets up to placing them on the rack, then freeze solid on the rack before transferring to a freezer bag. Bake from frozen, adding 5-10 minutes to the time. 2) Reheat leftovers: To revive leftover nuggets, reheat them in a 400°F oven or toaster oven for 5-10 minutes. The microwave will make them soft.
Q: Can I use chicken thighs instead of breasts?
A: Yes, and they’ll be incredibly juicy! Just trim any excess fat and cut into even pieces. The baking time may be similar, but always use your thermometer to be sure.
Q: Are these really kid-approved?
A> From my own experience and the countless messages from readers, the resounding answer is YES! Letting kids help with the dipping and coating (expect mess!) or choose their own dips makes them even more invested. The familiar shape with the homemade, tastier flavor is a total win.
The Best Crispy Baked Chicken Nuggets : Healthy, Easy & Kid-Approved
Description
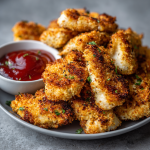
Hey there, fellow flavor-seeker! These crispy baked chicken nuggets are proof that you don’t need a deep fryer to get that crave-worthy crunch. With a golden, shatter-crisp coating and juicy, tender chicken inside, they’re everything we love about nuggets—only lighter, homemade, and just plain better.
Ingredients
-
1½ cups panko breadcrumbs
-
Olive oil cooking spray
-
1½ teaspoons kosher salt
-
1 teaspoon black pepper
-
1 teaspoon onion powder
-
½ teaspoon garlic powder
-
1 teaspoon paprika
-
¼ teaspoon cayenne pepper (optional)
-
2 large eggs
-
2 tablespoons milk (any kind)
-
1½ lbs boneless, skinless chicken breast, cut into bite-size pieces
Instructions
Preheat oven to 400°F (200°C).
Spread panko on a baking sheet and mist lightly with cooking spray. Bake 5–6 minutes, stirring halfway, until lightly golden and fragrant. Transfer to a shallow bowl and stir in salt, pepper, onion powder, garlic powder, paprika, and cayenne.
In a second shallow bowl, whisk eggs and milk until smooth.
Line a baking sheet with a wire rack and lightly spray with nonstick spray.
Dip chicken pieces into egg wash, letting excess drip off. Press firmly into seasoned panko to coat all sides. Place nuggets on the wire rack, leaving space between each. Lightly spray the tops with cooking spray.
Bake for 15–20 minutes, until nuggets are deep golden and reach an internal temperature of 165°F (74°C). Let rest for 2–3 minutes before serving to set the crust.
Notes
-
Toast the panko first for maximum crunch
-
Pat chicken dry before coating for better adhesion
-
Use a wire rack to keep nuggets crisp on all sides
-
Press crumbs firmly onto chicken to prevent coating loss
Nutritional Information*
*This is an estimate for 1 serving (approx. ¼ of the recipe), calculated without dipping sauces. Values can vary based on specific ingredients used.
Per Serving: Calories: 227 | Protein: 29g | Carbohydrates: 19g | Dietary Fiber: 1g | Total Fat: 5g | Saturated Fat: 1g
Final Thoughts
Sometimes, the greatest kitchen victories aren’t about mastering a complicated technique or sourcing a rare ingredient. They’re about taking a beloved classic and making it yours—healthier, crispier, and brimming with the kind of love that only comes from your own oven.
These nuggets are more than just a meal; they’re a promise of a happy table. They prove that you don’t have to choose between wholesome and delicious, or between a quick dinner and a memorable one. With a handful of simple ingredients and a few smart tricks, you can create something that truly delights everyone who gathers around your plate.
So, here’s to crispy triumphs, to sauce-covered smiles, and to the simple joy of a perfectly golden bite. May your baking sheets always be full, your panko always toasted, and your chicken forever juicy.
Now, go on—preheat that oven and get your crunch on.
Happy cooking,
Olivia