

Super Easy Easter Marshmallow Bark: Your New Favorite 4-Ingredient Spring Tradition
Hey friends! Olivia here, apron probably a little dusty with powdered sugar, coming at you from my sunlit kitchen counter. Can you feel it? That little buzz in the air? Spring is whispering, flowers are peeking out, and Easter is just around the corner, bringing with it all those wonderful, chaotic, beautiful gatherings.
And with gatherings comes the age-old question: what on earth am I going to make? I’m talking about that treat that needs to be easy enough to whip up during naptime or after work, impressive enough to make everyone’s eyes light up, and delicious enough to have people sneaking seconds (and thirds). It needs to be a crowd-pleaser, a conversation starter, and maybe even a little bit magical.
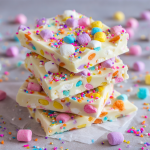
Well, my food-loving friend, I have the absolute perfect answer. Let me introduce you to your new kitchen superhero: Super Easy Easter Marshmallow Bark. This isn’t just a recipe; it’s a revelation. We’re talking about creamy, dreamy white chocolate, clouds of pastel mini marshmallows, and a joyful confetti of sprinkles, all coming together in a bark that’s simultaneously soft, crunchy, and melt-in-your-mouth wonderful. The best part? It requires just four simple ingredients, zero baking, and about 30 minutes from start to delicious finish.
Whether you’re prepping for an Easter egg hunt, needing a sweet contribution to Sunday brunch, or just wanting to make a weeknight feel special, this bark has your back. It’s the kind of homemade happiness that looks like you spent hours, but secretly took you less time than a single episode of your favorite show. So, grab your favorite mixing bowl, and let’s make some messy, wonderful, sweet memories together!
The Apron-String Memory That Inspired This Bark
This recipe always takes me right back to my grandma’s linoleum-floored kitchen. Easter at her house wasn’t a quiet affair. It was a symphony of cousins laughing, the hum of the oven, and the unmistakable *thwack* of eggs being dyed (sometimes a little too enthusiastically).
One year, when I was maybe seven or eight, I was deemed “old enough” to help with the real cooking. My job? The “sprinkle overseer.” My grandma was making a version of this bark, a recipe clipped from a magazine, and my sole responsibility was to shower the top with every color of sprinkle and sugar crystal we owned. I remember the intense concentration, my tongue poking out, carefully placing nonpareils like they were precious gems. When she broke it into pieces later, I pointed proudly to “my section.” That first taste—the cool, smooth chocolate giving way to the soft, sweet marshmallow—was a trophy. It wasn’t just a treat; it was a badge of honor, a sign I was part of the kitchen crew.
Now, every time I make this bark, I think of her. I don’t always measure the sprinkles perfectly anymore (sometimes more is more!), but that feeling of creating simple, shared joy? That’s the real recipe. This Easter, I hope this bark becomes a little part of your story, too.
Gathering Your Rainbow: Ingredients & Why They Work
See? I told you it was simple! Here’s your grocery list for pure joy. Don’t just toss them in the cart—let’s chat about why each one matters and how you can make it your own.
- 1 bag (12 oz) white chocolate chips: This is our superstar, the creamy canvas for our spring masterpiece. **Chef’s Insight:** I like using good-quality chips for the smoothest melt. White chocolate is a bit diva-ish—it seizes (gets clumpy) easily if overheated. We’ll handle it with care! Substitution Tip: You can use a white chocolate baking bar chopped up, or for a different flavor, try semi-sweet or milk chocolate chips!
- 3 cups mini rainbow marshmallows: These are the fluffy, chewy, colorful heart of the bark. The mini size is key—they distribute perfectly and are just adorable. **Chef’s Insight:** Look for the pastel-colored “Easter” minis if you can find them; they make it extra festive. If you only have regular marshmallows, just give them a quick chop!
- 1 tbsp shortening (optional, but highly recommended): This is my secret weapon for a flawlessly smooth, glossy chocolate. **Chef’s Insight:** Shortening helps thin the chocolate just enough for easy spreading and prevents it from getting chalky as it sets. Substitution Tip: If you don’t have shortening, you can use 1/2 tbsp of coconut oil. Avoid butter, as the water content can cause the chocolate to seize.
- Easter sprinkles (for topping): This is where you get to shout “Happy Spring!” with color. **Chef’s Insight:** Go wild! Use pastel jimmies, confetti quins, sugar pearls, or even crushed-up cereal like pastel Easter Egg Oreos. This is your chance to personalize. Pro-tip: Have your sprinkles ready in a small bowl before you melt the chocolate. Timing is everything!
Let’s Make Some Magic: Step-by-Step Instructions
Ready? Aprons on, music up, let’s do this! It’s so simple, but these little tips will guarantee bakery-level results every single time.
- Prep Your Pan: Line an 8×11-inch baking dish (or a similar-sized rimmed baking sheet) with parchment paper, letting a little overhang on two sides. Why? This creates a “sling” so you can lift the entire slab of bark out for easy cutting later. No struggling with a spatula! A light spritz of cooking spray on the pan under the paper helps it stick in place.
- Melt the Chocolate Like a Pro: In a clean, dry, microwave-safe bowl, combine your white chocolate chips and that tablespoon of shortening. **Chef’s Hack:** Microwave on high for 1 minute, then stop. Take it out (the bowl will be hot!). Stir vigorously with a rubber spatula. It will look mostly unmelted—that’s normal! Microwave again in 30-second intervals, stirring with determination after each blast. White chocolate holds its shape but can be secretly melted. Stop when just a few small lumps remain; the residual heat will melt them as you stir. Over-microwaving is the enemy of smooth chocolate!
- The Big Fold-In: Working quickly now, dump your 3 cups of mini marshmallows into the melted chocolate. Gently fold them in with your spatula until they’re all evenly coated. **Chef’s Secret:** Be swift and gentle. We want to coat the marshmallows, not melt them. If they start to get gooey, you’re stirring too hard or the chocolate was too hot. A few streaks of chocolate are fine—it looks homemade and wonderful!
- Spread & Sprinkle: Immediately pour the mixture onto your prepared pan. Use the spatula to spread it into an even layer, about 1/2 to 3/4-inch thick. Don’t stress about perfection—rustic is charming! Now, grab your pre-measured sprinkles and shower them over the top, pressing down gently so they adhere. This is the fun part—let any kids nearby take over!
- The Chill: Carefully transfer the pan to your freezer. Let it set for about 20 minutes. The freezer sets it faster and gives a great snap. **Chef’s Note:** You can use the fridge, but it will take closer to 45-60 minutes to set completely.
- The Grand Finale – Cutting: Once rock solid, lift the bark out using the parchment paper sling and place it on a cutting board. Let it sit at room temperature for 2-3 minutes—this prevents it from shattering. Use a sharp knife to cut into squares or rectangles. For extra Easter fun, lightly grease metal Easter egg-shaped cookie cutters and press them into the bark to create adorable shapes! The scraps are the cook’s treat—I won’t tell.
Serving Your Sweet Masterpiece
Presentation is half the fun! Pile your bark pieces high on a pastel platter or in a rustic wooden bowl. For a really special touch, layer pieces in a clear cellophane bag, tie it with a pretty ribbon, and give it as the sweetest homemade Easter gift. It’s perfect with a mid-afternoon coffee, as a sweet ending to a big meal, or tucked into lunchboxes for a surprise. Watch it disappear—it always does!
Make It Your Own: Delicious Recipe Variations
Got the basic recipe down? Let’s play! Here are a few of my favorite twists:
- Bunny Trail Mix Bark: Swap out 1 cup of the marshmallows for a mix of pretzel sticks (broken), roasted peanuts, and pastel M&M’s for a sweet-and-salty crunch.
- Spring Berry Blast: After folding in marshmallows, gently mix in 1/2 cup of freeze-dried strawberry or raspberry pieces. The tartness cuts the sweetness beautifully!
- “Cadbury Egg” Bark: Use milk chocolate instead of white. After spreading, dot the top with halved or mini Cadbury Creme Eggs before it sets.
- Gluten-Free & Nut-Free: This recipe is naturally both! Just double-check your chocolate chip and sprinkle labels to ensure they’re certified GF if needed.
- Peeps-tacular! Right after spreading the bark, press whole or halved Easter Peeps (chicks or bunnies) into the top for an iconic, fluffy finish.
Olivia’s Chef Notes: A Few More Crumbs of Wisdom
This recipe has evolved from my grandma’s clipped magazine version to my ultimate no-stress staple. I’ve learned a few things along the way! First, the shortening truly is a game-changer—it makes the chocolate so much more cooperative. Second, I used to be so careful not to break the marshmallows, but one day my toddler “helped” by vigorously stirring, and you know what? The slightly melted, swirly result was delicious! So don’t fear a little imperfection.
I also keep a stash of this in the freezer year-round, just changing up the sprinkles. Red and green for Christmas? Done. Orange and black for Halloween? Absolutely. It’s my edible mood ring. The biggest lesson, though, is that the messier the counter gets with sprinkles, the bigger the smiles are when you serve it. That’s a kitchen rule I live by.
Your Questions, Answered: FAQs & Troubleshooting
Let’s tackle the common hiccups before they happen. You’ve got this!
- Q: My white chocolate got thick, clumpy, and grainy. What happened?
A: Ah, you’ve met the “seizing” monster. This happens when water or steam gets into the chocolate (from a wet bowl or spoon) or if it’s overheated. Unfortunately, once seized, it’s hard to fully recover. Prevention is key: Use a perfectly dry bowl and spatula, and microwave in short bursts, stirring well. If it’s just slightly thick, try stirring in a teaspoon more of shortening until smooth. - Q: Can I use the stovetop instead of a microwave to melt the chocolate?
A: Absolutely! Use a double boiler (or a heatproof bowl set over a pot of simmering water, ensuring the bowl doesn’t touch the water). Stir constantly until melted. This method gives you more control and is less likely to overheat the chocolate. - Q: My marshmallows started melting into the chocolate! Is it ruined?
A: Not ruined at all—just a different, wonderfully gooey texture! It happens if the chocolate is too hot when you add them. Next time, let the chocolate cool for a minute or two after melting before folding. This batch will still taste amazing, I promise. - Q: How do I store this, and how long does it last?
A: Store it in an airtight container at room temperature for up to 5 days, or in the fridge for up to 2 weeks. For the best texture (that perfect snap!), I love storing mine in the freezer for up to a month. It’s a chilled, delightful treat straight from the freezer!
Super Easy Easter Marshmallow Bark : 4 Ingredient No-Bake Spring Treat
Description
Spring treats don’t get much easier than this. If you need something festive, colorful, and crowd-pleasing without turning on the oven, this Easter Marshmallow Bark is your new go-to. It’s creamy, sweet, and chewy with pops of crunch from sprinkles — and it comes together in minutes. Perfect for parties, school events, or a fun weekend kitchen project.
Ingredients
-
12 oz (340 g) white chocolate chips or chopped white chocolate
-
3 cups mini pastel marshmallows
-
1 tablespoon shortening or coconut oil (optional, for smoother melting)
-
2–3 tablespoons Easter sprinkles
Instructions
-
Prep the pan
Line an 8×11-inch pan or small baking sheet with parchment paper, leaving overhang for easy lifting. -
Melt the chocolate
Place white chocolate and shortening (if using) in a microwave-safe bowl.
Microwave 60 seconds, stir well, then continue in 30-second bursts, stirring each time, until smooth. Do not overheat. -
Mix in marshmallows
Let chocolate cool for about 1 minute, then gently fold in marshmallows until coated. -
Spread
Pour mixture into the lined pan and spread evenly with a spatula. -
Decorate
Sprinkle toppings over the surface and press lightly so they stick. -
Chill
Refrigerate 30–45 minutes or freeze 15–20 minutes until firm. -
Break or cut
Lift out and cut into squares or break into bark pieces.
Notes
-
Let the chocolate cool slightly before adding marshmallows so they don’t melt too much.
-
Stir chocolate even if it looks unmelted — white chocolate keeps its shape while melting.
-
Use dry bowls and spoons — even a little water can make chocolate clumpy.
-
Want less sweetness? Mix in crushed pretzels or plain cereal for balance.
-
Store in an airtight container in the fridge for a firmer snap.
Final Thoughts
Super Easy Easter Marshmallow Bark: Your New Favorite 4-Ingredient Spring Tradition
As I’m standing here in my kitchen, wiping the last traces of powdered sugar from the counter and sneaking one more piece of bark (purely for quality control, of course), I can’t help but smile. This little recipe—this humble combination of chocolate, marshmallows, and sprinkles—has become so much more than just a dessert in my home.
It’s the quiet Sunday afternoon activity when the kids are bouncing off the walls with spring fever. It’s the “I need something to bring to the potluck in an hour” miracle solution. It’s the gift we tie with ribbon for neighbors, teachers, and friends who deserve a little sweetness. And honestly? It’s the treat I make just for me sometimes, because everyone deserves a little edible joy.
What I love most about this Easter Marshmallow Bark is that it captures the very best part of springtime: the feeling that something colorful and beautiful can come together with minimal effort. The flowers don’t try hard to bloom—they just do. And this bark is exactly the same. Four ingredients, fifteen minutes of hands-on time, and suddenly you’ve created something that looks like it came from a fancy bakery.
So here’s my hope for you, sweet friend: Make this bark with abandon. Let the sprinkles fly everywhere. Let little hands help (and make a glorious mess). Package it up in cute bags for the mail carrier, the piano teacher, the coworker who always makes you laugh. Set a big pile of it on the Easter dessert table and watch how quickly it disappears—not because people are hungry, but because it makes them happy.
And when you bite into that perfect piece—the one with the ideal ratio of creamy chocolate to fluffy marshmallow to rainbow sprinkles—I hope you feel what I feel. A little bit of nostalgia. A whole lot of simple pleasure. And the quiet satisfaction of knowing that you made something lovely, with your own two hands, for the people you love.
That’s the real recipe, friends. That’s the magic.
Now go make some memories—and save a piece for yourself. You’ve earned it.
Happy Easter, and happy creating!
XOXO,
Olivia
P.S. I’d absolutely love to see your creations! Tag me when you make this—there’s nothing that makes my day quite like seeing your kitchen triumphs and sprinkle-covered smiles. And if you have a funny story about a marshmallow mishap or a toddler who “helped” a little too enthusiastically? Those are my favorite messages of all.


