

Strawberry Sushi Rolls: The Dessert That’s a Total Party!
Hey friends! Olivia here, wiping a bit of flour (or in today’s case, a speck of sticky rice) from my apron. Have you ever looked at something so cute and creative that it just makes you smile? That’s the exact feeling I’m chasing in the kitchen today, and I’m so excited to share it with you. We’re tossing the rulebook out the window and making something that’s pure, unadulterated fun: Strawberry Sushi Rolls.
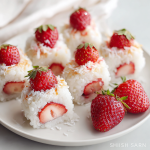
Now, before you raise an eyebrow—no, there’s no raw fish here! This is a playful, sweet twist on the idea of sushi. Imagine plump, juicy strawberries, hugged by a blanket of subtly sweet vanilla-kissed sticky rice, all sliced into adorable little rounds. They’re refreshing, surprisingly simple, and guaranteed to be the star of any picnic, party, or “I-deserve-a-pretty-treat” afternoon.
This is the kind of recipe that reminds me why I love cooking. It’s not about perfection; it’s about creativity, color, and that little spark of joy when you present something that looks like it came from a fancy cafe, but you made it with your own two hands. It’s vegan, gluten-free, no-bake, and an absolute blast to make with kids or friends. So, tie on your favorite apron (the one that’s probably seen better days, like mine), and let’s make something deliciously fun together!
The Day Sushi Went Sweet: A Kitchen Happy Accident
This recipe was born from a happy little kitchen accident—and aren’t those always the best kind? A few summers ago, I was hosting a big, chaotic, wonderful garden party. I’d planned a DIY sushi bar for the main course, complete with all the toppings and a giant bowl of perfectly seasoned sushi rice. Well, my brilliant plan hit a snag when my then-6-year-old niece, Mia, took one look at the nori seaweed and declared it “too fishy” and “too green.” (Can’t argue with that logic!).
But she was fascinated by the rolling process. To avoid a meltdown and keep her busy, I scooped a little of the still-warm rice into a bowl, stirred in a spoonful of sugar and a drop of vanilla, and handed her a few strawberries. “Let’s make fruit sushi,” I said on a whim. We pressed the rice onto plastic wrap, lined up the berries, and rolled. The result was messy, lopsided, and utterly glorious. The adults at the party flocked to her “dessert station,” and those impromptu strawberry rolls disappeared faster than the actual sushi! It was a beautiful reminder that the best food memories often come from ditching the plan and just playing with your ingredients. Now, it’s a requested staple at every family gathering.
Gathering Your Sweet Sushi Toolkit
Part of the magic here is the simplicity. You only need a handful of ingredients to create something that looks incredibly special. Here’s what you’ll need, along with my favorite tips for picking and swapping.
- 1 cup sushi rice – This is non-negotiable for the perfect sticky, chewy texture. Short-grain sushi rice has a higher starch content than other varieties, which is what gives us that lovely, clingy consistency that holds its shape. Don’t substitute with long-grain or jasmine rice—they just won’t work the same magic.
- 1 ¼ cups water – For cooking our star ingredient to plump perfection.
- 2 tbsp granulated sugar – This sweetens the rice just enough to complement the berries without being cloying. For a deeper flavor, you can use coconut sugar.
- ½ tsp pure vanilla extract OR a splash of coconut milk (optional) – My chef’s insight: The vanilla adds a beautiful, warm aroma. The coconut milk (about 1-2 tbsp) adds a very subtle creaminess and tropical hint. Choose your adventure! I often use a combo of both.
- 6–8 fresh, medium-sized strawberries – Look for berries that are firm, bright red, and fragrant. They should be uniform in size if possible, for prettier rolls. Hull them (remove the green tops) so they roll smoothly.
- For wrapping: Nori sheets, rice paper, OR thinly sliced fruit leather – This is where you can get creative! Nori gives the classic sushi look and a savory hint. Rice paper (just a thin strip) is neutral and adds fun texture. Fruit leather (like a strawberry or mango roll-up) is a brilliant, chewy, sweet option that kids adore. You’ll just cut them into thin strips to wrap around your sliced rolls.
- Optional Toppings for Garnish: Toasted coconut flakes, crushed freeze-dried strawberries, a drizzle of melted dark chocolate, a sprinkle of black or white sesame seeds, or even a dusting of powdered sugar. Have fun with it!
Let’s Roll! Your Step-by-Step Guide to Sweet Sushi Success
Ready to create? Follow these steps, and you’ll have a platter of gorgeous strawberry sushi in no time. I’ve packed each step with my best tips to ensure your rolls are picture-perfect.
- Rinse and Cook the Rice: First, place your sushi rice in a fine-mesh strainer and rinse it under cold running water. Gently swish it with your fingers until the water runs mostly clear. This removes excess surface starch and prevents the rice from being gummy. Combine the rinsed rice and 1 ¼ cups water in a saucepan. Bring to a boil, then immediately reduce the heat to the lowest setting, cover with a tight-fitting lid, and simmer for 15 minutes. Take it off the heat and let it sit, covered, for 10 more minutes. Chef’s Hack: Don’t peek while it’s cooking! That steam is essential.
- Sweeten the Deal: Transfer the hot, cooked rice to a large, non-metallic bowl (wood, glass, or ceramic is perfect). Sprinkle the sugar (and vanilla or coconut milk, if using) over the top. Using a rice paddle or a flat wooden spoon, gently fold and slice through the rice to distribute the sweetness. Be gentle—you want to keep those lovely grains intact, not mash them. Let it cool until it’s just warm to the touch, not scalding hot.
- Set Up Your Rolling Station: Tear off a piece of plastic wrap, about 12 inches long, and lay it flat on your counter. Lightly wet your fingers (this prevents major sticking!). Take about ½ to ¾ cup of the slightly cooled rice and place it in the center of the plastic wrap. Pat and press it into a rectangle, roughly 5 inches wide and 7 inches long, about ¼-inch thick. Pro Tip: Keep a small bowl of water nearby to re-wet your fingers as needed.
- The Strawberry Heart: Place 3-4 hulled strawberries in a straight line across the center of your rice rectangle, end-to-end. You want them to be snug against each other.
- The Roll-Up: This is the fun part! Using the plastic wrap to help you, lift the edge of the rice closest to you and carefully fold it up and over the strawberries, tucking the rice around them. Continue rolling forward, using the plastic wrap to guide and tighten the log, just like you’re making a sushi roll or a wrap. Twist the ends of the plastic wrap to secure it tightly. Repeat to make a second log with the remaining rice and berries.
- Chill Out: Pop the wrapped logs into the refrigerator for 15-20 minutes. This brief chill firms everything up and makes slicing a dream.
- Slice & Wrap (Optional): Unwrap one log and place it on a cutting board. Using a sharp knife that you dip in warm water between each slice, cut the log into ¾-inch to 1-inch rounds. If you’re using fruit leather or nori strips, now is the time to wrap a thin piece around the outside of each round, like a little belt. It will stick to the rice easily.
- Garnish and Serve: Arrange your beautiful strawberry sushi rounds on a platter. Now, go wild with your toppings! A drizzle of chocolate, a sprinkle of toasted coconut—make them your own.
How to Serve Your Sweet Masterpiece
Presentation is half the fun! I love arranging these rolls on a large, clean platter or a wooden board. Place little bowls of the different toppings (toasted coconut, crushed berries, etc.) in the center for a DIY garnish bar. They’re perfect as a light dessert after a big meal, a show-stopping snack at a baby or bridal shower, or a fun, interactive treat for a kids’ party. Serve them slightly cool for the most refreshing bite.
Mix It Up! Creative Twists on Strawberry Sushi
- Tropical Dream: Swap strawberries for a line of ripe mango or banana slices. Add a teaspoon of lime zest to the rice and use coconut milk instead of vanilla.
- Chocolate-Dipped Delight: After slicing, dip half of each sushi round in melted dark chocolate. Let set on parchment paper. Decadent!
- “PB&J” Sushi: Add a tiny dab of creamy peanut butter or almond butter to the rice before adding the strawberry. Use a fruit leather “belt” for the full lunchbox nostalgia effect.
- Berry Medley: Use a mix of whole raspberries, blueberries, and sliced strawberries for a burst of color and flavor in every bite.
- Savory-Sweet Start: If using nori, sprinkle a few grains of flaky sea salt over the finished rolls. The salty-sweet combo is incredible.
Olivia’s Kitchen Notes & Stories
Over the years, this recipe has seen many iterations. I once tried using quinoa for a “healthy” version—let’s just say it was more of a deconstructed salad and not the cute rolls we were after. Stick with sushi rice; it’s worth it! I also learned the hard way that overhandling the hot rice makes it gluey. Folding gently is the secret. The biggest evolution has been in the wrapping. The fruit leather was a game-changer suggested by a reader, and now it’s my go-to for kids’ parties. Remember, your kitchen, your rules. If a roll breaks when you slice it, just smush it into a little rice ball, top with a berry piece, and call it a “sushi donut.” No stress, just sweetness.
Your Questions, Answered!
Q: My rice is too sticky and messy to handle. What did I do wrong?
A: This usually means the rice was too hot when you tried to roll it, or it was overcooked. Let it cool longer until it’s just warm. Also, ensure you rinsed it thoroughly at the start. Wetting your hands liberally is your best defense against sticky fingers!
Q: Can I make these ahead of time?
A> You can prep the whole logs, wrap them tightly in plastic, and refrigerate for up to 4 hours before slicing and serving. I don’t recommend making them a full day ahead, as the strawberries can start to weep moisture into the rice.
Q: My roll falls apart when I slice it. Help!
A> Two tips! First, make sure you chilled the log—this is crucial. Second, always use a sharp, non-serrated knife and dip it in warm water and wipe it clean before every single slice. A clean, wet cut is the key to neat rounds.
Q: What can I use if I don’t have plastic wrap?
A> A silicone baking mat or a sushi rolling mat covered with a piece of parchment paper will work in a pinch! The goal is just to have a non-stick surface to help you form the initial roll.
Strawberry Sushi Rolls : Sweet, Fruity, and Fun to Make
Description
If you’re craving a dessert that’s fun, refreshing, and adorable enough to brighten any day, these Strawberry Sushi Rolls are perfect. They combine juicy fresh strawberries with lightly sweetened vanilla sticky rice, rolled up into cute bite-size pieces that look like sushi — but taste like a fruity treat.
Ingredients
For the Sweet Rice
-
1 cup sushi rice (short-grain; essential for stickiness)
-
1¼ cups water
-
2 tbsp granulated sugar
-
½ tsp vanilla extract or 1–2 tbsp coconut milk (optional for extra flavor)
For the Filling
-
6–8 medium strawberries, hulled and firm
For the Outside “Wrap” (Choose One)
-
Thin strips of nori
-
Thin strips of rice paper
-
Thin strips of fruit leather (strawberry or mango works great)
Optional Garnishes
-
Toasted coconut flakes
-
Crushed freeze-dried strawberries
-
Melted dark chocolate (small drizzle)
-
Sesame seeds
-
Powdered sugar
Instructions
1. Rinse & Cook the Rice
-
Place sushi rice in a fine-mesh strainer and rinse under cold water until mostly clear.
-
Combine the rinsed rice and 1¼ cups water in a saucepan.
-
Bring to a boil, then reduce heat to low, cover, and simmer for 15 minutes.
-
Turn off heat and let sit, covered, for 10 minutes.
Tip: Don’t lift the lid while cooking — the steam is essential!
2. Sweeten the Rice
-
Transfer warm rice to a glass, ceramic, or wooden bowl.
-
Sprinkle sugar (and vanilla or coconut milk, if using) on top.
-
Gently fold with a rice paddle or wooden spoon until evenly mixed.
-
Let cool until warm, not hot.
3. Set Up Your Rolling Station
-
Spread a piece of plastic wrap on your counter (about 12 inches long).
-
Wet your fingers to prevent sticking.
-
Press ½–¾ cup of warm rice into a rectangle about 5×7 inches, ¼-inch thick.
4. Add the Strawberries
Line 3–4 hulled strawberries horizontally across the center of the rice.
5. Roll It Up
Use the plastic wrap to lift the bottom edge of the rice and roll it over the strawberries, tightening as you go — like rolling sushi.
Twist the ends of the plastic wrap to secure.
Repeat with remaining rice.
6. Chill
Refrigerate the wrapped logs for 15–20 minutes until firm.
7. Slice & Wrap
-
Unwrap a chilled log.
-
Slice into ¾–1 inch rounds using a sharp knife dipped in warm water between each cut.
-
Wrap each piece with a thin strip of nori, rice paper, or fruit leather if you want that “belted” sushi look.
8. Garnish & Serve
Arrange your sushi rolls on a platter and sprinkle or drizzle any toppings you like. Serve slightly chilled for the most refreshing bite.
Notes
-
Use short-grain sushi rice only — it’s the key to perfect stickiness.
-
Let the rice cool enough before rolling so it isn’t mushy.
-
Wet your hands often to avoid sticking.
-
A sharp, clean, warm knife makes slicing much easier.
-
Don’t overfill with strawberries — keep them snug.
Quick Nutritional Snapshot*
*Approximate, per piece (based on 18 pieces, without optional toppings)
Calories: ~60 | Carbohydrates: 14g | Sugar: 5g | Fat: <1g | Protein: 1g | Fiber: 1g
This recipe is naturally vegan, gluten-free, and requires no baking.
“`


