

Strawberry Shortcake Easter Bars: Your New Spring Tradition
Hey there, friend! Come on in, grab an apron, and let’s get something wonderful baking. If your heart does a little happy dance at the first sight of ruby-red strawberries at the market, or if the idea of a dessert that’s equal parts stunning and simple makes you giddy, you are absolutely in the right kitchen today.
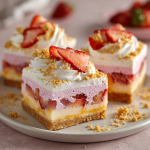
I’m so excited to share with you these Strawberry Shortcake Easter Bars. Imagine this: a buttery, melt-in-your-mouth shortbread crust. A cloud-like, vanilla-kissed cream layer that’s impossibly lush. And on top, a glittering blanket of fresh strawberries, macerated until they’re practically singing with spring flavor. It’s a dessert that looks like a pastel dream but tastes like pure, unadulterated joy.
This isn’t about fussy techniques or hard-to-find ingredients. This is about creating a showstopper that lets you spend less time stressing and more time savoring the moments with your people. These bars are meant to be shared, to be the centerpiece of your Easter table, your spring brunch, or just a Tuesday that needs a little brightening. They slice like a dream, travel well (hello, potluck superstar!), and have this magical way of making everyone feel like they’re getting a giant hug. So, are you ready to make something unforgettable? Let’s do this!
A Strawberry-Stained Memory
This recipe always takes me right back to my grandma’s sun-drenched kitchen in April. She wasn’t a fancy baker, but she was a generous one. Every Easter, alongside the glazed ham, she’d make a towering, slightly lopsided strawberry shortcake. The whipped cream would always start to weep, and the biscuit would soak up the berry juices, creating a glorious, messy masterpiece on our plates.
My job, as the “official strawberry washer,” was to de-stem the berries. I’d sneak a few, of course, and she’d pretend not to notice, her eyes crinkling at the corners. That dessert wasn’t just about the taste; it was the smell of sugar and berries mingling in the air, the sound of family laughter bouncing off the walls, and the feeling of being part of a sweet, sticky tradition. These bars are my love letter to that memory—capturing all that nostalgic flavor in a neat, sliceable package that’s perfect for making new traditions of your own.
Gathering Your Sunshine Ingredients
Here’s everything you’ll need to bring these springtime bars to life. I’ve added my little chef’s notes for each—think of me as your friendly guide, whispering tips over your shoulder!
For the Buttery Shortbread Crust:
- 1 cup (2 sticks) unsalted butter, melted – Using unsalted butter lets you control the salt level. Melted butter is the secret to that irresistibly tender, crumbly texture that holds together perfectly. No mixer needed!
- ½ cup granulated sugar – This sweetens the crust just enough to balance the tangy cream and bright berries.
- 2 cups all-purpose flour – The trusty backbone. For a slightly nuttier flavor, you could swap ½ cup for oat flour.
- ¼ tsp salt – Never skip this! Salt is the flavor booster that makes the butter and sugar sing.
For the Luscious Cream Layer:
- 8 oz cream cheese, softened – Pro-tip: Take this out of the fridge at least an hour ahead. Truly softened cream cheese is non-negotiable for a silky-smooth, lump-free layer. Low-fat works in a pinch, but full-fat delivers that decadent mouthfeel we’re after.
- ½ cup powdered sugar – It dissolves instantly, giving us a smooth filling. Sift it if it’s lumpy!
- 1 tsp pure vanilla extract – The soul of the cream layer. The good stuff makes a difference here.
- 1 cup whipped topping (like Cool Whip), thawed – This gives the layer incredible lightness and stability. For a from-scratch vibe, you can fold in 1 cup of freshly whipped heavy cream sweetened with a tablespoon of the powdered sugar.
For the Glittering Strawberry Topping:
- 2 cups fresh strawberries, diced small – About one pint. Their fresh, vibrant flavor is the star! Frozen won’t work well here as they release too much liquid.
- 2 tbsp granulated sugar – This draws out the berries’ natural juices, creating a gorgeous, glossy syrup.
- 1 tsp lemon juice – A bright pop of acid that wakes up all the flavors and keeps the berries looking vibrant.
- Crushed golden cookies (optional, for topping) – Think shortbread cookies or vanilla wafers. They add a delightful “shortcake” crunch and make it extra pretty!
Let’s Build Some Magic, Step-by-Step
Follow these steps, and you really can’t go wrong. I’m breaking it all down with my favorite kitchen hacks to ensure your bars are perfect.
Step 1: Prep & Preheat. First, let’s get organized! Preheat your oven to 350°F (175°C). Line a 9×9-inch baking pan with parchment paper, leaving some overhang on two sides. This is your lifesaver hack for lifting the entire slab of bars out of the pan later for flawless slicing. Give the paper a quick spritz with cooking spray so the crust doesn’t stick.
Step 2: Make the Shortbread Crust. In a medium bowl, stir together the melted butter, sugar, flour, and salt. You’ll use a fork, then your hands, and it will come together into a soft, crumbly dough. Don’t overmix! Just until no dry flour remains. Dump the mixture into your prepared pan and press it down firmly and evenly into one glorious layer. I use the bottom of a measuring cup to really pack it in—this prevents a crumbly disaster later. Bake for 18-22 minutes, until the edges are just beginning to turn a light golden brown. Let this cool completely on a wire rack. Patience here is key for a solid base!
Step 3: Whip Up the Cream Dream. While the crust cools, make the cream layer. In a large bowl, beat the softened cream cheese with an electric mixer (or a lot of arm power!) until it’s completely smooth and creamy. Add the powdered sugar and vanilla, and beat again until combined. Now, grab a spatula. Gently fold in the thawed whipped topping until you have a uniform, fluffy, cloud-like mixture. “Folding” means you’re turning the mixture over gently to keep all that air in it—no vigorous stirring!
Step 4: Macerate the Strawberries. In another bowl, toss the diced strawberries with the 2 tablespoons of sugar and lemon juice. Let it sit for at least 10 minutes. You’ll see a beautiful syrup start to pool at the bottom. This is liquid gold! We’ll spoon the berries and this syrup over the cream layer.
Step 5: The Grand Assembly. Spread the cream cheese mixture evenly over the completely cooled crust. Use an offset spatula or the back of a spoon to make it nice and level. Next, spoon the strawberry mixture over the cream layer, making sure to distribute that delicious syrup. If you’re using them, sprinkle your crushed cookies over the top for that perfect finishing texture.
Step 6: The Final Chill. Cover the pan loosely with plastic wrap and refrigerate for at least 2 hours, but ideally 4 or even overnight. This chilling time is what transforms the layers from soft to sliceably perfect. It allows the flavors to marry and the cream layer to set firmly.
How to Serve These Springtime Jewels
When it’s time to serve, use the parchment paper “handles” to lift the entire slab onto a cutting board. Run a sharp knife under hot water, wipe it dry, and slice into 12 beautiful bars. For an extra touch, plate them on a pastel platter and garnish with a whole fresh strawberry and a sprig of mint. They’re stunning on their own, but a tiny dollop of extra whipped cream never hurt anybody! Serve them straight from the fridge for the best texture.
Make It Your Own: Delicious Twists
- Lemon Berry Bliss: Add the zest of one lemon to the cream cheese mixture and use a mix of strawberries, blueberries, and raspberries for a patriotic or summery twist.
- Chocolate-Dipped Dream: Drizzle melted white or dark chocolate over the chilled bars before serving.
- “Cheesecake” Style: Add a tablespoon of fresh lemon juice and an extra ¼ cup of sugar to the strawberry layer for a more pronounced tang.
- Gluten-Free Friendly: Use a 1:1 gluten-free all-purpose flour blend for the crust and ensure your cookies (if using) are GF.
- Coconut Cream Delight: Fold ½ cup of toasted coconut into the cream layer and sprinkle more on top for a tropical feel.
Olivia’s Kitchen Notes
This recipe has become my springtime staple, and it’s evolved in the funniest ways. The first time I made it, I was so impatient that I spread the cream layer on a warm crust. Let’s just say I ended up with “Strawberry Shortcake Soup” instead of bars! Lesson learned: let that crust cool. I’ve also been known to swap the strawberry topping for a mix of peaches and blueberries in late summer, and it’s just as heavenly. The beauty of this recipe is in its layers and its flexibility. Don’t be afraid to play with it and make it yours. After all, the best recipes are the ones that gather a few splatters and stories on the page.
Your Questions, Answered!
Q: Can I use frozen strawberries?
A: I don’t recommend it for the topping. Frozen berries release a tremendous amount of water as they thaw, which will make your cream layer soggy and the bars difficult to slice. Fresh is truly best here for texture and flavor.
Q: My cream cheese layer is lumpy! What did I do wrong?
A> This almost always means your cream cheese wasn’t soft enough. It should be at room temperature for a good hour. If you have small lumps, you can try pressing the mixture through a fine-mesh sieve, but prevention (softening ahead of time) is the best cure!
Q: How far in advance can I make these?
A> They are the perfect make-ahead dessert! You can assemble them completely 1-2 days before serving. Just keep them covered tightly in the refrigerator. The crust might soften slightly, but it will still be delicious.
Q: Can I double this recipe?
A> Absolutely! Double all ingredients and press the crust into a 9×13-inch pan. You may need to add a few minutes to the crust baking time—just watch for that light golden color.
Strawberry Shortcake Easter Bars : Creamy Layered Spring Dessert
Description
These Strawberry Shortcake Easter Bars are spring on a plate! A buttery shortbread crust, cloud-like cream layer, and juicy, macerated strawberries make a dessert that’s as stunning as it is simple. Perfect for Easter brunch, potlucks, or any time you want a sweet slice of spring.
Ingredients
For the Shortbread Crust:
-
1 cup (2 sticks) unsalted butter, melted
-
½ cup granulated sugar
-
2 cups all-purpose flour (or 1½ cups flour + ½ cup oat flour for nuttier flavor)
-
¼ tsp salt
For the Cream Layer:
-
8 oz cream cheese, softened
-
½ cup powdered sugar
-
1 tsp pure vanilla extract
-
1 cup whipped topping, thawed (or freshly whipped cream sweetened with 1 tbsp sugar)
For the Strawberry Topping:
-
2 cups fresh strawberries, diced
-
2 tbsp granulated sugar
-
1 tsp lemon juice
-
Crushed golden cookies (optional, for extra crunch)
Instructions
-
Prep & Preheat: Preheat oven to 350°F (175°C). Line a 9×9-inch baking pan with parchment, leaving overhang for easy lifting. Lightly spray with cooking spray.
-
Make the Crust: In a medium bowl, stir melted butter, sugar, flour, and salt until combined. Press evenly into the pan using the bottom of a measuring cup. Bake 18–22 minutes until edges turn light golden. Cool completely.
-
Whip the Cream Layer: Beat cream cheese until smooth. Add powdered sugar and vanilla; beat until combined. Gently fold in whipped topping until fluffy and uniform.
-
Macerate Strawberries: Toss diced strawberries with sugar and lemon juice. Let sit at least 10 minutes to create syrup.
-
Assemble Bars: Spread cream layer over cooled crust. Spoon strawberry mixture evenly on top. Sprinkle crushed cookies if desired.
-
Chill: Cover loosely and refrigerate 2–4 hours (or overnight) until set.
-
Serve: Lift bars using parchment overhang. Slice into 12 squares using a hot, dry knife for clean cuts. Garnish with extra strawberries or mint if desired.
Notes
-
Chocolate-Dipped: Drizzle melted white or dark chocolate over chilled bars.
-
Cheesecake Style: Add 1 tbsp lemon juice + ¼ cup sugar to strawberry layer for extra tang.
-
Gluten-Free: Use a 1:1 gluten-free flour blend for crust and GF cookies.
-
Coconut Cream Delight: Fold ½ cup toasted coconut into cream layer and sprinkle on top.
Nutritional Information (Per Bar, Approximate)
Calories: 310 | Fat: 19g | Saturated Fat: 12g | Carbohydrates: 32g | Fiber: 1g | Sugar: 18g | Protein: 4g
Prep Time: 20 mins | Cook Time: 20 mins | Chill Time: 2 hours | Total Time: 2 hours 40 mins | Yield: 12 bars | Difficulty: Easy
Final Thoughts: A Slice of Springtime Joy
And there you have it, friend—a pristine pan of Strawberry Shortcake Easter Bars, ready to steal the show. Take one last look at those jewel-toned berries glistening on their creamy, golden pedestal. Isn’t it amazing how a few simple ingredients, layered with a little love, can transform into something so beautiful?
As you carry that pan to the table, I hope you feel a swell of pride. You’ve created more than just a dessert. You’ve created a centerpiece for connection. In a world that often feels too busy, these bars are an invitation to pause—to gather around, to let the conversation flow, and to savor something sweet together. Watch as that first slice is lifted out, revealing the perfect layers inside. Listen for the happy murmurs of “oh, this is good” that will inevitably ripple around the room.
These bars carry the warmth of my grandma’s kitchen and the joy of a spring day, all wrapped up in one neat, sliceable package. They’re proof that the most memorable recipes aren’t about perfection or complexity. They’re about translating a feeling—the anticipation of Easter, the brightness of the season, the comfort of tradition—into something you can share.
So, as you hand out that first plate, know that you’ve given a gift. You’ve given a moment of sweetness, a taste of sunshine, and a new tradition just waiting to be written into your family’s story.


