

There’s a Certain Kind of Magic in a Strawberry Rhubarb Pie
Hey there, friend! Come on in, pull up a stool. Can you smell that? It’s the sweet, jammy perfume of strawberries getting cozy with the sharp, tangy whisper of rhubarb, all wrapped up in the warm, buttery embrace of a flaky crust. That, my friends, is the scent of pure, unadulterated joy. It’s the smell of late spring turning into early summer, of backyard gatherings, and of a dessert so iconic, it feels less like a recipe and more like a heirloom passed down through generations.
If you’ve never danced with rhubarb before, let me tell you—you’re in for a treat. On its own, it’s puckeringly tart, the vegetable (yep, it’s a veggie!) masquerading as a fruit. But pair it with sun-ripened strawberries and a little sugar, and something alchemical happens. They balance each other perfectly, creating a filling that’s both vibrant and deep, sweet and sophisticated, bubbling up into a glossy, ruby-red masterpiece.
Today, we’re not just making a pie. We’re creating a centerpiece. A conversation starter. A slice of nostalgia that’s somehow both comforting and exciting. Whether you’re a pie pro or your rolling pin still has the price tag on it, I’m here with you. We’re going to make the most beautiful, delicious Strawberry Rhubarb Pie, with a crust so good people will ask for your secret (spoiler: it’s butter and a little know-how). So tie on that apron—the messy ones are the best—and let’s bake some happiness.
The Pie That Started It All: A Lesson from Grandma Rose
My love affair with this pie began not in a fancy kitchen, but at my Grandma Rose’s laminate countertop, flour dusting the air like snow. I was maybe seven, standing on a wobbly wooden stool, tasked with the “very important job” of sprinkling sugar over the mountain of chopped rhubarb. I remember being suspicious of the celery-looking stalks. “You’re going to eat that?” I’d ask. She’d just wink and say, “Trust the process, Livvie.”
Her hands, quick and sure, would weave a lattice top that looked less like pastry and more like a golden tapestry. I was always in charge of the egg wash, painting it on with a little pastry brush, my tongue poking out in concentration. The magic happened in the oven. The worrying tartness of the rhubarb melted away with the strawberries, and that smell… it would float through her entire house, a siren’s call that promised something wonderful was coming.
The best part? She never cared about perfect crimps or even lattice strips. If the juice bubbled over, she’d call it “flavor caramelization.” Her lesson was clear: the love you stir into the bowl and the anticipation you share while it bakes are the most important ingredients. Every time I make this pie, I’m back on that stool, and I can almost hear her saying, “See? I told you to trust it.” That’s the heart of this recipe—it’s not about perfection, it’s about creating something real and wonderful to share.
Your Pie-Making Toolkit: A Guide to the Good Stuff
Great pies start with great ingredients. Here’s everything you’ll need, plus my little chef-y insights to help you understand the “why” behind the “what.”
For the Filling:
- 3 cups fresh strawberries, hulled and halved (or quartered if large) – Look for berries that smell sweet and fragrant. In a pinch, frozen whole strawberries (not in syrup!) work too—just thaw and drain them really well. Chef’s Insight: The strawberries bring the jammy sweetness and beautiful color. Halving them creates the perfect juicy bite without turning the filling to mush.
- 2½ cups chopped fresh rhubarb (½-inch pieces) – Use firm, crisp stalks. The color doesn’t affect flavor much, but the redder stalks make a prettier, pinker filling. Trim off any leafy tops (they’re toxic!). Substitution Tip: No fresh rhubarb? Frozen chopped rhubarb is a fantastic, year-round alternative. No need to thaw—just toss it in frozen and add an extra 1-2 tbsp of cornstarch.
- 1 cup granulated sugar – This is the sweet peacemaker between the tart rhubarb and sweet berry. If your strawberries are super sweet or your rhubarb is very mild, you can scale back to ¾ cup. Taste your fruit first!
- ¼ cup cornstarch – Our thickening hero. It creates a clear, glossy filling that lets the fruit’s color shine, unlike flour which can be cloudy. Chef’s Hack: For extra insurance against a runny pie, use up to ⅓ cup, especially if your fruit is super juicy.
- 1 tbsp fresh lemon juice – A bright spark! It enhances all the other flavors and keeps the fruit’s color vibrant. Always use fresh here—it makes a difference.
- ½ tsp pure vanilla extract – The flavor booster. It adds a warm, round depth that makes the pie taste “complete.”
- A generous pinch of salt – Never, ever skip this! Salt makes the sweet taste sweeter and balances the entire flavor profile.
For the Crust & Assembly:
- 1 recipe for a double pie crust – Use your favorite all-butter recipe (mine’s below in the notes!), or a good-quality store-bought crust to save time. No judgment here! Chef’s Creed: Cold butter = flaky layers. That’s the golden rule.
- 1 large egg, beaten with 1 tsp water (egg wash) – This is your pie’s makeup. It gives that gorgeous, deep golden-brown shine and helps any sugar topping stick.
- 1 tbsp coarse sugar (like turbinado or sanding sugar) – Optional, but oh-so-recommended. It adds a delightful crunch and a beautiful sparkle. Plain granulated sugar works in a pinch, too.
Let’s Build Your Masterpiece: Step-by-Step with Chef Liv
Ready? Here we go. We’ll move through this together, one simple step at a time. Remember, breathe, have fun, and don’t stress the small stuff.
Step 1: Preheat & Prep
Fire up your oven to 400°F (200°C). Place a rack in the lower third of your oven. This helps the bottom crust cook through and get crispy. While it heats, get out a 9-inch pie dish (glass or ceramic is best for seeing how the bottom is browning).
Step 2: Macerate the Filling (A Fancy Word for “Let it Get Juicy”)
In a large bowl, gently toss the strawberries and rhubarb with the sugar, cornstarch, lemon juice, vanilla, and salt. I use my hands for this—it’s therapeutic! Let it sit for at least 10-15 minutes. You’ll see a lovely ruby syrup start to pool at the bottom. This is a GOOD sign—it means the cornstarch is already starting to work with the juices, which will lead to a perfectly set filling, not a soupy one.
Step 3: Roll & Line
On a lightly floured surface, roll out one disk of your chilled pie dough into a circle about 12 inches across. Don’t worry about a perfect circle! Rustic is charming. Gently drape it into your pie dish. Use your fingers to nestle it in, letting the edges overhang. Don’t stretch the dough—just let it slump in. Stretching leads to shrinkage. Pop this in the fridge to stay cool while you roll the top crust.
Step 4: Fill ‘Er Up!
Take your bowl of filling and give it one more gentle stir. Pour all of it, including every last drop of that delicious syrup, into the bottom crust. Spread it into an even layer. Those juices are flavor gold.
Step 5: Top It Off (Lattice or Full-Crust)
For a Full Top Crust: Roll out your second disk. Drape it over the filling. Trim the overhang to about ½ inch. Tuck the top edge under the bottom crust edge and crimp all the way around with your fingers or a fork. Cut 4-5 slits in the center to let steam escape.
For a Lattice Top (It’s Easier Than You Think!): Roll the second disk into a rough rectangle. Cut it into 10-12 even strips with a pizza cutter or knife. Lay half the strips vertically over the pie, spacing them apart. Fold every other strip back, lay a horizontal strip across, then fold the vertical strips back down. Repeat, weaving over and under. Crimp the edges. It looks impressive but is just simple weaving!
Pro-Tip: If the dough gets too warm and sticky while you work, slide the whole pie plate onto a baking sheet and chill it for 10 minutes.
Step 6: The Golden Glow-Up
Brush the top crust (not the crimped edges) evenly with your egg wash. This is key for color! Then, sprinkle generously with that coarse sugar. It’s the finishing touch.
Step 7: Bake to Perfection
Place your pie on a rimmed baking sheet (this catches any bubbling-over juices and saves your oven from a smoky mess!). Bake at 400°F for 20 minutes. This initial high heat sets the crust.
Then, without opening the door, reduce the oven temperature to 350°F (175°C). Bake for another 30-35 minutes. You’re looking for a deeply golden brown crust and thick, bubbly filling bubbling through the vents or lattice. If the edges start browning too fast, tent them loosely with aluminum foil or a pie shield.
Step 8: The Hardest Part: Wait.
When the timer dings, transfer the pie (still on its baking sheet) to a wire cooling rack. You must, must, MUST let it cool completely—at least 3-4 hours. I know, it’s torture. But this is non-negotiable. This cooling time is when the cornstarch fully sets the filling. Slicing into a warm pie is a recipe for a delicious, but soupy, mess. Trust me on this. Let it set.
How to Serve Your Slice of Sunshine
Once fully cooled, slice your beautiful pie with a sharp, thin knife. The perfect serving? A generous wedge on a plate, ideally still with a slight warmth from the day. The classic, and truly unbeatable, pairing is a big scoop of vanilla bean ice cream melting slowly over the top. The cold, creamy ice cream against the sweet-tart fruit is a match made in heaven. For a lighter touch, softly whipped cream or a dollop of Greek yogurt is divine. Pour a cup of coffee, gather your people, and watch how one simple pie can turn an ordinary day into a small celebration.
Make It Your Own: Delicious Twists & Swaps
Love the base recipe? Here are some fun ways to play with it:
- Herb-Infused: Add 1 tablespoon of finely chopped fresh basil or thyme to the filling. It adds an incredible, fragrant complexity that will have people guessing your secret ingredient.
- Berry Medley: Swap out 1 cup of the strawberries for raspberries or blackberries for a deeper, more complex berry flavor.
- Ginger Kick: Add 1-2 tablespoons of minced crystallized ginger or ½ tsp of ground ginger to the filling for a warm, spicy zing.
- Oat Crumble Topping: Skip the top crust! Mix ¾ cup flour, ½ cup rolled oats, ½ cup brown sugar, a pinch of salt, and 6 tbsp melted butter into a crumble. Sprinkle over the filling and bake.
- Gluten-Free: Use a certified gluten-free flour blend in your favorite pie crust recipe or a store-bought GF crust. The filling is naturally gluten-free.
Liv’s Kitchen Confessions & Pro-Tips
This recipe has been my trusty sidekick for years, and it’s evolved with every bake. My biggest lesson? Don’t fear the bubble-over. My first “solo” pie as a teen bubbled over so dramatically it set off the smoke alarm. My dad called it “Volcano Pie,” and we ate it with spoons, laughing. It was still delicious. So if your pie juices caramelize on the baking sheet, just smile—you’ve made a pie with character.
My ultimate crust hack? I use a mix of butter for flavor and a touch of vodka or vinegar for tenderness. The alcohol evaporates in the oven, leaving behind a crust that’s incredibly flaky and easy to work with. If you want that recipe, just shout—I’ll share it in my next post!
Finally, remember: fruit is unpredictable. Some berries are juicier, some rhubarb is tarter. Taste your mix before it goes in the crust. You’re the chef—adjust the sugar or cornstarch to your liking. That’s the beauty of homemade.
Your Pie Questions, Answered
Q: My bottom crust was soggy! What happened?
A: The classic pie puzzle! A few tricks: 1) Make sure your filling isn’t too warm when it goes in. 2) Use a glass or ceramic pie dish (they conduct heat better than metal for a crispier bottom). 3) Bake on that lower oven rack AND on a preheated baking sheet. Putting the pie dish on a hot surface gives the bottom crust a powerful heat boost from the get-go.
Q: The filling is runny after cooling. Can I fix it?
A> First, did it cool completely? If so, it might need more thickener next time. For this recipe, you can safely increase the cornstarch to ⅓ cup, especially with frozen fruit or peak-season berries. If you’ve already baked it, just serve it in bowls! It’ll taste amazing. For future bakes, let the macerating fruit sit longer
Strawberry Rhubarb Pie : A Sweet & Tangy Classic with a Flaky Crust
Description
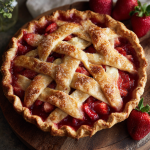
Strawberry Rhubarb Pie
Sweet, tangy, and wrapped in buttery flakiness—a classic spring-to-summer dessert.
This pie balances the tartness of rhubarb with the sweetness of strawberries, all encased in a golden, flaky crust. Perfect for family gatherings, picnics, or any day that needs a little celebration.
Ingredients
For the Filling
-
3 cups fresh strawberries, hulled and halved (or quartered if large)
-
2½ cups fresh rhubarb, chopped into ½-inch pieces
-
1 cup granulated sugar (adjust if fruits are very sweet)
-
¼ cup cornstarch
-
1 tbsp fresh lemon juice
-
½ tsp pure vanilla extract
-
Pinch of salt
For the Crust & Assembly
-
1 double pie crust (homemade or store-bought, all-butter recommended)
-
1 large egg, beaten with 1 tsp water (for egg wash)
-
1 tbsp coarse sugar (optional, for topping)
Instructions
-
Preheat & prep:
Preheat oven to 400°F (200°C) with a rack in the lower third. Have a 9-inch pie dish ready. -
Macerate the fruit:
In a large bowl, gently toss strawberries and rhubarb with sugar, cornstarch, lemon juice, vanilla, and salt. Let sit 10–15 minutes until juices start forming. -
Roll & line bottom crust:
Roll out one dough disk into a 12-inch circle. Gently place it in the pie dish, letting edges overhang. Chill while rolling the top crust. -
Add filling:
Pour fruit mixture (with all juices) into the bottom crust. -
Top crust:
-
Full crust: Place second disk on top, trim edges to ½ inch, crimp edges, and cut 4–5 slits for steam.
-
Lattice: Cut dough into strips and weave over filling. Crimp edges.
-
-
Egg wash & sugar:
Brush top crust with egg wash and sprinkle coarse sugar. -
Bake:
Place pie on a rimmed baking sheet. Bake at 400°F for 20 minutes. Reduce to 350°F (175°C) and bake 30–35 more minutes until golden and bubbly. Tent edges with foil if browning too quickly. -
Cool completely:
Transfer to a wire rack. Let cool 3–4 hours for the filling to set.
Notes
-
Use glass or ceramic pie dishes for a crisp bottom crust.
-
Let fruit juices macerate; it helps the filling set.
-
Adjust sugar to taste depending on fruit sweetness.
-
Slice with a sharp knife for clean cuts.
Final Thoughts
The magic of Strawberry Rhubarb Pie lies in its beautiful contradiction: humble ingredients transformed into a show-stopping centerpiece. It’s a lesson in trust—trusting the process, trusting the alchemy of fruit and sugar, and trusting that the love you bake into it is the most important ingredient of all.
Remember: keep your butter cold, let your filling macerate, and for the love of flaky crusts, let it cool completely before you slice! This pie isn’t just a treat; it’s an experience. An experience of patience, creativity, and the simple, profound pleasure of sharing something homemade.


