Your New Favorite No-Bake Obsession is Here!
Hey there, friend! Can you smell that? It’s the sweet, nostalgic scent of golden Oreos, ripe strawberries, and creamy, dreamy cheesecake filling swirling together. Okay, maybe you can’t *actually* smell it through the screen (wouldn’t that be magical?), but trust me, your kitchen is about to become the most popular room in the house. Welcome to the wonderful, whimsical world of my No-Bake Strawberry Crunch Cheesecake Bites!
If you’ve ever found yourself staring longingly at a box of strawberry shortcake ice cream bars, dreaming of a way to capture that iconic, crunchy strawberry coating in a more “adult” (but just as fun) dessert, you and I are already on the same page. These little bites are my answer to that craving. They’re mini, they’re mighty, and they are bursting with layers of texture and flavor that will make your taste buds do a happy dance.
The best part? We’re keeping things cool, calm, and collected. No oven required! This is the kind of dessert magic that builds confidence, even if you’re a kitchen newbie. We’re talking about a buttery graham cracker base, a cloud-like no-bake cheesecake filling that’s impossibly smooth, and a topping that delivers that unforgettable strawberry CRUNCH. So, tie on your favorite apron (the messy one with all the character), and let’s make some no-bake magic together!
A Crunchy, Sweet Trip Down Memory Lane
This recipe is more than just a list of ingredients; it’s a little piece of my childhood, reimagined. I can still picture my grandma’s kitchen table, littered with the tell-tale wrappers from those pink-boxed ice cream treats. My sister and I would race to see who could eat the vanilla center fastest, just to get to that glorious, crumbly strawberry shell. The sound of that first bite, the way the crisp coating gave way to the cool creaminess underneath… it was pure, unadulterated joy.
Years later, as a frazzled adult trying to throw a last-minute book club party, that memory came rushing back. I wanted to serve a dessert that felt special, looked adorable, and delivered that same iconic flavor and texture combo. I started experimenting, and after a few… let’s call them “learning experiences” (a.k.a. a kitchen dusted in pink powdered sugar), these Strawberry Crunch Cheesecake Bites were born. They were the star of the show that night, and they’ve been a staple in my recipe box ever since. They’re my little edible hug, a way to share a bite of happy nostalgia with everyone I love.
Gathering Your Flavor Arsenal
Here’s the beautiful part: you only need a handful of simple ingredients to create this masterpiece. Let’s break them down, because knowing your ingredients is the first step to becoming a kitchen rockstar.
For the Crust:
- 1 cup graham cracker crumbs: This is our foundation, providing a sweet, slightly honeyed, and wonderfully sturdy base. Chef’s Insight: You can buy pre-crumbled crumbs, but crushing whole graham crackers in a zip-top bag with a rolling pin is a fantastic (and therapeutic!) way to release a little stress.
- 4 tbsp unsalted butter, melted: This is the glue that holds our crust together, giving it a rich, toasty flavor and that perfect, packable texture.
For the Cheesecake Filling:
- 8 oz cream cheese, softened: This is non-negotiable, friends! Let your brick of cream cheese sit on the counter for at least 30-60 minutes until it’s room temperature. A soft cream cheese is the secret to a silky-smooth filling with zero lumps. Substitution Tip: For a tangier twist, feel free to use Neufchâtel cheese.
- 1/3 cup powdered sugar: Also known as confectioner’s sugar, it dissolves instantly into our filling, providing sweetness without any grittiness.
- 1 tsp vanilla extract: The warm, aromatic backbone of our dessert. It enhances all the other flavors beautifully.
- 1/2 cup heavy cream, whipped: This is our magic wand for a light and airy filling. We’re going to whip it to soft peaks before folding it in, which gives the cheesecake its incredible, mousse-like texture.
For the Strawberry Crunch Topping:
- 1/2 cup freeze-dried strawberries, crushed: This is the flavor powerhouse! Freeze-dried fruit gives us an intense, pure strawberry punch without adding any unwanted moisture. Chef’s Insight: Crush them in a bag for less mess, or pulse them a few times in a food processor.
- 1/2 cup crushed golden Oreos or vanilla cookies: These provide the “crunch” and a lovely vanilla note that pairs perfectly with the strawberry. Golden Oreos are my go-to for their color and flavor.
- 2 tbsp melted butter: A little bit of butter helps the topping clump together, mimicking that iconic ice cream bar coating.
Let’s Build Some Bite-Sized Magic!
Ready to get your hands dirty? This is where the fun begins. Follow these steps, and you’ll have a picture-perfect dessert in no time.
Step 1: The Foundation – Crafting the Perfect Crust
In a medium bowl, combine your graham cracker crumbs and melted butter. You’re looking for a texture that resembles wet sand—it should hold together when you pinch it between your fingers. Chef’s Hack: Using a fork to mix ensures everything gets evenly coated. Now, grab your mini muffin tin (lined with paper or silicone liners—this is crucial for easy removal!). Spoon about a teaspoon of the mixture into each cup, then use the back of a small spoon or a tamper to press it down firmly and evenly. A firm pack is the key to a crust that won’t fall apart! Pop the whole tray into the fridge for at least 10 minutes to set. This quick chill gives our base a head start.
Step 2: The Heart – Whipping Up the Dreamy Filling
In a large bowl, beat your softened cream cheese with an electric mixer on medium speed until it’s completely smooth and lump-free. This should take about 1-2 minutes. Scrape down the sides of the bowl! Now, add in the powdered sugar and vanilla extract, and beat again until everything is fully incorporated and creamy. Little Tip: Sifting your powdered sugar first can prevent any tiny lumps. Now, in a separate, clean bowl, pour in your heavy cream. Whip it on medium-high speed until soft peaks form. You’ll know they’re soft peaks when the whisk leaves a trail in the cream that slowly dissolves back in. Gently fold the whipped cream into the cream cheese mixture. Chef’s Secret: “Folding” means using a spatula to cut down through the middle, scoop along the bottom, and turn the mixture over itself. This keeps all that lovely air in the whipped cream, giving us a light and fluffy filling. Be patient and stop as soon as no white streaks remain.
Step 3: Assembly & The Big Chill – Patience is a Virtue!
Pull your chilled crusts out of the fridge. Now, you can spoon your filling into a piping bag (or a zip-top bag with a corner snipped off) for super-neat, professional-looking bites, or you can simply use two small spoons to dollop the filling on top. Fill each liner almost to the top, then use the back of a spoon or an offset spatula to smooth the surface. Now, for the hardest part: the wait. Carefully transfer the tray to the refrigerator and let the bites chill for at least 2 hours, but ideally 4 hours or even overnight. This uninterrupted chill time is what allows the filling to firm up perfectly, so they hold their shape when you bite into them.
Step 4: The Grand Finale – Creating the Iconic Crunch Topping
While your bites are chilling, let’s make the star of the show! In a small bowl, combine your crushed freeze-dried strawberries, crushed golden Oreos, and melted butter. Stir it all together with a fork until the mixture is clumpy and well-mixed. Just before you’re ready to serve, take the cheesecake bites out of the fridge. Generously sprinkle a heaping teaspoon of the strawberry crunch topping over each bite, pressing down gently so it adheres. And voilà! You’ve just created dessert magic.
How to Serve These Stunners
Presentation is part of the fun! Arrange these little gems on a beautiful platter or a tiered dessert stand for a real “wow” factor. They are the ultimate party dessert—easy to grab and absolutely gorgeous. For an extra touch of elegance, you can garnish the platter with a few whole, fresh strawberries or a light dusting of leftover crushed freeze-dried strawberries. They pair wonderfully with a cup of hot coffee for a midday treat or a glass of bubbly Prosecco for a celebratory dessert.
Make It Your Own! Creative Twists & Swaps
The beauty of this recipe is its versatility. Don’t be afraid to play with the flavors!
- Chocolate Lover’s Dream: Swap the graham cracker crust for a chocolate wafer crust. Use crushed regular Oreos in the topping and add a teaspoon of cocoa powder to the cheesecake filling.
- Lemon Blueberry Bliss: Use crushed vanilla wafers for the crust. Add the zest of one lemon to the cheesecake filling, and create a topping with crushed freeze-dried blueberries and vanilla cookie crumbs.
- Peaches & Cream: Create a crust with gingersnap cookies. For the topping, use crushed freeze-dried peaches and vanilla cookie crumbs.
- Dairy-Free Delight: Use your favorite vegan cream cheese and butter substitutes. Whip chilled coconut cream instead of heavy cream for the filling.
- Nutty Professor: Mix finely chopped toasted pecans or almonds right into the graham cracker crust for an extra layer of flavor and crunch.
From My Kitchen to Yours: A Few Parting Thoughts
This recipe has seen a few iterations over the years. My first attempt involved trying to use strawberry jam in the filling, which, spoiler alert, made the filling too soft and weepy. Lesson learned: freeze-dried fruit is our no-bake best friend! It’s also evolved in size—I once made a giant version in a springform pan for a birthday, and while it was delicious, there’s something so fun and communal about these individual bites. They feel like a special little gift for each person.
One of my favorite kitchen memories involving these bites was when my nephew, who is a notoriously picky eater, tried one. He looked at it suspiciously, took a tiny bite, then his eyes went wide, and he shoved the whole thing in his mouth. The sound of his happy, crunching “Mmm!” was the best review I’ve ever received. So, don’t be surprised if these become your go-to “impress everyone” dessert. They have a way of bringing out the kid in all of us.
Your Questions, Answered!
Let’s tackle a few common questions to ensure your cheesecake bite success.
Q: My cream cheese was a little cold, and now my filling has tiny lumps. Can I fix it?
A: Don’t panic! This is a common hiccup. The best fix is to press the filling through a fine-mesh sieve with a spatula. It might take a minute, but it will catch all those little lumps and leave you with a perfectly smooth mixture.
Q: Can I make these ahead of time?
A: Absolutely! They are the perfect make-ahead dessert. You can assemble them completely (including the topping) and store them in an airtight container in the fridge for up to 3 days. The crunch topping might soften slightly, but it will still be delicious.
Q: My crust is too crumbly and won’t hold together. What did I do wrong?
A: This usually means you need a bit more “glue” (butter). The texture should be like wet sand. If it’s still dry and crumbly after mixing, try adding another half tablespoon of melted butter and mix again. When you press it into the liner, really press down firmly!
Q: Can I freeze these cheesecake bites?
A: You can! Freeze them on a parchment-lined baking sheet until solid (about 2 hours), then transfer to a freezer-safe container. They’ll keep for up to 2 months. Thaw in the refrigerator for a few hours before serving. The texture of the filling may be slightly less creamy after freezing, but still totally tasty.
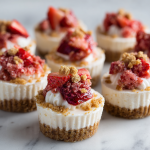
Strawberry Crunch Cheesecake Bites : No-Bake Dessert Magic
Description
If you love strawberry shortcake ice cream bars, these no-bake cheesecake bites are going to be your new obsession! They’re creamy, crunchy, fruity, and super easy to make — no oven, no stress. With just a few common ingredients and a little chill time, you’ll have a fun, crowd-pleasing dessert that looks adorable and tastes even better.
Ingredients
Crust
-
1 cup graham cracker crumbs
-
4 tbsp unsalted butter, melted
Cheesecake Filling
-
8 oz cream cheese, softened
-
1/3 cup powdered sugar
-
1 tsp vanilla extract
-
1/2 cup heavy cream, whipped to soft peaks
Strawberry Crunch Topping
-
1/2 cup freeze-dried strawberries, crushed
-
1/2 cup crushed golden Oreos or vanilla cookies
-
2 tbsp melted butter
Instructions
1. Make the Crust
-
Mix graham cracker crumbs and melted butter in a bowl until the mixture resembles wet sand.
-
Line a mini muffin tin with paper or silicone liners.
-
Press about 1 teaspoon of the crumb mixture firmly into the bottom of each cup.
-
Chill in the fridge for 10 minutes.
2. Make the Cheesecake Filling
-
Beat softened cream cheese until smooth.
-
Add powdered sugar and vanilla; mix until creamy.
-
In a separate bowl, whip heavy cream until soft peaks form.
-
Gently fold the whipped cream into the cream cheese mixture until smooth and airy.
3. Assemble
-
Spoon or pipe the cheesecake filling over the chilled crusts, filling each cup almost to the top.
-
Chill for at least 2 hours, or ideally 4 hours, until firm.
4. Make the Strawberry Crunch
-
Mix crushed freeze-dried strawberries, crushed cookies, and melted butter until crumbly.
-
Just before serving, sprinkle generously over each cheesecake bite and press lightly so it sticks.
Notes
-
Soft cream cheese = smooth filling. Let it sit at room temperature for 30–45 minutes before mixing.
-
Don’t rush the chilling time. It’s what helps the bites hold their shape.
-
Make ahead! These keep well in the fridge for up to 3 days (topping may soften slightly).
-
Crumb too dry? Add an extra 1/2 tablespoon of melted butter.
-
Want to swap flavors? Freeze-dried blueberries or raspberries work great too.
Quick Nutritional Snapshot
Please note: This is an estimated nutritional breakdown per bite, assuming the recipe makes 14 bites. Values may vary based on specific ingredients used.
Calories: ~140 | Fat: 10g | Carbs: 10g | Sugar: 6g | Protein: 2g
Final Thoughts: Your Ticket to Easy Dessert Stardom
So there you have it—your guide to creating little jars of joy that are equal parts nostalgia and sheer deliciousness. These No-Bake Strawberry Crunch Cheesecake Bites are more than just a recipe; they’re an experience. They’re the proof that you don’t need fancy equipment or hours of labor to create something truly special that sparks conversation and pure, crumbly-fingered delight.
Remember, the magic is in the layers: that sturdy, buttery base, the cloud-like filling, and the iconic, nostalgic crunch. But the real secret ingredient is you—the joy and love you stir into the bowl. Whether you’re making these for a party, a potluck, or just a well-deserved Tuesday treat, you’re crafting moments of happiness.
Don’t be afraid to make them your own. Tweak the flavors, get creative with the presentation, and most importantly, share them with someone. Because the best part of any great dessert is the smile it creates.
“`