

Why These Bars Will Become Your New Favorite “Hug in a Pan”
Hey there, fellow flavor adventurer! Olivia here, apron dusted with graham cracker crumbs and probably a smudge of marshmallow creme on my cheek. You know that moment when you bite into something so ridiculously comforting, it instantly transports you? That’s exactly what happened when I first pulled these S’mores Cookie Bars out of the oven. Imagine: the crackle of a campfire, the scent of toasted marshmallows clinging to your sweater, the joy of squishing chocolate between graham crackers… now bottle that nostalgia into a fudgy, portable bar you can make anytime. No fire pit required!
These aren’t just dessert bars – they’re edible memory capsules. Perfect for when you’re craving that gooey s’mores magic but it’s raining cats and dogs (or you just really don’t feel like battling mosquitoes). They’re the ultimate crowd-pleaser at bake sales, the star of potlucks that’ll have people begging for the recipe, and honestly? My secret weapon for turning a gloomy Tuesday into a celebration. The best part? You likely have most ingredients in your pantry right now. So preheat that oven, friend – we’re about to turn your kitchen into the coziest campsite ever.
That One Rainy Summer & the Birth of a Kitchen Legend
Picture this: Summer ‘08. My family’s annual camping trip got completely washed out by a thunderstorm that just wouldn’t quit. We were crammed into my Aunt Linda’s tiny lakeside cabin, twelve of us, with serious s’mores withdrawal. The campfire was a no-go, and morale was… damp. My cousin Jake, ever the drama king, actually draped himself over the sofa declaring, “All is lost without the sacred s’more!” Challenge accepted.
Raidng Aunt Linda’s pantry felt like a culinary treasure hunt. Graham crackers? Check. Chocolate bars? Obviously. But marshmallows? Nada. All she had was this dusty jar of marshmallow creme way in the back. “It’s now or never,” I thought. I smashed graham crackers into crumbs, swirled that fluffy creme like my life depended on it, and prayed to the baking gods. What emerged was pure magic – these dense, chewy bars with molten chocolate pockets and sticky-sweet marshmallow rivers. The cabin erupted. Jake declared it “better than any campfire s’more,” and Aunt Linda still calls them “The Rainstorm Rescue Bars.” Every time I bake them, I’m back in that cozy, chaotic cabin, proving that sometimes the best memories start with a little kitchen improvisation (and maybe a jar of Fluff!).
Your S’mores Treasure Map: Ingredients & Why They Matter
Gather your squad! These simple ingredients work serious magic together. Here’s the scoop on each:
- ½ cup (113g) unsalted butter, softened – Your flavor foundation! Unsalted lets you control the salt. Chef’s Tip: Softened butter creams beautifully. Can’t wait? Grate cold butter!
- ¾ cup (150g) packed light or dark brown sugar – Dark brown adds deeper molasses notes (my fave!), light keeps it bright. Pack it tight in your measuring cup!
- 1 large egg, room temperature – Binds the party! Room temp blends smoother. Quick Fix: Place your egg in warm water for 5 mins.
- 1 tsp pure vanilla extract – The secret whisper of warmth. Skip the imitation stuff!
- 1 cup (125g) all-purpose flour – Structure queen! Spoon & level it – don’t scoop!
- 1 cup (120g) graham cracker crumbs – The soul of s’mores! Pro Hack: Blitz whole crackers in a food processor or bash them in a zip-top bag. Need gluten-free? Use GF grahams!
- ½ tsp baking powder – Our lift agent for chewy-perfect bars.
- ¼ tsp salt – Balances the sweetness. Essential!
- 1 cup (180g) semi-sweet chocolate chips – Classic campfire vibes. Fun Swap: Try dark chocolate chunks or even peanut butter chips!
- 1 heaping cup marshmallow creme (“Fluff” or homemade) – The GOO factor! Warning: It’s sticky! Spray your spoon with oil. No Fluff? See FAQ below!
Let’s Build Some S’mores Magic: Step-by-Step
Ready? Aprons on! This is where the cozy chaos begins. Don’t worry – I’ll guide you through every sticky step.
- Preheat & Prep (Your First Win!): Crank that oven to 350°F (175°C). Line your 8×8 pan with parchment paper, leaving an overhang on two sides. Why? This creates a sling for easy lifting later! No parchment? Grease it well, but trust me, parchment is your BFF here. Chef’s Secret: Spritz the parchment lightly with oil to prevent any sticking disasters.
- Creamy Dreams (Butter & Sugar Tango): Grab a big bowl and beat that softened butter and brown sugar together for 2-3 minutes with a hand mixer (or stand mixer paddle). You want it light, fluffy, and pale – this incorporates air for a tender crumb! Watch for the change: It’ll go from gritty to glorious. Scrape the bowl sides halfway.
- Egg-cellent Addition (Binding the Joy): Beat in the egg and vanilla. Mix just until combined – maybe 30 seconds. Overbeating eggs can make things tough. Look for: A smooth, glossy mixture. Yum!
- Dry Team Unite (The Gentle Fold): In another bowl, whisk together the flour, graham crumbs, baking powder, and salt. Key Move: Add this dry mix to the wet ingredients all at once. Mix on LOW speed (or by hand) just until no dry streaks remain. Stop before it’s totally uniform! A few streaks are fine – overmixing = tough bars. Fold in the chocolate chips with a spatula.
- Layering the Love (The S’mores Sandwich Effect): This is the fun part! Grab about ⅔ of the dough. Press it firmly and evenly into the bottom of your prepped pan. Tip: Use slightly damp fingers or the bottom of a glass to prevent sticking. Now, gently spread the marshmallow creme over this layer. Fluff Fight Solution: Spray your spatula or offset knife with cooking spray! Dollop it in blobs first, then gently connect them. Sprinkle the remaining chocolate chips evenly over the Fluff. Finally, take pinches of the reserved dough and dot them randomly over the top. Don’t cover completely – we want that marshmallow to peek through!
- Bake to Golden Bliss (Patience, Grasshopper!): Slide the pan into the oven’s center rack. Bake for 22-25 minutes. What to Watch For: The edges will be deeply golden brown, the top dough chunks will look set, and the marshmallow might be bubbling *slightly* around the edges. CRUCIAL: The center will look soft – that’s perfect! It sets as it cools. Overbaking = dry bars. Rotate the pan halfway for even baking.
- The Cool Down (The Hardest Part!): Place the pan on a wire rack. Resist the urge to cut in! Let it cool COMPLETELY – at least 1-2 hours. This allows the molten layers to set so you get clean slices, not a gooey landslide. Speed Trick? Pop it in the fridge for 30 mins after 30 mins of room temp cooling.
- Slice & Savor (Victory Lap!): Use the parchment overhang to lift the entire bar slab out of the pan. Place it on a cutting board. Use a sharp knife, wiping it clean between cuts for neat squares. Enjoy at room temp or zap a piece for 10 seconds for warm, melty heaven!
Serving Up Smiles: How to Present These Beauties
These bars are stars on their own! For maximum cozy vibes, stack them slightly haphazardly on a rustic wooden board or a cheerful vintage plate. A light dusting of graham cracker crumbs or flaky sea salt adds a bakery-worthy touch. Pair them with a cold glass of milk for classic comfort, a steaming mug of coffee for grown-up bliss, or hot chocolate for ultimate s’mores immersion. They’re perfect for picnics (pack in parchment squares!), lunchbox treats (if they last that long), or as the grand finale to a backyard BBQ. Just watch the smiles spread!
Shake Up Your S’mores: 5 Fun Twists!
Got the classic down? Time to play! Here are my favorite riffs:
- Salty-Sweet Surprise: Sprinkle ½ tsp flaky sea salt over the marshmallow layer before adding the top dough.
- Peanut Butter Passion: Swirl ¼ cup peanut butter into the marshmallow creme layer. Use peanut butter chips instead of chocolate chips!
- Fruity Fireworks: Add ½ cup dried cranberries or chopped tart cherries to the dough with the chocolate chips.
- Minty Fresh Campfire: Swap semi-sweet chips for dark chocolate AND add ½ tsp peppermint extract to the dough. Hello, Thin Mint vibes!
- Gluten-Free Getaway: Use certified GF graham crackers for crumbs and a 1-to-1 GF flour blend. Works like a charm!
Olivia’s Extra Scoop: Lessons from the Gooey Trenches
Oh, the stories these bars could tell! Remember my first test batch? I used mini marshmallows instead of creme, thinking it would be “easier.” Big mistake. They melted into a single, sticky, volcanic layer that welded itself to the pan. Lesson learned: Fluff is your friend! Over the years, I’ve tweaked this gem – adding the extra sprinkle of chocolate chips over the Fluff layer was a game-changer for intense chocolate pockets. Storage tip: Keep them airtight at room temp for 3 days, but good luck with that! They freeze beautifully too (see FAQ). The dough also chills well – you can prep it, layer it in the pan, cover, and refrigerate overnight before baking. Perfect for stress-free entertaining! These bars embody my kitchen philosophy: Start with love, embrace the mess (hello, sticky fingers!), and always, always share the results.
Your S’mores Bar SOS: Fixing Common Hiccups
Let’s tackle those burning questions!
- Q: Can I use real marshmallows instead of marshmallow creme? PLEASE?
A: Oh, I feel your pain! You *can*, but it’s tricky. Mini marshmallows (about 1.5 cups) work best. Sprinkle them evenly over the bottom dough layer *before* adding the chocolate chips and top dough. Bake as directed, but expect them to melt completely into a thinner, chewier layer rather than distinct swirls. Cover loosely with foil in the last 5-10 minutes if they start browning too much!
- Q: Help! My bars are a gooey mess when I try to cut them. What did I do wrong?
A: The number one culprit is not cooling completely. That molten marshmallow and chocolate need time to set! Be patient, my friend. Let them cool fully in the pan on a rack. Chilling them briefly helps immensely. Also, ensure you pressed the bottom layer firmly – a loose base makes cutting harder. Use a sharp knife dipped in hot water and wiped clean between cuts.
- Q: Can I freeze these bars for a s’mores emergency stash?
A: Absolutely! They freeze like champions. Cool completely, cut into bars, then flash-freeze them in a single layer on a parchment-lined sheet for 1 hour. Once solid, transfer to an airtight container or freezer bag, separating layers with parchment. Freeze for up to 3 months. Thaw at room temp or warm gently in the microwave (10-15 secs).
- Q: The edges got really dark, but the center seems underdone. How do I prevent that?
A: Oven hotspots strike! First, ensure your rack is in the center. Using a light-colored metal pan (not glass or dark metal) helps prevent over-browning. You can also loosely tent the pan with foil during the last 5-10 minutes of baking. If it happens, don’t despair! Trim the very dark edges (chef’s snack!) – the rest should be delicious.
S’mores Cookie Bars
- Total Time: 45 mins
Description
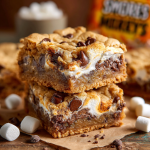
No firepit? No problem. These gooey, fudgy S’mores Cookie Bars pack all the nostalgia of campfire nights into a bake-anytime square. Imagine golden graham cracker cookie dough sandwiching rivers of marshmallow creme and pockets of melty chocolate. They’re sweet, sticky, chewy, and—yes—completely irresistible. Best of all? You likely have everything on hand to make these today.
Ingredients
-
½ cup (113g) unsalted butter, softened
-
¾ cup (150g) light or dark brown sugar, packed
-
1 large egg (room temp)
-
1 tsp vanilla extract
-
1 cup (125g) all-purpose flour
-
1 cup (120g) graham cracker crumbs
-
½ tsp baking powder
-
¼ tsp salt
-
1 cup (180g) semi-sweet chocolate chips
-
1 heaping cup marshmallow creme (“Fluff”)
Instructions
-
Preheat Oven to 350°F (175°C). Line an 8×8 pan with parchment, leaving overhang.
-
Cream Butter & Sugar until fluffy (2-3 mins). Beat in egg and vanilla.
-
Mix Dry Ingredients (flour, graham crumbs, baking powder, salt) and add to wet. Stir until mostly combined. Fold in chocolate chips.
-
Layer the Dough
-
Press ⅔ of dough into the pan.
-
Spread marshmallow creme gently over it.
-
Sprinkle a few extra chocolate chips.
-
Dot remaining dough on top in pieces (don’t cover fully).
-
-
Bake 22–25 mins until edges are golden and marshmallow is just bubbling. Center will look soft—let it be!
-
Cool Completely in pan before slicing (at least 1–2 hours). For clean cuts, chill 30 mins then slice with a hot, wiped knife.
Notes
-
Sprinkle sea salt over the Fluff for a sweet-savory pop
-
Swirl peanut butter or Nutella into the marshmallow layer
-
Use GF grahams and flour for a gluten-free twist
-
Freeze bars up to 3 months for sweet emergency moments
- Prep Time: 20 mins
- Cook Time: 25 mins
Nutrition
- Calories: 250 cal Per Serving
- Sugar: 18g
- Fat: 12g
- Carbohydrates: 30g
- Fiber: 1g
Nutritional Info (Approximate Per Bar)
🔥 Calories: ~250 | 💪 Carbs: 30g | 🥑 Fat: 12g | 🍬 Sugar: 18g | 🌾 Fiber: 1g
Remember: This is a treat meant for savoring and sharing joy! Enjoy every gooey bite.
Final Thought: More Than Just a Dessert
These S’mores Cookie Bars are a reminder that joy doesn’t need to be complicated. Whether you stick to the classic or globe-trot with flavors, they’re a celebration of simplicity, nostalgia, and the universal love of chocolate.
They’ve survived kitchen disasters, toddler raids, and my questionable oven—yet they always deliver smiles. So here’s to imperfectly perfect desserts, toasty fingers, and the magic of a shared sweet moment.
Now, who’s ready to preheat the oven


