

Ditch the Takeout Menus: Your New Favorite Weeknight Hero Is Here
Hey there, friend! Come on in, grab an apron, and let’s talk about one of life’s great dilemmas: that intense craving for crispy, savory, nutty takeout cashew chicken… and the simultaneous desire to not deal with multiple pans, a splattering wok, or a stack of dishes taller than my stack of cookbooks. Been there, ordered that. But what if I told you we could capture all that magical flavor and get it on the table with just one pan, minimal fuss, and a kitchen that doesn’t look like a tornado hit it?
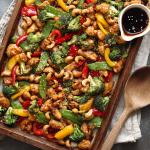
Welcome to the glorious, life-changing world of sheet pan dinners, and specifically, this Sheet Pan Cashew Chicken. This isn’t just a recipe; it’s your ticket to a stress-free, flavor-packed dinner that feels like a treat. Imagine tender, juicy chicken and vibrant, crisp-tender vegetables all roasted to caramelized perfection, then tossed in a sticky-sweet, garlicky, ginger-kissed sauce that clings to every bite. And the cashews! Roasting them right on the pan transforms them into little golden nuggets of crunch.
This dish is the perfect example of what I love most about cooking: turning simple, real ingredients into something that feels truly special. It’s for the busy parent, the tired professional, the new cook, and the seasoned foodie who just wants a darn good meal without the cleanup. So, preheat that oven, and let’s make something incredibly delicious together. I promise, your takeout spot might just start missing you.
The Takeout Epiphany: Why This Dish Stole My Heart
My love affair with cashew chicken started in a most unglamorous way: a tiny, hole-in-the-wall takeout joint in my college town. My roommate Sam and I had a ritual. Every Thursday, after a grueling biochemistry lab (a class that, to this day, makes me grateful I chose a path involving whisking over microscopes), we’d pool our change, order a giant container of their “Special Cashew Chicken,” and feast on the floor of our dorm room, dissecting our week between bites.
It was more than food; it was comfort, camaraderie, and the first taste of adulthood that didn’t involve dining hall mystery meat. Years later, living in my first apartment with a woefully underpowered stove, I tried to recreate that taste. The wok smoke alarm symphony was… dramatic. But then, one night, rushing to get dinner done, I threw everything on a sheet pan. The result? That same sticky, savory, crunchy joy, but with zero stress. It was my “aha!” moment. The soul of our Thursday night ritual, updated for real, busy life. Now, every time I smell that soy-garlic sauce roasting, I’m transported back—minus the biochemistry textbook!
Gathering Your Flavor Allies: What You’ll Need
Here’s the beautiful part: every ingredient here is a team player, building layers of flavor and texture. Let’s break it down.
- 1 ½ lbs boneless, skinless chicken breast or thighs, cubed – Chef’s Insight: Thighs are my secret weapon for guaranteed juiciness and richer flavor, but breasts work perfectly if you prefer leaner meat. Just don’t overcook them! Cube them into even, 1-inch pieces so everything cooks uniformly.
- 2 cups broccoli florets – The classic veggie that soaks up sauce like a dream and gets deliciously crisp-edged.
- 1 red bell pepper & 1 yellow bell pepper, sliced – For sweetness, color, and a lovely soft-but-firm texture. No yellow? Use two reds or throw in an orange!.
- 1 cup snow peas or green beans – Substitution Tip: Snow peas stay bright and snappy, while green beans offer a heartier bite. No fresh? A cup of frozen, thawed edamame works in a pinch for a protein boost.
- 3/4 cup unsalted cashews – Crucial: Unsalted lets you control the seasoning. Roasting them on the pan is non-negotiable—it unlocks their buttery, toasty potential.
- 2 tablespoons olive oil, Salt & pepper to taste – The simple start to any great roast. Coating everything well ensures golden, not steamed, results.
For The Magic Sauce:
- 1/3 cup low-sodium soy sauce – The salty, umami backbone. Using low-sodium gives you control. Tamari is a perfect gluten-free swap.
- 2 tablespoons hoisin sauce – The secret ingredient! It adds a complex, slightly sweet, fermented depth. In a bind, use oyster sauce or even a bit more soy + a teaspoon of brown sugar.
- 1 tablespoon rice vinegar – The bright, acidic balance that cuts through the richness. Lime juice or apple cider vinegar can sub in a 1:1 ratio.
- 1 tablespoon honey or maple syrup – For that irresistible sticky-sweet glaze. Agave works too for a vegan version.
- 2 garlic cloves, minced & 1 teaspoon grated fresh ginger – Chef’s Plea: Fresh is best here! That pungent, aromatic kick is what makes the sauce sing. A microplane is your best friend for the ginger.
- 1 tablespoon cornstarch + 2 tbsp water (slurry) – Our thickening agent. Mix it separately before adding to avoid clumps. Arrowroot powder works as a clear substitute.
Let’s Get Cooking: Your Foolproof Roadmap to Delicious
Ready? This is where the magic happens, and it’s easier than you think. I’ll walk you through every step with my favorite kitchen hacks.
- Preheat & Prep. Fire up your oven to a hot 400°F (200°C). This high heat is key for caramelization, not steaming. Line a large, rimmed baking sheet with parchment paper – your future self doing dishes will thank you. Little Chef Hack: If you want even easier cleanup, give the parchment a *very* light spritz of oil to prevent any super-sticky sauce spots from clinging.
- Pan Party Time. In a large bowl (or right on the pan if you’re a minimalist!), toss your cubed chicken and all those beautiful chopped veggies with the olive oil, salt, and pepper. Don’t be shy—get everything evenly coated. Spread it all out in a single, even layer. Crowding is the enemy of crispness! Give each piece some personal space.
- The First Roast. Slide that loaded pan into your hot oven and roast for 20-25 minutes. Here’s the flip: At the halfway mark (about 10-12 minutes in), pull the pan out and give everything a good stir/flip. This ensures even browning and cooking. You’ll see the chicken starting to opaque and the veggies getting those lovely charred tips. That’s the flavor happening!
- Sauce Sorcery. While the pan is roasting, make your sauce. In a small saucepan, combine the soy sauce, hoisin, rice vinegar, honey, garlic, and ginger. Whisk it together and bring it to a gentle simmer over medium heat. Let it bubble happily for just a minute to mellow the raw garlic. Now, give your cornstarch and water slurry a final stir (it settles!) and slowly drizzle it into the simmering sauce while whisking constantly. In about 60 seconds, you’ll watch it transform from thin liquid to a gorgeous, glossy, coating sauce. Remove it from the heat.
- The Grand Finale. Carefully pull the sheet pan from the oven. The chicken should be cooked through (165°F internal temp). Now, pour that glorious sauce right over everything. Add the raw cashews (they’ll toast in the last few minutes). Use tongs or a big spoon to toss and coat every single piece thoroughly. It’s a saucy, beautiful mess.
- One Last Heat. Pop the pan back into the oven for just 5 more minutes. This allows the sauce to thicken further, cling to the food, and lets the cashews get perfectly toasted. Your kitchen will smell absolutely insane.
- Serve & Swoon. That’s it! Spoon your masterpiece over a bed of fluffy rice, quinoa, or into crisp lettuce cups for a low-carb option. Don’t forget to scrape up every last bit of that caramelized sauce from the pan.
Plating Up Your Masterpiece
Presentation is part of the joy! I love serving this family-style: pour the entire sheet pan contents into a big, rustic serving bowl or platter. Scatter some thinly sliced green onions and a sprinkle of sesame seeds on top for a pop of color and extra flavor. For individual plates, fluff a scoop of jasmine rice in a bowl, pile the cashew chicken high on top, and let the sauce drizzle down the sides. A small wedge of lime on the side for a fresh squeeze takes it over the top. Simple, beautiful, and inviting.
Make It Your Own: Endless Delicious Twists
The beauty of this framework is its flexibility! Here are a few ways to play:
- Spicy Kick: Add 1-2 teaspoons of Sriracha or a drizzle of chili crisp to the sauce, or toss in some sliced fresh chili with the veggies.
- Different Protein: Swap chicken for peeled shrimp (add them in the last 10 minutes of cooking), firm tofu cubes (press them well first), or even thin strips of steak.
- Seasonal Veg Swap: Use what you have! Asparagus, sliced carrots, zucchini, or snap peas are all fantastic. Just keep pieces roughly the same size.
- Pineapple Sweet & Sour Twist: Add 1 cup of fresh pineapple chunks with the veggies and swap the hoisin for 2 tbsp ketchup + 1 tbsp more vinegar.
- Gluten-Free: Use tamari instead of soy sauce and ensure your hoisin is a GF brand (or substitute with more tamari + a touch of molasses).
Olivia’s Kitchen Corner: Notes from My Apron Pocket
This recipe has become a true workhorse in my kitchen, and it’s evolved with me. I used to whisk the sauce in a bowl and pour it over before roasting, but I found the sugar in the hoisin and honey would sometimes burn before the chicken was done. The two-step process—roasting first, saucing later—is the foolproof golden ticket. It’s also a fantastic meal prep hero. I’ll double the recipe on a Sunday, and the leftovers (which somehow taste even better the next day) make my weekday lunches something I actually look forward to. One funny fail? The time I used salted cashews and didn’t adjust the soy sauce. Let’s just say it was a… *very* seasoned experience. We live and we learn, always with a smile (and a big glass of water).
Your Questions, Answered (Because We’ve All Been There!)
Q: My veggies are soggy! What happened?
A: The most common culprit is overcrowding the pan. If the pieces are piled on top of each other, they steam instead of roast. Use two sheet pans if needed! Also, ensure your oven is fully preheated before the pan goes in.
Q: Can I make this ahead of time?
A> Absolutely! You can chop the veggies and chicken, store them separately in the fridge up to a day ahead. Whisk the sauce ingredients (except the cornstarch slurry) together and store in a jar. When ready to cook, proceed with the recipe—you’ll just need to make the slurry and thicken the sauce.
Q: My sauce didn’t thicken. Help!
A> No worries! First, ensure your cornstarch slurry was well-mixed. Second, the sauce needs to come to a proper simmer before adding the slurry, and then you need to cook it for a full 60-90 seconds while whisking. If it’s still thin, mix another ½ tsp cornstarch with 1 tbsp water and whisk it in.
Q: Is it okay to use frozen vegetables?
A> You can, but pat them extremely dry with paper towels first. They release a lot of water and won’t get as crispy. For best results, fresh is the way to go for that perfect roasted texture.
Sheet Pan Cashew Chicken : Takeout Flavor, One-Pan Ease
Description
If you love cashew chicken but hate the mess and effort that usually comes with it, this recipe is your weeknight hero. Everything cooks on one sheet pan—juicy chicken, colorful veggies, and crunchy cashews—then gets tossed in a sticky-sweet, garlicky sauce that tastes just like your favorite takeout (honestly, better). It’s easy, satisfying, and perfect for busy nights when you still want a great homemade meal.
Ingredients
Chicken & Veggies
-
1½ lb (700 g) boneless, skinless chicken breast or thighs, cut into 1-inch cubes
-
2 cups broccoli florets
-
1 red bell pepper, sliced
-
1 yellow bell pepper, sliced
-
1 cup snow peas or green beans
-
¾ cup unsalted cashews
-
2 tablespoons olive oil
-
Salt and black pepper, to taste
Sauce
-
⅓ cup low-sodium soy sauce (or tamari)
-
2 tablespoons hoisin sauce
-
1 tablespoon rice vinegar
-
1 tablespoon honey or maple syrup
-
2 garlic cloves, minced
-
1 teaspoon fresh ginger, grated
-
1 tablespoon cornstarch + 2 tablespoons water
Instructions
-
Preheat Oven
Preheat oven to 400°F (200°C). Line a large sheet pan with parchment paper. -
Roast Chicken & Veggies
Toss chicken, broccoli, bell peppers, and snow peas with olive oil, salt, and pepper.
Spread evenly on the sheet pan. Roast for 20–25 minutes, stirring once halfway through. -
Make the Sauce
While everything roasts, combine soy sauce, hoisin, vinegar, honey, garlic, and ginger in a small saucepan.
Bring to a gentle simmer. Stir in the cornstarch slurry and cook 1–2 minutes until thick and glossy. Remove from heat. -
Add Sauce & Cashews
Remove the pan from the oven. Pour sauce over chicken and veggies, add cashews, and toss to coat. -
Finish Baking
Return pan to the oven for 5 more minutes, until cashews are lightly toasted and everything is coated and sticky. -
Serve
Serve hot over rice, quinoa, or in lettuce cups. Optional garnish: green onions or sesame seeds.
Notes
-
Don’t overcrowd the pan: Use two pans if needed for crispy veggies.
-
Use unsalted cashews: The sauce already has plenty of flavor.
-
Extra crisp: Broil for the last 1–2 minutes, watching closely.
-
Spicy option: Add sriracha or chili flakes to the sauce.
Nutritional Info (Approximate, Per Serving)
Prep Time: 15 minutes | Cook Time: 30 minutes | Total Time: 45 minutes | Servings: 4
Calories: 450 | Fat: 22g | Saturated Fat: 4g | Carbohydrates: 25g | Fiber: 3g | Sugar: 10g | Protein: 35g | Sodium: ~900mg (varies based on soy sauce used)
Final Thoughts: More Than Just a Meal
So, there you have it. A recipe that’s more than just a list of ingredients and steps—it’s a promise. A promise that a truly delicious, satisfying dinner doesn’t have to come with a side of stress, a mountain of dishes, or a hefty delivery fee.
This Sheet Pan Cashew Chicken is proof that the best meals often live in the beautiful middle ground: between takeout convenience and homemade heart, between effortless cooking and exceptional flavor. It’s a testament to the power of a hot oven, a good sauce, and the simple magic that happens when you give a few real ingredients some space to shine.
I hope this recipe becomes more than just a dish in your rotation. I hope it becomes a reliable friend on those hectic weeknights, a customizable canvas for your creativity, and perhaps even the start of your own rituals. Maybe it’s the meal you make after a long day, the one you serve to friends with pride, or the easy answer to “What’s for dinner?” that makes everyone at the table smile.
Cooking, at its best, is an act of generosity—to others and to yourself. So, be generous with your time (even if it’s just 45 minutes), be generous with that extra sprinkle of green onions, and be generous with the joy of creating something wonderful. You’ve got this.
Now, go forth, preheat that oven, and reclaim your weeknight. Your new favorite dinner—and a very clean kitchen—awaits.
Happy cooking,
Olivia


