
When a Classic Cookie Meets a Sweet Surprise
Hello, my fellow flavor lovers! Olivia here, welcoming you back to my cozy kitchen corner. Is there anything in the world that smells more like a warm hug than a batch of snickerdoodles baking in the oven? That magical blend of cinnamon and sugar, the way your whole house fills with this impossibly cozy aroma… it’s pure, unadulterated joy. It’s the smell of happy childhoods, of after-school treats, and of simple, homemade goodness.
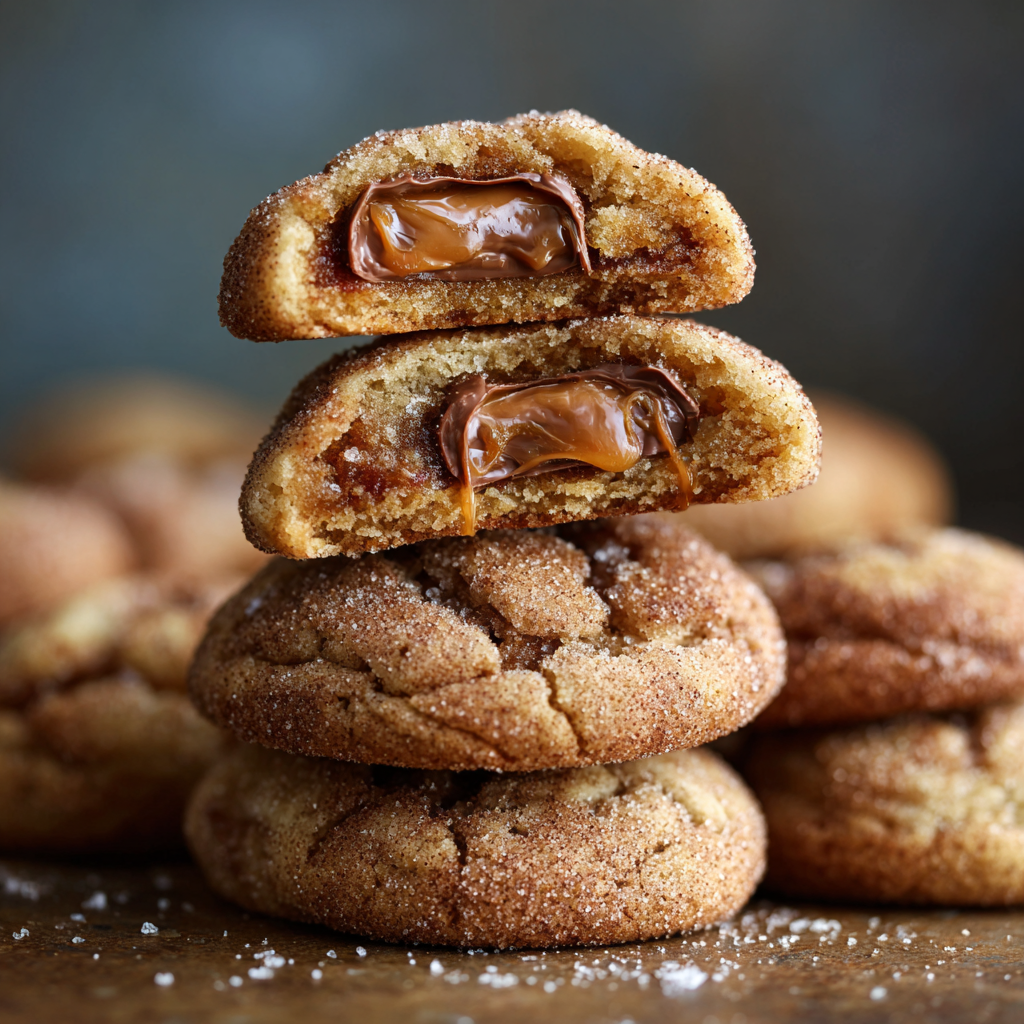
But what if I told you we could take that already-perfect cookie and turn it into something truly legendary? What if we could inject a little bit of magic, a gooey, chocolatey, caramel-filled secret right into its soft, chewy heart? Friends, prepare to have your world rocked. We’re taking the beloved snickerdoodle and giving it the most delicious upgrade imaginable: a hidden Rolo center.
Imagine this: you bite through that signature cinnamon-sugar crunch into a cloud of buttery, soft snickerdoodle dough. And just when you think it can’t get any better, you hit a pocket of warm, melted caramel and smooth milk chocolate. It’s a flavor explosion, a textural dream, and an instant crowd-pleaser. These Rolo-Stuffed Snickerdoodles are the cookie of your dreams, and I am so incredibly excited to share them with you. They’re easier to make than you think, and I promise, they will make you a baking hero. So, tie on your favorite apron (the messy one tells the best stories, I always say!), and let’s bake some magic.
The Accidental Discovery That Started It All
This recipe, like so many of my favorites, was born from a happy little kitchen accident. It was a chilly autumn afternoon a few years back, and I was in a serious baking mood. I had a double batch of my go-to snickerdoodle dough whirring away in my stand mixer and a giant bowl of Halloween candy sitting on the counter, begging to be used up. My eyes landed on a half-eaten bag of Rolos, and a lightbulb went off.
I remembered the thrill of thumbprint cookies and the joy of a surprise center. What if…? I scooped a portion of dough, pressed a single, unwrapped Rolo into its center, and carefully sealed it up. I rolled it in the classic cinnamon-sugar coating and held my breath as it baked. When I pulled that first tray out, they looked just like normal snickerdoodles—maybe a little plumper, a little more promising. But the real magic happened when I broke one open. The caramel had melted into a perfect, oozy pool, swirling with the chocolate and cradled by the soft, cinnamon-spiced dough. I knew instantly I’d stumbled onto something special. It was a reminder that the best recipes often come not from rigidly following rules, but from a little bit of curiosity and a whole lot of heart.
Gathering Your Sweet Supplies
You don’t need a pantry full of exotic ingredients for these show-stoppers. The beauty is in the combination of simple, classic elements. Here’s everything you’ll need to create 32 pockets of pure joy.
For the Snickerdoodle Dough:
(This is a double batch of my favorite recipe, making enough to generously wrap all 32 Rolos!)
- 3 cups All-Purpose Flour: The sturdy backbone of our cookie. For a slightly softer, more cake-like texture, you can swap in 1/2 cup of cake flour, but all-purpose works perfectly.
- 2 tsp Cream of Tartar: This is the non-negotiable star that gives snickerdoodles their iconic tangy flavor and contributes to their soft, chewy texture. Don’t skip it!
- 1 tsp Baking Soda: Our leavening agent, working with the cream of tartar to help the cookies puff up and develop those lovely crackly tops.
- 1/2 tsp Salt: A crucial flavor enhancer that makes all the sweet elements pop. I use fine sea salt.
- 1 cup Unsalted Butter, softened: The key to richness and that melt-in-your-mouth quality. Make sure it’s truly softened at room temperature for easy creaming. If you only have salted butter, just reduce the added salt to 1/4 tsp.
- 1 1/2 cups Granulated Sugar: For sweetness and that perfect chewy texture.
- 2 large Eggs, room temperature: They bind everything together. Pro tip: Room temp eggs incorporate much more smoothly into the creamed butter and sugar, giving you a better dough texture.
- 2 tsp Vanilla Extract: The warm, aromatic flavor that makes any baked good taste like it came from a professional bakery. Use the good stuff if you have it!
For the Filling & Coating:
- 32 Rolo Chewy Caramels in Milk Chocolate, unwrapped: The glorious, gooey heart of the operation! Unwrapping them is the most tedious part, I promise. Get a helper, or put on a good podcast.
- 4 tbsp Granulated Sugar: For our crunchy, sparkly outer shell.
- 2 tsp Ground Cinnamon: The perfect partner for sugar. Its warm, spicy fragrance is what makes a snickerdoodle a snickerdoodle.
- Optional Chef’s Twist: A generous pinch of Sea Salt Flakes: I highly recommend adding this to your cinnamon-sugar mix. It creates an incredible “salted caramel” finish that balances the sweetness beautifully.
Let’s Get Baking: The Step-by-Step Magic
Ready to create some cookie magic? Follow these steps, and you’ll be a Rolo-stuffing pro in no time. I’ve packed this section with all my favorite chef hacks to ensure your cookies turn out perfect every single time.
- Preheat and Prep. Start by preheating your oven to 350°F (175°C). This gives it plenty of time to reach a consistent, accurate temperature. Line your baking sheets with parchment paper. This is my number one tip for preventing sticking and ensuring easy cleanup. No parchment? A silicone baking mat works wonders too.
- Whisk the Dry Goods. In a medium bowl, whisk together the flour, cream of tartar, baking soda, and salt. Whisking, instead of just stirring, ensures the leavening agents and salt are perfectly distributed, so every cookie bakes evenly. Set this aside.
- Cream the Butter & Sugar. In the bowl of a stand mixer fitted with the paddle attachment (or using a hand mixer), beat the softened butter and 1 1/2 cups of sugar together on medium-high speed for 2-3 minutes. We’re not just mixing here; we’re “creaming.” This process incorporates air into the dough, which helps the cookies rise. You’ll know it’s ready when the mixture becomes pale yellow and wonderfully fluffy. Scrape down the sides of the bowl with a spatula to make sure everything is incorporated.
- Incorporate the Wet Ingredients. Reduce the mixer speed to low and add the eggs, one at a time, mixing until each is fully blended in. Then, mix in the vanilla extract. Adding the eggs slowly prevents the mixture from curdling and ensures a smooth, emulsified dough.
- Combine Wet and Dry. With the mixer on low, gradually add the dry ingredient mixture to the wet ingredients. Mix only until the flour streaks have just disappeared. Chef’s Hack: Overmixing at this stage develops the gluten in the flour, which can lead to tough cookies. A few remaining flour patches are okay—you can fold them in by hand with your spatula at the end.
- Create Your Cinnamon-Sugar Coating. In a small, shallow bowl (a cereal bowl is perfect), stir together the 4 tablespoons of sugar and 2 teaspoons of cinnamon (and that pinch of sea salt if you’re using it!). This is your cookie’s glittery, flavorful jacket.
- The Fun Part: Stuffing the Rolos! Here’s the secret to a perfectly sealed cookie: scoop about 1 ½ tablespoons of dough. I love using a medium cookie scoop for consistency, but two spoons work just fine. Flatten the dough ball slightly in the palm of your hand to create a small disc. Press one unwrapped Rolo into the center. Now, gently bring the edges of the dough up and around the candy, pinching them together to seal it completely. Roll it gently between your palms to form a smooth, round ball. The goal is to fully encase the Rolo so no caramel escapes during baking!
- Coat and Place. Roll each sealed dough ball in the cinnamon-sugar mixture until it’s completely coated. Place the balls about 2 inches apart on your prepared baking sheets. They will spread a little as they bake, so give them some space to become the beautiful cookies they’re destined to be.
- Bake to Perfection. Bake for 10-12 minutes. You’re looking for the edges to be set and lightly golden, and the tops to be puffed and slightly crackled. Pro Tip: They will look a tad underdone in the center, but that’s exactly what you want for an ultra-soft, chewy cookie. Remember, they continue to cook on the hot baking sheet after you take them out.
- The Crucial Cool-Down. This is the hardest part: patience! Let the cookies cool on the baking sheet for at least 5 minutes before transferring them to a wire rack to cool completely. This resting time allows them to set up, so you don’t end up with a crumbly mess. The caramel inside is molten lava hot straight from the oven, so this also saves your taste buds!
How to Serve These Caramel Masterpieces
Presentation is part of the fun! For the ultimate experience, serve these cookies slightly warm. That’s when the caramel center is at its most gloriously gooey state. Pile them high on a rustic wooden board or a pretty ceramic platter. A glass of cold milk is their absolute best friend, but they’re also divine crumbled over a scoop of vanilla bean ice cream. For a real “wow” factor at a dinner party, serve them warm with a little dish of extra sea salt for sprinkling, letting your guests customize their own sweet-and-salty bite.
Get Creative: Delicious Twists on the Classic
Once you’ve mastered the basic recipe, the fun really begins! Here are a few of my favorite ways to mix things up:
- Salted Dark Chocolate: Swap the Rolos for dark chocolate-covered caramel candies for a more sophisticated, less sweet flavor profile.
- Peanut Butter Lover’s: Use a mini peanut butter cup instead of a Rolo for a chocolate-peanut butter explosion.
- Apple Pie Vibe: Add 1/2 teaspoon of apple pie spice to the cinnamon-sugar coating for a warm, autumnal twist.
- Stuffed with Nutella: For a different kind of gooey center, freeze teaspoon-sized dollops of Nutella and wrap the dough around those.
- Gluten-Free Friendly: Use a 1:1 gluten-free all-purpose flour blend in the dough. The result is just as soft and delicious!
Olivia’s Kitchen Notes & Stories
This recipe has become a staple in my kitchen, and it’s evolved in the best ways. I’ve learned that chilling the stuffed dough balls for 15-20 minutes before baking can help them spread a tiny bit less, resulting in an even thicker, chewier cookie. But honestly? I’m usually too impatient for that, and they’re fantastic either way.
A funny story: I once brought these to a potluck and didn’t tell anyone about the surprise inside. The chorus of “WHOA!” and “WHAT IS THIS?!” from across the room was one of the most satisfying moments of my baking life. It’s a reminder that food is about more than just taste—it’s about creating moments of shared delight and wonder. So, share them widely, and don’t be shy about your secret ingredient!
Your Questions, Answered!
I’ve gotten a lot of questions about these cookies over the years, so I’ve compiled the most common ones here to help you troubleshoot like a pro.
Q: My caramel leaked out everywhere! What did I do wrong?
A: Ah, the great caramel escape! This usually happens for one of two reasons. First, the dough might not have been sealed completely. Make sure you’ve pinched the seams firmly and rolled it into a smooth, seamless ball. Second, you might be over-baking. The longer they’re in the oven, the more the caramel liquefies and seeks an escape route. Try taking them out right at the 10-minute mark if this is a recurring issue.
Q: Can I make the dough ahead of time and bake it later?
A: Absolutely! This is a great time-saver. You can prepare the dough, stuff and roll the cookies, and then place the unbaked balls on a parchment-lined tray. Freeze them until solid, then transfer to a freezer bag. When a cookie craving hits, just bake them straight from the freezer, adding 1-2 minutes to the baking time. No need to thaw!
Q: My cookies came out flat. How can I prevent that?
A> Flat cookies are often a result of butter that was too warm. Make sure your butter is softened but still cool to the touch—you should be able to make an indent with your finger, but it shouldn’t feel greasy or melty. Also, double-check that your baking soda and cream of tartar are fresh, as their leavening power diminishes over time.
Q: Can I use a different candy?
A> Of course! Get creative. Mini Reese’s Peanut Butter Cups, a square of a caramel-filled chocolate bar, or even a Hershey’s Kiss (though the bake time may need a slight adjustment) all work wonderfully. The world is your candy-filled oyster!
Rolo-Stuffed Snickerdoodles with Cinnamon Sugar Crunch
Description
Rolo-Stuffed Snickerdoodles – Gooey Cinnamon-Caramel Magic
Ingredients
Snickerdoodle Dough (Double Batch)
-
3 cups all-purpose flour (or substitute ½ cup cake flour for softer cookies)
-
2 tsp cream of tartar
-
1 tsp baking soda
-
½ tsp salt
-
1 cup unsalted butter, softened
-
1½ cups granulated sugar
-
2 large eggs, room temperature
-
2 tsp vanilla extract
Filling & Coating
-
32 Rolos, unwrapped
-
4 tbsp granulated sugar
-
2 tsp ground cinnamon
-
Optional: pinch of sea salt flakes
Instructions
1. Prep
-
Preheat oven to 350°F (175°C) and line baking sheets with parchment paper.
2. Dry Ingredients
-
Whisk flour, cream of tartar, baking soda, and salt in a medium bowl.
3. Cream Butter & Sugar
-
Beat butter and 1½ cups sugar on medium-high for 2–3 min until pale and fluffy.
-
Scrape bowl sides as needed.
4. Add Wet Ingredients
-
Mix in eggs one at a time, then add vanilla extract until smooth.
5. Combine Wet & Dry
-
Gradually add dry ingredients to wet mixture on low speed, mixing just until flour disappears.
-
Fold in any remaining streaks by hand.
6. Cinnamon-Sugar Coating
-
Mix 4 tbsp sugar, 2 tsp cinnamon, and optional sea salt in a small bowl.
7. Stuff the Rolos
-
Scoop ~1½ tbsp dough, flatten slightly, and place a Rolo in the center.
-
Pinch edges to seal completely and roll into a smooth ball.
8. Coat & Place
-
Roll dough balls in cinnamon-sugar mixture.
-
Place ~2 inches apart on prepared sheets.
9. Bake
-
Bake 10–12 min until edges are set and tops slightly crackled.
-
Cookies may look slightly underdone in the center—this ensures a soft, chewy texture.
10. Cool
-
Cool on baking sheet 5 min, then transfer to a wire rack.
-
Serve slightly warm for gooey caramel centers.
Notes
-
Prevent leaks: Seal dough completely and remove cookies at 10 min.
-
Make ahead: Freeze unbaked, stuffed dough balls; bake from frozen with +1–2 min.
-
Alternative candies: Mini Reese’s cups, Nutella dollops, or dark chocolate caramel squares.
-
Extra flavors: Add apple pie spice to coating, or try a salted dark chocolate center.
-
Gluten-free: Use a 1:1 gluten-free flour blend.
Nutritional Information (Approximate)
Please note: This is an estimate per cookie and may vary based on specific ingredients used.
- Calories: ~170 kcal
- Fat: 8g
- Carbohydrates: 24g
- Sugar: 15g
- Protein: 1g
- Sodium: 80mg
Prep Time: 15 mins | Bake Time: 10-12 mins | Total Time: ~30 mins | Servings: 32 cookies
Final Thoughts
When a classic cookie meets a sweet surprise, the result is nothing short of baking alchemy. These Rolo-Stuffed Snickerdoodles are more than just a recipe; they are an experience. They masterfully combine the nostalgic, comforting warmth of cinnamon and sugar with the pure, unadulterated joy of a molten chocolate and caramel center.
This recipe is a testament to the magic that can happen in your own kitchen when you approach baking with a little curiosity and a lot of heart. It proves that the most beloved creations often come from simple ingredients and a willingness to experiment. From the essential cream of tartar in the dough to the crucial tip of sealing the Rolo completely, every step is designed to guide you toward cookie perfection.


