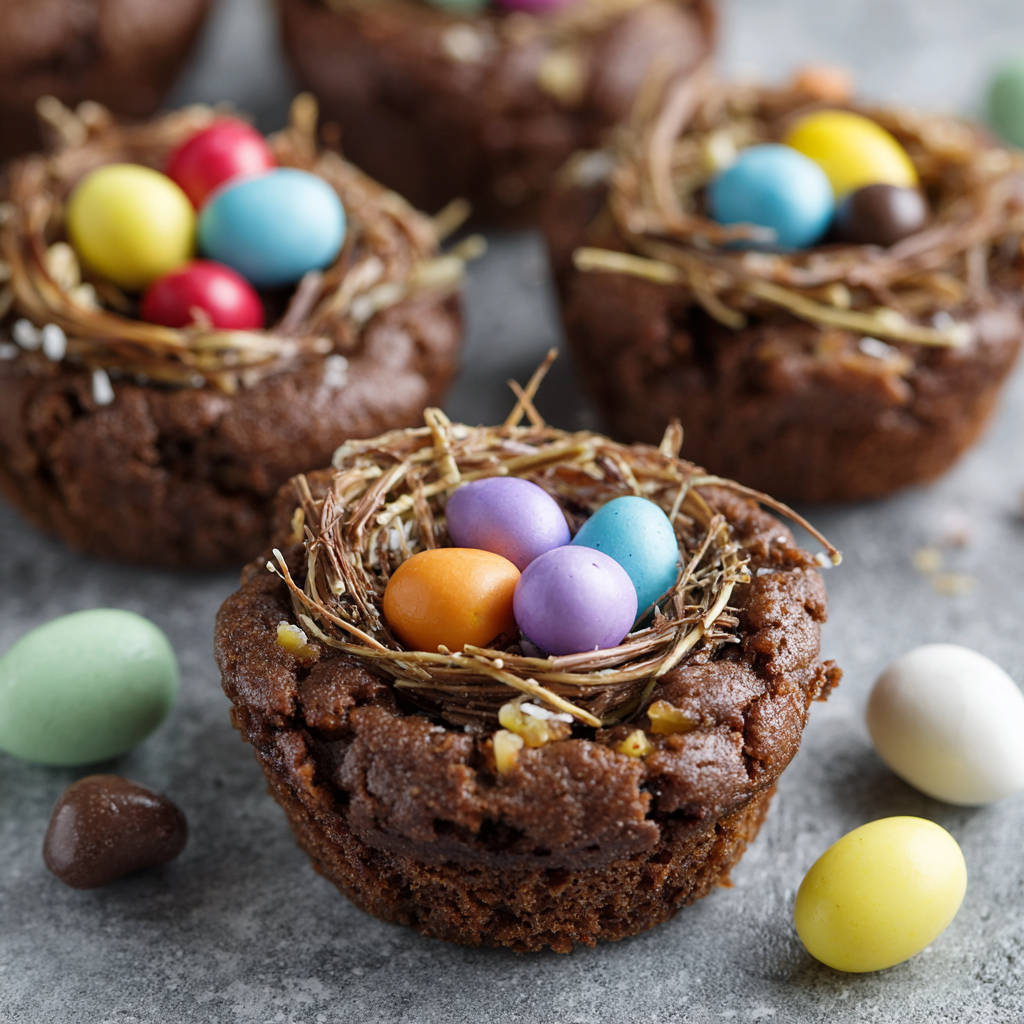
Sweet, Simple, and Oh-So-Springy: Let’s Make Easter Nests!
Hey there, friend! Come on in—apron’s on, the sun is (finally) thinking about shining, and I’ve got a bowl of chocolate melting that smells like pure happiness. Is there anything more delightfully spring than those first little hints of green and the promise of sweet treats? For me, that joy is perfectly captured in a recipe that’s less about precision and more about play: Rice Krispie Easter Nests.
If the thought of baking has you breaking a sweat, take a deep breath. This is your no-stress, no-oven, all-fun ticket to a festive dessert. We’re talking about that magical combo of crispy cereal, melty chocolate, and those adorable candy eggs that just scream “spring is here!” Whether you’re corralling a crew of mini helpers in the kitchen or you just need a last-minute, show-stopping treat for your Easter table, these little nests are the answer. They’re whimsical, they’re delicious, and they’re guaranteed to spark those “oohs” and “aahs” we all love to hear. So, let’s ditch the complicated techniques and lean into the cozy, creative fun. Grab a spatula and let’s make some sweet memories together!
The Messy, Magical Kitchen of My Childhood
This recipe always takes me right back to my grandma’s linoleum-floored kitchen. Easter at her house wasn’t about fancy, perfect desserts. It was about us kids, covered in more chocolate than the treats, with cereal pieces scattered like confetti across the table. She’d melt chocolate in her old double boiler, and my brother and I would fight over who got to stir. The rule was simple: one stir for you, one stir for the treat.
Our “nests” were always hilariously lopsided. Some were giant, ambitious bird homes; others were tiny, overfilled clumps. But when we pressed those pastel candy eggs into the center, it was pure magic. It wasn’t just a dessert; it was our creation. That’s the spirit I want to bring to your kitchen. Perfection is overrated. A little mess, a lot of laughter, and something made with your own two hands (or tiny, eager hands helping you)—that’s the real recipe. These nests are my edible homage to those messy, joyful, sugar-filled afternoons.
What You’ll Need: A Handful of Happy Ingredients
Here’s the beautiful part: you only need a few simple things. I’ll walk you through each one with some tips to make it your own!
- 3 cups Rice Krispies cereal: The star of the show! That iconic *snap, crackle, pop* gives our nests their wonderful structure and airy crunch. Chef’s Insight: Make sure your cereal is fresh and crispy. If the box has been open a while, they can get stale and won’t hold the shape as well.
- 1 cup milk or dark chocolate chips: This is our glue and our flavor. I adore dark chocolate (70% is my go-to) for a richer, less sweet nest. But classic milk chocolate is absolute heaven with the candy eggs and is always a kid-pleaser. Substitution Tip: You can use chopped chocolate bars too! Just avoid chocolate with added wax or stabilizers, as it might not melt as smoothly.
- 1 tbsp butter or coconut oil: A little fat is the secret to a glossy, smooth chocolate that coats every piece beautifully. Butter adds a hint of creamy flavor, while coconut oil keeps it dairy-free and gives a slight tropical note. Chef’s Insight: Don’t skip this! It prevents the chocolate from seizing and makes the mixture easier to work with.
- Mini candy eggs (chocolate or sugar-coated): The jewel-toned finale! You can find these everywhere come spring. The sugar-coated ones are vibrant and classic, while little chocolate eggs add a double chocolate punch. This is where you can really personalize your nests’ look.
Let’s Build Our Nests: Step-by-Step Fun
Ready? This comes together in minutes. I’ll guide you through each step with all my favorite little hacks to ensure success.
- Line a baking sheet or muffin tin with parchment paper. This is your non-stick lifesaver! If you’re using a muffin tin, the cups will give you perfectly uniform nests. For a more rustic, free-form look, a parchment-lined baking sheet is the way to go. I often do a combo—some in the tin for the perfectionists, some on the sheet for the wild, artistic ones.
- Melt the chocolate and butter/coconut oil together. You can use a microwave-safe bowl or a double boiler (a heatproof bowl set over a pot of simmering water). My foolproof microwave method: Combine them in a bowl and microwave on 50% power for 20-second intervals, stirring well in between. This gentle heat prevents the chocolate from burning. Stir until it’s completely silky and smooth. See? No fancy skills required!
- Gently fold in the Rice Krispies. Pour your crispy cereal into the big bowl of melted chocolate. Now, use a flexible spatula and a light touch! We’re “folding,” not stirring aggressively. You want to coat every single piece without crushing all the lovely air out of them. Think of it as gently turning the mixture over onto itself until it’s all a beautiful, chocolaty brown.
- Spoon and shape your nests. This is the fun part! Use a spoon or a cookie scoop to portion out the mixture. Place each mound on your prepared sheet or into the muffin cups. Then, take the back of a small spoon or your thumb (lightly greased with butter helps!) and press into the center of each mound, pushing the mixture up the sides to form a cup or nest shape. Don’t stress about them being identical—variety is charming!
- Add the eggs and let them set. Immediately, while the chocolate is still tacky, place 2-3 mini candy eggs into the center “dip” of each nest. You can be precise or just scatter them in. Then, let them set at room temperature if you’re not in a hurry, or pop the whole tray in the fridge for 15-20 minutes to firm up quickly. The wait is the hardest part!
How to Serve These Little Bites of Joy
Presentation is part of the fun! Arrange your nests on a festive platter or a cake stand lined with a pastel napkin. For a real “spring meadow” vibe, scatter a few extra candy eggs or edible flowers around the plate. They’re perfect as a standalone sweet treat at your Easter brunch, tucked into lunchboxes as a surprise, or packaged in clear cellophane bags tied with ribbon as adorable homemade gifts. However you serve them, get ready for smiles.
Make It Your Own: Fun Twists & Swaps
- Peanut Butter Paradise: Stir ¼ cup of smooth peanut butter into the melted chocolate for a salty-sweet, protein-packed twist. Top with mini peanut butter cups instead of eggs!
- Spring Fling: Add a handful of pastel M&M’s or sprinkles to the cereal mixture before shaping for extra color and crunch inside the nest.
- Gluten-Free & Vegan: Use certified gluten-free crispy rice cereal, dairy-free chocolate chips, and coconut oil. Top with vegan-friendly candy eggs.
- Nutty Crunch: Fold in ½ cup of finely chopped toasted almonds or pecans for a more “grown-up,” textured nest.
- White Chocolate Blossoms: Use white chocolate instead! The nests will look like little snowdrifts. Top with pastel Jordan almonds or freeze-dried raspberries for a stunning look.
A Few More Thoughts From My Kitchen to Yours
This recipe has been my kitchen’s little chameleon. One year, in a pinch, I used cornflakes because I was out of Rice Krispies—and you know what? They were fantastic, with a different, flakier texture! Another time, I added a pinch of sea salt to the dark chocolate, and it was a total game-changer. Don’t be afraid to play.
The best kitchen memory with these? The year my niece decided the nests needed “baby birds.” She made tiny marzipan birds to sit next to the eggs. It was absurdly cute and completely stole the show. That’s the beauty of a simple recipe—it becomes a canvas for creativity and connection. So have fun with it. Your version will be perfect because it’s yours.
Your Questions, Answered!
Q: My chocolate got thick and clumpy when I added the cereal. What happened?
A: Sounds like the chocolate may have gotten too hot or a bit of steam/water got in. This is called “seizing.” To rescue it, try stirring in a teaspoon of very hot water or a bit more melted butter/coconut oil, one drop at a time, until it smooths back out. For next time, melt gently and ensure your bowls and utensils are completely dry.
Q: Can I make these ahead of time?
A> Absolutely! They keep beautifully. Store them in a single layer in an airtight container at room temperature for up to 3 days, or in the fridge for up to a week. The cereal will stay surprisingly crisp!
Q: My nests are falling apart when I pick them up.
A> This usually means you need a bit more “glue.” Next time, try increasing the chocolate by ¼ cup, or make sure you’re really coating every piece well. If they’re currently soft, pressing them more firmly into the muffin tin can help them hold shape as they set.
Q: Can I use other cereals?
A> You bet! Chex, cornflakes, or even slightly crushed shredded wheat biscuits work. Just avoid overly sweetened or heavy cereals, as they can make the nests too dense or overly sweet.

Rice Krispie Easter Nests (No-Bake, Kid-Friendly Treat)
Description
These no-bake Rice Krispie Easter Nests are crispy, chocolaty, and topped with pastel candy eggs—an easy, fun, and festive treat for Easter or any spring celebration. No oven required, just a little chocolate magic and some playful hands!
Ingredients
-
3 cups Rice Krispies cereal
-
1 cup milk or dark chocolate chips
-
1 tbsp butter or coconut oil
-
Mini candy eggs (chocolate or sugar-coated), 2–3 per nest
Optional Fun Twists:
-
¼ cup peanut butter for a salty-sweet version
-
Sprinkles, pastel M&M’s, or chopped nuts for texture and color
-
Gluten-free or vegan swaps: use GF cereal, dairy-free chocolate, and coconut oil
Instructions
1. Prep
-
Line a baking sheet or muffin tin with parchment paper. Muffin cups = uniform nests; baking sheet = rustic charm.
2. Melt Chocolate
-
Combine chocolate chips and butter/coconut oil in a microwave-safe bowl or double boiler.
-
Microwave in 20-second intervals at 50% power, stirring each time, until smooth.
3. Coat the Cereal
-
Gently fold the Rice Krispies into the melted chocolate using a spatula until fully coated. Avoid crushing the cereal.
4. Shape the Nests
-
Spoon portions of the mixture onto your prepared sheet or into muffin cups.
-
Press a shallow well in the center with a spoon or lightly greased thumb to form the nest shape.
5. Add Candy Eggs
-
While chocolate is still tacky, place 2–3 mini candy eggs into each nest.
6. Let Set
-
Allow nests to firm at room temperature or refrigerate for 15–20 minutes until chocolate is completely set.
Notes
-
Chocolate Clumps: If chocolate seizes, stir in a teaspoon of hot water or extra butter/coconut oil, one drop at a time.
-
Nest Falls Apart: Ensure each cereal piece is fully coated; add a little extra chocolate if needed. Press firmly into muffin cups while setting.
-
Other Cereals: Chex, cornflakes, or lightly crushed shredded wheat all work. Avoid overly sweetened or heavy cereals.
-
Make Ahead: Store in a single layer in an airtight container—room temp 3 days, fridge up to 1 week.
Nutritional Information*
*This is an estimate for 1 nest (based on a yield of 12) using milk chocolate and butter. Values will vary based on specific ingredients used.
- Calories: ~155
- Carbohydrates: 20g
- Fat: 8g
- Protein: 2g
- Sugar: 13g
Prep Time: 10 minutes | Chill Time: 20 minutes | Total Time: 30 minutes | Yield: 10-12 nests
Final Thoughts: Your Sweet Springtime Ritual
And there you have it! In the time it takes for a pot of coffee to brew, you’ve created something far more special than just a dessert. You’ve crafted little edible tokens of the season—whimsical, personal, and brimming with charm.
These Rice Krispie Nests are a beautiful reminder that the most memorable kitchen moments aren’t about flawless technique or gourmet ingredients. They’re about the sticky fingers, the shared laughter, and the proud moment of placing that final candy egg. They prove that a handful of simple, honest ingredients and a dash of playful intention can create pure magic.
So whether you’re making these for a festive table, with little helpers by your side, or simply as a sweet gift to yourself, I hope you feel the joy of creating something from the heart. They may be called “nests,” but what you’re really building are sweet, crunchy containers for happiness.
Happy Nesting, and a wonderful, sweet spring to you and yours.
With love and a pocketful of sprinkles,