
Spooky, Savory, and Seriously Cute: Your New Favorite Halloween Appetizer
Hey there, friend! Come on in, the kitchen’s warm, there’s a crispness in the air that just *screams* autumn, and I’m absolutely buzzing with excitement to share this recipe with you. Is there anything better than that moment at a gathering when you place a platter of food on the table and hear a collective, genuine “Ooooh!”? It’s pure magic. It’s that little spark of joy that turns a simple meal into a memory. And today, we’re creating that magic with one of the most fun, festive, and downright adorable appetizers you’ll ever make: Pumpkin Deviled Eggs.
Now, I know what you might be thinking. “Olivia, deviled eggs? Really?” But trust me, these are not your grandma’s church picnic deviled eggs (though I love those, too!). These are a whimsical twist on a classic, transforming the humble egg into a tiny, edible pumpkin that’s as delicious as it is delightful. They’re creamy, tangy, and have that perfect savory kick we all love, but with a festive orange hue and a cute little stem that will have everyone reaching for their cameras before they reach for a bite.
The best part? They are deceptively simple. You don’t need a culinary degree or a pantry full of obscure ingredients. We’re talking about a handful of staples, a tiny bit of food coloring, and about 25 minutes of your time. Whether you’re hosting a full-blown Halloween bash, a cozy Friendsgiving, or just want to add a little festive cheer to your weeknight dinner, these pumpkin deviled eggs are your secret weapon. They’re a guaranteed conversation starter and proof that the most memorable dishes often come from a place of playfulness and heart. So, tie on your favorite apron (the messy one with the stains of past kitchen adventures, of course), and let’s make some magic!
A Halloween Tradition is Born
This recipe actually came from a bit of a kitchen “happy accident” a few years ago. I was tasked with bringing an appetizer to my best friend’s notoriously over-the-top Halloween party. I wanted to make something spooky and spectacular, but after a long week, my creative energy was running on empty. I had a carton of eggs on the counter, a fridge full of condiments, and a serious case of chef’s block.
As I was lazily mashing the yolks for a standard batch of deviled eggs, my eye caught a bottle of orange food coloring I’d used for a birthday cake. On a complete whim, I squeezed a few drops into the creamy yellow mixture. It turned this vibrant, brilliant orange that was just so… festive! I piped it back into the whites, but they looked a little plain. Then, I remembered the chives growing in a pot on my windowsill. A tiny snip on top, a dusting of paprika for depth, and just like that—a little pumpkin was born! I arranged them on a platter with some kale leaves as “vines,” and they were the undisputed star of the party. Now, I can’t imagine a fall gathering without them. They’re a little reminder that sometimes, the best ideas come when you’re just playing around and having fun in the kitchen.
Gathering Your Pumpkin Patch: The Ingredients
Simple ingredients, big flavor! Here’s everything you need to create your own patch of edible pumpkins. Don’t be afraid to make swaps based on what you have—cooking is all about making it your own!
- 6 large hard-boiled eggs, peeled: The foundation of our dish! I find older eggs peel easier than super fresh ones. For the perfect, non-green-ring yolk, place eggs in a single layer in a pot, cover with cold water by an inch, bring to a rolling boil, then cover and remove from heat. Let sit for 10-12 minutes before plunging into an ice bath.
- 3 tbsp mayonnaise: This creates our creamy, luxurious base. For a tangier kick, you can use Greek yogurt or sour cream, but mayo gives the classic deviled egg texture we all know and love.
- 1 tsp Dijon mustard: My little secret for a flavor boost! Dijon adds a subtle complexity and tang that yellow mustard just can’t match. It cuts through the richness beautifully.
- ½ tsp white vinegar: A tiny bit of acidity is key to balancing the fat from the mayo and egg yolks. It brightens the whole filling right up. Apple cider vinegar works great here too!
- Salt and pepper to taste: Season as you go! Taste your filling and adjust until it sings. I always start with a ¼ tsp of salt and a few cracks of pepper.
- Orange food coloring (gel preferred): The magic wand! Gel food coloring is my go-to because it provides vibrant color without thinning out the filling. Start with a little—you can always add more.
- Paprika (sweet or smoked): This is for garnish and adds a lovely pop of color and a hint of earthy flavor. Smoked paprika will give a subtle, smoky depth that’s incredible.
- Fresh chives or green onions: Our pumpkin stems! Chives are delicate and perfect, but the green part of a green onion, sliced thinly, works just as well for a slightly bigger “stem.”
Crafting Your Little Pumpkins: A Step-by-Step Guide
Ready to create your edible masterpiece? Let’s do this! Follow these steps for a fuss-free, fun cooking experience. I’ve packed in all my best tips to ensure your pumpkin deviled eggs are absolutely perfect.
Step 1: The Perfect Hard-Boil
First, we need perfectly cooked eggs. Place your eggs in a single layer in a saucepan and cover them with cold water by about an inch. Bring the water to a full, rolling boil over high heat. Once it’s boiling, immediately cover the pot with a lid and remove it from the heat. Set a timer for 10 minutes. This “passive cooking” method is my foolproof way to avoid those dreaded gray/green rings around the yolk—it means you’ve overcooked them! While they sit, prepare an ice bath in a large bowl. After 10 minutes, use a slotted spoon to transfer the hot eggs directly into the ice bath. Let them chill completely—this stops the cooking process and makes them a dream to peel.
Step 2: Peel & Slice with Care
Once your eggs are completely cool, gently tap them on the counter and roll them to crackle the shell all over. Peel under a trickle of cool running water—the water helps get under the shell membrane. Pat the peeled eggs dry with a paper towel. Using a sharp knife, slice each egg in half lengthwise. My pro tip? Wipe your knife clean between each cut for the smoothest, cleanest edges on your egg whites.
Step 3: Create the Creamy Filling
Gently pop the yolks out into a medium-sized bowl. Arrange your empty egg white halves on your serving platter—this way, you won’t have to move them later and risk messing up your beautiful piping! To the yolks, add the mayonnaise, Dijon mustard, white vinegar, salt, and pepper. Now, mash it all together with a fork until it’s completely smooth. No one wants a lumpy pumpkin! For an ultra-silky texture, you can press the mixture through a fine-mesh sieve or give it a quick mix with a hand mixer.
Step 4: A Dash of Halloween Magic (The Color!)
Here’s the fun part! Start by adding a small drop or two of your orange gel food coloring. Fold it in completely. Remember, you can always add more, but you can’t take it away! Keep adding and mixing until you achieve a vibrant, pumpkin-like orange. Taste and adjust your seasoning one more time—sometimes the color can trick your brain, so make sure the flavor is still on point.
Step 5: Pipe Like a Pro
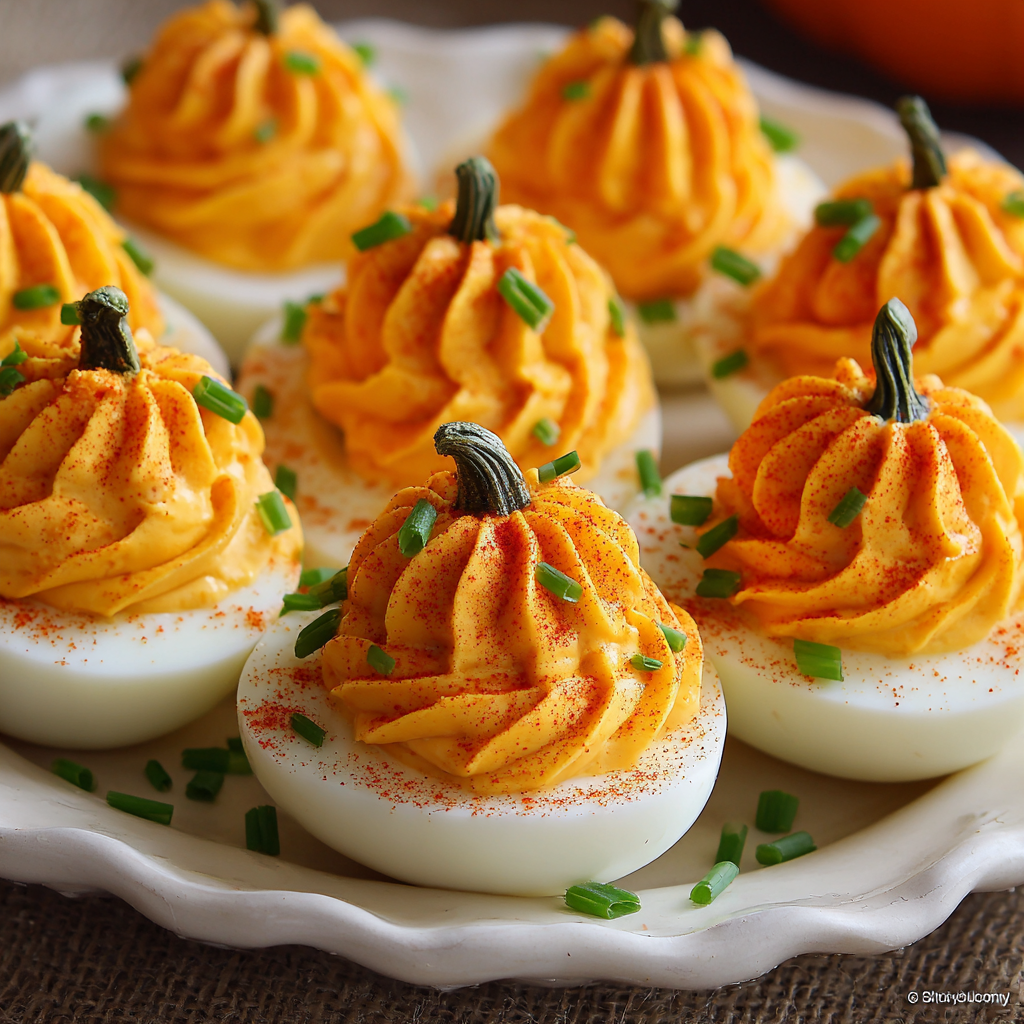
Scoop your beautiful orange filling into a piping bag fitted with a star tip (a Wilton 1M or 2D is perfect). If you don’t have a piping bag, no worries! A zip-top bag with one corner snipped off works almost as well. Now, pipe the filling into the waiting egg white cavities. Start in the center and pipe in a circular motion, building upwards to create a tall, ridged “pumpkin” shape. The ridges from the star tip are what really sell the pumpkin effect! Don’t be shy—make them nice and tall.
Step 6: The Finishing Touches
Almost done! Lightly dust the top of each piped “pumpkin” with a pinch of paprika. This gives them a lovely, realistic gradient of color, just like a real pumpkin sitting in the sun. Finally, take a small piece of chive or green onion and press it firmly into the top center of each egg to create the perfect little pumpkin stem. And voilà! You’ve just created a platter of sheer edible joy.
Setting the Scene: How to Serve Your Masterpiece
Presentation is part of the fun! To really make your pumpkin deviled eggs shine, arrange them on a dark-colored platter or a rustic wooden board—the contrast makes the orange color pop. Scatter a few fresh kale leaves, parsley sprigs, or even some crushed pretzel “dirt” around them to create a mini autumnal garden. For a real “wow” factor, place a small bowl of extra paprika or everything bagel seasoning in the center for guests who might want an extra savory kick. Serve them immediately or chill until you’re ready to wow your guests!
Make It Your Own: Delicious Variations
Feel like mixing it up? This recipe is a fantastic canvas for creativity!
- Smoky & Spicy: Add a pinch of smoked paprika and a tiny dash of cayenne pepper or a few drops of hot sauce to the filling for a grown-up kick.
- Everything Bagel: Skip the paprika dusting and garnish the top with everything bagel seasoning for incredible savory crunch and flavor.
- Bacon Ranch: Mix 1 tbsp of dry ranch seasoning and 2 tbsp of finely chopped cooked bacon into the yolk mixture. Garnish with more bacon and a tiny piece of dill.
- Natural Color: Want to skip the food coloring? Try mixing in 1 tablespoon of pureed canned pumpkin or sweet potato! You’ll get a natural orange hue and a subtle, sweet flavor. You may need to adjust the mayo slightly for consistency.
- Curry Spice: Add ½ tsp of your favorite curry powder to the filling for a warm, aromatic twist that pairs beautifully with the egg.
Olivia’s Chef Notes & Kitchen Confessions
Over the years, I’ve learned a few things. First, the gel food coloring is a total game-changer. The first time I made these, I used liquid and my filling became a bit too soft. Gel for the win! Second, don’t stress if your piping isn’t perfect. I once piped a whole batch that looked more like spiky sea urchins than pumpkins. I just called them “monster eggs” and they were a hit anyway. The point is to have fun! Lastly, these are best made the day you plan to serve them, but you can absolutely hard-boil and peel the eggs up to two days in advance. Store them submerged in water in a sealed container in the fridge to keep them fresh. The filling can also be made a day ahead and stored separately. Just pipe and garnish right before your party!
Your Questions, Answered!
Q: My filling is too runny to pipe! What did I do wrong?
A: This usually happens if the eggs are still warm when you mixed the filling, or if you used a bit too much mayo or liquid food coloring. No panic! Pop the whole bowl of filling into the fridge for 20-30 minutes to firm up. You can also add a tiny sprinkle of powdered sugar (it won’t make it sweet, I promise!) or a bit more mashed yolk if you have any extra.
Q: I can’t get my eggs to peel cleanly! The whites are a mess.
A: I feel your pain—this is the universal struggle! The ice bath is crucial. Also, using eggs that are a week or two old really does help. If you’re still having trouble, try steaming your eggs instead of boiling! Place a steamer basket in a pot with an inch of water, bring to a boil, add the eggs, cover, and steam for 12-13 minutes. Then, straight into the ice bath. This method has never failed me.
Q: Can I make these ahead of time?
A: You can be a prep superstar! Hard-boil and peel the eggs up to 2 days ahead (store them in water in the fridge). You can also make the filling (without the food coloring) 1 day ahead and store it in a sealed container. When you’re ready, add the food coloring, pipe, and garnish. I don’t recommend assembling them more than a few hours in advance, as the eggs can dry out and the colors might bleed slightly.
Q: I don’t have a piping tip. Can I still make them look like pumpkins?
A: Absolutely! Get creative. You can use a fork to create ridges in the filling after spooning it in. Or, use a small spoon to make indentations like the lines on a pumpkin. The chive stem is what really sells it, so even without perfect ridges, they’ll still be adorable.
Print
Pumpkin Deviled Eggs
Description
Turn ordinary deviled eggs into a festive fall masterpiece! With creamy, tangy yolks dyed pumpkin-orange and topped with little chive stems, these deviled eggs are the perfect combination of playful and delicious. They’re simple to make, adorable to serve, and guaranteed to wow your guests.
Ingredients
-
6 large hard-boiled eggs, peeled
-
3 tbsp mayonnaise
-
1 tsp Dijon mustard
-
½ tsp white vinegar (or apple cider vinegar)
-
Salt and freshly cracked black pepper, to taste
-
Orange gel food coloring
-
Paprika (sweet or smoked), for garnish
-
Fresh chives or green onion tops, for pumpkin stems
Instructions
1. Hard-Boil the Eggs
-
Place eggs in a single layer in a saucepan and cover with cold water by about 1 inch.
-
Bring to a rolling boil over high heat, then cover and remove from heat. Let sit 10 minutes.
-
Transfer eggs to an ice bath and chill completely.
2. Peel & Slice
-
Crack and peel the eggs under cool running water. Pat dry.
-
Slice each egg lengthwise and remove the yolks into a medium bowl.
3. Make the Filling
-
Mash yolks with mayonnaise, Dijon mustard, vinegar, salt, and pepper until smooth.
-
Add orange gel food coloring a drop at a time until you reach a vibrant pumpkin-orange hue. Taste and adjust seasoning.
4. Pipe or Spoon the Filling
-
Transfer the filling to a piping bag fitted with a star tip (or a zip-top bag with a corner snipped).
-
Pipe the yolk mixture into the egg whites, building a tall, ridged “pumpkin” shape.
-
If you don’t have a piping bag, spoon the filling and use a fork or small spoon to create ridges.
5. Garnish
-
Lightly dust each pumpkin with paprika.
-
Press a small piece of chive or green onion into the top as a pumpkin stem.
Notes
-
Use older eggs for easier peeling.
-
Chill the filling if it’s too runny before piping.
-
Assemble just before serving to prevent drying or color bleeding.
Nutrition
- Calories: 60 cal Per Serving
- Carbohydrates: 1 g
- Protein: 3 g
Nutritional Information (Per Serving – 1 half)
Calories: 60 | Protein: 3g | Carbs: <1g | Fat: 5g | Fiber: 0g | Sugar: 0g | Sodium: ~90mg
Please note: This is an estimate provided for informational purposes only. Exact values can vary based on specific ingredients used.
Final Thoughts: A Simple Recipe for Spooky Joy
And that’s it! From a simple “what-if” moment to a now-cherished Halloween tradition, these Pumpkin Deviled Eggs are proof that a little creativity can transform the everyday into something truly magical.
So this season, I hope you embrace the fun. Don’t worry about making them look flawless. Celebrate the slightly lopsided pumpkin, the one with the extra-long stem, and the one that’s just a little too orange. Those little quirks are what make them uniquely yours and are sure to bring a smile to everyone’s face.


