

Peanut Butter Oreo Heavenly Dessert: Your New No-Bake Secret Weapon
Hey there, friend! Come on in, pull up a stool. Can you smell that? It’s the scent of… well, absolutely nothing baking, and that’s the best part! I’m so glad you’re here, because today we’re making the dessert that single-handedly earns me invites to every potluck, picnic, and family gathering. This is the legendary Peanut Butter Oreo Heavenly Dessert, and I’m not exaggerating when I say it’s life-changing.
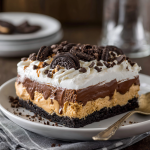
We’re talking about a towering, glorious masterpiece built on a foundation of buttery Oreo crust. Then, we pile on a cloud of fluffy, sweet-and-salty peanut butter cheesecake that’s studded with mini chocolate chips. Just when you think it can’t get better, we add a layer of rich, silky chocolate fudge pudding. And because we believe in going big or going home, we crown it all with a final layer of whipped topping and a confetti of peanut butter chips, more chocolate chips, and crushed Oreos. It’s a symphony of textures and flavors in every single bite.
The magic? It’s a no-bake wonder. You don’t need to turn on the oven, and you can make it a day ahead, letting your fridge do all the work. This recipe is a double batch, designed specifically for a deep 9×13-inch pan because, trust me, you’ll want plenty to share (or not… no judgment here!). So, whether you’re feeding a hungry crowd or just treating your future self, this dessert is your ticket to pure, unadulterated joy. Let’s get mixing!
The Potluck That Started It All
This recipe takes me right back to my first summer in this neighborhood. We were new, and I was determined to make a good impression at the annual block party potluck. The pressure was on! I wanted something that screamed “fun” and “delicious” but wouldn’t have me slaving away in a hot kitchen all day. I found a scribbled version of this dessert in my grandma’s old recipe box, and decided to give it a whirl.
I remember the nervous excitement as I carried my pan over to the picnic table, nestled between plates of deviled eggs and trays of grilled burgers. It looked a little messy, a little over-the-top, but oh-so-inviting. The moment the first person took a bite, their eyes went wide. Then another. And another. Within minutes, a little crowd had gathered around the dessert table, forks clinking, and I heard the best question a new neighbor can hear: “Who made THIS?!” That dessert was my welcome wagon. It sparked conversations, forged friendships, and became my most-requested recipe. It’s more than just layers in a pan; it’s a memory-maker.
Gathering Your Sweet Supplies
Here’s everything you’ll need to create this masterpiece. I’ve included some of my favorite tips and substitutions to make this recipe your own!
For the Crust:
- 72 Oreo cookies: You’ll use the whole cookie—cream filling and all! This gives the crust an extra hint of sweetness and structure. No need to get fancy with the filling scraping.
- ¾ cup unsalted butter, melted: This acts as the glue. Using unsalted butter lets you control the salt level, but salted works in a pinch and adds a nice salty kick against the sweet layers.
For the Peanut Butter Layer (The Star of the Show!):
- 16 oz (two 8-oz blocks) cream cheese, softened: Softened is key! Leave it on the counter for an hour or two. If it’s too cold, you’ll end up with lumpy batter. This creates the luxurious, tangy base for our peanut butter cloud.
- 2 cups creamy peanut butter: I’m a loyalist to creamy for that smooth texture, but if you adore a crunch, chunky peanut butter will add a wonderful peanutty bite.
- 2 cups powdered sugar: Also called confectioners’ sugar. It dissolves beautifully and sweetens the layer without any graininess.
- 16 oz Cool Whip, thawed: This is our secret weapon for fluffiness! Make sure it’s thawed in the fridge so it folds in gently. You can use an equal amount of homemade whipped cream if you prefer, but the structure will be a bit softer.
- 1½ cups mini chocolate chips: Minis are essential here! They distribute evenly and are much easier to slice through than standard chips.
For the Pudding Layer:
- 4 (3.9 oz) packages instant chocolate fudge pudding mix: Instant pudding is a must because it sets without cooking. The “fudge” variety gives us that deep, dark, rich chocolate layer that contrasts perfectly with the peanut butter.
- 5½ cups cold whole milk: The colder the milk, the quicker and thicker the pudding will set. Whole milk gives the creamiest result, but 2% works well, too.
For the Toppings:
- 16 oz Cool Whip, thawed: Because more fluff is always better.
- ⅔ cup peanut butter chips: For that extra peanut butter punch.
- ⅔ cup mini chocolate chips: A classic finish.
- 8 Oreos, crushed: This brings it all full circle and adds a fantastic crunch.
Building Your No-Bake Masterpiece, Step by Step
Okay, apron on! This is where the fun begins. We’re building layers of happiness, and I’ll be with you for every step.
Step 1: The Foundation – The Oreo Crust
First, we need a solid base for all that goodness. Place the 72 Oreo cookies in a large zip-top bag (do this in batches if needed) and seal it tightly. Now, for the therapeutic part: grab a rolling pin, a heavy skillet, or even a wine bottle, and crush those Oreos into fine crumbs. You want them to resemble dark, sandy soil. Don’t leave big chunks, or your crust won’t hold together well. Pour the crumbs into a bowl and drizzle in the melted butter. Mix it with a fork until every last crumb is moistened and the mixture looks like wet sand.
Chef’s Hack: Instead of a bag, you can pulse the Oreos in a food processor for super-fast, even crumbs. Just be careful not to turn it into a paste!
Transfer the buttery crumbs to your deep 9×13-inch pan. Press them down firmly and evenly into the bottom. I like to use the flat bottom of a measuring cup to really tamp it down—this creates a firm, compact crust that can stand up to the heavy layers above. Pop the pan into the refrigerator to chill and set while you make the next layer. This takes about 15-20 minutes.
Step 2: The Main Event – The Peanut Butter Cheesecake Layer
In a large mixing bowl, beat the softened cream cheese with an electric mixer on medium speed until it’s completely smooth and lump-free. This should only take about a minute. Scrape down the sides of the bowl. Now, add the 2 cups of creamy peanut butter and beat again until the mixture is perfectly blended and dreamily smooth.
Chef’s Tip: If your cream cheese was still a bit cold and you see a few tiny lumps, don’t panic! Keep beating. They should incorporate. If not, a quick press with a rubber spatula usually does the trick.
Turn the mixer to low speed and gradually add the powdered sugar. Once it’s incorporated, scrape the bowl again and give it one final mix. Now, here’s the crucial part for a light, fluffy texture: gently fold in the thawed Cool Whip. I like to add it in two batches, using a large spatula and a “figure-eight” motion to combine without deflating all the air. Finally, fold in the 1½ cups of mini chocolate chips.
Take the chilled crust out of the fridge. Spoon the peanut butter mixture over the crust and spread it into a smooth, even layer, making sure to get it into all the corners. A small offset spatula is my best friend for this job, but the back of a spoon works just fine!
Step 3: The Chocolate Dream – The Pudding Layer
In another large bowl, whisk together the 4 packages of instant chocolate fudge pudding mix and the 5½ cups of cold milk. Whisk continuously for about 2 minutes. You’ll feel it start to thicken almost immediately. Keep going until it’s nicely thickened and smooth.
Chef’s Hack: Let the pudding sit for about 3-5 minutes after whisking. This allows it to set up just a bit more, making it easier to spread without mixing into the delicate peanut butter layer below.
Carefully pour the pudding over the peanut butter layer and spread it gently to the edges. We’re almost there!
Step 4: The Grand Finale – The Toppings
Now for the easy part! Spread the second container of thawed Cool Whip over the pudding layer. Then, sprinkle the top generously with the peanut butter chips, mini chocolate chips, and the crushed Oreos. Cover the pan tightly with plastic wrap or a lid.
This is non-negotiable: You must chill the dessert for at least 4 hours, but overnight is truly ideal. This waiting period is essential for all the layers to firm up, meld together, and become sliceable perfection. I know it’s hard, but patience is a virtue that tastes like peanut butter and chocolate!
How to Serve This Slice of Heaven
When it’s finally time to serve, use a sharp knife dipped in hot water and wiped dry between each cut. This will give you those gorgeous, clean slices that show off every beautiful layer. I love serving this on simple white plates to let the dessert really shine. A cold glass of milk or a hot cup of coffee is the perfect companion. It’s rich, so a smaller slice is often plenty, but let’s be real… seconds are almost always required.
Get Creative! Flavor Twists & Swaps
This recipe is a fantastic canvas for your own creativity! Here are a few of my favorite ways to mix it up:
- Coffee Kick: Add 1-2 tablespoons of instant espresso powder to the chocolate pudding mix before whisking with the milk for a delicious mocha flavor.
- Nutella Swirl: Warm ½ cup of Nutella for 15 seconds in the microwave to make it pourable. After spreading the peanut butter layer, drizzle the Nutella over the top and use a knife to swirl it in before adding the pudding.
- Banana Split Vibe: Use Golden Oreos for the crust. After the crust is set, add a layer of sliced bananas before the peanut butter layer. It’s like a banana cream pie met an Oreo!
- Cookie Butter Bliss: Swap the peanut butter for speculoos cookie butter for a warm, spiced flavor that’s utterly addictive.
- Gluten-Free/Dairy-Free: Use gluten-free chocolate sandwich cookies (like Glutino or Enjoy Life). For dairy-free, use plant-based butter, cream cheese, milk, and whipped topping. The recipe is very adaptable!
Olivia’s Final Thoughts & Kitchen Confessions
This recipe has evolved so much since that first neighborhood potluck. I’ve learned that the overnight chill is the true game-changer. I’ve also had my share of kitchen fails—like the time I was too impatient and used cold cream cheese, resulting in a lumpy layer I tried to hide with extra toppings (it still tasted great, but the texture wasn’t perfect). Or the time I accidentally used *cook-and-serve* pudding mix. Let’s just say we had a very soupy dessert that night! The lesson? Read your labels and embrace the process.
What I love most about this dessert is how it brings people together. It’s unpretentious, decadent, and made with so much love. It’s the recipe I’ve passed on to my sister, my best friend, and now to you. I hope it becomes a staple in your home, creating your own delicious memories.
Your Questions, Answered!
Q: My peanut butter layer is too soft and doesn’t hold its shape when I slice it. What happened?
A: This usually boils down to two things: 1) The cream cheese wasn’t softened enough, creating a less stable base. Or 2) The dessert didn’t chill long enough. This is a *must-make-ahead* recipe. The four-hour minimum is crucial, but overnight chilling is truly best for perfect, clean slices.
Q: Can I make this dessert ahead of time?
A: Absolutely! In fact, I highly recommend it. You can make this up to 24 hours in advance. Just keep it covered tightly in the refrigerator. The flavors have more time to meld, and it sets up perfectly.
Q: I don’t like Cool Whip. Can I use real whipped cream?
A> You sure can! For both the peanut butter layer and the topping, you can substitute an equal amount of sweetened, stabilized whipped cream. Just note that real whipped cream can become a bit softer, so your dessert might be a little more delicate. It will, however, be incredibly delicious!
Q: My pudding layer seemed runny. How can I prevent this?
A> First, double-check that you’re using *instant* pudding mix, not the cook-and-serve kind. Second, make sure your milk is very cold. Third, be sure to whisk for the full two minutes to activate the thickening agents. Letting it sit for a few minutes before spreading also helps.
Peanut Butter Oreo Heavenly Dessert – No-Bake Party Perfection
Description
Layers of Oreo crust, fluffy peanut butter cheesecake, silky chocolate pudding, and whipped topping make this no-bake beauty the ultimate crowd-pleaser. Perfect for potlucks, holidays, or any moment that deserves a little extra sweetness. Bonus? The fridge does all the work—no oven required!
Ingredients
Crust
-
72 Oreo cookies
-
¾ cup unsalted butter, melted
Peanut Butter Layer
-
16 oz cream cheese, softened
-
2 cups creamy peanut butter
-
2 cups powdered sugar
-
16 oz Cool Whip (thawed)
-
1½ cups mini chocolate chips
Pudding Layer
-
4 (3.9 oz) pkgs instant chocolate fudge pudding
-
5½ cups cold whole milk
Topping
-
16 oz Cool Whip (thawed)
-
⅔ cup peanut butter chips
-
⅔ cup mini chocolate chips
-
8 Oreos, crushed
Instructions
-
Crust – Crush Oreos into fine crumbs, mix with melted butter, and press into pan. Chill 15–20 min.
-
Peanut Butter Layer – Beat cream cheese until smooth. Mix in peanut butter, then powdered sugar. Gently fold in Cool Whip, then stir in mini chocolate chips. Spread over crust.
-
Pudding Layer – Whisk pudding mix with cold milk until thick (about 2 min). Let rest 3–5 min, then spread over peanut butter layer.
-
Topping – Spread Cool Whip over pudding. Sprinkle with peanut butter chips, chocolate chips, and crushed Oreos.
-
Chill – Cover and refrigerate at least 4 hrs (overnight is best) before slicing.
Notes
-
Coffee Kick – Add espresso powder to pudding.
-
Nutella Swirl – Drizzle and swirl Nutella into the PB layer.
-
Banana Split – Add sliced bananas on crust before peanut butter.
-
Gluten/Dairy-Free – Swap in gluten-free cookies & plant-based subs.
Nutrition
- Calories: 340 cal Per Serving
- Fat: 20g
- Carbohydrates: 30g
Nutritional Information (Approximate, Per Serving)
This is a rich, celebratory dessert! Enjoy it as a treat. The following is an estimate based on the ingredients used and assuming 48 servings.
Calories: 340 | Carbohydrates: 30g | Fat: 20g | Protein: 5g
Prep Time: 30 mins | Chill Time: 4 hours | Total Time: 4 hrs 30 mins
Warm and Inviting (The Best Fit)
And there you have it—your new no-bake secret weapon, ready to unleash upon a grateful world. This dessert is more than just a list of ingredients; it’s a promise of good times, a guaranteed smile, and the easiest way to become the most popular person at any gathering.
I hope this recipe brings as much joy to your kitchen as it has to mine. Don’t be afraid to make it your own! Tag me when you make it—I can’t wait to see your masterpiece and hear the stories it creates. Now, go make some memories (and save a corner piece for yourself!).


