
Your New Favorite Dessert: Peanut Butter Cup Cream Pie
Hey there, friend! Come on in, grab an apron, and let’s get ready to make something truly magical. If your heart does a little happy dance at the combination of rich peanut butter and smooth, creamy chocolate, you are absolutely in for a treat today. We’re whipping up not one, but two spectacularly decadent Peanut Butter Cup Cream Pies. Yes, you read that right—two! This is the kind of dessert that doesn’t just satisfy a sweet tooth; it throws it a full-blown party. Imagine a velvety, no-bake peanut butter filling that’s lighter than air, all nestled into a crispy, buttery graham cracker crust. Now, picture it loaded with chunks of everyone’s favorite chocolate-covered peanut butter candy and topped with a fluffy cloud of whipped topping. It’s cool, creamy, and packed with so much candy-shop charm, it’s guaranteed to be the star of any potluck, birthday, or “just because it’s Tuesday” celebration. The best part? You don’t need to turn on your oven. This is all about mixing, folding, and the hardest part: waiting for it to chill. So, let’s create some kitchen magic together!
A Slice of Nostalgia: My Love Affair with This Pie
This pie recipe isn’t just a list of ingredients to me; it’s a delicious slice of my childhood. I vividly remember being ten years old, perched on a stool at my grandma’s yellow Formica countertop, watching her make her famous “special occasion” pie. Her version was a simpler chocolate cream number, but the ritual was everything. She’d let me crush the graham crackers with a rolling pin (a mess I relished) and sneak me a spoonful of the sweet, fluffy filling before it ever saw the crust. When I got older and started developing my own recipes, I knew I had to create a pie that captured that same feeling of pure, unadulterated joy—but with my own obsessive peanut butter twist. I swapped the chocolate for peanut butter, folded in a whole army of chopped peanut butter cups, and voilà! This pie was born. It’s become my go-to for celebrating friends, comforting loved ones, and creating new memories around the table. Every time I make it, I’m right back in my grandma’s kitchen, and that’s a feeling I’m so thrilled to now share with you.
Gathering Your Dream Team: The Ingredients
This recipe is wonderfully simple, but each ingredient plays a key role in creating that perfect texture and flavor. Here’s what you’ll need and why it’s important:
- 2 (8 oz) packages cream cheese, softened: This is the structural heart of our filling, giving it a rich, tangy base that balances the sweetness. Chef’s Insight: MUST be softened to room temperature! This is non-negotiable for a smooth, lump-free filling. Take it out of the fridge at least an hour before you start.
- 1 cup creamy peanut butter: The star of the show! I prefer a standard creamy, shelf-stable peanut butter (like Jif or Skippy) for this recipe because its consistent texture and slight sweetness blend perfectly. Substitution Tip: You can use natural peanut butter, but make sure it’s well-stirred and note that the filling might be a bit oilier and less sweet.
- 1 cup confectioners’ sugar: Also known as powdered sugar, it dissolves instantly into our filling, providing sweetness without any graininess. It also helps thicken the mixture.
- 2 (16 oz) containers frozen whipped topping, thawed and divided: This is our secret weapon for incredible lightness. One container gets folded into the filling, and the other is used for the gorgeous topping. Chef’s Hack: Be sure it’s fully thawed in the fridge for a few hours. If it’s still icy, it can deflate and cause weepiness.
- 2 (9-inch) prepared graham cracker crusts: The perfect, no-fuss, crunchy foundation. I love the convenience of store-bought, but hey, if you’re feeling ambitious, a homemade crust is always amazing!
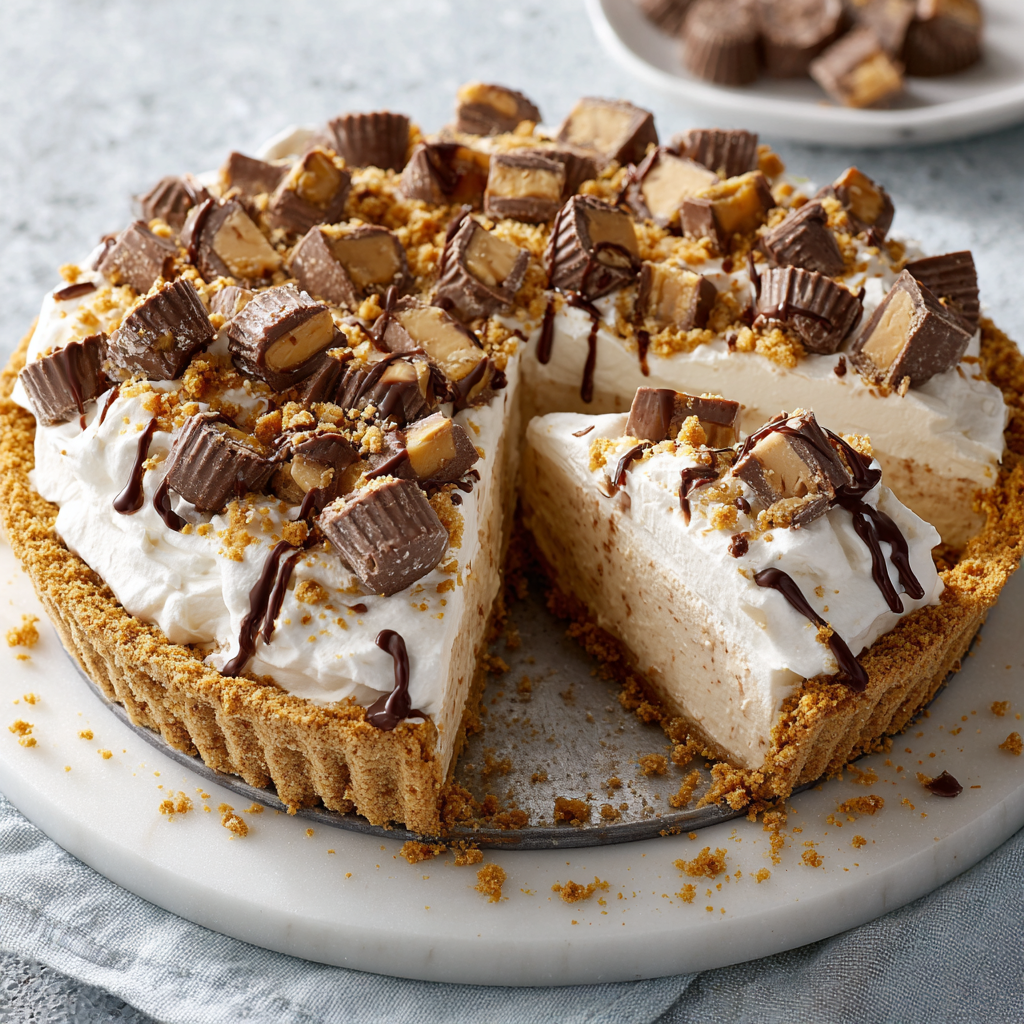
- 30 miniature chocolate-covered peanut butter cups, unwrapped and chopped: The “charm” in our candy-shop charm! Chopping them gives you that incredible peanut butter cup surprise in every single bite.
- Optional twist: Drizzle with melted chocolate and top with crushed pretzels or sea salt: This is where you become an artist! The salt from the pretzels or a flaky sea salt cuts through the richness beautifully, and a chocolate drizzle is just, well, gorgeous.
Let’s Build Some Magic: Step-by-Step Instructions
Ready to make the easiest, most impressive pies of your life? Let’s do this! I’ll walk you through every step with my favorite tips and hacks.
Step 1: The Creamy Base
In a large bowl, beat the softened cream cheese and peanut butter together with an electric mixer on medium speed until the mixture is completely smooth, creamy, and lump-free. This should take about 2-3 minutes. Chef’s Tip: Scrape down the sides and bottom of the bowl with a spatula halfway through to ensure everything is perfectly incorporated. This is the foundation, so let’s make it strong!
Step 2: Sweeten the Deal
Add the confectioners’ sugar to the peanut butter mixture. Start your mixer on low speed unless you want a sweet cloud all over your kitchen! Once the sugar is somewhat incorporated, bump the speed up to medium and beat for another minute until it’s fully blended and smooth.
Step 3: Lighten It Up
Now, here’s the key to that dreamy, cloud-like texture: gently fold in one entire container of the thawed whipped topping. Chef’s Hack: “Folding” is crucial! Use a spatula and cut through the center of the mixture, scoop around the edge, and fold over on top. Turn the bowl a quarter turn and repeat. This incorporates air and keeps the filling light and fluffy. Don’t stir or beat it, or you’ll deflate all that airiness.
Step 4: The Grand Finale (Mix-In!)
Time for the best part! Grab half of your chopped peanut butter cups and gently fold them into the filling until they’re evenly distributed. Those little pockets of peanut butter and chocolate are what make this pie so special.
Step 5: Divide and Conquer
Using your spatula, divide the delicious filling evenly between your two graham cracker crusts. Smooth the tops out nicely so they’re ready for their next layer.
Step 6: Top It Off
Spread the second container of thawed whipped topping over the two pies. You can make pretty peaks and swirls with the back of a spoon—get creative! Sprinkle the remaining chopped peanut butter cups over the top.
Step 7: The Optional (But Highly Recommended) Glam Squad
If you’re going for the optional twist, melt a little chocolate or caramel in the microwave (in 15-second bursts, stirring in between) and drizzle it artfully over the pies. A sprinkle of crushed pretzels or a pinch of flaky sea salt takes this from a 10 to an 11!
Step 8: The Test of Patience
Carefully place the pies in the refrigerator to chill for at least 4 hours, but overnight is truly best. Chef’s Secret: This waiting period is essential for the filling to firm up perfectly, making it sliceable and allowing all the flavors to meld together into pure bliss. I know it’s hard, but trust me, it’s worth the wait!
How to Serve This Masterpiece
When it’s finally time to serve, use a sharp knife that you’ve run under hot water and wiped dry. This will give you the cleanest, most beautiful slices. Slide a pie server underneath and lift out a perfect wedge. I love serving this on simple white plates to really let the pie be the showstopper. A little extra cup of hot coffee or a cold glass of milk on the side is the perfect companion to this rich, sweet treat. Get ready for the compliments to roll in!
Make It Your Own: Delicious Variations
The beauty of this recipe is its versatility! Here are a few fun ways to switch it up:
- Cookie Dough Twist: Fold in 1/2 cup of mini chocolate chips and 1/2 cup of undressed, heat-treated flour for a safe-to-eat cookie dough experience.
- Chocolate Lover’s Dream: Use a chocolate cookie crust (Oreo!) instead of graham cracker. You can also swap 1/4 cup of the peanut butter for chocolate syrup.
- Berry Bliss: After adding the whipped topping layer, top with a swirl of strawberry or raspberry dessert sauce for a PB&J vibe.
- Lighter Option: Use reduced-fat cream cheese and peanut butter, and swap the whipped topping for a light or sugar-free version. The texture will be slightly different but still delicious!
- Elvis Special: Top with sliced bananas and a drizzle of honey right before serving. Thank ya very much.
From My Kitchen to Yours: Chef’s Notes
This recipe has seen many iterations in my kitchen! The first time I made it, I got a little *too* excited and added the peanut butter cups while the mixer was still running. Let’s just say I ended up with more of a peanut butter cup dust than chunks—still tasty, but not the textural joy we’re going for! I’ve learned that gentle folding is everything. I’ve also found that letting the pies chill overnight, as agonizing as it is, makes a world of difference in the final set and flavor. It’s a forgiving recipe, so don’t stress. The most important ingredient is the joy you put into making it. So put on some music, unwrap those peanut butter cups (and maybe sneak a few for yourself), and have fun with it!
Your Questions, Answered: FAQs & Troubleshooting
Q: My filling is lumpy! What did I do wrong?
A: This almost always happens if the cream cheese wasn’t fully softened to room temperature before you started. You can try to press the filling through a fine-mesh sieve to salvage it, but it’s a bit of a pain. Prevention is key—plan ahead and let that cream cheese soften!
Q: Can I make this into one deep-dish pie instead of two regular ones?
A: Absolutely! You can absolutely pour all the filling into one deep 9-inch springform pan. You might need to adjust the chilling time, making it longer (closer to 6-8 hours or overnight) to ensure it sets firmly in the center.
Q: Why is my pie watery or weepy after chilling?
A: Weeping can happen for two main reasons: 1) The whipped topping wasn’t fully thawed, or 2) The cream cheese was over-beaten, causing it to break down and release water. Make sure your whipped topping is thawed in the fridge and mix just until everything is combined.
Q: How long will this pie keep in the fridge?
A: It’s best enjoyed within 2-3 days. The crust will start to get softer the longer it sits, but I doubt it will last that long anyway! You can also freeze the pies for up to a month. Thaw in the refrigerator for a few hours before serving.

Peanut Butter Cup Cream Pie
- Total Time: 4 hrs 20 mins
Description
This dessert is pure joy in a crust—silky peanut butter filling, light as a cloud, packed with chunks of peanut butter cups, and finished with a fluffy whipped topping. No oven needed, just a little mixing, folding, and patience while it chills. Perfect for potlucks, birthdays, or a Tuesday pick-me-up.
Ingredients
-
2 (8 oz) cream cheese blocks, softened
-
1 cup creamy peanut butter
-
1 cup powdered sugar
-
2 (16 oz) tubs whipped topping, thawed & divided
-
2 (9-inch) graham cracker crusts
-
30 mini peanut butter cups, chopped
-
Optional: melted chocolate, crushed pretzels, or flaky sea salt
Instructions
-
Blend Base – Beat cream cheese + peanut butter until smooth (2–3 min).
-
Sweeten – Mix in powdered sugar until fully combined.
-
Fold In Lightness – Gently fold in 1 tub of whipped topping.
-
Mix Magic – Stir in half the chopped peanut butter cups.
-
Fill & Smooth – Divide mixture between crusts, smooth tops.
-
Top It Off – Spread remaining whipped topping, sprinkle on the rest of the cups.
-
Optional Glam – Drizzle melted chocolate, add pretzels or sea salt.
-
Chill – Refrigerate at least 4 hours (overnight best).
✨ Pro tip: Use a hot knife for perfect, clean slices.
- Prep Time: 20 mins
Nutrition
- Calories: 380 cal Per Slice
- Fat: 24g
- Saturated Fat: 12g
- Carbohydrates: 35g
Nutritional Information
*Please note: This is an estimated nutritional breakdown provided for informational purposes only. Calculations will vary based on specific brands and ingredients used.*
Per Slice (based on 16 servings total, 1 slice from one pie):
Calories: 380 | Fat: 24g | Saturated Fat: 12g | Carbohydrates: 35g | Sugar: 27g | Protein: 6g | Sodium: 220mg
Final Thoughts: A Pie to Remember
So there you have it—the recipe for what is sure to become your new signature dessert. This Peanut Butter Cup Cream Pie is more than just a collection of ingredients; it’s a passport to joy, a guaranteed smile-maker, and a testament to the fact that the best things in life are often the simplest.
It’s the perfect dessert because it meets you where you are. Whether you’re a seasoned baker showing off or a nervous newbie looking for a surefire win, this pie has your back. It requires no special skills, just a little patience for that chilling time (which, I promise, makes all the difference).


