
Pastel Deviled Eggs: Your New Favorite Easter (or Anytime!) Appetizer
Hey there, friend! Olivia here. Can you smell that? It’s the warm, comforting scent of hard-boiled eggs mingling with the promise of spring. I’m so glad you’ve pulled up a chair in my kitchen today because we’re about to make something that’s equal parts magic and delicious: Naturally Dyed Pastel Deviled Eggs.
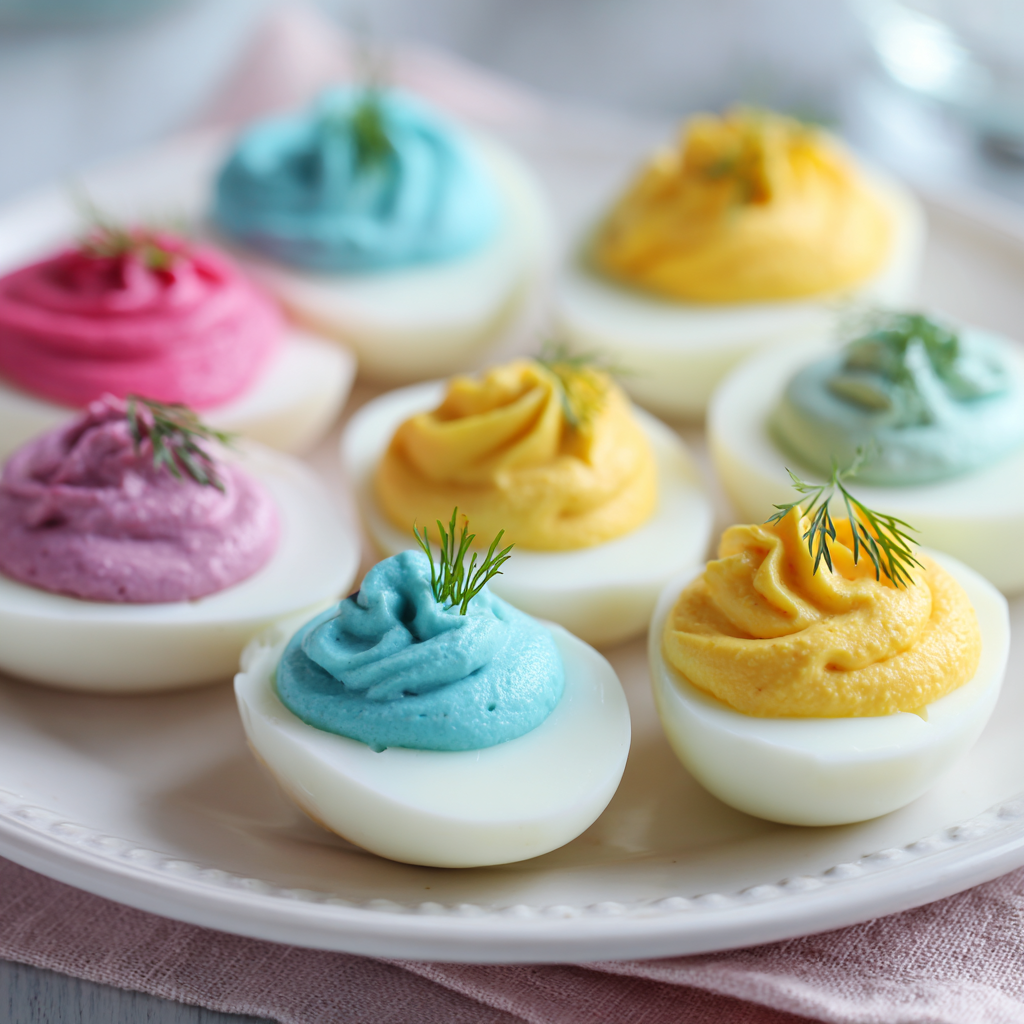
Now, I know what you might be thinking. “Deviled eggs? Aren’t those just a potluck classic?” And you’re right, they are! But that’s exactly why I love giving them a playful, seasonal twist. Imagine a platter of these little gems, their whites glowing in the softest shades of blush pink, sunshine yellow, and lavender blue, all cradling that creamy, savory filling we know and love. They’re a total conversation starter, and the best part? We’re creating all those beautiful colors straight from the earth, using things like beets, turmeric, and cabbage.
This isn’t about complicated kitchen science or fancy tools. It’s about embracing a little whimsy, celebrating the seasons, and creating food that makes people’s eyes light up. Whether you’re hosting Easter brunch, a spring baby shower, or just want to add a splash of joy to Tuesday’s dinner table, these eggs are your ticket. So, tie on that “messy apron” (you know I’m right there with you), and let’s turn simple ingredients into something unforgettable together. I promise, your guests—and your inner food artist—are going to be thrilled.
A Dash of Nostalgia: Why These Eggs Mean Spring to Me
My love affair with deviled eggs started long before I had my own kitchen. It was in my Nana’s warm, always-bustling house on Easter Sunday. While the grown-ups handled the ham, my cousin and I had one sacred job: decorating the deviled eggs. Back then, our “decoration” was a very enthusiastic, slightly haphazard sprinkle of paprika from a height of about two feet, resulting in a festive (if somewhat fiery) red dusting over everything, the countertops included.
Years later, when I first saw the idea of naturally dyed egg whites, it felt like unlocking a new level of that childhood joy. It was my “aha!” moment where classic family tradition met creative play. The first time I slid those pure white halves into a jar of brilliant pink beet juice, I felt like a kitchen wizard. Pulling them out, transformed into the prettiest pastel, brought back that same giddy excitement from Nana’s kitchen. Now, making these is my own spring ritual. It’s my way of honoring those messy, happy memories while creating new ones, proving that the food that brings us together can always find a fresh, beautiful spin.
Gathering Your Rainbow: Ingredients & Why They Work
Here’s everything you’ll need to create your pastel masterpiece. I’ve included my little chef insights for each one, because knowing the “why” makes you feel more confident in the kitchen!
For the Eggs & Natural Dyes:
- 6 large eggs: The star of the show! Older eggs (about 7-10 days) are actually easier to peel after boiling. Size matters here—large eggs give you the perfect canvas-to-filling ratio.
- 1 cup beet juice (for pink): This creates the most gorgeous, natural pink hue. Chef’s Tip: You can juice a small raw beet, use the liquid from canned beets (my easy shortcut!), or simmer a chopped beet in 1.5 cups water for 20 minutes to make your own dye.
- 1 teaspoon turmeric + 1 cup warm water (for yellow): Turmeric is a potent, vibrant natural dye. The warm water helps it dissolve. Substitution Tip: A pinch of saffron steeped in hot water makes a stunning golden yellow, but turmeric is much more budget-friendly.
- 1 cup red cabbage water (for blue/purple): This is the coolest kitchen science trick! Boiled red cabbage water is a pH indicator. Chef’s Insight: It starts blueish and can turn more lavender or even teal depending on the vinegar. It’s pure magic.
- 1 tablespoon white vinegar (per dye bath): This is non-negotiable! The vinegar’s acidity helps set the natural dye onto the egg white proteins, making the color stick beautifully.
For the Dreamy Filling:
- Cooked egg yolks: Reserved from your peeled eggs, of course! They’re the rich, creamy base of our filling.
- 3 tablespoons mayonnaise: This binds everything into luscious, smooth perfection. Use your favorite brand—full-fat will give the richest flavor and texture.
- 1 teaspoon Dijon mustard: My secret weapon! Dijon adds a subtle tang and depth that plain yellow mustard just can’t match. It elevates the flavor without being overpowering.
- Salt and pepper, to taste: Seasoning is key. I always start with a pinch of each, mix, taste, and then add more. Remember, you can always add, but you can’t take away!
- Optional: Fresh herbs (dill, chives, parsley), finely chopped: A pop of green and fresh flavor. Chives are my top pick for a classic, mild oniony bite that complements everything.
Let’s Get Cooking: Step-by-Step with Chef Olivia
Ready to create some magic? Follow these steps, and don’t skip my little commentary—it’s where all my favorite hacks live!
- Perfect Hard-Boiled Eggs: Place your eggs in a single layer in a saucepan. Cover with cold water by about an inch. Bring to a full, rolling boil over high heat. Once boiling, immediately cover the pot, remove it from the heat, and let it sit for exactly 12 minutes. My #1 Tip: This “steam” method prevents that nasty gray/green ring around the yolk! After 12 minutes, transfer the eggs to an ice bath (a bowl of cold water with ice cubes) to stop the cooking. Let them chill completely—this also makes peeling a breeze.
- Peel & Prep: Gently tap each egg on the counter and roll it lightly to crackle the shell all over. Start peeling from the wider end (where there’s usually an air pocket) under a trickle of cool running water—the water helps loosen the membrane. Chef’s Hack: Patience is your friend here. Rinse off any little bits of shell, then pat the eggs completely dry with a paper towel. A dry egg is crucial for clean slicing.
- Slice & Scoop: Using a sharp knife, slice each egg in half lengthwise. Wipe the knife clean between cuts for neat edges. Gently pop the yolks out into a medium bowl. Arrange the empty white halves on a plate or tray—they’re ready for their color bath!
- Create Your Dye Baths: In three separate small bowls or jars, prepare your dyes. For pink: mix 1 cup beet juice with 1 tbsp vinegar. For yellow: dissolve 1 tsp turmeric in 1 cup warm water, then stir in 1 tbsp vinegar. For blue/purple: use 1 cup of the liquid from boiled red cabbage (simmer 1/4 of a chopped cabbage in 2 cups water for 10 min, strain) mixed with 1 tbsp vinegar. Color Note: The cabbage dye might look blue or purple; both are beautiful!
- The Dyeing Magic: Divide your egg white halves among the three dye baths, making sure they’re fully submerged. Pop them in the refrigerator! Check them after 30 minutes for soft pastels. For more vibrant color, you can go up to 2 hours. Don’t leave them overnight—the vinegar will start to toughen the whites.
- Rinse & Dry: Using a slotted spoon, carefully remove the dyed eggs. Give them a very gentle rinse under cool water to remove any surface dye particles, then pat them completely dry with paper towels. This step is important so your filling doesn’t get watery.
- Make the Filling: To your bowl of yolks, add the mayo, Dijon, salt, and pepper. Mash it all together with a fork until it’s perfectly smooth and creamy. Taste it! Adjust seasoning if needed. Fold in your chopped herbs now, if using.
- Fill & Flourish: You can simply spoon the filling back into the wells, but for a truly elegant look, piping is the way to go. Spoon the filling into a zip-top bag, snip off a corner (about 1/2 inch), and pipe away! No fancy piping tip needed. Swirl it, peak it, get creative!
- Chill & Serve: Cover your finished pastel deviled eggs loosely with plastic wrap and refrigerate for at least 15-20 minutes before serving. This lets the flavors meld and makes them the perfect cool, refreshing bite.
Plating Your Pastel Masterpiece
Presentation is part of the fun! I love using a simple white platter or a rustic wooden board to really let the colors sing. Arrange them in a rainbow gradient or mix the colors playfully. For a final touch, garnish the platter with a few sprigs of fresh dill, edible flowers like pansies or violas, or a light dusting of smoked paprika or extra chopped chives. The contrast is stunning! Serve them chilled, and watch them disappear.
Make It Your Own: Fun Twists & Swaps
Once you’ve mastered the classic, the playground is open! Here are a few ways to mix it up:
- Herb Garden Filling: Swap the Dijon for 2 tablespoons of finely minced fresh herbs (think tarragon, chervil, and parsley) for a super fresh, spring-forward flavor.
- The “Avocado Devil”: Replace half the mayonnaise with mashed ripe avocado for a wonderfully creamy, slightly green-tinged filling with healthy fats. Add a squeeze of lime juice to prevent browning.
- Spicy Sriracha Kick: Add 1/2 to 1 teaspoon of sriracha (or your favorite hot sauce) to the yolk mixture. The pink and orange-red filling looks amazing in the pastel shells!
- Dairy-Free & Paleo: Use a high-quality, avocado oil-based mayonnaise to keep things creamy without the dairy. It works like a charm!
- Extra Color: Create a green dye by simmering spinach or kale! Or, add a tiny bit of baking soda (1/4 tsp) to your blue cabbage dye to shift it toward a more turquoise/teal color. Experiment!
Chef Olivia’s Notebook: Extra Thoughts & A Kitchen Story
This recipe has evolved so much in my kitchen. The first time I made them, I was so impatient I didn’t let the dye baths chill—I left them on the counter. The colors were… muted, to say the least. Lesson learned: patience makes pretty pastels! Also, I once got overzealous with the turmeric and my yellow eggs could have doubled as highlighter pens. A little truly goes a long way.
My biggest piece of advice? Don’t stress the small stuff. If an egg tears while peeling, it’s okay. If your colors aren’t perfectly even, they’re more charming for it. If you just want to spoon the filling instead of pipe, do it! These are meant to bring joy, not perfection. The real magic is in the sharing, the “oohs” and “aahs,” and the empty platter at the end of the party. That’s the true sign of a recipe made with love.
Your Questions, Answered (FAQs & Troubleshooting)
Q: My yolks have a gray/green ring! What did I do wrong?
A: Don’t worry, they’re still safe to eat! That ring means they were overcooked or not cooled quickly enough. Next time, try my “cover and steam” method (Step 1) and get them into an ice bath immediately. The ring is just a visual thing, but we’re aiming for pretty, bright yellow yolks!
Q: The dye isn’t sticking to my egg whites very well. Why?
A: Two likely culprits! First, make sure you added the vinegar to the dye bath—it’s essential for setting the color. Second, ensure your peeled egg whites are patted completely dry before submerging.

Pastel Deviled Eggs (Naturally Dyed, Easter-Perfect Appetizer)
Description
These pastel deviled eggs are a fun, colorful twist on the classic appetizer. Naturally dyed with simple ingredients like beet juice, turmeric, and red cabbage, they look impressive but are surprisingly easy to make. Perfect for spring gatherings, brunch tables, or party platters, they taste just as good as they look.
Ingredients
Eggs
-
6 large eggs
Natural Dye Baths
-
1 cup beet juice + 1 tbsp white vinegar (pink)
-
1 cup warm water + 1 tsp turmeric + 1 tbsp white vinegar (yellow)
-
1 cup red cabbage water + 1 tbsp white vinegar (blue/purple)
To make cabbage water: simmer chopped red cabbage in water for 10 minutes, then strain and cool.
Filling
-
Cooked egg yolks (from the eggs)
-
3 tbsp mayonnaise
-
1 tsp Dijon mustard
-
Salt and black pepper, to taste
-
Optional: 1–2 tbsp finely chopped chives or dill
-
Optional garnish: paprika or extra herbs
Instructions
-
Hard-boil the eggs
Place eggs in a saucepan and cover with cold water. Bring to a boil, then cover and remove from heat. Let sit 12 minutes. Transfer to an ice bath and cool completely. -
Peel and slice
Peel eggs and pat dry. Slice in half lengthwise. Remove yolks to a bowl and set whites aside. -
Prepare dye baths
Pour each dye mixture into a separate cup or bowl. -
Dye the egg whites
Submerge egg white halves in the dye baths. Refrigerate 30–90 minutes depending on how deep you want the color. -
Rinse and dry
Remove whites with a spoon, lightly rinse, and pat dry with paper towels. -
Make the filling
Mash yolks with mayonnaise, Dijon, salt, and pepper until smooth. Stir in herbs if using. -
Fill the eggs
Spoon or pipe the filling into each colored egg white half. -
Chill and serve
Refrigerate at least 20 minutes before serving.
Notes
-
Use slightly older eggs — they peel more easily.
-
Always add vinegar to dye baths so the color sticks.
-
Pat egg whites dry before dyeing for more even color.
-
Don’t soak longer than 2 hours or the whites can become firm.
-
Pipe the filling with a zip-top bag (snip the corner) for a neat look.
-
Make them the day of serving for the freshest texture.
Final Thoughts: Your Turn to Shine
And there you have it—your guide to creating little bites of edible, pastel joy. From the science of the perfect hard-boil to the magic of turning cabbage water into a lavender dream, I hope you feel equipped and inspired.
Remember, this recipe is more than just an appetizer; it’s an invitation. An invitation to slow down, play with your food, and add a splash of unexpected beauty to an ordinary day. Whether these eggs grace your Easter table, become the star of a spring picnic, or simply make a Tuesday night feel a bit more special, their purpose is to delight—both you and anyone lucky enough to try one.
So, embrace the process. Don’t fret if a few eggs tear (they’ll still taste amazing), or if your “purple” leans more toward slate blue (it’s gorgeous, I promise). Your version will be uniquely yours, and that’s the best part. The real success isn’t in flawless presentation, but in the shared smiles, the stories told over the platter, and the quiet satisfaction of creating something beautiful with your own two hands.
Thank you for spending this time in my kitchen. Now, go tie on that apron, gather your dyes, and make some magic. I can’t wait to hear how your pastel creations turn out! Happy cooking, friend.
With love and a sprinkle of paprika,
Olivia


