
The Dessert That Stole the Show (And My Heart)
Hey there, friend! Come on in, pull up a stool, and let’s talk about one of life’s simple, glorious pleasures: dessert. Not just any dessert, but the kind that makes people’s eyes light up the second you bring it to the table. The kind that requires zero baking, minimal fuss, and delivers maximum, soul-soothing deliciousness. I’m talking about my legendary No-Bake Oreo Truffle Dessert.
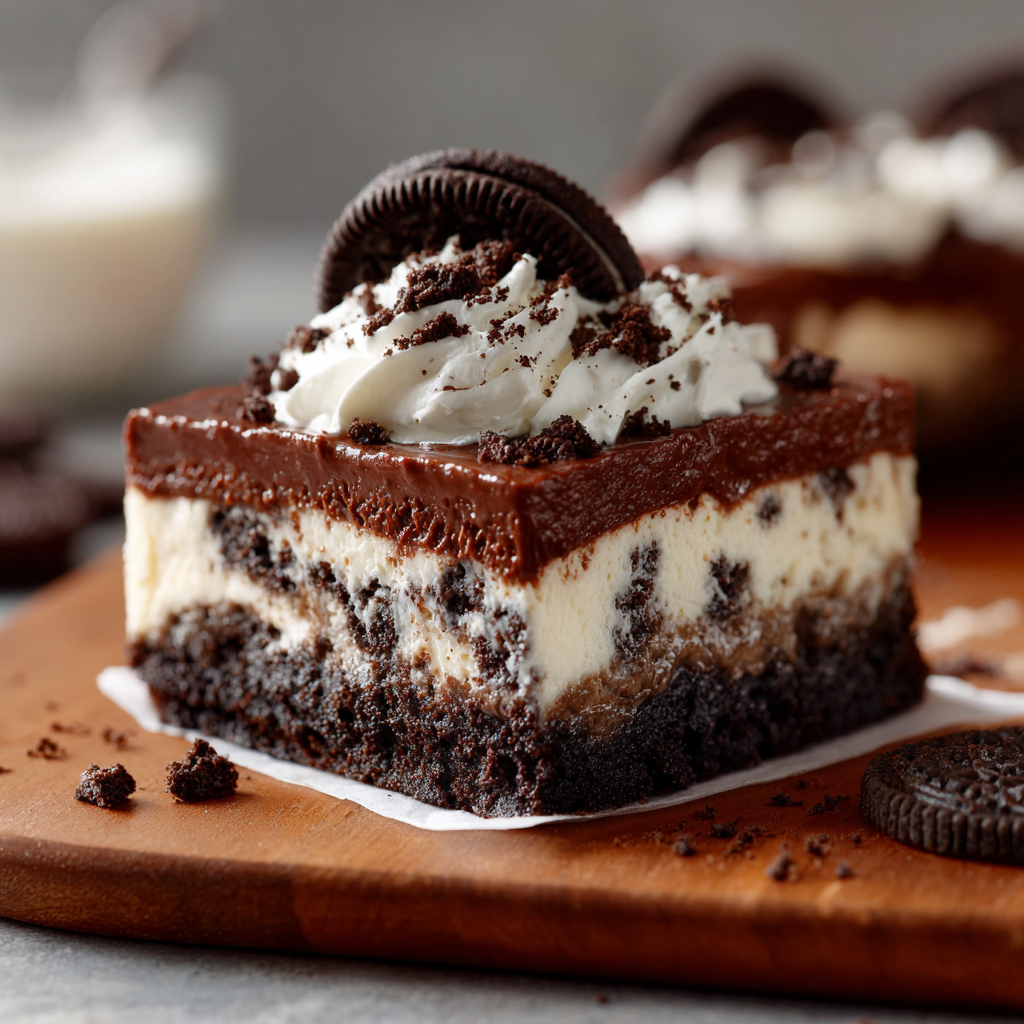
If you’ve ever made classic Oreo truffles, you know the magic. That perfect combination of crunchy cookie, creamy filling, and rich chocolate is just… *chef’s kiss*. Well, I took everything we love about those little bites and turned it into a stunning, shareable, layered masterpiece. We’re talking a buttery Oreo crust, a luxuriously thick and creamy truffle layer, a silky chocolate pudding cloud, and a finale of fluffy whipped topping and a decadent chocolate ganache drizzle. Every single spoonful is a textural dream.
This is my go-to dessert for potlucks, birthday parties, busy weeknights when you need a sweet victory, or those “I just need a little something” moments (we all have them!). It’s the ultimate crowd-pleaser, and the best part? You don’t need to be a pastry chef to pull it off. You just need a food processor, a bowl, a whisk, and a whole lot of love for Oreos. Ready to make some magic? Let’s get started!
A Pan of Pure Joy: My First Oreo Truffle Dessert
I’ll never forget the first time I threw this together. It was for my nephew’s 10th birthday party—a last-minute, “Auntie Liv, can you bring a dessert?” kind of situation. I had a pantry full of Oreos (a kitchen essential, in my opinion) and a vision. I remember layering it all in my trusty 9×13 pan, crossing my fingers that it would set in time, and hoping the kids would like it.
Well, let me tell you, it wasn’t just a hit; it was a sensation. The kids descended upon it like a swarm of happy, sugar-seeking bees. But the real victory was watching the adults, who were trying to be “good,” sneak back for second and third slivers. My brother-in-law, a self-proclaimed dessert connoisseur, looked at me and said, “You’re not allowed to come over without this ever again.” That’s when I knew this recipe was something special. It wasn’t just a dessert; it was a memory-maker, a conversation starter, and the star of the party. It’s been a Bennett family staple ever since.
Gathering Your Treasure Trove of Ingredients
Here’s the beautiful part: you only need a handful of simple ingredients to create pure magic. I always say, great food starts with great ingredients, so let’s break them down. This is where the fun begins!
- 1 family-size package Oreos (about 50 cookies), divided: This is the backbone of our entire dessert! We’ll use most for the crust and truffle layer, and save a handful for a gorgeous, crunchy garnish. Chef’s Insight: Don’t scrape off the cream! That iconic white filling is what gives our truffle layer its perfect texture and sweetness.
- 8 oz cream cheese, softened: This is the secret weapon in our truffle layer, creating that rich, tangy, cheesecake-like heart of the dessert. Tip: Ensure it’s truly softened at room temperature. This is non-negotiable for a smooth, lump-free layer! If you forget, you can place the sealed block in a bowl of warm water for 10-15 minutes.
- 1 tub (8 oz) whipped topping (like Cool Whip), thawed: This brings the airy, light-as-a-cloud texture to both our truffle and top layers. Substitution: You can absolutely use an equal amount of freshly whipped heavy cream sweetened with a little powdered sugar for a from-scratch vibe.
- 1 box (3.9 oz) instant chocolate pudding mix: This is our quick-and-easy route to a firm, flavorful, and silky chocolate layer. Chef’s Insight: It MUST be “instant” pudding. Cook-and-serve pudding will not set properly without being heated, which would melt our beautiful layers beneath it.
- 2 cups cold milk: The key word here is cold. Using ice-cold milk is the trick to getting your pudding to whip up thick and luxurious in just two minutes. Whole milk will give you the creamiest result, but any milk will work.
- 1 cup semisweet chocolate chips (for optional ganache): Because why stop at amazing when you can be extraordinary? A ganache drizzle adds a professional, bakery-style finish. Substitution: Feel free to use milk chocolate or dark chocolate chips based on your preference.
- ½ cup heavy cream (for optional ganache): When heated and poured over chocolate chips, it creates that glossy, pourable, dreamy ganache we all love.
Let’s Build Our Masterpiece: Step-by-Step
Okay, team! Aprons on, music up—it’s assembly time. This process is like building a delicious edible puzzle, and I’ll be with you every step of the way with my favorite chef hacks.
Step 1: Make the Irresistible Crust
First, take about 30 of your Oreos and toss them into a food processor. Pulse until you have fine, even crumbs. No food processor? No problem! Place the cookies in a large zip-top bag, seal it tightly, and roll over them with a rolling pin. Get out any kitchen frustrations—it’s therapeutic! Once they’re crushed, press them firmly and evenly into the bottom of your 9×13-inch dish. I like to use the flat bottom of a measuring cup to really pack it down, which gives us a solid base for all those lovely layers. Chef’s Hack: Reserve a small handful of these crumbs *before* you press them in. We’ll use them for a pretty topping later!
Step 2: Create the Dreamy Truffle Layer
Now, for the star of the show. In a large mixing bowl, use an electric hand mixer (or a stand mixer with the paddle attachment) to beat the softened cream cheese until it’s completely smooth and lump-free. This is crucial! Now, add in the remaining Oreos (about 20 cookies), crushed just like the first batch. Blend it all together. It will be thick, almost like a cookie dough, and smell absolutely incredible. Now, gently fold in half of your thawed whipped topping. “Folding” means using a spatula to cut down through the middle, sweep across the bottom, and turn the mixture over itself. This keeps all that lovely air in the whipped topping, ensuring our truffle layer stays light and creamy. Spread this heavenly mixture evenly over your crust layer.
Step 3: Whip Up the Silky Pudding Layer
In another bowl, grab a whisk and combine the instant chocolate pudding mix with the two cups of cold milk. Now, whisk like you mean it! Set a timer for 2 full minutes. You’ll see it transform from a liquid into a thick, pudding-like consistency. This vigorous whisking is what activates the thickening agents. Once it’s beautifully thick, immediately spread it over the truffle layer. We do this right away before a skin forms. Pop the whole pan into the fridge for a quick 10-minute chill to let the pudding set up just a bit before we add the final layer.
Step 4: The Grand Finale: Topping & Chill Time
Take the pan out of the fridge and lovingly spread the remaining half of the whipped topping over the pudding layer. If you’re going for the ganache (and I highly recommend you do!), now’s the time. Place your chocolate chips in a heatproof bowl. Heat the heavy cream in a small saucepan over medium heat until it’s just simmering—you’ll see little bubbles around the edges. Pour the hot cream over the chocolate chips, let it sit for one minute, and then whisk until it’s smooth, glossy, and perfect. Let it cool for a few minutes so it thickens slightly, then drizzle it artfully over the whipped topping with a spoon. Finally, sprinkle the reserved Oreo crumbs over everything for that final touch of texture.
Now, the hardest part: patience. Cover the pan and refrigerate it for at least 4 hours, but ideally overnight. This waiting period is non-negotiable—it’s what allows all the layers to firm up and the flavors to marry into one cohesive, spectacular dessert.
Serving Up the Sweetness
When it’s finally time to serve, dip a sharp knife in hot water, wipe it dry, and then slice your dessert into clean, beautiful squares. The hot knife will glide through the layers without dragging. I love serving this on a simple white platter to let those gorgeous layers really shine. A little dusting of cocoa powder or a few fresh raspberries on the side never hurt anybody, either! It’s rich, so a little goes a long way, but let’s be real… seconds are always encouraged in my kitchen.
Get Creative! Fun Recipe Twists
This recipe is a fantastic canvas for your creativity! Here are a few of my favorite ways to mix it up:
- Mint Chocolate Chip: Use Mint Oreos for a refreshing, cool twist that feels so fancy.
- Peanut Butter Paradise: Swirl ½ cup of creamy peanut butter into the truffle layer and use Reese’s Pieces as a garnish instead of Oreo crumbs.
- Cookies & Cream Cheesecake: Swap the chocolate pudding for vanilla or white chocolate pudding for a pure, classic cookies-and-cream flavor.
- Mocha Madness: Dissolve a tablespoon of instant espresso powder into the cold milk before whisking in the chocolate pudding mix for a sophisticated coffee kick.
- Fruity Fun: After spreading on the whipped topping, top with a layer of fresh, sliced strawberries or raspberries before adding the ganache.
Olivia’s Chef’s Notes & Kitchen Confessions
This recipe has evolved so much since that first pan for my nephew! I originally made it without the pudding layer, but I found adding it gave the dessert more structure and an extra hit of chocolatey goodness that balances the sweetness perfectly. My favorite kitchen story involving this dessert was the time I was bringing it to a friend’s house and, while navigating a sharp turn, the pan slid right off the passenger seat. I let out a gasp that probably scared the neighbors! I arrived in a panic, sure it was a goner, but when we opened the lid, it was perfectly intact. Those layers are more resilient than they look! It just goes to show, this dessert is meant to be shared, even if it has a little adventure on the way.
Your Questions, Answered!
Over the years, I’ve gotten a lot of questions about this recipe. Here are the most common ones to ensure your success!
Q: My truffle layer was really difficult to spread. What happened?
A: This almost always means your cream cheese wasn’t soft enough! It needs to be at room temperature for at least 30-60 minutes to blend smoothly. If you’re in a pinch, you can microwave the unwrapped block for 10-15 seconds, but be very careful not to melt it.
Q: Can I make this dessert gluten-free or dairy-free?
A> Absolutely! For a gluten-free version, use your favorite gluten-free chocolate sandwich cookies (they make great ones now!). For dairy-free, use dairy-free cream cheese, non-dairy whipped topping, and plant-based milk. The results are just as delicious.
Q: My ganache split/got grainy. How can I fix it?
A> Don’t worry, we can save it! A split ganache usually means the cream was too hot and caused the fat to separate. Try whisking in a teaspoon of warm milk or cream to bring it back together. If it’s grainy, it might have been whisked too vigorously and incorporated air bubbles. Gently tapping the bowl on the counter can help settle it.
Q: Why does it need to chill for so long? Is 2 hours enough?
A> I know, the wait is tough! But the 4+ hour chill is essential for the dessert to set up properly so you get clean slices. If you only chill it for 2 hours, it will still taste amazing, but it might be a bit messy when you serve it. Overnight is truly the gold standard.

Oreo Truffle Dessert : No-Bake Layers of Cookies, Cream & Chocolate
Description
No-Bake Oreo Truffle Dessert
Prep Time: 25 minutes
Chill Time: 4 hours (overnight preferred)
Total Time: 4 hours 25 minutes
Ingredients
Crust
-
30 Oreo cookies
-
(Optional) Extra crumbs reserved for garnish
Truffle Layer
-
20 Oreo cookies, crushed
-
8 oz cream cheese, softened
-
½ tub (4 oz) whipped topping, thawed
Pudding Layer
-
1 box (3.9 oz) instant chocolate pudding mix
-
2 cups cold milk
Top Layer
-
½ tub (4 oz) whipped topping, thawed
Optional Ganache
-
1 cup semisweet chocolate chips
-
½ cup heavy cream
Instructions
Crush 30 Oreos to fine crumbs using a food processor or a zip bag + rolling pin.
Press firmly into the bottom of a 9×13-inch dish to form an even crust.
Beat softened cream cheese until completely smooth.
Add crushed Oreos and mix until well combined (texture will be thick).
Fold in ½ of the whipped topping until creamy.
Spread evenly over the crust.
Whisk instant pudding mix with cold milk for 2 minutes until thick.
Spread immediately over the truffle layer.
Refrigerate 10 minutes to set slightly.
Spread the remaining whipped topping evenly over the pudding layer.
Place chocolate chips in a bowl.
Heat heavy cream until simmering and pour over the chocolate.
Let sit 1 minute, then whisk until smooth and glossy.
Cool slightly, then drizzle over the dessert.
Cover and refrigerate at least 4 hours, preferably overnight, until fully set.
Cut into squares using a hot knife (dip in hot water, wipe dry).
Garnish with reserved Oreo crumbs.
Notes
-
Cream cheese must be fully softened for a smooth truffle layer.
-
Only instant pudding works — cook & serve will not set.
-
Overnight chilling gives the cleanest slices.
Nutrition
- Calories: 380cal Per Serving
- Fat: 24g
- Carbohydrates: 35g
- Protein: 4g
Nutritional Information*
*Please note: This is an estimated nutritional breakdown provided for informational purposes. Values can vary based on specific ingredient brands.
Per Serving (based on 12 servings):
Calories: 380 | Protein: 4g | Carbohydrates: 35g | Sugars: 24g | Fat: 24g | Saturated Fat: 13g | Cholesterol: 40mg | Sodium: 310mg
Final Thoughts: Your New Secret Weapon for Sweet Success
And there you have it—the dessert that’s guaranteed to steal the show, win hearts, and solve any last-minute “what should I bring?” panic. This No-Bake Oreo Truffle Dessert is more than just a list of ingredients and steps; it’s a testament to the fact that the most memorable treats don’t require a fancy degree or a day of slaving in the kitchen. They just require a little bit of fun, a whole lot of Oreos, and the joy of creating something truly special.
It’s the perfect recipe to have in your back pocket, ready to transform a simple Tuesday into a celebration or to become the undisputed star of the potluck table. It proves that with a few simple techniques and quality ingredients, you can create layers of flavor and texture that feel indulgent, professional, and straight from the heart.
So, the next time you’re looking for a dessert that promises rave reviews and zero stress, I hope you remember this pan of pure, unadulterated joy. Whip it up, share it with someone you love, and get ready to make some delicious memories of your own.
Now, I have to ask—what twist will you try first? The minty freshness, the peanut butter paradise, or will you stick with the classic that stole my heart? Tag me in your photos; I can’t wait to see your creations and hear the stories that come with them
“`


