Your New Go-To Party Appetizer is Here!
Hey there, friend! Come on in, the kitchen’s warm, and I’ve got a baking sheet full of pure magic about to come out of the oven. If you’ve ever been to a party and found yourself strategically hovering near the appetizer table, waiting for that one specific dish to appear, then you and I are kindred spirits. For me, that dish has always been a platter of perfectly golden, outrageously delicious stuffed mushrooms.
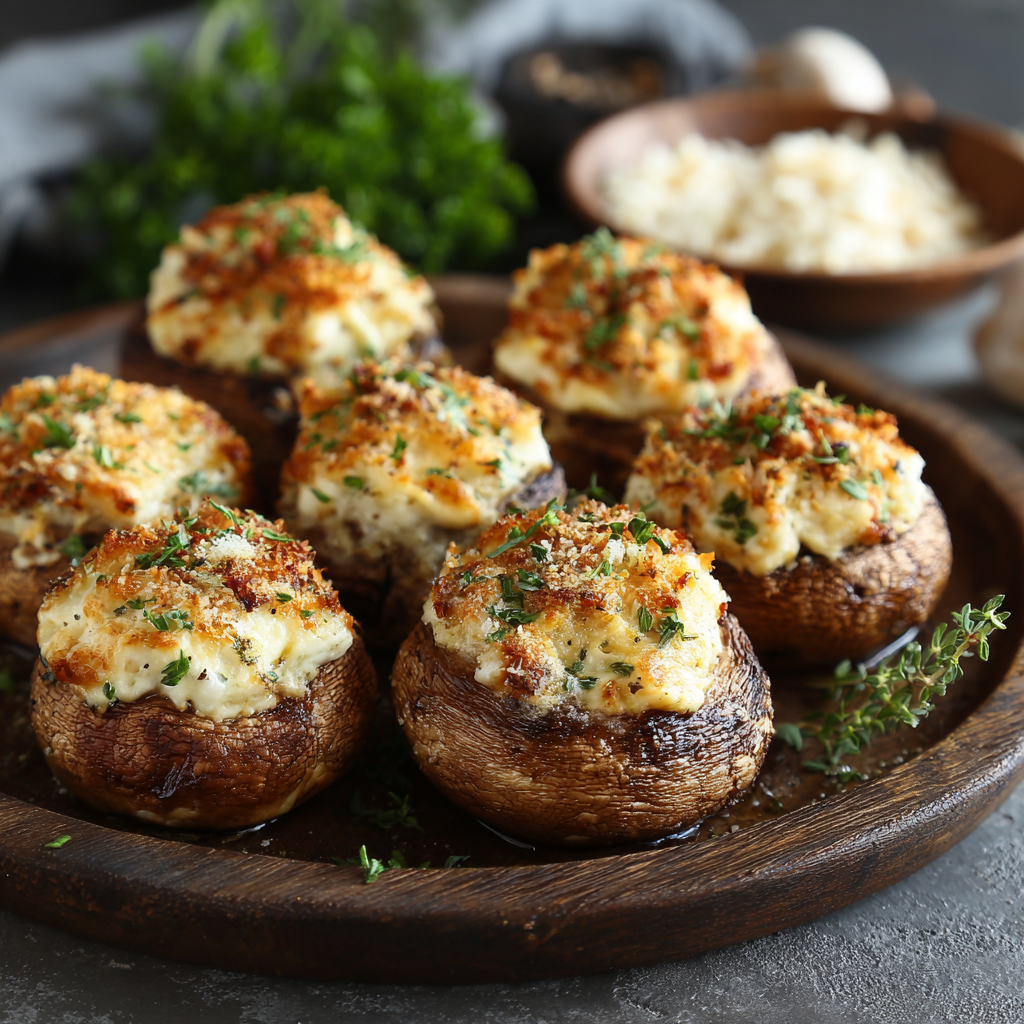
We’re not talking about any old stuffed mushroom, though. Oh no. We’re talking about a version that’s so good, it almost caused a minor diplomatic incident at my cousin’s wedding shower (more on that later). These are the ultimate crowd-pleasers: tender, juicy mushroom caps cradling a creamy, cheesy, savory filling that’s got just the right whisper of heat. They’re elegant enough for a fancy dinner party but so darn easy that you can whip them up for a casual game night without breaking a sweat.
The best part? You don’t need any fancy chef skills. All you need is a bowl, a spoon, and a whole lot of love for flavor. This recipe is my love letter to simple ingredients that, when combined, become something truly unforgettable. So, tie on your favorite apron (the messy one with all the stains tells the best stories), and let’s make some memories together. Get ready for your kitchen to smell like a five-star bistro and for these mushrooms to disappear faster than you can say, “Wait, did you try one?”
The Great Wedding Shower Mushroom Standoff
I have to share a quick story that perfectly captures the power of these little flavor bombs. A few years back, I was tasked with bringing an appetizer to my cousin Chloe’s bridal shower. I wanted to make something special, so I doubled this very recipe, believing a mountain of stuffed mushrooms would be a safe bet. Oh, how naive I was!
I placed the two heaping platters on the table, and within what felt like 90 seconds, a quiet but intense battle for the last one began between Chloe’s future mother-in-law, Aunt Carol, and her feisty college roommate, Maya. I’m talking polite, smiling, but very determined fork-jousting. It was a standoff witnessed in whispers and side-eyes. I had to literally sneak into the kitchen and whip up a third, emergency batch to restore peace and familial harmony.
From that day on, these weren’t just “Olivia’s Stuffed Mushrooms” anymore. In our family, they’re now officially known as “The Peacemaker Mushrooms.” They have a 100% success rate in bringing people together, even if it’s through a little friendly competition first! It’s a reminder that the best food isn’t just about taste; it’s about the stories and the smiles it creates.
Gathering Your Flavor All-Stars
One of the things I love most about this recipe is its beautiful simplicity. Let’s break down these superstar ingredients. Remember, cooking is part art, part science, and all heart—don’t be afraid to make it your own!
- 24 whole fresh mushrooms (stems removed and reserved): I like using white button or cremini (baby bella) mushrooms for their perfect, bite-sized caps and meaty texture. Chef’s Insight: When cleaning them, never run them under water! They’re like little sponges. Just give them a quick wipe with a damp paper towel. And for goodness sake, save those stems! They are packed with umami flavor and are the secret start to our incredible filling.
- 2 Tbsp vegetable oil: A neutral oil is perfect here for sautéing. You won’t even taste it, but it helps our garlic and mushroom stems get perfectly tender. Substitution Tip: Feel free to use olive oil or avocado oil if that’s what you have on hand.
- 2 Tbsp minced garlic: Yes, that’s two full tablespoons! We’re going for big, bold flavor. Using pre-minced jarred garlic is a total time-saver and completely acceptable in my kitchen. But if you’re using fresh cloves, about 5-6 large ones should do the trick.
- 16 oz cream cheese, softened: This is the lush, creamy base of our filling. Critical Tip: Let it sit on the counter for at least 30-60 minutes before you start. A rock-hard block of cream cheese will never blend smoothly, and we want a silky, lump-free filling. Trust me on this one!
- ½ cup grated Parmesan cheese: This brings a salty, nutty, savory punch that takes the flavor to the next level. Chef’s Insight: For the best texture and melt, grate your own Parmesan from a block. The pre-shredded stuff in bags often has anti-caking agents that can make it a bit grainy.
- ½ tsp ground black pepper: A simple but essential warmth and bite.
- ½ tsp onion powder: This is our flavor secret weapon! It gives a sweet, savory onion essence without any chopping or crunch.
- ½ tsp ground cayenne pepper: Don’t worry, this isn’t about making them super spicy! This small amount provides a gentle, background kick that beautifully balances the richness of the cheeses. It’s the “what is that amazing flavor?” factor.
Let’s Get Stuffing! Your Foolproof Guide
Alright, team! It’s go time. This is where the magic happens. I’ll walk you through every step, sharing all my little kitchen hacks to ensure your stuffed mushrooms are absolutely perfect.
- Prep Your ‘Shrooms: First, gently wipe each mushroom cap with a damp paper towel to remove any dirt. Next, carefully pop out the stems by rocking them back and forth—they should come out cleanly. Don’t toss them! Give the stems a fine chop. We’re going to transform these “scraps” into flavor gold. Chef’s Hack: Use a small melon baller or a ¼ teaspoon to gently scrape out a bit more of the gills from the inside of the cap. This creates a deeper, more stable well for all that glorious filling!
- Sauté for Flavor: Heat your vegetable oil in a skillet over medium heat. Add the chopped mushroom stems and minced garlic. Now, just breathe in that incredible aroma. Sauté for about 5 minutes, until the stems are tender and the garlic is fragrant. Key Tip: You’re not trying to brown or crisp them, just cook out the raw edge and release their moisture and flavor. Once done, take the skillet off the heat and let this mixture cool for a few minutes. Adding it piping hot to the cream cheese will melt it and make the filling runny.
- Create the Dreamy Filling: In a medium-sized bowl, add your softened cream cheese, grated Parmesan, black pepper, onion powder, and cayenne. Now, scrape in your slightly cooled mushroom and garlic mixture. Using a sturdy spatula or a wooden spoon, mix everything together until it’s smooth, creamy, and wonderfully well-combined. Chef’s Touch: Taste it! This is your moment. Want more pepper? A pinch more cayenne? Adjust the seasoning to your heart’s content. This is your masterpiece.
- The Main Event: Stuffing! Preheat your oven to 375°F (190°C). Lightly grease a baking sheet with a bit of oil or line it with parchment paper for easy cleanup. Now, take a spoonful of your filling and generously mound it into each mushroom cap. Don’t be shy! I like to create a little dome on top. Pro Tip: If you want an extra layer of texture, now is the time to sprinkle the tops with some crushed crackers or panko breadcrumbs. It adds a fantastic, buttery crunch that contrasts beautifully with the creamy interior.
- Bake to Perfection: Arrange your stuffed soldiers on the prepared baking sheet and pop them into the preheated oven. Bake for 20-22 minutes. You’re looking for the mushrooms to be tender (a fork should pierce them easily) and the tops to be a lovely, light golden brown. Your kitchen should smell absolutely divine right now.
- The Final Touch: Carefully remove the baking sheet from the oven. Let them rest for just a minute or two—that filling is like molten lava! Then, transfer them to a serving platter. For a final flourish, sprinkle with some freshly chopped parsley or chives, or even a light drizzle of balsamic glaze. It adds a pop of color and a touch of acidity that cuts through the richness perfectly.
How to Serve These Little Gems
Presentation is part of the fun! I love using a beautiful, rustic wooden board or a simple white platter to really let the golden-brown mushrooms shine. Scatter a few extra fresh herbs around the platter for a restaurant-worthy touch. Serve them warm right out of the oven when the cheese is at its peak gooeyness. They’re the ultimate finger food, so have some napkins handy—these are meant to be enjoyed in one delicious, messy bite!
Make It Your Own! Creative Twists & Swaps
The basic recipe is a masterpiece, but feel free to play with your food! Here are a few of my favorite ways to mix things up:
- Mediterranean Sunshine: Fold in ¼ cup of finely chopped sun-dried tomatoes (the oil-packed ones are best) or roasted red peppers. They add a sweet, tangy note that’s just incredible.
- Herb Garden Freshness: Stir in ¼ cup of chopped fresh herbs like parsley, chives, or thyme right into the filling. It brings a wonderful brightness that lightens up the whole dish.
- Seafood Sensation: Add a small can of well-drained lump crab meat or finely chopped cooked shrimp to the filling for a truly decadent, special-occasion appetizer.
- Bacon Lover’s Dream: Because everything is better with bacon! Mix in ¼ cup of cooked, crumbled bacon. Need I say more?
- Gluten-Free & Keto-Friendly: This recipe is naturally low-carb! Just skip any cracker or panko topping, or use crushed pork rinds for that crunch instead.
Olivia’s Extra Scoop & Kitchen Confessions
Over the years, this recipe has evolved in the best way. I started out being very precise and careful, but now I embrace the beautiful mess of it all. I’ve learned that a little extra garlic never hurt anybody, and that the “imperfect” mushrooms with the filling overflowing a bit are often the ones with the most character and the best crispy bits.
One of my favorite kitchen confessions? I used to be so impatient that I’d stuff the mushrooms while the stem mixture was still hot, resulting in a filling that was a bit too soft. I’ve since learned the virtue of letting things cool, and it makes a world of difference in getting that picture-perfect, domed filling. This recipe is a testament to the fact that sometimes, the best cooking lessons come from our little “oops” moments. These mushrooms have been with me through countless holidays, potlucks, and quiet nights in, and they’ve never, ever let me down.
Your Questions, Answered!
I’ve gotten so many wonderful questions about this recipe over the years. Here are the ones that pop up most often to help you on your stuffed mushroom journey!
- Q: Can I make these stuffed mushrooms ahead of time?A: Absolutely! You are a party-planning genius. Assemble them completely up to 24 hours in advance. Cover the baking sheet tightly with plastic wrap and keep them in the fridge. When you’re ready, just pop them straight into the preheated oven. You might need to add 1-2 extra minutes to the bake time since they’ll be starting from cold.
- Q: My filling turned out a bit watery. What happened?A: This is a common one! Two likely culprits: 1) You didn’t let the sautéed mushroom stem and garlic mixture cool enough before mixing it into the cream cheese. The heat can cause the fat in the cheese to separate. 2) Mushrooms hold a lot of water. Make sure you’re sautéing the chopped stems until they’ve released their moisture and look tender, not just for a set time. Giving them a good squeeze in a paper towel after sautéing can also help wick away extra liquid.
- Q: Can I use a different cheese instead of cream cheese?A: You can experiment! I’ve had great success using an equal amount of whipped goat cheese (chèvre) for a tangier flavor. For a lighter version, you could try a mix of part-skim ricotta and a little mayo to bind it, but the texture will be less creamy and more custardy. The cream cheese base is truly the gold standard for that rich, velvety texture we all love.
- Q: Why are my mushrooms soggy?A: Sogginess usually comes from excess moisture. Be sure not to wash the mushrooms under running water. The wipe-with-a-damp-paper-towel method is key. Also, make sure your oven is fully preheated so they start cooking immediately, and don’t overcrowd them on the baking sheet—steam needs space to escape!

Mouth-Watering Stuffed Mushrooms : Creamy, Savory & Crowd-Pleasing
Description
Tender, juicy mushroom caps filled with a creamy, cheesy, savory filling with just a whisper of heat. Elegant enough for a dinner party, easy enough for a casual game night, and guaranteed to disappear fast!
Ingredients
-
24 fresh mushrooms, stems removed (reserve stems)
-
2 Tbsp vegetable oil (or olive/avocado oil)
-
2 Tbsp minced garlic (or ~5–6 fresh cloves)
-
16 oz cream cheese, softened
-
½ cup grated Parmesan cheese
-
½ tsp ground black pepper
-
½ tsp onion powder
-
½ tsp ground cayenne pepper (for a gentle kick)
-
Optional toppings: crushed crackers, panko breadcrumbs, fresh herbs, balsamic glaze
Instructions
1. Prep Your Mushrooms
-
Wipe mushroom caps gently with a damp paper towel.
-
Remove stems carefully; finely chop stems for the filling.
-
Optional: use a small spoon or melon baller to scoop out a bit more gill for a deeper cavity.
2. Sauté for Flavor
-
Heat oil in a skillet over medium heat.
-
Add chopped mushroom stems and garlic; sauté ~5 minutes until tender and fragrant.
-
Remove from heat and allow to cool slightly.
3. Make the Filling
-
In a medium bowl, combine cream cheese, Parmesan, black pepper, onion powder, cayenne, and sautéed mushroom mixture.
-
Mix until smooth and creamy. Taste and adjust seasoning.
4. Stuff the Mushrooms
-
Preheat oven to 375°F (190°C).
-
Grease a baking sheet or line with parchment.
-
Spoon filling into each mushroom cap, mounding slightly.
-
Optional: sprinkle tops with breadcrumbs or crackers for extra crunch.
5. Bake to Perfection
-
Bake 20–22 minutes until mushrooms are tender and tops are lightly golden.
-
Let rest 1–2 minutes before serving.
6. Serve & Garnish
-
Transfer to a platter and sprinkle with fresh herbs or drizzle with balsamic glaze if desired.
-
Serve warm and enjoy!
Notes
| Problem | Solution |
|---|---|
| Filling too watery | Let sautéed stems cool before mixing; squeeze excess water from stems |
| Mushrooms soggy | Don’t wash under running water; preheat oven fully; avoid overcrowding |
| Make ahead | Assemble up to 24 hours in advance, cover, and refrigerate; bake as usual (add 1–2 min if cold) |
Quick Bite of Nutrition (If You’re Curious!)
While we’re here for the flavor, it’s always nice to know what’s in your food! Please note, this is just an estimate and can vary based on your specific ingredients.
Prep Time: 25 mins | Cook Time: 20 mins | Total Time: 45 mins | Yields: 24 stuffed mushrooms
Per Piece (approx.): ~85 calories, 7g fat, 2g carbs, 2g protein
Final Thoughts: Your New Party Legend
And just like that, you’re armed and ready. You’re no longer just a guest at the party; you’re the one bringing the legendary appetizer that has people whispering, “Did you try Olivia’s mushrooms?” You’ve learned that the humblest of ingredients, treated with a little care and a lot of flavor, can create pure magic.
Remember the sound of the sizzling garlic, the satisfaction of mixing that creamy filling, and the incredible aroma that will soon be wafting from your oven. This recipe isn’t just a list of instructions; it’s an invitation to create your own stories. Maybe yours will be the dish that causes a friendly standoff, or maybe it will simply be the comforting, delicious centerpiece of a quiet night in.
So, bookmark this page, tuck it into your recipe box, or commit it to memory. These “Peacemaker Mushrooms” are now yours to share. Get ready for the compliments, the recipe requests, and the quiet pride that comes from serving something made completely from the heart.
Now, go preheat that oven and get ready to make some memories, one delicious, savory bite at a time